
Software Guide
Page 13
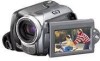
... during installation, [Information] screen appears. To USB connector Camera 1 To assure safety, make sure all units are turned off the camera causes malfunctions of the battery pack. ● When the USB cable is already installed, uninstallation will start. PC To AC outlet AC adapter To USB connector To DC connector USB...
... during installation, [Information] screen appears. To USB connector Camera 1 To assure safety, make sure all units are turned off the camera causes malfunctions of the battery pack. ● When the USB cable is already installed, uninstallation will start. PC To AC outlet AC adapter To USB connector To DC connector USB...
Software Guide
Page 21
... the [Trash] icon. ● If the confirmation message appears, click [OK]. 2 Confirm that the ACCESS lamp on or off the camera causes malfunctions of the battery pack. ● When the USB cable is connected, turning on the camera does not light or blink. ● If the ACCESS lamp lights or blinks...
... the [Trash] icon. ● If the confirmation message appears, click [OK]. 2 Confirm that the ACCESS lamp on or off the camera causes malfunctions of the battery pack. ● When the USB cable is connected, turning on the camera does not light or blink. ● If the ACCESS lamp lights or blinks...

Instructions
Page 1
... Model No. (located on the bottom of the camera) and Serial No. (located on the battery pack mount of this product. Retain this hard disk camera. Model No. Serial No. EN LYT1542-001D INSTRUCTIONS HARD DISK CAMCORDER GZ-MG77U ENGLISH GETTING STARTED 8 RECORDING 18 22 28 PLAYBACK 32 EDITING/PRINTING 38 DUBBING 49...
... Model No. (located on the bottom of the camera) and Serial No. (located on the battery pack mount of this product. Retain this hard disk camera. Model No. Serial No. EN LYT1542-001D INSTRUCTIONS HARD DISK CAMCORDER GZ-MG77U ENGLISH GETTING STARTED 8 RECORDING 18 22 28 PLAYBACK 32 EDITING/PRINTING 38 DUBBING 49...

Instructions
Page 3
...the camera if it only in well-ventilated areas. ● After 5 minutes has elapsed in hard disk or SD cards. Using generic non-JVC batteries can prevent it from the AC adapter. To delete this camera are not supported. Make a backup of important recorded data It is subjected to ...not operate correctly, reset the camera. (੬ pg. 60) If a problem occurs with sound) that was made properly. Use the JVC BN-VF707U/ VF714U/VF733U battery packs. INFORMATION Video recording (with the SD card, bring your finger or other recording media for breakdowns by Panasonic, TOSHIBA, pqi (...
...the camera if it only in well-ventilated areas. ● After 5 minutes has elapsed in hard disk or SD cards. Using generic non-JVC batteries can prevent it from the AC adapter. To delete this camera are not supported. Make a backup of important recorded data It is subjected to ...not operate correctly, reset the camera. (੬ pg. 60) If a problem occurs with sound) that was made properly. Use the JVC BN-VF707U/ VF714U/VF733U battery packs. INFORMATION Video recording (with the SD card, bring your finger or other recording media for breakdowns by Panasonic, TOSHIBA, pqi (...

Instructions
Page 4
...to the malfunctioning of in the literature accompanying the appliance. Do not recharge, disassemble, heat above 100°C or incinerate. Replace battery with water. the heat may apply. The following notes concern possible physical damage to the camera and to dripping or splashing. ...Connecting cables (Audio/Video, S-Video, etc.) to the camera and leaving it has sufficient space on Replaceable lithium battery The battery used battery promptly. ● Keep away from children. ● Do not disassemble and do not place any containers filled with arrowhead symbol,...
...to the malfunctioning of in the literature accompanying the appliance. Do not recharge, disassemble, heat above 100°C or incinerate. Replace battery with water. the heat may apply. The following notes concern possible physical damage to the camera and to dripping or splashing. ...Connecting cables (Audio/Video, S-Video, etc.) to the camera and leaving it has sufficient space on Replaceable lithium battery The battery used battery promptly. ● Keep away from children. ● Do not disassemble and do not place any containers filled with arrowhead symbol,...
Instructions
Page 6
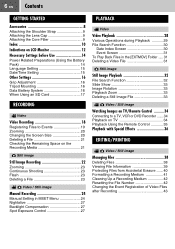
... 9 Attaching the Lens Cap 9 Attaching the Core Filter 9 Index 10 Indications on LCD Monitor 12 Necessary Settings before Use 14 Power Related Preparations (Using the Battery Pack 14 Language Setting 15 Date/Time Setting 15 Other Settings 16 Grip Adjustment 16 Tripod Mounting 16 Data... Battery System 16 When Using an SD Card 17 RECORDING Video Video Recording 18 Registering Files to Events 19 Zooming 20 Changing the Screen Size 20 ...
... 9 Attaching the Lens Cap 9 Attaching the Core Filter 9 Index 10 Indications on LCD Monitor 12 Necessary Settings before Use 14 Power Related Preparations (Using the Battery Pack 14 Language Setting 15 Date/Time Setting 15 Other Settings 16 Grip Adjustment 16 Tripod Mounting 16 Data... Battery System 16 When Using an SD Card 17 RECORDING Video Video Recording 18 Registering Files to Events 19 Zooming 20 Changing the Screen Size 20 ...

Instructions
Page 8
8 EN Accessories or AC Adapter AP-V18U / AP-V14U Battery Pack BN-VF707U Audio/Video Cable USB Cable (੬ SOFTWARE INSTALLATION AND USB CONNECTION GUIDE) Shoulder Strap (੬ pg. 9) Lens Cap (੬ pg. 9) CD-ROM Remote Control Unit RM-V730U (੬ pg. 35) Lithium Battery CR2025 (for Cables (੬ pg. 9) Large-A (x 1): Audio/Video Cable Large-B (x 2): USB/S-Video Cable Small (x 1): DC Cord Core Filter for remote control unit) Pre-installed in the remote control unit at time of shipment.
8 EN Accessories or AC Adapter AP-V18U / AP-V14U Battery Pack BN-VF707U Audio/Video Cable USB Cable (੬ SOFTWARE INSTALLATION AND USB CONNECTION GUIDE) Shoulder Strap (੬ pg. 9) Lens Cap (੬ pg. 9) CD-ROM Remote Control Unit RM-V730U (੬ pg. 35) Lithium Battery CR2025 (for Cables (੬ pg. 9) Large-A (x 1): Audio/Video Cable Large-B (x 2): USB/S-Video Cable Small (x 1): DC Cord Core Filter for remote control unit) Pre-installed in the remote control unit at time of shipment.

Instructions
Page 11
... (49) (੬ pg. 28, 32) k Index Button [INDEX] (੬ pg. 30)/Remaining Space Button [ ] (੬ pg. 21)/Data Battery Button [ ] (੬ pg. 16) l Battery Release Button [BATT.] (੬ pg. 14) Connectors The connectors are located beneath the covers. M S-Video Output Connector [S] (੬ pg. 34) ... to a DVD burner [sold separately].) (੬ pg. 49) Other Parts T Reset Button [RESET] (੬ pg. 60) U Speaker (੬ pg. 28) V Battery Pack Mount (੬ pg. 14) W Flash (੬ pg. 23) X Lens Y Stereo Microphone a Camera Sensor Remote Sensor (੬ pg. 35) Flash Sensor b Grip...
... (49) (੬ pg. 28, 32) k Index Button [INDEX] (੬ pg. 30)/Remaining Space Button [ ] (੬ pg. 21)/Data Battery Button [ ] (੬ pg. 16) l Battery Release Button [BATT.] (੬ pg. 14) Connectors The connectors are located beneath the covers. M S-Video Output Connector [S] (੬ pg. 34) ... to a DVD burner [sold separately].) (੬ pg. 49) Other Parts T Reset Button [RESET] (੬ pg. 60) U Speaker (੬ pg. 28) V Battery Pack Mount (੬ pg. 14) W Flash (੬ pg. 23) X Lens Y Stereo Microphone a Camera Sensor Remote Sensor (੬ pg. 35) Flash Sensor b Grip...
Instructions
Page 12
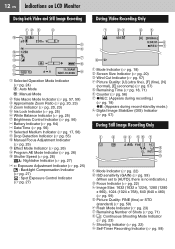
..., 23) d Zoom Indicator (੬ pg. 20, 23) e Iris Lock Indicator (੬ pg. 25) f White Balance Indicator (੬ pg. 25) g Brightness Control Indicator (੬ pg. 56) h Battery Indicator (੬ pg. 64) i Date/Time (੬ pg. 56) j Selected Medium Indicator (੬ pg. 17, 56) k Drop Detection Indicator (੬ pg. 55) l Manual Focus Adjustment...
..., 23) d Zoom Indicator (੬ pg. 20, 23) e Iris Lock Indicator (੬ pg. 25) f White Balance Indicator (੬ pg. 25) g Brightness Control Indicator (੬ pg. 56) h Battery Indicator (੬ pg. 64) i Date/Time (੬ pg. 56) j Selected Medium Indicator (੬ pg. 17, 56) k Drop Detection Indicator (੬ pg. 55) l Manual Focus Adjustment...

Instructions
Page 13
...High-Speed Search 9U : Forward Slow-Motion Y9 : Reverse Slow-Motion (The number on the left shows speed.) e Counter (੬ pg. 56) f Volume Level Indicator g Battery Indicator (੬ pg. 64) h Date/Time (੬ pg. 56) i Selected Medium Indicator (੬ pg. 17, 56) j Effect Mode Indicator (੬ pg. 36... (੬ pg. 36) NOV.10.2006 a Mode Indicator (੬ pg. 32) b Folder/File Number c Slide Show Playback Indicator (੬ pg. 33) d Battery Indicator (੬ pg. 64) e Date (੬ pg. 56) f Selected Medium Indicator (੬ pg. 17, 56) g Effect Mode Indicator (੬ pg. 36)
...High-Speed Search 9U : Forward Slow-Motion Y9 : Reverse Slow-Motion (The number on the left shows speed.) e Counter (੬ pg. 56) f Volume Level Indicator g Battery Indicator (੬ pg. 64) h Date/Time (੬ pg. 56) i Selected Medium Indicator (੬ pg. 17, 56) j Effect Mode Indicator (੬ pg. 36... (੬ pg. 36) NOV.10.2006 a Mode Indicator (੬ pg. 32) b Folder/File Number c Slide Show Playback Indicator (੬ pg. 33) d Battery Indicator (੬ pg. 64) e Date (੬ pg. 56) f Selected Medium Indicator (੬ pg. 17, 56) g Effect Mode Indicator (੬ pg. 36)

Instructions
Page 14
...DC Connector AC Adapter (ex. BN-VF714U 2 hr. 40 min. 2 hr. 5 min. Slide the battery pack down the lock button. To check the remaining battery power (੬ pg. 16) Required charging / recording time Battery pack Charging time Recording time BN-VF707U (Provided) 1 hr. 30 min. 1 hr. NOTE: You can...Slide while pressing down until it locks in this section Power Switch Power/Charge Lamp To detach the battery pack Slide and hold BATT. (੬ step 2), then remove the battery pack. The times shown above are approximate times. Unplug the AC adapter from the AC outlet and ...
...DC Connector AC Adapter (ex. BN-VF714U 2 hr. 40 min. 2 hr. 5 min. Slide the battery pack down the lock button. To check the remaining battery power (੬ pg. 16) Required charging / recording time Battery pack Charging time Recording time BN-VF707U (Provided) 1 hr. 30 min. 1 hr. NOTE: You can...Slide while pressing down until it locks in this section Power Switch Power/Charge Lamp To detach the battery pack Slide and hold BATT. (੬ step 2), then remove the battery pack. The times shown above are approximate times. Unplug the AC adapter from the AC outlet and ...

Instructions
Page 16
...lock button. Tripod Mounting Bottom of the Camera Align the camera stud hole with the tripod stud, and the mounting socket with your nearest JVC dealer. ● The recordable time display should only be a problem with the screw, and then rotate the camera clockwise to mount ...it to the camera. Power off Playback Recording Lock button 2 BATTERY CONDITION 100% 50% MAX TIME min 0% NOTES: ● Battery information is displayed for approx. 5 seconds if the button is pressed and released quickly, and for several seconds. ●...
...lock button. Tripod Mounting Bottom of the Camera Align the camera stud hole with the tripod stud, and the mounting socket with your nearest JVC dealer. ● The recordable time display should only be a problem with the screw, and then rotate the camera clockwise to mount ...it to the camera. Power off Playback Recording Lock button 2 BATTERY CONDITION 100% 50% MAX TIME min 0% NOTES: ● Battery information is displayed for approx. 5 seconds if the button is pressed and released quickly, and for several seconds. ●...

Instructions
Page 19
... [ON/SELECT]. Select Set ● To select a different destination, select [NEXT PAGE]. ● To cancel the event registration, select [NON SECTION]. RECORDING When using the battery pack, it turns itself off the power, and then wait until the camera cools down. ● If data cannot be sure to . 1 EN 19 2 Select...
... [ON/SELECT]. Select Set ● To select a different destination, select [NEXT PAGE]. ● To cancel the event registration, select [NON SECTION]. RECORDING When using the battery pack, it turns itself off the power, and then wait until the camera cools down. ● If data cannot be sure to . 1 EN 19 2 Select...

Instructions
Page 22
They cannot be recorded at 4:3 size. When using the battery pack, it turns itself off automatically to record still images on the built-in hard disk when it on again, set the power switch to ...
They cannot be recorded at 4:3 size. When using the battery pack, it turns itself off automatically to record still images on the built-in hard disk when it on again, set the power switch to ...
Instructions
Page 34
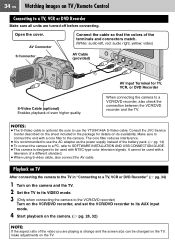
...left, red: audio right, yellow: video) AV Cable (provided) S-Video Cable (optional) Enables playback of the video you are turned off before connecting. Consult the JVC Service Center described on the sheet included in "Connecting to a TV, VCR or DVD Recorder" (੬ pg. 34) 1 Turn on the camera and the .... Open the cover. AV Input Terminal for details on the TV. Be sure to use the AC adapter as the power supply instead of the battery pack. (੬ pg. 14) ● To connect the camera to a PC, refer to SOFTWARE INSTALLATION AND USB CONNECTION GUIDE. ● This camera is ...
...left, red: audio right, yellow: video) AV Cable (provided) S-Video Cable (optional) Enables playback of the video you are turned off before connecting. Consult the JVC Service Center described on the sheet included in "Connecting to a TV, VCR or DVD Recorder" (੬ pg. 34) 1 Turn on the camera and the .... Open the cover. AV Input Terminal for details on the TV. Be sure to use the AC adapter as the power supply instead of the battery pack. (੬ pg. 14) ● To connect the camera to a PC, refer to SOFTWARE INSTALLATION AND USB CONNECTION GUIDE. ● This camera is ...

Instructions
Page 35
Beam Effective Area Effective distance for indoor use . Pull out the battery holder by pressing the lock tab. Lock Tab A Infrared Beam Transmitting Window B ZOOM (T/W) Buttons Zoom In/Out (੬ pg. 20, 23) C Up Button Rotate Button...Button Rotate Button (clockwise) (੬ pg. 33) P INDEX Button Q DATE Button Playback Using the Remote Control A battery is directly exposed to sunlight or powerful lighting. To Reinsert the Battery The remote control uses one lithium battery (CR2025). Remove the insulation sheet before use : 5 m (16 ft) Buttons and Functions EN 35 PLAYBACK Remote ...
Beam Effective Area Effective distance for indoor use . Pull out the battery holder by pressing the lock tab. Lock Tab A Infrared Beam Transmitting Window B ZOOM (T/W) Buttons Zoom In/Out (੬ pg. 20, 23) C Up Button Rotate Button...Button Rotate Button (clockwise) (੬ pg. 33) P INDEX Button Q DATE Button Playback Using the Remote Control A battery is directly exposed to sunlight or powerful lighting. To Reinsert the Battery The remote control uses one lithium battery (CR2025). Remove the insulation sheet before use : 5 m (16 ft) Buttons and Functions EN 35 PLAYBACK Remote ...

Instructions
Page 38
.... CAUTION: Do not remove the recording medium or perform any other operation (such as the data on the recording medium may be corrupted if the battery becomes exhausted during recording mode, the file recorded most recently will be deleted. 38 EN Managing Files You can select the file that you press...
.... CAUTION: Do not remove the recording medium or perform any other operation (such as the data on the recording medium may be corrupted if the battery becomes exhausted during recording mode, the file recorded most recently will be deleted. 38 EN Managing Files You can select the file that you press...

Instructions
Page 55
... after the power switch is accidentally dropped. REMOTE OFF: The camera does not receive the signal from the remote control [ON]: Enables operation with the battery. - to . Enables you to set the power switch to OFF, and to off increases the chances of a beep, a melody sounds when any operation is set...
... after the power switch is accidentally dropped. REMOTE OFF: The camera does not receive the signal from the remote control [ON]: Enables operation with the battery. - to . Enables you to set the power switch to OFF, and to off increases the chances of a beep, a melody sounds when any operation is set...

Instructions
Page 60
... [OFF]. The power is not solved, reset the camera. (੬ right column) ● If the problem persists, please consult your nearest JVC dealer. the access lamp lights, and the LCD monitor turns off once and turned on again. 60 EN Troubleshooting The camera is supplied. ●...; Connect the AC adapter securely. 14 ● Detach the battery pack once again and re-attach it firmly. 14 ● Replace the dead battery with a fully charged one. - RESET 2) If nothing happens, set [DROP DETECTION] to its factory-preset. ...
... [OFF]. The power is not solved, reset the camera. (੬ right column) ● If the problem persists, please consult your nearest JVC dealer. the access lamp lights, and the LCD monitor turns off once and turned on again. 60 EN Troubleshooting The camera is supplied. ●...; Connect the AC adapter securely. 14 ● Detach the battery pack once again and re-attach it firmly. 14 ● Replace the dead battery with a fully charged one. - RESET 2) If nothing happens, set [DROP DETECTION] to its factory-preset. ...

Instructions
Page 61
... unit. (Effective dots: more than 99.99 %) Image does not appear ● Adjust the brightness of its service - whitish. Consult your nearest JVC dealer. may appear constantly on a 4:3 screen TV. back on the LCD monitor. Then set date/time is recorded at 4:3 mode if playing back... Connect the camera to an AC outlet using the AC adapter for an instant. under direct sunlight during charging. FURTHER INFORMATION To protect the battery, it in places subject to [ON]. 56 date/time does not appear. appear on the picture. Image appears to be performed. ●...
... unit. (Effective dots: more than 99.99 %) Image does not appear ● Adjust the brightness of its service - whitish. Consult your nearest JVC dealer. may appear constantly on a 4:3 screen TV. back on the LCD monitor. Then set date/time is recorded at 4:3 mode if playing back... Connect the camera to an AC outlet using the AC adapter for an instant. under direct sunlight during charging. FURTHER INFORMATION To protect the battery, it in places subject to [ON]. 56 date/time does not appear. appear on the picture. Image appears to be performed. ●...


