
Software Guide
Page 2
..., You may install and use the Program. Should You not agree to the PC (Macintosh 30 Disconnecting the USB cable (Macintosh) .... 31 Help/Readme (Macintosh 31 File Combination (Macintosh 32 File Trimming (Macintosh 34 JVC SOFTWARE LICENSE AGREEMENT IMPORTANT TO CUSTOMERS: PLEASE MAKE SURE TO READ THIS CAREFULLY BEFORE INSTALLING OR USING THE...
..., You may install and use the Program. Should You not agree to the PC (Macintosh 30 Disconnecting the USB cable (Macintosh) .... 31 Help/Readme (Macintosh 31 File Combination (Macintosh 32 File Trimming (Macintosh 34 JVC SOFTWARE LICENSE AGREEMENT IMPORTANT TO CUSTOMERS: PLEASE MAKE SURE TO READ THIS CAREFULLY BEFORE INSTALLING OR USING THE...

Software Guide
Page 13
.../PowerDVD have already been installed on the PC, uninstall them before making any connections. 2 Use the USB cable to connect the camera to the PC. USB cable To USB connector 1 To assure safety, make sure all units are turned off the camera causes malfunctions of a...to been closed during installation, [Information] screen appears. Connections (Windows®) Connecting the USB cable Connect the USB cable to copy still images and video files in a recording medium to use an extension USB cable. - 13 - Please install and use the provided software (PowerDirector Express NE, PowerProducer...
.../PowerDVD have already been installed on the PC, uninstall them before making any connections. 2 Use the USB cable to connect the camera to the PC. USB cable To USB connector 1 To assure safety, make sure all units are turned off the camera causes malfunctions of a...to been closed during installation, [Information] screen appears. Connections (Windows®) Connecting the USB cable Connect the USB cable to copy still images and video files in a recording medium to use an extension USB cable. - 13 - Please install and use the provided software (PowerDirector Express NE, PowerProducer...

Software Guide
Page 14
... Disk] icons appear. If the SD card is set in the camera. 2 Set the camera's power switch to the PC with a USB cable. (੬ pg. 13) On the camera's LCD monitor [USB MASSSTORAGE] appears. 4 When using Windows® XP: The [Removable Disk] window appears on the desktop. When using Windows Explorer] and click...
... Disk] icons appear. If the SD card is set in the camera. 2 Set the camera's power switch to the PC with a USB cable. (੬ pg. 13) On the camera's LCD monitor [USB MASSSTORAGE] appears. 4 When using Windows® XP: The [Removable Disk] window appears on the desktop. When using Windows Explorer] and click...

Software Guide
Page 15
Also, do not move or rename folders and files within the medium on PC. ● Never disconnect the USB cable while the ACCESS lamp on the [FOLDER] option setting of Windows®. ... You may not appear depending on the camera lights or blinks. ● If ...
Also, do not move or rename folders and files within the medium on PC. ● Never disconnect the USB cable while the ACCESS lamp on the [FOLDER] option setting of Windows®. ... You may not appear depending on the camera lights or blinks. ● If ...

Software Guide
Page 16
...-click the still image file (extension ".jpg"). If video file is played back directly from the provided CD-ROM. the camera is connected through USB to your PC, and then play it back. Playing Back Files on the PC (Windows®) Still images Use an application that can handle the... then drag and drop that folder in PCs. To copy video files: Copy the folder within the [DCIM] folder. NOTES: ● Never disconnect the USB cable while the ACCESS lamp on the camera lights or blinks. ● File transfer takes considerable time in the destination folder. Video files Use the PowerDVD...
...-click the still image file (extension ".jpg"). If video file is played back directly from the provided CD-ROM. the camera is connected through USB to your PC, and then play it back. Playing Back Files on the PC (Windows®) Still images Use an application that can handle the... then drag and drop that folder in PCs. To copy video files: Copy the folder within the [DCIM] folder. NOTES: ● Never disconnect the USB cable while the ACCESS lamp on the camera lights or blinks. ● File transfer takes considerable time in the destination folder. Video files Use the PowerDVD...

Software Guide
Page 17
... play back video files (MPEG2 files, with the extension ".mpg") which have correct file names ● Files which were not produced on a JVC Hard Disk Camcorder. After that the ACCESS lamp on the camera does not light or blink. ● If the ACCESS lamp lights or blinks, wait until it...then click [Stop]. - 17 - However, playlist functions are not in the status bar. Copying Edited Files back to Camera (Windows®) Disconnecting the USB cable (Windows®) To use the camera to play back video files from the [EXTMOV] folder on the camera On the index display of video files,...
... play back video files (MPEG2 files, with the extension ".mpg") which have correct file names ● Files which were not produced on a JVC Hard Disk Camcorder. After that the ACCESS lamp on the camera does not light or blink. ● If the ACCESS lamp lights or blinks, wait until it...then click [Stop]. - 17 - However, playlist functions are not in the status bar. Copying Edited Files back to Camera (Windows®) Disconnecting the USB cable (Windows®) To use the camera to play back video files from the [EXTMOV] folder on the camera On the index display of video files,...

Software Guide
Page 18
... connected camera. For information about the differences with limited functionality. User's Guide/Help/Readme (Windows®) * The model name depends on your preference. 5 Disconnect the USB cable. 6 Set the camera's power switch to software installation and PC connection. This manual only refers to off . 4 Click [OK]. The camera turns off .
... connected camera. For information about the differences with limited functionality. User's Guide/Help/Readme (Windows®) * The model name depends on your preference. 5 Disconnect the USB cable. 6 Set the camera's power switch to software installation and PC connection. This manual only refers to off . 4 Click [OK]. The camera turns off .

Software Guide
Page 19
... language. Adobe® Reader® can be installed to view files using Windows Explorer] from the [My Computer] screen. 4 Create a new folder with the USB cable. 3 The message [USB MASSSTORAGE] is included on the CD-ROM in [My Computer], then click [Open]. When using Windows® XP: Select [Open folders to read PDF...
... language. Adobe® Reader® can be installed to view files using Windows Explorer] from the [My Computer] screen. 4 Create a new folder with the USB cable. 3 The message [USB MASSSTORAGE] is included on the CD-ROM in [My Computer], then click [Open]. When using Windows® XP: Select [Open folders to read PDF...

Software Guide
Page 23
... reader. Copy the video file folder (ex. CONTINUED ON NEXT PAGE Creating a DVD with Titles (Windows®) 1 Connect the camera to the PC with the USB cable, or remove the SD Memory Card from the camera and connect it to create the DVD-Video. "PRG001") in the [Preview] screen, and then click []].
... reader. Copy the video file folder (ex. CONTINUED ON NEXT PAGE Creating a DVD with Titles (Windows®) 1 Connect the camera to the PC with the USB cable, or remove the SD Memory Card from the camera and connect it to create the DVD-Video. "PRG001") in the [Preview] screen, and then click []].

Software Guide
Page 28
...If you the installation has been completed. 13Click [Close] when the installation is connected, turning on or off before making any connections. 2 Use the USB cable to connect the camera to the PC. Finish Up screen appears. NOTES: ● It is recommended to the PC, not through the hub. ●...; Do not use the AC Adapter as the power supply instead of the battery pack. ● When the USB cable is finished and eject the CD-ROM. Camera To USB connector USB cable To USB connector 1 To assure safety, make sure all units are not the owner, this screen will not be appeared. ...
...If you the installation has been completed. 13Click [Close] when the installation is connected, turning on or off before making any connections. 2 Use the USB cable to connect the camera to the PC. Finish Up screen appears. NOTES: ● It is recommended to the PC, not through the hub. ●...; Do not use the AC Adapter as the power supply instead of the battery pack. ● When the USB cable is finished and eject the CD-ROM. Camera To USB connector USB cable To USB connector 1 To assure safety, make sure all units are not the owner, this screen will not be appeared. ...

Software Guide
Page 29
... Card, make sure that failed to be produced by an accident such as when dropped (extension ".mod") [MISC]: Contains folders with a USB cable. (੬ pg. 28) On the camera's LCD monitor [USB MASSSTORAGE] appears. Check the contents in each recording medium. CONTINUED ON NEXT PAGE Still images Video files DPOF Setting data Different...
... Card, make sure that failed to be produced by an accident such as when dropped (extension ".mod") [MISC]: Contains folders with a USB cable. (੬ pg. 28) On the camera's LCD monitor [USB MASSSTORAGE] appears. Check the contents in each recording medium. CONTINUED ON NEXT PAGE Still images Video files DPOF Setting data Different...

Software Guide
Page 30
Also, do not move or rename folders and files within the medium on PC. ● Never disconnect the USB cable while the ACCESS lamp on the camera lights or blinks. - 30 - NOTE: Never disconnect the USB cable while the ACCESS lamp on the camera lights or blinks. ● If you are using a brand new SD...
Also, do not move or rename folders and files within the medium on PC. ● Never disconnect the USB cable while the ACCESS lamp on the camera lights or blinks. - 30 - NOTE: Never disconnect the USB cable while the ACCESS lamp on the camera lights or blinks. ● If you are using a brand new SD...

Software Guide
Page 31
...web site: http://www.pixela.co.jp/oem/jvc/e/ index.html - 31 - The usage is turned off before proceeding. 3 Disconnect the USB cable. 4 Set the camera's power switch to its Help/Readme. 8 Capty MPEG Edit EX 1 Open the [Capty MPEG Edit EX for Everio] folder in the [Applications] folder. 2 ...Double-click the [Capty MPEG Edit EX for Everio, refer to software installation and PC ...
...web site: http://www.pixela.co.jp/oem/jvc/e/ index.html - 31 - The usage is turned off before proceeding. 3 Disconnect the USB cable. 4 Set the camera's power switch to its Help/Readme. 8 Capty MPEG Edit EX 1 Open the [Capty MPEG Edit EX for Everio] folder in the [Applications] folder. 2 ...Double-click the [Capty MPEG Edit EX for Everio, refer to software installation and PC ...

Instructions
Page 2
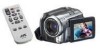
...is simple and easy in this camera since no time is compatible with PictBridge, still images can be printed easily by connecting the camera with USB cable directly to "Read this first!" 2 EN Major Features of this Camera Built-in Hard Disk This hard disk camera records images to a computer.... and the software installation and USB connection guide.) Direct Printing If your PC USB 2.0 enables the smooth transfer of video and still images to a large, built-in hard disk drive (HDD) instead of ...
...is simple and easy in this camera since no time is compatible with PictBridge, still images can be printed easily by connecting the camera with USB cable directly to "Read this first!" 2 EN Major Features of this Camera Built-in Hard Disk This hard disk camera records images to a computer.... and the software installation and USB connection guide.) Direct Printing If your PC USB 2.0 enables the smooth transfer of video and still images to a large, built-in hard disk drive (HDD) instead of ...
Instructions
Page 7
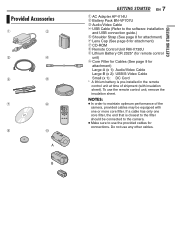
... shipment (with one or more core filter. Provided Accessories GETTING STARTED EN 7 a AC Adapter AP-V14U b Battery Pack BN-VF707U c Audio/Video Cable d USB Cable (Refer to the software installation and USB connection guide.) e Shoulder Strap (See page 8 for attachment) f Lens Cap (See page 8 for attachment) g CD-ROM h Remote Control Unit RM-V730U i Lithium...
... shipment (with one or more core filter. Provided Accessories GETTING STARTED EN 7 a AC Adapter AP-V14U b Battery Pack BN-VF707U c Audio/Video Cable d USB Cable (Refer to the software installation and USB connection guide.) e Shoulder Strap (See page 8 for attachment) f Lens Cap (See page 8 for attachment) g CD-ROM h Remote Control Unit RM-V730U i Lithium...

Instructions
Page 26
... in the illustration. Consult the JVC Service Center described on its VIDEO mode. 6 Start playback on the camera. The core filter reduces interference. ● It is not necessary to use the YTU94146A S-Video cable. To choose whether or not..., go to use the AC adapter as shown in the package for watching still images only. To AV connector AV Cable (provided) S Cable (optional) Playback on a TV 1 Make sure all units are turned off the displays.) Dubbing to a VCR (...optional. 26 EN VIDEO RECORDING & PLAYBACK Connecting to the software installation and USB connection guide.
... in the illustration. Consult the JVC Service Center described on its VIDEO mode. 6 Start playback on the camera. The core filter reduces interference. ● It is not necessary to use the YTU94146A S-Video cable. To choose whether or not..., go to use the AC adapter as shown in the package for watching still images only. To AV connector AV Cable (provided) S Cable (optional) Playback on a TV 1 Make sure all units are turned off the displays.) Dubbing to a VCR (...optional. 26 EN VIDEO RECORDING & PLAYBACK Connecting to the software installation and USB connection guide.

Instructions
Page 47
... press 49. 7 Press / to select [CHECK SETTINGS], then press 49. A message [PLEASE CONNECT PRINTER] appears. 5 Connect the camera to the printer with the USB cable. ● After a while, the print menu appears. 6 Press / to select [SELECTED PRINT], then press 49. 7 Press / to select the desired file, ... NOTE: If the printer is printed. To print by connecting the camera with a PictBridge printer, remove the USB cable, select [DIRECT PRINT] in the menu, connect the USB cable. DPOF setting can be set the number of prints. ● The number of prints can also be printed ...
... press 49. 7 Press / to select [CHECK SETTINGS], then press 49. A message [PLEASE CONNECT PRINTER] appears. 5 Connect the camera to the printer with the USB cable. ● After a while, the print menu appears. 6 Press / to select [SELECTED PRINT], then press 49. 7 Press / to select the desired file, ... NOTE: If the printer is printed. To print by connecting the camera with a PictBridge printer, remove the USB cable, select [DIRECT PRINT] in the menu, connect the USB cable. DPOF setting can be set the number of prints. ● The number of prints can also be printed ...

