Instruction Manual
Page 1
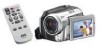
HARD DISK CAMCORDER GZ-MG50E/EK GZ-MG40E/EK GZ-MG30E/EK GZ-MG20E/EK GETTING STARTED ENGLISH 7 VIDEO RECORDING & PLAYBACK 22 28 STILL IMAGE RECORDING & PLAYBACK 31 ADVANCED OPERATIONS MENU SETTINGS 48 REFERENCES 52 To deactivate the demonstration, set "DEMO MODE" to "OFF". (੬ pg. 48) INSTRUCTIONS EN LYT1472-001C
HARD DISK CAMCORDER GZ-MG50E/EK GZ-MG40E/EK GZ-MG30E/EK GZ-MG20E/EK GETTING STARTED ENGLISH 7 VIDEO RECORDING & PLAYBACK 22 28 STILL IMAGE RECORDING & PLAYBACK 31 ADVANCED OPERATIONS MENU SETTINGS 48 REFERENCES 52 To deactivate the demonstration, set "DEMO MODE" to "OFF". (੬ pg. 48) INSTRUCTIONS EN LYT1472-001C
Instruction Manual
Page 2
... recording mode for rewinding or fast forward operations. PLAYLIST CONTENTS ALL SCENES 01 10.11 2005 11:30 02 15.11 2005 23:00 03 25.11 2005 11:00 Editing Files on your printer is needed for picture quality, image size, recording time, and computer environment. (੬ pg. 62) Enjoying...
... recording mode for rewinding or fast forward operations. PLAYLIST CONTENTS ALL SCENES 01 10.11 2005 11:30 02 15.11 2005 23:00 03 25.11 2005 11:00 Editing Files on your printer is needed for picture quality, image size, recording time, and computer environment. (੬ pg. 62) Enjoying...
Instruction Manual
Page 3
... Remaining Space on the Recording Media ... 21 Drop Detection 21 VIDEO RECORDING & PLAYBACK 22 Video Recording 22 Zooming 23 Video Playback 24 How to Use the Scroll Bar 25 Date Index Screen 25 Various Playback Operations 25 Playback Zoom 25 Connecting to a TV, VCR or VDR 26 Playback on a TV 26 Dubbing to a VCR (or DVD...
... Remaining Space on the Recording Media ... 21 Drop Detection 21 VIDEO RECORDING & PLAYBACK 22 Video Recording 22 Zooming 23 Video Playback 24 How to Use the Scroll Bar 25 Date Index Screen 25 Various Playback Operations 25 Playback Zoom 25 Connecting to a TV, VCR or VDR 26 Playback on a TV 26 Dubbing to a VCR (or DVD...
Instruction Manual
Page 4
... on the cables will cause the camera to the mains supply. CAUTIONS: ● This camera is recommended that you are possible anywhere. ● Use the JVC BN-VF707U battery pack and, to recharge it on top of the TV is not supplied fitted with PAL- Do not use the provided multivoltage...
... on the cables will cause the camera to the mains supply. CAUTIONS: ● This camera is recommended that you are possible anywhere. ● Use the JVC BN-VF707U battery pack and, to recharge it on top of the TV is not supplied fitted with PAL- Do not use the provided multivoltage...
Instruction Manual
Page 5
... disposal of this waste, in accordance with national legislation. (Business users) If you wish to dispose of this product, please visit our web page www.jvc-europe.com to obtain information about the take-back of the product. [Other Countries outside the European Union] If you wish to operate the equipment...
... disposal of this waste, in accordance with national legislation. (Business users) If you wish to dispose of this product, please visit our web page www.jvc-europe.com to obtain information about the take-back of the product. [Other Countries outside the European Union] If you wish to operate the equipment...
Instruction Manual
Page 6
... is specifically stated that purpose, or by your camera together with a hammer etc. If a problem occurs with the SD Memory Card, bring your dealer or JVC service centre, be formatted. Also read "Cautions" on when it is unattended unless it is repaired or inspected, data may be erased, and the hard...
... is specifically stated that purpose, or by your camera together with a hammer etc. If a problem occurs with the SD Memory Card, bring your dealer or JVC service centre, be formatted. Also read "Cautions" on when it is unattended unless it is repaired or inspected, data may be erased, and the hard...
Instruction Manual
Page 7
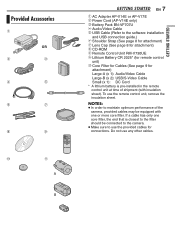
Provided Accessories OR GETTING STARTED EN 7 a AC Adapter AP-V14E or AP-V17E b Power Cord (AP-V14E only) c Battery Pack BN-VF707U d Audio/Video Cable e USB Cable (Refer to the software installation and USB connection guide.) f Shoulder Strap (See page 8 for attachment) g Lens Cap (See page 8 for attachment) h CD-ROM i Remote Control Unit RM-V730UE j Lithium Battery CR 2025* (for remote control unit) k Core Filter for Cables (See page 9 for connections. To use any other cables. Do not use the remote control unit, remove the insulation sheet. NOTES: ● In order to use the provided ...
Provided Accessories OR GETTING STARTED EN 7 a AC Adapter AP-V14E or AP-V17E b Power Cord (AP-V14E only) c Battery Pack BN-VF707U d Audio/Video Cable e USB Cable (Refer to the software installation and USB connection guide.) f Shoulder Strap (See page 8 for attachment) g Lens Cap (See page 8 for attachment) h CD-ROM i Remote Control Unit RM-V730UE j Lithium Battery CR 2025* (for remote control unit) k Core Filter for Cables (See page 9 for connections. To use any other cables. Do not use the remote control unit, remove the insulation sheet. NOTES: ● In order to use the provided ...
Instruction Manual
Page 8
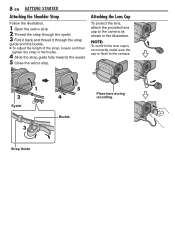
NOTE: To confirm the lens cap is on correctly, make sure the cap is flush to the camera as shown in the buckle. 4 Slide the strap guide fully towards the eyelet. 5 Close the velcro strip. 8 EN GETTING STARTED Attaching the Shoulder Strap Follow the illustration. 1 Open the velcro strip. 2 Thread the strap through the eyelet. 3 Fold it back and thread it through the strap guide and the buckle. ● To adjust the length of the strap, loosen and then tighten the strap in the illustration. Attaching the Lens Cap To protect the lens, attach the provided lens cap to the camera. 1 2 Eyelet 3 ...
NOTE: To confirm the lens cap is on correctly, make sure the cap is flush to the camera as shown in the buckle. 4 Slide the strap guide fully towards the eyelet. 5 Close the velcro strip. 8 EN GETTING STARTED Attaching the Shoulder Strap Follow the illustration. 1 Open the velcro strip. 2 Thread the strap through the eyelet. 3 Fold it back and thread it through the strap guide and the buckle. ● To adjust the length of the strap, loosen and then tighten the strap in the illustration. Attaching the Lens Cap To protect the lens, attach the provided lens cap to the camera. 1 2 Eyelet 3 ...

Instruction Manual
Page 9
GETTING STARTED EN 9 LCD Monitor Pull on both ends of the core filter. Core Filter (Large) 3 cm Wind once. GETTING STARTED Attaching the Core Filter Attach the core filters to the camera. It can rotate 270°. S-Video/Audio/Video/USB cable Wind the cable once around the outside of the LCD monitor and open the LCD monitor fully. S-Video/Audio/Video/ USB Cable DC Cord NOTES: ● Take care not to damage the cable. ● When connecting a cable, attach the end with the core filter to the cables. The core filter reduces interference. 1 Release the stoppers on the end...
GETTING STARTED EN 9 LCD Monitor Pull on both ends of the core filter. Core Filter (Large) 3 cm Wind once. GETTING STARTED Attaching the Core Filter Attach the core filters to the camera. It can rotate 270°. S-Video/Audio/Video/USB cable Wind the cable once around the outside of the LCD monitor and open the LCD monitor fully. S-Video/Audio/Video/ USB Cable DC Cord NOTES: ● Take care not to damage the cable. ● When connecting a cable, attach the end with the core filter to the cables. The core filter reduces interference. 1 Release the stoppers on the end...
Instruction Manual
Page 10
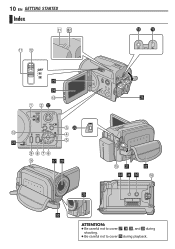
10 EN GETTING STARTED Index ATTENTION: ● Be careful not to cover b, c, d, and e during shooting. ● Be careful not to cover Y during playback.
10 EN GETTING STARTED Index ATTENTION: ● Be careful not to cover b, c, d, and e during shooting. ● Be careful not to cover Y during playback.
Instruction Manual
Page 11
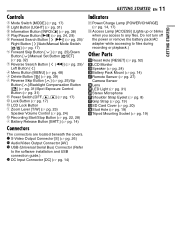
... Play/Pause Button [49] (੬ pg. 24, 29) e Forward Search Button [ (5)] (੬ pg. 25)/ Right Button [ ]/Auto/Manual Mode Switch [ / ] (੬ pg. 17) f Forward Skip Button [ ] (੬ pg. 25)/Down Button [ ]/Manual Set Button [ SET] (੬ pg. 32) g Reverse Search Button [ (3)] (੬...j Reverse Skip Button [ ] (੬ pg. 25)/Up Button [ ]/Backlight Compensation Button [ ] (੬ pg. 31)/Spot Exposure Control Button (੬ pg. 31) k Power Switch [OFF, , ] (੬ pg. 17) l Lock Button (੬ pg. 17) m LCD Lock Button n Zoom Lever [T/W] (੬ pg. 23) Speaker Volume ...
... Play/Pause Button [49] (੬ pg. 24, 29) e Forward Search Button [ (5)] (੬ pg. 25)/ Right Button [ ]/Auto/Manual Mode Switch [ / ] (੬ pg. 17) f Forward Skip Button [ ] (੬ pg. 25)/Down Button [ ]/Manual Set Button [ SET] (੬ pg. 32) g Reverse Search Button [ (3)] (੬...j Reverse Skip Button [ ] (੬ pg. 25)/Up Button [ ]/Backlight Compensation Button [ ] (੬ pg. 31)/Spot Exposure Control Button (੬ pg. 31) k Power Switch [OFF, , ] (੬ pg. 17) l Lock Button (੬ pg. 17) m LCD Lock Button n Zoom Lever [T/W] (੬ pg. 23) Speaker Volume ...
Instruction Manual
Page 12
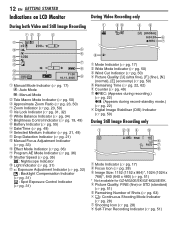
...] 11:30 10.11. 2005 a Manual Mode Indicator (੬ pg. 17) : Auto Mode : Manual Mode b Tele Macro Mode Indicator (੬ pg. 50) c Approximate Zoom Ratio (੬ pg. 23, 50) d Zoom Indicator (੬ pg. 23, 50) e Iris Lock Indicator (੬ pg. 31, 32) f White Balance Indicator (੬ pg. 34) g Brightness Control Indicator (੬... (੬ pg. 17) b Focus Icon (੬ pg. 28) c Image Size: 1152 (1152 x 864)*, 1024 (1024 x 768)*, 640 (640 x 480) (੬ pg. 51) * Not available for GZ-MG30E/EK/GZ-MG20E/EK.
...] 11:30 10.11. 2005 a Manual Mode Indicator (੬ pg. 17) : Auto Mode : Manual Mode b Tele Macro Mode Indicator (੬ pg. 50) c Approximate Zoom Ratio (੬ pg. 23, 50) d Zoom Indicator (੬ pg. 23, 50) e Iris Lock Indicator (੬ pg. 31, 32) f White Balance Indicator (੬ pg. 34) g Brightness Control Indicator (੬... (੬ pg. 17) b Focus Icon (੬ pg. 28) c Image Size: 1152 (1152 x 864)*, 1024 (1024 x 768)*, 640 (640 x 480) (੬ pg. 51) * Not available for GZ-MG30E/EK/GZ-MG20E/EK.

Instruction Manual
Page 13
During Video Playback GETTING STARTED EN 13 During Still Image Playback GETTING STARTED 10. 11. 2005 a Mode Indicator (੬ pg. 17) b Play List Playback Indicator (Appears when play list is turned 180°. (੬ pg. 9) Such a phenomenon also occurs when the LCD monitor is played back. ੬ pg. 43) c Picture Quality: [U] (ultra fine), [F] (fine), [N] (normal), [E] (economy) (੬ pg. 50) d Playback Mode (੬ pg. 24) U : Playback 9 : Pause 5 : Forward High-Speed Search 3 : Reverse High-Speed Search 9U : Forward Slow-Motion Y9 : Reverse Slow-Motion (The number on the left...
During Video Playback GETTING STARTED EN 13 During Still Image Playback GETTING STARTED 10. 11. 2005 a Mode Indicator (੬ pg. 17) b Play List Playback Indicator (Appears when play list is turned 180°. (੬ pg. 9) Such a phenomenon also occurs when the LCD monitor is played back. ੬ pg. 43) c Picture Quality: [U] (ultra fine), [F] (fine), [N] (normal), [E] (economy) (੬ pg. 50) d Playback Mode (੬ pg. 24) U : Playback 9 : Pause 5 : Forward High-Speed Search 3 : Reverse High-Speed Search 9U : Forward Slow-Motion Y9 : Reverse Slow-Motion (The number on the left...

Instruction Manual
Page 14
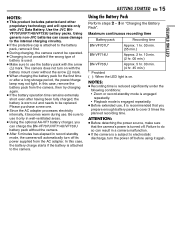
Do not use provided power supply units with other equipment. Approx. 5 hr. 40 min. Battery Pack Arrow Battery Pack Mount AC Adapter (ex. AP-V17E) 1 Set the power switch to OFF. 2 With the arrow on the camera blinks to the AC adapter. (AP-V14E only) 6 Plug the power cord into an AC outlet. The power/charge lamp on the battery pack pointing downward, push the battery pack slightly against the battery pack mount. ● If the battery mount cover is attached, remove it by sliding BATT. 3 Slide down the battery pack until it locks in place. 4 Connect the AC adapter to the camera....
Do not use provided power supply units with other equipment. Approx. 5 hr. 40 min. Battery Pack Arrow Battery Pack Mount AC Adapter (ex. AP-V17E) 1 Set the power switch to OFF. 2 With the arrow on the camera blinks to the AC adapter. (AP-V14E only) 6 Plug the power cord into an AC outlet. The power/charge lamp on the battery pack pointing downward, push the battery pack slightly against the battery pack mount. ● If the battery mount cover is attached, remove it by sliding BATT. 3 Slide down the battery pack until it locks in place. 4 Connect the AC adapter to the camera....
Instruction Manual
Page 15
...camera does not turn the power off before using it again. NOTES: ● Recording time is reduced significantly under the following conditions: • Zoom or record-standby mode is engaged repeatedly. • Playback mode is engaged repeatedly. ● Before extended use, it is recommended that the ... only with the battery mount cover without the camera. ● After 5 minutes has elapsed in "Charging the Battery Pack". Using generic non-JVC batteries can charge the BN-VF707U/VF714U/VF733U battery pack without the arrow ( ) mark. ● When charging the battery pack for the ...
...camera does not turn the power off before using it again. NOTES: ● Recording time is reduced significantly under the following conditions: • Zoom or record-standby mode is engaged repeatedly. • Playback mode is engaged repeatedly. ● Before extended use, it is recommended that the ... only with the battery mount cover without the camera. ● After 5 minutes has elapsed in "Charging the Battery Pack". Using generic non-JVC batteries can charge the BN-VF707U/VF714U/VF733U battery pack without the arrow ( ) mark. ● When charging the battery pack for the ...
Instruction Manual
Page 16
... used for several seconds. ● If "COMMUNICATING ERROR" appears instead of the battery status even though you tried to come in contact with your nearest JVC dealer. ● The recordable time display should only be a problem with metals, as a guide. It is pressed and held for a long period of time under...
... used for several seconds. ● If "COMMUNICATING ERROR" appears instead of the battery status even though you tried to come in contact with your nearest JVC dealer. ● The recordable time display should only be a problem with metals, as a guide. It is pressed and held for a long period of time under...

Instruction Manual
Page 17
Power Switch Power Off Manual mode: Manual recording is possible by setting various functions. (੬ pg. 31 - 37) To return to the auto recording mode Press ( / ) again so that the indicator appears. 4 Power-Linked Operation When the power switch is selected, the indicator appears on the LCD monitor. Playback Recording Auto mode: You can also turn on/off the camera, set the power switch to OFF. 1 Power Switch Power/Charge Lamp GETTING STARTED EN 17 2 Recording/Playback Mode Select the recording/playback mode using the power and MODE switches and ( / ) button. 1 Power Switch ...
Power Switch Power Off Manual mode: Manual recording is possible by setting various functions. (੬ pg. 31 - 37) To return to the auto recording mode Press ( / ) again so that the indicator appears. 4 Power-Linked Operation When the power switch is selected, the indicator appears on the LCD monitor. Playback Recording Auto mode: You can also turn on/off the camera, set the power switch to OFF. 1 Power Switch Power/Charge Lamp GETTING STARTED EN 17 2 Recording/Playback Mode Select the recording/playback mode using the power and MODE switches and ( / ) button. 1 Power Switch ...
Instruction Manual
Page 18
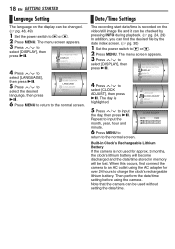
Date/Time Settings The recording start date/time is recorded on the display can be lost. CLOCK ADJUST DATE TIME 31 01 2005 11 : 07 Built-in memory will become discharged and the date/time stored in Clock's Rechargeable Lithium Battery If the camera is highlighted. The menu screen appears. 3 Press / to the normal screen. Repeat to input the month, year, hour and minute. 6 Press MENU to return to select [DISPLAY], then CAMERA SETTING BASIC SETTING press 49. Note that the camera can find the desired file by pressing INFO during playback. (੬ pg. 24, 29) In addition, ...
Date/Time Settings The recording start date/time is recorded on the display can be lost. CLOCK ADJUST DATE TIME 31 01 2005 11 : 07 Built-in memory will become discharged and the date/time stored in Clock's Rechargeable Lithium Battery If the camera is highlighted. The menu screen appears. 3 Press / to the normal screen. Repeat to input the month, year, hour and minute. 6 Press MENU to return to select [DISPLAY], then CAMERA SETTING BASIC SETTING press 49. Note that the camera can find the desired file by pressing INFO during playback. (੬ pg. 24, 29) In addition, ...

Instruction Manual
Page 19
... studs. Grip Adjustment 1 Adjust the velcro strip. 2 Pass your right hand through the grip to easily operate the recording start/stop button, power switch and zoom lever. The menu screen appears. 4 Press / to select [DISPLAY], then press 49. 5 Press / to clear the brightness control indicator from the display. The brightness control...
... studs. Grip Adjustment 1 Adjust the velcro strip. 2 Pass your right hand through the grip to easily operate the recording start/stop button, power switch and zoom lever. The menu screen appears. 4 Press / to select [DISPLAY], then press 49. 5 Press / to clear the brightness control indicator from the display. The brightness control...
Instruction Manual
Page 20
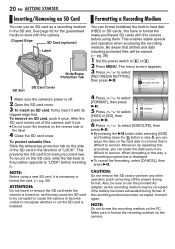
Clipped Edge SD Card (optional) Label Write/Erase Protection Tab SD Card Cover SD Slot 1 Make sure the camera's power is displayed. ● To cancel the formatting, select [CANCEL], then press 49. This enables stable speeds and operation when accessing the recording medium. CAUTION: Do not remove the SD card or perform any other operation (such as the recording medium may cause the SD card to be erased. (੬ pg. 38) 1 Set the power switch to "LOCK" before using a new SD card, it . Also, be sure to use an SD card as this may be corrupted if the battery becomes ...
Clipped Edge SD Card (optional) Label Write/Erase Protection Tab SD Card Cover SD Slot 1 Make sure the camera's power is displayed. ● To cancel the formatting, select [CANCEL], then press 49. This enables stable speeds and operation when accessing the recording medium. CAUTION: Do not remove the SD card or perform any other operation (such as the recording medium may cause the SD card to be erased. (੬ pg. 38) 1 Set the power switch to "LOCK" before using a new SD card, it . Also, be sure to use an SD card as this may be corrupted if the battery becomes ...
