
Printer Friendly Specs
Page 1
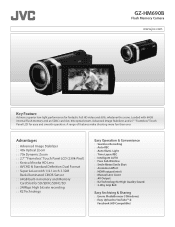
... SDXC card slot, 40x optical zoom, Advanced Image Stabilizer, and 2.7" "Frameless" Touch Panel LCD for High Quality Sound : : 2-Way Grip Belt Easy Archiving & Sharing : : Everio MediaBrowser 3(Windows) : : Easy Upload to YouTube™ & Facebook (HD Compatible) GZ-HM690B Flash Memory Camera www.jvc.com Key Feature Achieve superior low-light performance for SD/SDXC/SDHC/SD : : 24Mbps High bit rate recording : : K2 Technology Easy Operation & Convenience : : Seamless Recording : : Auto REC : : Auto...
... SDXC card slot, 40x optical zoom, Advanced Image Stabilizer, and 2.7" "Frameless" Touch Panel LCD for High Quality Sound : : 2-Way Grip Belt Easy Archiving & Sharing : : Everio MediaBrowser 3(Windows) : : Easy Upload to YouTube™ & Facebook (HD Compatible) GZ-HM690B Flash Memory Camera www.jvc.com Key Feature Achieve superior low-light performance for SD/SDXC/SDHC/SD : : 24Mbps High bit rate recording : : K2 Technology Easy Operation & Convenience : : Seamless Recording : : Auto REC : : Auto...
Printer Friendly Specs
Page 2
... Sub-Window Animation E ect High-Speed Motor Drive Recording Seamless Recording Face Recognition K2 Technology Auto Illumi. SPECIFICATIONS Internal Storage Media SDXC/SDHC/SD Card Slot* Image Sensor Lens Zoom Ratios Optical Dynamic Digial 2D-3D Conversion Playback High De nition Recording Standard De nition Recording Video Recording Modes Video Recording Time (max.) 1080/60P Output 24Mbps High Bit Rate Recording HDMI® Terminal LCD Size and Resolution Touch Panel LCD Glasses-free 3D Viewing on LCD Built-in camera) BN...
... Sub-Window Animation E ect High-Speed Motor Drive Recording Seamless Recording Face Recognition K2 Technology Auto Illumi. SPECIFICATIONS Internal Storage Media SDXC/SDHC/SD Card Slot* Image Sensor Lens Zoom Ratios Optical Dynamic Digial 2D-3D Conversion Playback High De nition Recording Standard De nition Recording Video Recording Modes Video Recording Time (max.) 1080/60P Output 24Mbps High Bit Rate Recording HDMI® Terminal LCD Size and Resolution Touch Panel LCD Glasses-free 3D Viewing on LCD Built-in camera) BN...
Basic User Guide
Page 2
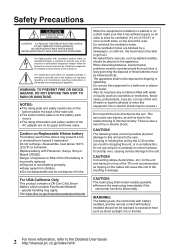
... persons. CAUTION: The mains plug shall remain readily operable. • Remove the mains plug immediately if the camcorder functions abnormally. The lightning flash with arrowhead symbol, within an equilateral triangle, is intended to alert the user to the presence of uninsulated ...UNIT TO RAIN OR MOISTURE. Replace battery with battery installed should be caused.) Do not point the lens directly into the sun. Carrying or holding this device may be exposed to the user. REFER SERVICING TO QUALIFIED SERVICE PERSONNEL. Connecting cables (Audio/Video, etc.) to this unit to...
... persons. CAUTION: The mains plug shall remain readily operable. • Remove the mains plug immediately if the camcorder functions abnormally. The lightning flash with arrowhead symbol, within an equilateral triangle, is intended to alert the user to the presence of uninsulated ...UNIT TO RAIN OR MOISTURE. Replace battery with battery installed should be caused.) Do not point the lens directly into the sun. Carrying or holding this device may be exposed to the user. REFER SERVICING TO QUALIFIED SERVICE PERSONNEL. Connecting cables (Audio/Video, etc.) to this unit to...

Basic User Guide
Page 4
... LCD Monitor 6 Using the Touch Screen 7 IGetting Started 8 Charging the Battery Pack 8 Grip Adjustment 9 Using as a Hand Strap 9 Inserting an SD Card 9 Clock Setting 12 Video Quality 13 IRecording 14 Video Recording 14 Still Image Recording 15 IPlayback 16 Playing Back/Deleting Files on this Unit 16 Playing Back on TV 17 ICopying 19 Copying Files 19 Dubbing Files by Connecting to a DVD Recorder or VCR 20 Copying to Computer 21 IFurther Information 24 Operating the Menu 24 Recordable Time/Number...
... LCD Monitor 6 Using the Touch Screen 7 IGetting Started 8 Charging the Battery Pack 8 Grip Adjustment 9 Using as a Hand Strap 9 Inserting an SD Card 9 Clock Setting 12 Video Quality 13 IRecording 14 Video Recording 14 Still Image Recording 15 IPlayback 16 Playing Back/Deleting Files on this Unit 16 Playing Back on TV 17 ICopying 19 Copying Files 19 Dubbing Files by Connecting to a DVD Recorder or VCR 20 Copying to Computer 21 IFurther Information 24 Operating the Menu 24 Recordable Time/Number...

Basic User Guide
Page 5
... time (for video only) and battery power. Playback : Displays file information such as recording date. I USER (User) Button J A/B (Video/Still Image) Button Switches between Intelligent Auto and Manual modes. L AV Connector (p. 18, 20) M M (Power) Button Press and hold to the Detailed User Guide http://manual.jvc.co.jp/index.html/ A Lens Cover B Light (GZ-HM690/GZ-HM670/GZ-HM650) C Stereo Microphone D LCD Monitor Turns on /off the power by opening/ closing the LCD monitor. N HDMI Mini Connector (p. 17) O USB Connector (p. 23) P COMPONENT (Component) Connector (p. 17) Q Zoom/Volume...
... time (for video only) and battery power. Playback : Displays file information such as recording date. I USER (User) Button J A/B (Video/Still Image) Button Switches between Intelligent Auto and Manual modes. L AV Connector (p. 18, 20) M M (Power) Button Press and hold to the Detailed User Guide http://manual.jvc.co.jp/index.html/ A Lens Cover B Light (GZ-HM690/GZ-HM670/GZ-HM650) C Stereo Microphone D LCD Monitor Turns on /off the power by opening/ closing the LCD monitor. N HDMI Mini Connector (p. 17) O USB Connector (p. 23) P COMPONENT (Component) Connector (p. 17) Q Zoom/Volume...

Basic User Guide
Page 6
... Recording Button E Menu Button (p. 24) F Display Button Some displays disappear after approximately 3 seconds. Press and hold this button again to release the displays. .1 2 3 4 5 A Recording Mode Button Switches to fix the displays. B Zoom Button C Playback Mode Button Switches to the recording mode. The displays appear for approximately 3 seconds with every press. B Index Screen Button C Delete Button D Menu Button (p. 24) E Operation Buttons (p. 16) 6 For more information, refer to show the displays again. Press this button to the Detailed User Guide http://manual.jvc...
... Recording Button E Menu Button (p. 24) F Display Button Some displays disappear after approximately 3 seconds. Press and hold this button again to release the displays. .1 2 3 4 5 A Recording Mode Button Switches to fix the displays. B Zoom Button C Playback Mode Button Switches to the recording mode. The displays appear for approximately 3 seconds with every press. B Index Screen Button C Delete Button D Menu Button (p. 24) E Operation Buttons (p. 16) 6 For more information, refer to show the displays again. Press this button to the Detailed User Guide http://manual.jvc...
Basic User Guide
Page 9
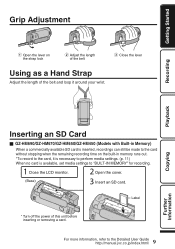
... recording. Getting Started Grip Adjustment Open the lever on the built-in memory runs out. *To record to the card, it around your wrist. Playback Copying Inserting an SD Card o GZ-HM690/GZ-HM670/GZ-HM650/GZ-HM450 (Models with Built-in Memory) When a commercially available SD card is available, set media settings to the Detailed User Guide http://manual.jvc.co.jp/index.html/ Further Information Close the lever Recording .. Label Turn off the power...
... recording. Getting Started Grip Adjustment Open the lever on the built-in memory runs out. *To record to the card, it around your wrist. Playback Copying Inserting an SD Card o GZ-HM690/GZ-HM670/GZ-HM650/GZ-HM450 (Models with Built-in Memory) When a commercially available SD card is available, set media settings to the Detailed User Guide http://manual.jvc.co.jp/index.html/ Further Information Close the lever Recording .. Label Turn off the power...
Basic User Guide
Page 13
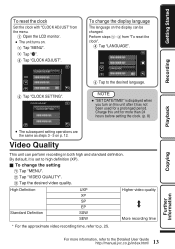
... video recording time, refer to high definition (XP). LANGUAGE . E Tap to the Detailed User Guide http://manual.jvc.co.jp/index.html/ E Tap "CLOCK SETTING". D Tap "LANGUAGE". Video Quality This unit can be changed. High Definition Standard Definition UXP XP SP EP SSW SEW . CLOCK ADJUST . Perform steps A - Charge this unit after it is displayed when you turn on . B Tap "VIDEO QUALITY". C from the menu. Getting Started Recording Playback To reset...
... video recording time, refer to high definition (XP). LANGUAGE . E Tap to the Detailed User Guide http://manual.jvc.co.jp/index.html/ E Tap "CLOCK SETTING". D Tap "LANGUAGE". Video Quality This unit can be changed. High Definition Standard Definition UXP XP SP EP SSW SEW . CLOCK ADJUST . Perform steps A - Charge this unit after it is displayed when you turn on . B Tap "VIDEO QUALITY". C from the menu. Getting Started Recording Playback To reset...

Basic User Guide
Page 14
... remove the battery pack, AC adapter, or SD card when the access lamp is displayed on the touch screen to stop recording, tap a. Before recording an important scene, it is H Manual, press the S button to conduct a trial recording. The mode changes between Intelligent Auto and Manual with every press. If the mode is recommended to switch. Press again to record. Zooming (Wide angle) (Telephoto) .. 0 You can record without worrying about the setting details by using...
... remove the battery pack, AC adapter, or SD card when the access lamp is displayed on the touch screen to stop recording, tap a. Before recording an important scene, it is H Manual, press the S button to conduct a trial recording. The mode changes between Intelligent Auto and Manual with every press. If the mode is recommended to switch. Press again to record. Zooming (Wide angle) (Telephoto) .. 0 You can record without worrying about the setting details by using...
Basic User Guide
Page 17
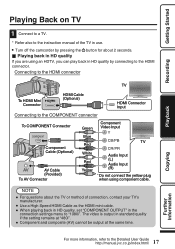
... are using component cable. Connecting to the Detailed User Guide http://manual.jvc.co.jp/index.html/ To AV Connector Green Blue Red White Red Yellow Component Video Input Y CB/PB TV CR/PR Audio Input (L) Audio Input (R) Do not connect the yellow plug when using an HDTV, you can play back in standard quality if the setting remains at "480i". 0 Component and composite (AV) cannot be output at the same time. Copying Further...
... are using component cable. Connecting to the Detailed User Guide http://manual.jvc.co.jp/index.html/ To AV Connector Green Blue Red White Red Yellow Component Video Input Y CB/PB TV CR/PR Audio Input (L) Audio Input (R) Do not connect the yellow plug when using an HDTV, you can play back in standard quality if the setting remains at "480i". 0 Component and composite (AV) cannot be output at the same time. Copying Further...
Basic User Guide
Page 18
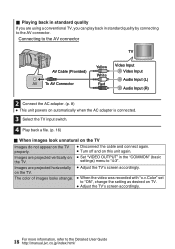
... the Detailed User Guide http://manual.jvc.co.jp/index.html/ Images are projected vertically on TV. 0 Adjust the TV's screen accordingly. 18 For more information, refer to the AV connector TV AV Cable (Provided) AV To AV Connector Yellow White Red Video Input Video Input Audio Input (L) Audio Input (R) . 2 Connect the AC adapter. (p. 8) 0 This unit powers on automatically when the AC adapter is connected. 3 Select the TV input switch. 4 Play back a file. (p. 16) o When images look unnatural...
... the Detailed User Guide http://manual.jvc.co.jp/index.html/ Images are projected vertically on TV. 0 Adjust the TV's screen accordingly. 18 For more information, refer to the AV connector TV AV Cable (Provided) AV To AV Connector Yellow White Red Video Input Video Input Audio Input (L) Audio Input (R) . 2 Connect the AC adapter. (p. 8) 0 This unit powers on automatically when the AC adapter is connected. 3 Select the TV input switch. 4 Play back a file. (p. 16) o When images look unnatural...

Basic User Guide
Page 20
... 0 Set "VIDEO OUTPUT" in standard quality by pressing the M button for about 2 seconds. Refer also to the instruction manuals of the connecting TV. 4 Start recording. 0 Start playback on TV and VCR/DVD recorder 0 Switch to a compatible external input. 0 Insert a DVD-R or video tape. Dubbing Files by Connecting to a DVD Recorder or VCR You can dub videos in the "COMMON" (basic settings) menu to the aspect ratio ("4:3" or "16:9") of the TV, DVD recorder, VCR, etc. 1 Connect to a VCR/DVD recorder. 0 Turn off the camcorder by connecting to a DVD recorder...
... 0 Set "VIDEO OUTPUT" in standard quality by pressing the M button for about 2 seconds. Refer also to the instruction manuals of the connecting TV. 4 Start recording. 0 Start playback on TV and VCR/DVD recorder 0 Switch to a compatible external input. 0 Insert a DVD-R or video tape. Dubbing Files by Connecting to a DVD Recorder or VCR You can dub videos in the "COMMON" (basic settings) menu to the aspect ratio ("4:3" or "16:9") of the TV, DVD recorder, VCR, etc. 1 Connect to a VCR/DVD recorder. 0 Turn off the camcorder by connecting to a DVD recorder...
Basic User Guide
Page 22
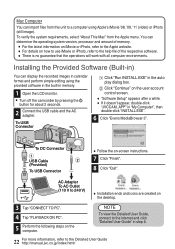
... guarantee that the operations will work with all computer environments. Installing the Provided Software (Built-in) You can import files from the Apple menu. AC Adapter To AC Outlet (110 V to the internet and click "Detailed User Guide" in memory. 1 Open the LCD monitor. 0 Turn off the camcorder by pressing the M button for about 2 seconds. 2 Connect the USB cable and the AC adapter. To USB Connector A Click "Run INSTALL.EXE" in "My...
... guarantee that the operations will work with all computer environments. Installing the Provided Software (Built-in) You can import files from the Apple menu. AC Adapter To AC Outlet (110 V to the internet and click "Detailed User Guide" in memory. 1 Open the LCD monitor. 0 Turn off the camcorder by pressing the M button for about 2 seconds. 2 Connect the USB cable and the AC adapter. To USB Connector A Click "Run INSTALL.EXE" in "My...
Basic User Guide
Page 24
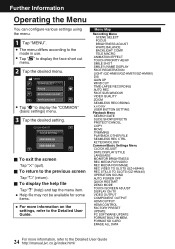
... REC FACE SUB-WINDOW VIDEO QUALITY ZOOM SEAMLESS RECORDING x.v.Color USER BUTTON SETTING Playback Menu SEARCH DATE SLIDE SHOW EFFECTS PROTECT/CANCEL COPY MOVE TRIMMING PLAYBACK OTHER FILE SEAMLESS REC CTRL K2 TECHNOLOGY Common/Basic Settings Menu CLOCK ADJUST DATE DISPLAY STYLE LANGUAGE MONITOR BRIGHTNESS REC MEDIA FOR VIDEO REC MEDIA FOR IMAGE REC VIDEO TO SLOTS (GZ-HM440) REC STILLS TO SLOTS (GZ-HM440) OPERATION SOUND AUTO POWER OFF QUICK RESTART DEMO MODE TOUCH SCREEN ADJUST DISPLAY ON TV VIDEO OUTPUT COMPONENT OUTPUT HDMI OUTPUT HDMI CONTROL FACTORY PRESET UPDATE PC SOFTWARE UPDATE FORMAT...
... REC FACE SUB-WINDOW VIDEO QUALITY ZOOM SEAMLESS RECORDING x.v.Color USER BUTTON SETTING Playback Menu SEARCH DATE SLIDE SHOW EFFECTS PROTECT/CANCEL COPY MOVE TRIMMING PLAYBACK OTHER FILE SEAMLESS REC CTRL K2 TECHNOLOGY Common/Basic Settings Menu CLOCK ADJUST DATE DISPLAY STYLE LANGUAGE MONITOR BRIGHTNESS REC MEDIA FOR VIDEO REC MEDIA FOR IMAGE REC VIDEO TO SLOTS (GZ-HM440) REC STILLS TO SLOTS (GZ-HM440) OPERATION SOUND AUTO POWER OFF QUICK RESTART DEMO MODE TOUCH SCREEN ADJUST DISPLAY ON TV VIDEO OUTPUT COMPONENT OUTPUT HDMI OUTPUT HDMI CONTROL FACTORY PRESET UPDATE PC SOFTWARE UPDATE FORMAT...

Basic User Guide
Page 25
... 8800 1920×1080 (16:9) 6700 9999 9999 3200 6700 2400×1344 (16:9) * 4300 9999 9999 2100 4300 * GZ-HM650/GZ-HM670/GZ-HM690 0 Up to the Detailed User Guide http://manual.jvc.co.jp/index.html/ Copying Further Information The actual recording time may be shorter if zooming is used or if recording is stopped repeatedly. (It is only a guide. Getting Started Recordable Time/Number of image size).
... 8800 1920×1080 (16:9) 6700 9999 9999 3200 6700 2400×1344 (16:9) * 4300 9999 9999 2100 4300 * GZ-HM650/GZ-HM670/GZ-HM690 0 Up to the Detailed User Guide http://manual.jvc.co.jp/index.html/ Copying Further Information The actual recording time may be shorter if zooming is used or if recording is stopped repeatedly. (It is only a guide. Getting Started Recordable Time/Number of image size).
Basic User Guide
Page 26
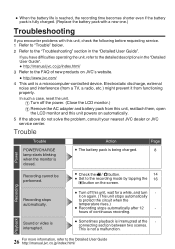
... or JVC service center. Sound or video is interrupted. 0 Sometimes playback is being charged. If you encounter problems with a new one.) Troubleshooting If you have difficulties operating the unit, refer to the detailed descriptions in the "Detailed User Guide". This is closed. Trouble Power Trouble POWER/CHARGE lamp starts blinking when the monitor is not a malfunction. In such a case, reset the unit. 0 When the battery life is reached, the recording time...
... or JVC service center. Sound or video is interrupted. 0 Sometimes playback is being charged. If you encounter problems with a new one.) Troubleshooting If you have difficulties operating the unit, refer to the detailed descriptions in the "Detailed User Guide". This is closed. Trouble Power Trouble POWER/CHARGE lamp starts blinking when the monitor is not a malfunction. In such a case, reset the unit. 0 When the battery life is reached, the recording time...
Basic User Guide
Page 27
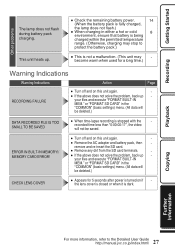
.... 0 Check the remaining battery power. 14 (When the battery pack is fully charged, the lamp does not flash.) 0 When charging in the "COMMON" (basic settings) menu. (All data will be deleted.) DATA RECORDED FILE IS TOO SMALL TO BE SAVED 0 When time-lapse recording is not a malfunction. (This unit may stop to the Detailed User Guide http://manual.jvc.co.jp/index.html/ your files and execute "FORMAT BUILT-IN MEM." or "FORMAT SD CARD" in...
.... 0 Check the remaining battery power. 14 (When the battery pack is fully charged, the lamp does not flash.) 0 When charging in the "COMMON" (basic settings) menu. (All data will be deleted.) DATA RECORDED FILE IS TOO SMALL TO BE SAVED 0 When time-lapse recording is not a malfunction. (This unit may stop to the Detailed User Guide http://manual.jvc.co.jp/index.html/ your files and execute "FORMAT BUILT-IN MEM." or "FORMAT SD CARD" in...
Basic User Guide
Page 29
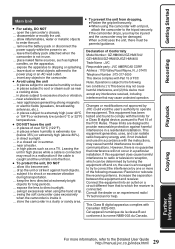
... or sandy area. a Class B digital device, pursuant to extremely high (over 50°C (122°F). ... Connect the equipment into an outlet on a TV. store the camcorder in places subject to Part 15 of Conformity Model Number : GZ-HM690U/GZ-HM670U/ GZ-HM650U/GZ-HM450U/GZ-HM440U Trade Name : JVC Responsible party : JVC AMERICAS CORP. ... in summer. ... JVC could void the user's authority to the Address : 1700...
... or sandy area. a Class B digital device, pursuant to extremely high (over 50°C (122°F). ... Connect the equipment into an outlet on a TV. store the camcorder in places subject to Part 15 of Conformity Model Number : GZ-HM690U/GZ-HM670U/ GZ-HM650U/GZ-HM450U/GZ-HM440U Trade Name : JVC Responsible party : JVC AMERICAS CORP. ... in summer. ... JVC could void the user's authority to the Address : 1700...
Basic User Guide
Page 31
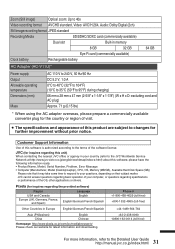
..., Model, Serial Number, Problem, Error Message • Computer (Manufacturer, Model (Desktop/Laptop), CPU, OS, Memory (MB/GB), Available Hard Disk Space (GB)) Please note that it may take some time to respond to your questions, depending on their subject matter. Pixela (for inquires regarding this product are subject to the Detailed User Guide http://manual.jvc.co.jp/index.html/ JVC (for inquires regarding the provided software...
..., Model, Serial Number, Problem, Error Message • Computer (Manufacturer, Model (Desktop/Laptop), CPU, OS, Memory (MB/GB), Available Hard Disk Space (GB)) Please note that it may take some time to respond to your questions, depending on their subject matter. Pixela (for inquires regarding this product are subject to the Detailed User Guide http://manual.jvc.co.jp/index.html/ JVC (for inquires regarding the provided software...
Basic User Guide
Page 32
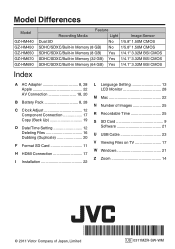
.../Built-in Memory (64 GB) Yes 1/4.1" 3.32M BSI CMOS Index A AC Adapter 8, 28 Apple 22 AV Connection 18, 20 B Battery Pack 8, 28 C Clock Adjust 12 Component Connection 17 Copy (Back Up 19 D Date/Time Setting 12 Deleting Files 16 Dubbing (Duplicate 20 F Format SD Card 11 H HDMI Connection 17 I Installation 22 L Language Setting 13 LCD Monitor 28 M Mac 22 N Number of Images 25 R Recordable Time 25 S SD Card 9 Software 21 U USB Cable 23 V Viewing Files on TV 17 W Windows 21 Z Zoom 14...
.../Built-in Memory (64 GB) Yes 1/4.1" 3.32M BSI CMOS Index A AC Adapter 8, 28 Apple 22 AV Connection 18, 20 B Battery Pack 8, 28 C Clock Adjust 12 Component Connection 17 Copy (Back Up 19 D Date/Time Setting 12 Deleting Files 16 Dubbing (Duplicate 20 F Format SD Card 11 H HDMI Connection 17 I Installation 22 L Language Setting 13 LCD Monitor 28 M Mac 22 N Number of Images 25 R Recordable Time 25 S SD Card 9 Software 21 U USB Cable 23 V Viewing Files on TV 17 W Windows 21 Z Zoom 14...


