
User Guide
Page 2
... 24 Capturing Still Images During Video Recording 26 Taking Still Images in Auto Mode 27 Zooming 30 Manual Recording 30 Shooting According to Scene (Subject 32 Adjusting Focus Manually 33 Adjusting Brightness 34 Setting Backlight Compensation 35 Setting White Balance 36 Taking Close-up Shots 37 ...Videos to Discs 117 Backing Up Files Without Using Provided Software ......... 119 List of Files and Folders 120 Copying to Windows PC (GZ-E300 121 Verifying System Requirements (Guideline 121 Installing the Provided Software (Built-in 122 Backing Up All Files 123 Organizing Files 124 ...
... 24 Capturing Still Images During Video Recording 26 Taking Still Images in Auto Mode 27 Zooming 30 Manual Recording 30 Shooting According to Scene (Subject 32 Adjusting Focus Manually 33 Adjusting Brightness 34 Setting Backlight Compensation 35 Setting White Balance 36 Taking Close-up Shots 37 ...Videos to Discs 117 Backing Up Files Without Using Provided Software ......... 119 List of Files and Folders 120 Copying to Windows PC (GZ-E300 121 Verifying System Requirements (Guideline 121 Installing the Provided Software (Built-in 122 Backing Up All Files 123 Organizing Files 124 ...
User Guide
Page 10
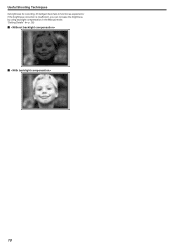
Useful Shooting Techniques its brightness for recording. "Setting Details" (A p. 35) o o 10 If Intelligent Auto fails to function as expected or if the brightness correction is insufficient, you can increase the brightness by using backlight compensation in the Manual mode. ..
Useful Shooting Techniques its brightness for recording. "Setting Details" (A p. 35) o o 10 If Intelligent Auto fails to function as expected or if the brightness correction is insufficient, you can increase the brightness by using backlight compensation in the Manual mode. ..
User Guide
Page 16
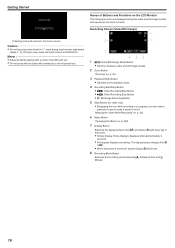
... touch screen adjustment (steps 4 - 5). "Marking the Video While Recording" (A p. 53) 6 Menu Button "Operating the Menu" (A p. 224) 7 Display Button Switches the display between P Intelligent Auto and H Manual. 16 Doing so may cause the touch screen to the menu screen. The display button changes from n to m. 0 When the power is in progress, you...
... touch screen adjustment (steps 4 - 5). "Marking the Video While Recording" (A p. 53) 6 Menu Button "Operating the Menu" (A p. 224) 7 Display Button Switches the display between P Intelligent Auto and H Manual. 16 Doing so may cause the touch screen to the menu screen. The display button changes from n to m. 0 When the power is in progress, you...
User Guide
Page 21
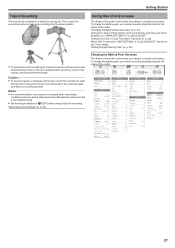
... to the telephoto end). 0 Set the image stabilizer to b (OFF) when using a tripod for preventing camera shake and recording from falling off , read the instruction manual of the power outlet varies according to be mounted on the unit carefully before mounting, and turn the screws until they are fastened firmly. "Reducing...
... to the telephoto end). 0 Set the image stabilizer to b (OFF) when using a tripod for preventing camera shake and recording from falling off , read the instruction manual of the power outlet varies according to be mounted on the unit carefully before mounting, and turn the screws until they are fastened firmly. "Reducing...
User Guide
Page 24
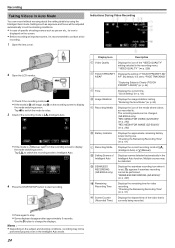
...TRACKING" . Tap A to switch the mode to video. 3 Check if the recording mode is P Intelligent Auto. 0 If the mode is H Manual, tap H on the screen. 0 Before recording an important scene, it is B still image, tap B on the subject and shooting conditions, recording...p. 52) E Recording Media Displays the icon of the video that is set to stop. 0 Some displays disappear after approximately 3 seconds. "SEAMLESS RECORDING (GZ-EX355)" (A p. 227) J Remaining Recording Time Displays the remaining time for video recording. "Checking the Remaining Recording Time" (A p. 61) G Recording ...
...TRACKING" . Tap A to switch the mode to video. 3 Check if the recording mode is P Intelligent Auto. 0 If the mode is H Manual, tap H on the screen. 0 Before recording an important scene, it is B still image, tap B on the subject and shooting conditions, recording...p. 52) E Recording Media Displays the icon of the video that is set to stop. 0 Some displays disappear after approximately 3 seconds. "SEAMLESS RECORDING (GZ-EX355)" (A p. 227) J Remaining Recording Time Displays the remaining time for video recording. "Checking the Remaining Recording Time" (A p. 61) G Recording ...
User Guide
Page 27
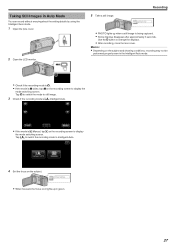
... displays disappear after approximately 3 seconds. Tap B to switch the mode to still image. 3 Check if the recording mode is P Intelligent Auto. 0 If the mode is H Manual, tap H on the recording screen to display the mode switching screen. Use the n button to display the mode switching screen. Memo : 0 Depending on the subject...
... displays disappear after approximately 3 seconds. Tap B to switch the mode to still image. 3 Check if the recording mode is P Intelligent Auto. 0 If the mode is H Manual, tap H on the recording screen to display the mode switching screen. Use the n button to display the mode switching screen. Memo : 0 Depending on the subject...
User Guide
Page 28
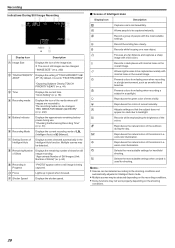
.... 0 Multiple scenes may be detected depending on the recording conditions. 0 Some functions may be captured naturally. "REC MEDIA FOR IMAGE (GZ-EX355)" (A p. 242) E Battery Indicator Displays the approximate remaining battery power during the day. H Remaining Number of Shots Displays the ...mode of Shots)" (A p. 62) I Recording in green when focused. "Approximate Number of Still Images (Unit: Number of P (Intelligent Auto) or H (Manual). f Record a group of people with vivid colors. " IMAGE SIZE " (A p. 232) B TOUCH PRIORITY AE/AF Displays the setting of still images ...
.... 0 Multiple scenes may be detected depending on the recording conditions. 0 Some functions may be captured naturally. "REC MEDIA FOR IMAGE (GZ-EX355)" (A p. 242) E Battery Indicator Displays the approximate remaining battery power during the day. H Remaining Number of Shots Displays the ...mode of Shots)" (A p. 62) I Recording in green when focused. "Approximate Number of Still Images (Unit: Number of P (Intelligent Auto) or H (Manual). f Record a group of people with vivid colors. " IMAGE SIZE " (A p. 232) B TOUCH PRIORITY AE/AF Displays the setting of still images ...
User Guide
Page 30
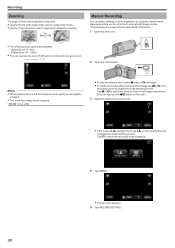
Digital Zoom (41 - 200x) 0 You can be adjusted using the manual mode. Memo : 0 When digital zoom is used, the image becomes grainy as brightness, by ...screen to video or still image respectively. (You can also use the zoom (T/W) button on this unit.) 3 Select the Manual recording mode. 0 If the mode is digitally enlarged. 0 The zoom ratio range can be set for shooting. Recording Zooming...functions. 1 Open the lens cover. 0 The following zoom options are available: - Manual recording can adjust settings, such as it is P Intelligent Auto, tap P on the recording screen to...
Digital Zoom (41 - 200x) 0 You can be adjusted using the manual mode. Memo : 0 When digital zoom is used, the image becomes grainy as brightness, by ...screen to video or still image respectively. (You can also use the zoom (T/W) button on this unit.) 3 Select the Manual recording mode. 0 If the mode is digitally enlarged. 0 The zoom ratio range can be set for shooting. Recording Zooming...functions. 1 Open the lens cover. 0 The following zoom options are available: - Manual recording can adjust settings, such as it is P Intelligent Auto, tap P on the recording screen to...
User Guide
Page 31
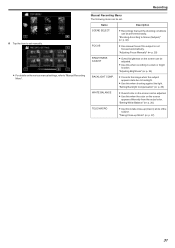
... (macro) shots of the subject. "Setting White Balance" (A p. 36) TELE MACRO 0 Use this when shooting against the light. "Adjusting Focus Manually" (A p. 33) BRIGHTNESS ADJUST 0 Overall brightness on the screen can be adjusted. 0 Use this when recording in a dark or bright location. ...to set . "Setting Backlight Compensation" (A p. 35) WHITE BALANCE 0 Overall color on the various manual settings, refer to Scene (Subject)" (A p. 32) FOCUS 0 Use manual focus if the subject is not focused automatically. Name Description SCENE SELECT 0 Recordings that suit the shooting ...
... (macro) shots of the subject. "Setting White Balance" (A p. 36) TELE MACRO 0 Use this when shooting against the light. "Adjusting Focus Manually" (A p. 33) BRIGHTNESS ADJUST 0 Overall brightness on the screen can be adjusted. 0 Use this when recording in a dark or bright location. ...to set . "Setting Backlight Compensation" (A p. 35) WHITE BALANCE 0 Overall color on the various manual settings, refer to Scene (Subject)" (A p. 32) FOCUS 0 Use manual focus if the subject is not focused automatically. Name Description SCENE SELECT 0 Recordings that suit the shooting ...
User Guide
Page 32
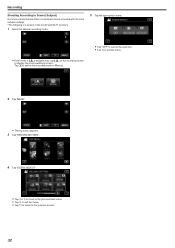
Tap H to switch the recording mode to Manual. 0 Tap "OFF" to cancel the selection. 0 Tap L to exit the menu. . . . .. . 2 Tap "MENU". 0 The top menu appears. 3 Tap "RECORD SETTING". 4 Tap "SCENE SELECT". 0 Tap 0 or 1 ... that are often encountered can be recorded with the most suitable settings. *The following is a screen of the model with Wi-Fi functions. 1 Select the Manual recording mode. 5 Tap the appropriate scene. 0 If the mode is P Intelligent Auto, tap P on the recording screen to the previous screen. 32
Tap H to switch the recording mode to Manual. 0 Tap "OFF" to cancel the selection. 0 Tap L to exit the menu. . . . .. . 2 Tap "MENU". 0 The top menu appears. 3 Tap "RECORD SETTING". 4 Tap "SCENE SELECT". 0 Tap 0 or 1 ... that are often encountered can be recorded with the most suitable settings. *The following is a screen of the model with Wi-Fi functions. 1 Select the Manual recording mode. 5 Tap the appropriate scene. 0 If the mode is P Intelligent Auto, tap P on the recording screen to the previous screen. 32
User Guide
Page 33
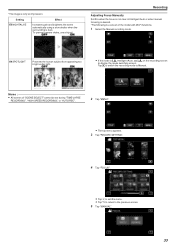
... this when the focus is not clear in Intelligent Auto or when manual focusing is desired. *The following is P Intelligent Auto, tap P on the recording screen to display the mode switching screen. Setting b NIGHTALIVE Effect Increases gain and ... SPEED RECORDING", or "AUTO REC". 2 Tap "MENU". 0 The top menu appears. 3 Tap "RECORD SETTING". 4 Tap "FOCUS". 0 Tap L to exit the menu. 0 Tap J to return to Manual. Memo : 0 All scenes of the model with Wi-Fi functions. 1 Select the Manual recording mode. Tap H to switch the recording mode to the previous screen. 5 Tap...
... this when the focus is not clear in Intelligent Auto or when manual focusing is desired. *The following is P Intelligent Auto, tap P on the recording screen to display the mode switching screen. Setting b NIGHTALIVE Effect Increases gain and ... SPEED RECORDING", or "AUTO REC". 2 Tap "MENU". 0 The top menu appears. 3 Tap "RECORD SETTING". 4 Tap "FOCUS". 0 Tap L to exit the menu. 0 Tap J to return to Manual. Memo : 0 All scenes of the model with Wi-Fi functions. 1 Select the Manual recording mode. Tap H to switch the recording mode to the previous screen. 5 Tap...
User Guide
Page 34
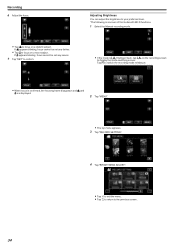
...focus cannot be set any further. 0 Tap p to your preferred level. *The following is a screen of the model with Wi-Fi functions. 1 Select the Manual recording mode. 0 If the mode is confirmed, the focusing frame disappears and E and p are displayed. 2 Tap "MENU". 0 The top menu appears. 3... to display the mode switching screen. Adjusting Brightness You can adjust the brightness to focus on a near subject. Tap H to switch the recording mode to Manual. 0 When focus is P Intelligent Auto, tap P on a distant subject. . . . .. . . Recording 6 Adjust the focus. 0 Tap E to focus on ...
...focus cannot be set any further. 0 Tap p to your preferred level. *The following is a screen of the model with Wi-Fi functions. 1 Select the Manual recording mode. 0 If the mode is confirmed, the focusing frame disappears and E and p are displayed. 2 Tap "MENU". 0 The top menu appears. 3... to display the mode switching screen. Adjusting Brightness You can adjust the brightness to focus on a near subject. Tap H to switch the recording mode to Manual. 0 When focus is P Intelligent Auto, tap P on a distant subject. . . . .. . . Recording 6 Adjust the focus. 0 Tap E to focus on ...
User Guide
Page 35
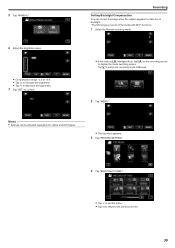
... correct the image when the subject appears too dark due to backlight. *The following is a screen of the model with Wi-Fi functions. 1 Select the Manual recording mode. 0 If the mode is P Intelligent Auto, tap P on the recording screen to the previous screen. 35 Tap H to switch the recording mode to...
... correct the image when the subject appears too dark due to backlight. *The following is a screen of the model with Wi-Fi functions. 1 Select the Manual recording mode. 0 If the mode is P Intelligent Auto, tap P on the recording screen to the previous screen. 35 Tap H to switch the recording mode to...
User Guide
Page 36
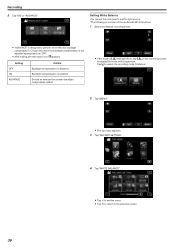
. . . .. . Tap H to switch the recording mode to Manual. 2 Tap "MENU". 0 The top menu appears. 3 Tap "RECORD SETTING". 4 Tap "WHITE BALANCE". 0 Tap L to exit the menu. 0 Tap J to return to display the mode switching ... Balance You can set the color tone to suit the light source. *The following is a screen of the model with Wi-Fi functions. 1 Select the Manual recording mode. 0 "ADVANCE" is not adjusted appropriately by "ON". 0 After setting, the tele macro icon l appears.
. . . .. . Tap H to switch the recording mode to Manual. 2 Tap "MENU". 0 The top menu appears. 3 Tap "RECORD SETTING". 4 Tap "WHITE BALANCE". 0 Tap L to exit the menu. 0 Tap J to return to display the mode switching ... Balance You can set the color tone to suit the light source. *The following is a screen of the model with Wi-Fi functions. 1 Select the Manual recording mode. 0 "ADVANCE" is not adjusted appropriately by "ON". 0 After setting, the tele macro icon l appears.
User Guide
Page 37
Setting AUTO MWB FINE CLOUD HALOGEN MARINE:BLUE MARINE:GREEN Details Adjusts automatically to Manual. 2 Tap "MENU". 0 The top menu appears. 3 Tap "RECORD SETTING". 37 Set this when the problem of the lens so that the white paper fills the ... a shade. Memo : 0 The setting will not change if "MWB" is being tapped too fast (less than 1 second). *The image is only an impression. 1 Select the Manual recording mode. 0 If the mode is not resolved. Tap H to switch the recording mode to the natural colors. Set this when shooting the sea at...
Setting AUTO MWB FINE CLOUD HALOGEN MARINE:BLUE MARINE:GREEN Details Adjusts automatically to Manual. 2 Tap "MENU". 0 The top menu appears. 3 Tap "RECORD SETTING". 37 Set this when the problem of the lens so that the white paper fills the ... a shade. Memo : 0 The setting will not change if "MWB" is being tapped too fast (less than 1 second). *The image is only an impression. 1 Select the Manual recording mode. 0 If the mode is not resolved. Tap H to switch the recording mode to the natural colors. Set this when shooting the sea at...
User Guide
Page 55
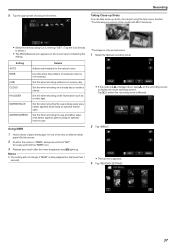
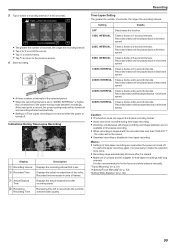
... previous screen. 6 Start recording. 0 A frame is taken at 1-second intervals. Remaining time left to fix the focus and white balance manually. Displays the actual elapsed time after it is turned off . Displays the actual recorded time of a tripod and AC adapter for time-lapse...the video will be played back at 600 times speed. 40SEC INTERVAL Takes a frame at 10-second intervals. "Tripod Mounting" (A p. 21) "Adjusting Focus Manually" (A p. 33) "Setting White Balance" (A p. 36) 55 Recorded videos will not be recorded during time-lapse recording. 0 Zooming, simultaneous still image ...
... previous screen. 6 Start recording. 0 A frame is taken at 1-second intervals. Remaining time left to fix the focus and white balance manually. Displays the actual elapsed time after it is turned off . Displays the actual recorded time of a tripod and AC adapter for time-lapse...the video will be played back at 600 times speed. 40SEC INTERVAL Takes a frame at 10-second intervals. "Tripod Mounting" (A p. 21) "Adjusting Focus Manually" (A p. 33) "Setting White Balance" (A p. 36) 55 Recorded videos will not be recorded during time-lapse recording. 0 Zooming, simultaneous still image ...
User Guide
Page 57
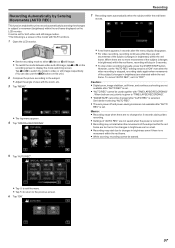
... recording is set. When there are too small. 0 Recording may not start when the movements of the subject (changes in 5 seconds. 0 To stop video recording manually, press the START/STOP button. However, as the "AUTO REC" setting remains at "ON" even after "AUTO REC" is set , priority is given to "TIME...
... recording is set. When there are too small. 0 Recording may not start when the movements of the subject (changes in 5 seconds. 0 To stop video recording manually, press the START/STOP button. However, as the "AUTO REC" setting remains at "ON" even after "AUTO REC" is set , priority is given to "TIME...

User Guide
Page 64
extracted scenes can be searched. For the game recording mode, refer to the game score settings. (GZ-EX355/EX310) "Game Score Settings" (A p. 186) DIGEST PLAYBACK From the recorded video, scenes with a smile detected, scenes with a person whose face is digested in ...playback that can be performed by using the smartphone application) can be extracted for a digest playback. PLAYBACK PLAYLIST Plays back the playlists that are marked manually are the types of time. Tap A to switch the mode to display the mode switching screen. Also, marked scenes and goal scenes can also ...
extracted scenes can be searched. For the game recording mode, refer to the game score settings. (GZ-EX355/EX310) "Game Score Settings" (A p. 186) DIGEST PLAYBACK From the recorded video, scenes with a smile detected, scenes with a person whose face is digested in ...playback that can be performed by using the smartphone application) can be extracted for a digest playback. PLAYBACK PLAYLIST Plays back the playlists that are marked manually are the types of time. Tap A to switch the mode to display the mode switching screen. Also, marked scenes and goal scenes can also ...
User Guide
Page 77
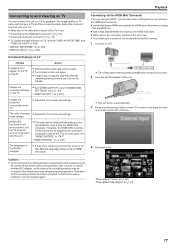
...cable. Caution : 0 Do not remove the recording medium or perform any other operation (such as the HDMI mini cable. 0 Refer also to the instruction manual of the TV in HD quality by pressing the M button for about 2 seconds. 2 Connect the AC adapter to this unit to "ON". Connecting ... you are projected vertically on the TV properly. The image quality on TV varies with this unit again. 0 Images may be sure to the instruction manual of the model with the built-in conjunction with the type of images 0 Adjust the TV's screen accordingly. " VIDEO OUTPUT " (A p. 241) Images ...
...cable. Caution : 0 Do not remove the recording medium or perform any other operation (such as the HDMI mini cable. 0 Refer also to the instruction manual of the TV in HD quality by pressing the M button for about 2 seconds. 2 Connect the AC adapter to this unit to "ON". Connecting ... you are projected vertically on the TV properly. The image quality on TV varies with this unit again. 0 Images may be sure to the instruction manual of the model with the built-in conjunction with the type of images 0 Adjust the TV's screen accordingly. " VIDEO OUTPUT " (A p. 241) Images ...
User Guide
Page 78
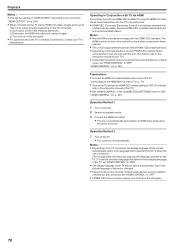
... and on the specifications of each HDMI-CEC enabled device, some functions may not work with this unit. (For details, refer to the instruction manual of your TV's manufacturer. The HDMI control function of the TV will automatically switch to "OFF". "Connecting via the HDMI Mini Connector" (A ...HDMI mini cable allows linked operations with a language that differs from the display language of the TV, set "HDMI CONTROL" to the instruction manual of this unit is changed. 0 These functions may not be performed. 0 HDMI-CEC (Consumer Electronics Control) is an industry standard that enables...
... and on the specifications of each HDMI-CEC enabled device, some functions may not work with this unit. (For details, refer to the instruction manual of your TV's manufacturer. The HDMI control function of the TV will automatically switch to "OFF". "Connecting via the HDMI Mini Connector" (A ...HDMI mini cable allows linked operations with a language that differs from the display language of the TV, set "HDMI CONTROL" to the instruction manual of this unit is changed. 0 These functions may not be performed. 0 HDMI-CEC (Consumer Electronics Control) is an industry standard that enables...


