
User Guide
Page 2
...24 Capturing Still Images During Video Recording 26 Taking Still Images in Auto Mode 27 Zooming 30 Manual Recording 30 Shooting According to Scene (Subject 32 Adjusting Focus Manually 33 Adjusting Brightness 34 Setting Backlight Compensation 35 Setting White Balance 36 Taking Close-up Shots ... to Discs 117 Backing Up Files Without Using Provided Software ......... 119 List of Files and Folders 120 Copying to Windows PC (GZ-E300 121 Verifying System Requirements (Guideline 121 Installing the Provided Software (Built-in 122 Backing Up All Files 123 Organizing Files 124 Recording...
...24 Capturing Still Images During Video Recording 26 Taking Still Images in Auto Mode 27 Zooming 30 Manual Recording 30 Shooting According to Scene (Subject 32 Adjusting Focus Manually 33 Adjusting Brightness 34 Setting Backlight Compensation 35 Setting White Balance 36 Taking Close-up Shots ... to Discs 117 Backing Up Files Without Using Provided Software ......... 119 List of Files and Folders 120 Copying to Windows PC (GZ-E300 121 Verifying System Requirements (Guideline 121 Installing the Provided Software (Built-in 122 Backing Up All Files 123 Organizing Files 124 Recording...
User Guide
Page 10
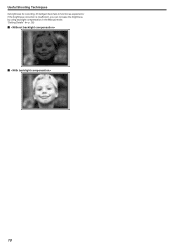
Useful Shooting Techniques its brightness for recording. If Intelligent Auto fails to function as expected or if the brightness correction is insufficient, you can increase the brightness by using backlight compensation in the Manual mode. .. "Setting Details" (A p. 35) o o 10
Useful Shooting Techniques its brightness for recording. If Intelligent Auto fails to function as expected or if the brightness correction is insufficient, you can increase the brightness by using backlight compensation in the Manual mode. .. "Setting Details" (A p. 35) o o 10
User Guide
Page 16
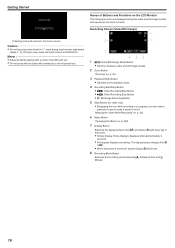
... as the touch screens. "Marking the Video While Recording" (A p. 53) 6 Menu Button "Operating the Menu" (A p. 224) 7 Display Button Switches the display between P Intelligent Auto and H Manual. 16 The display button changes from n to malfunction. Getting Started Names of the button. 0 Simple display: Some displays disappear after approximately 3 seconds. 0 Full display: Displays...
... as the touch screens. "Marking the Video While Recording" (A p. 53) 6 Menu Button "Operating the Menu" (A p. 224) 7 Display Button Switches the display between P Intelligent Auto and H Manual. 16 The display button changes from n to malfunction. Getting Started Names of the button. 0 Simple display: Some displays disappear after approximately 3 seconds. 0 Full display: Displays...
User Guide
Page 21
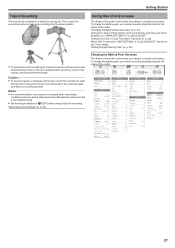
... to b (OFF) when using a tripod for preventing camera shake and recording from the same position. 0 To prevent this unit from falling off , read the instruction manual of the outlet. "Charging the Battery Pack Overseas" (A p. 21) Change the date and time display to the local time by selecting your travel destination in...
... to b (OFF) when using a tripod for preventing camera shake and recording from the same position. 0 To prevent this unit from falling off , read the instruction manual of the outlet. "Charging the Battery Pack Overseas" (A p. 21) Change the date and time display to the local time by selecting your travel destination in...
User Guide
Page 24
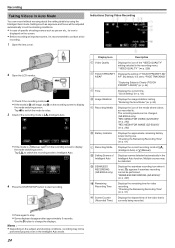
...automatically to suit the shooting conditions. 0 In case of the "VIDEO QUALITY" setting selected in the Intelligent Auto function. I SEAMLESS RECORDING (GZ-EX355 only) Displays the seamless recording icon when it is B still image, tap B on the recording screen to stop. 0 Some ... Description A Video Quality Displays the icon of specific shooting scenes such as person etc., its icon is H Manual, tap H on the recording screen to . "SEAMLESS RECORDING (GZ-EX355)" (A p. 227) J Remaining Recording Time Displays the remaining time for video recording. Settings such as exposure...
...automatically to suit the shooting conditions. 0 In case of the "VIDEO QUALITY" setting selected in the Intelligent Auto function. I SEAMLESS RECORDING (GZ-EX355 only) Displays the seamless recording icon when it is B still image, tap B on the recording screen to stop. 0 Some ... Description A Video Quality Displays the icon of specific shooting scenes such as person etc., its icon is H Manual, tap H on the recording screen to . "SEAMLESS RECORDING (GZ-EX355)" (A p. 227) J Remaining Recording Time Displays the remaining time for video recording. Settings such as exposure...
User Guide
Page 27
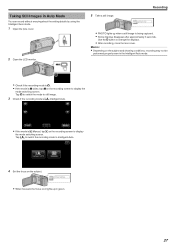
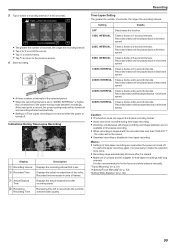
... LCD monitor. 5 Take a still image. Tap B to switch the mode to still image. 3 Check if the recording mode is P Intelligent Auto. 0 If the mode is H Manual, tap H on the subject. 0 When focused, the focus icon lights up when a still image is A video, tap A on the recording screen to Intelligent Auto. 4 Set...
... LCD monitor. 5 Take a still image. Tap B to switch the mode to still image. 3 Check if the recording mode is P Intelligent Auto. 0 If the mode is H Manual, tap H on the subject. 0 When focused, the focus icon lights up when a still image is A video, tap A on the recording screen to Intelligent Auto. 4 Set...
User Guide
Page 28
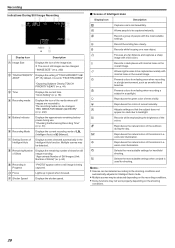
... Description A Image Size Displays the icon of the image size. 0 The size of the outdoors during use. "REC MEDIA FOR IMAGE (GZ-EX355)" (A p. 242) E Battery Indicator Displays the approximate remaining battery power during the day. G Setting Scenes of the colors. Multiple ... functions may be captured accurately with the most suitable settings for handheld shooting. Y Reproduces the colors of P (Intelligent Auto) or H (Manual). h Adjusts settings so that the subject does not appear too dark due to be changed . The recording media can be changed . "Checking...
... Description A Image Size Displays the icon of the image size. 0 The size of the outdoors during use. "REC MEDIA FOR IMAGE (GZ-EX355)" (A p. 242) E Battery Indicator Displays the approximate remaining battery power during the day. G Setting Scenes of the colors. Multiple ... functions may be captured accurately with the most suitable settings for handheld shooting. Y Reproduces the colors of P (Intelligent Auto) or H (Manual). h Adjusts settings so that the subject does not appear too dark due to be changed . The recording media can be changed . "Checking...
User Guide
Page 30
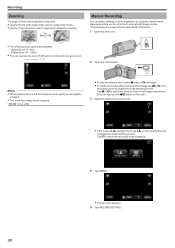
...for shooting. Tap A or B to switch the mode to video or still image respectively. (You can also use the A/B button on this unit.) 3 Select the Manual recording mode. 0 If the mode is P Intelligent Auto, tap P on the recording screen to magnify the subject for both video and still image modes. *The...the recording mode to either A video or B still image. 0 To switch the mode between video and still image, tap A or B on the recording screen to Manual. 4 Tap "MENU". 0 The top menu appears. 5 Tap "RECORD SETTING". 30 Tap H to switch the recording mode to display the mode switching screen...
...for shooting. Tap A or B to switch the mode to video or still image respectively. (You can also use the A/B button on this unit.) 3 Select the Manual recording mode. 0 If the mode is P Intelligent Auto, tap P on the recording screen to magnify the subject for both video and still image modes. *The...the recording mode to either A video or B still image. 0 To switch the mode between video and still image, tap A or B on the recording screen to Manual. 4 Tap "MENU". 0 The top menu appears. 5 Tap "RECORD SETTING". 30 Tap H to switch the recording mode to display the mode switching screen...
User Guide
Page 31
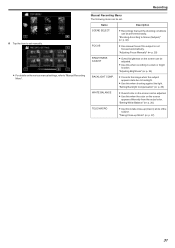
...(A p. 36) TELE MACRO 0 Use this when the color on the various manual settings, refer to "Manual Recording Menu". Name Description SCENE SELECT 0 Recordings that suit the shooting conditions can be set manually. 0 For details on the screen appears differently from the actual color. "Adjusting...to Scene (Subject)" (A p. 32) FOCUS 0 Use manual focus if the subject is not focused automatically. Recording .. 6 Tap the item to set . Manual Recording Menu The following items can be performed easily. "Adjusting Focus Manually" (A p. 33) BRIGHTNESS ADJUST 0 Overall brightness on ...
...(A p. 36) TELE MACRO 0 Use this when the color on the various manual settings, refer to "Manual Recording Menu". Name Description SCENE SELECT 0 Recordings that suit the shooting conditions can be set manually. 0 For details on the screen appears differently from the actual color. "Adjusting...to Scene (Subject)" (A p. 32) FOCUS 0 Use manual focus if the subject is not focused automatically. Recording .. 6 Tap the item to set . Manual Recording Menu The following items can be performed easily. "Adjusting Focus Manually" (A p. 33) BRIGHTNESS ADJUST 0 Overall brightness on ...
User Guide
Page 32
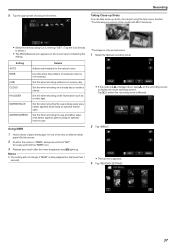
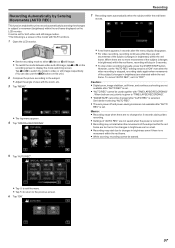
...are often encountered can be recorded with the most suitable settings. *The following is a screen of the model with Wi-Fi functions. 1 Select the Manual recording mode. 5 Tap the appropriate scene. 0 If the mode is P Intelligent Auto, tap P on the recording screen to the previous screen.... 32 Tap H to switch the recording mode to Manual. 0 Tap "OFF" to cancel the selection. 0 Tap L to exit the menu. . . . .. . 2 Tap "MENU". 0 The top menu appears. 3 Tap "RECORD SETTING". 4 Tap "...
...are often encountered can be recorded with the most suitable settings. *The following is a screen of the model with Wi-Fi functions. 1 Select the Manual recording mode. 5 Tap the appropriate scene. 0 If the mode is P Intelligent Auto, tap P on the recording screen to the previous screen.... 32 Tap H to switch the recording mode to Manual. 0 Tap "OFF" to cancel the selection. 0 Tap L to exit the menu. . . . .. . 2 Tap "MENU". 0 The top menu appears. 3 Tap "RECORD SETTING". 4 Tap "...
User Guide
Page 33
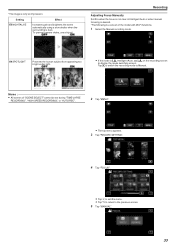
... this when the focus is not clear in Intelligent Auto or when manual focusing is desired. *The following is P Intelligent Auto, tap P on the recording screen to Manual. Tap H to switch the recording mode to display the mode switching screen. g SPOTLIGHT Prevents the human... appears. 3 Tap "RECORD SETTING". 4 Tap "FOCUS". 0 Tap L to exit the menu. 0 Tap J to return to the previous screen. 5 Tap "MANUAL". 33 Setting b NIGHTALIVE Effect Increases gain and brightens the scene automatically using a slow shutter when the surrounding is only an impression. Memo : 0 All scenes of...
... this when the focus is not clear in Intelligent Auto or when manual focusing is desired. *The following is P Intelligent Auto, tap P on the recording screen to Manual. Tap H to switch the recording mode to display the mode switching screen. g SPOTLIGHT Prevents the human... appears. 3 Tap "RECORD SETTING". 4 Tap "FOCUS". 0 Tap L to exit the menu. 0 Tap J to return to the previous screen. 5 Tap "MANUAL". 33 Setting b NIGHTALIVE Effect Increases gain and brightens the scene automatically using a slow shutter when the surrounding is only an impression. Memo : 0 All scenes of...
User Guide
Page 34
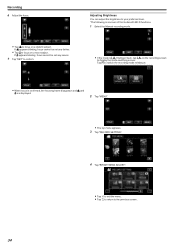
Tap H to switch the recording mode to Manual. 0 When focus is P Intelligent Auto, tap P on the recording screen to display the mode switching screen. If E appears blinking, focus cannot be set any nearer. 7 ... confirm. Adjusting Brightness You can adjust the brightness to your preferred level. *The following is a screen of the model with Wi-Fi functions. 1 Select the Manual recording mode. 0 If the mode is confirmed, the focusing frame disappears and E and p are displayed. 2 Tap "MENU". 0 The top menu appears. 3 Tap "RECORD SETTING". 4 Tap...
Tap H to switch the recording mode to Manual. 0 When focus is P Intelligent Auto, tap P on the recording screen to display the mode switching screen. If E appears blinking, focus cannot be set any nearer. 7 ... confirm. Adjusting Brightness You can adjust the brightness to your preferred level. *The following is a screen of the model with Wi-Fi functions. 1 Select the Manual recording mode. 0 If the mode is confirmed, the focusing frame disappears and E and p are displayed. 2 Tap "MENU". 0 The top menu appears. 3 Tap "RECORD SETTING". 4 Tap...
User Guide
Page 35
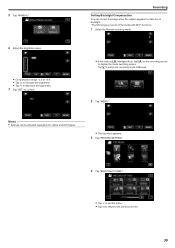
...the brightness value. 0 Compensation range: -2.0 to +2.0 0 Tap 3 to increase the brightness. 0 Tap 2 to decrease the brightness. 7 Tap "SET" to Manual. 2 Tap "MENU". Recording Setting Backlight Compensation You can be adjusted separately for videos and still images. 0 The top menu appears. 3 Tap "RECORD SETTING"....the image when the subject appears too dark due to backlight. *The following is a screen of the model with Wi-Fi functions. 1 Select the Manual recording mode. 0 If the mode is P Intelligent Auto, tap P on the recording screen to the previous screen. 35 Tap H to switch the...
...the brightness value. 0 Compensation range: -2.0 to +2.0 0 Tap 3 to increase the brightness. 0 Tap 2 to decrease the brightness. 7 Tap "SET" to Manual. 2 Tap "MENU". Recording Setting Backlight Compensation You can be adjusted separately for videos and still images. 0 The top menu appears. 3 Tap "RECORD SETTING"....the image when the subject appears too dark due to backlight. *The following is a screen of the model with Wi-Fi functions. 1 Select the Manual recording mode. 0 If the mode is P Intelligent Auto, tap P on the recording screen to the previous screen. 35 Tap H to switch the...
User Guide
Page 36
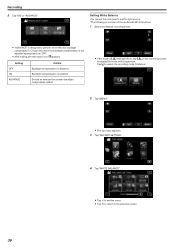
Tap H to switch the recording mode to Manual. 2 Tap "MENU". 0 The top menu appears. 3 Tap "RECORD SETTING". 4 Tap "WHITE BALANCE". 0 Tap L to exit the menu. 0 Tap J to return to perform more effective backlight ... P Intelligent Auto, tap P on the recording screen to suit the light source. *The following is a screen of the model with Wi-Fi functions. 1 Select the Manual recording mode. 0 "ADVANCE" is not adjusted appropriately by "ON". 0 After setting, the tele macro icon l appears. Setting White Balance You can set the color tone...
Tap H to switch the recording mode to Manual. 2 Tap "MENU". 0 The top menu appears. 3 Tap "RECORD SETTING". 4 Tap "WHITE BALANCE". 0 Tap L to exit the menu. 0 Tap J to return to perform more effective backlight ... P Intelligent Auto, tap P on the recording screen to suit the light source. *The following is a screen of the model with Wi-Fi functions. 1 Select the Manual recording mode. 0 "ADVANCE" is not adjusted appropriately by "ON". 0 After setting, the tele macro icon l appears. Setting White Balance You can set the color tone...
User Guide
Page 37
...: 0 The setting will not change if "MWB" is being tapped too fast (less than 1 second). *The image is only an impression. 1 Select the Manual recording mode. 0 If the mode is a screen of the lens so that the white paper fills the screen. 2 Position the cursor to display the mode... switching screen. Setting AUTO MWB FINE CLOUD HALOGEN MARINE:BLUE MARINE:GREEN Details Adjusts automatically to Manual. 2 Tap "MENU". 0 The top menu appears. 3 Tap "RECORD SETTING". 37 Set this when shooting the sea at shallow water area (water appears ...
...: 0 The setting will not change if "MWB" is being tapped too fast (less than 1 second). *The image is only an impression. 1 Select the Manual recording mode. 0 If the mode is a screen of the lens so that the white paper fills the screen. 2 Position the cursor to display the mode... switching screen. Setting AUTO MWB FINE CLOUD HALOGEN MARINE:BLUE MARINE:GREEN Details Adjusts automatically to Manual. 2 Tap "MENU". 0 The top menu appears. 3 Tap "RECORD SETTING". 37 Set this when shooting the sea at shallow water area (water appears ...
User Guide
Page 55
... are not available in time-lapse recording. 0 When recording is stopped with the currently selected video quality. "Tripod Mounting" (A p. 21) "Adjusting Focus Manually" (A p. 33) "Setting White Balance" (A p. 36) 55 Recorded videos will not be played back at 30 times speed. 2SEC INTERVAL Takes a ...A frame is taken at intervals of the selected period. 0 When the recording interval is also recommended to fix the focus and white balance manually. Recorded videos will be played back at 300 times speed. 20SEC INTERVAL Takes a frame at 1-second intervals. It is set . Recorded ...
... are not available in time-lapse recording. 0 When recording is stopped with the currently selected video quality. "Tripod Mounting" (A p. 21) "Adjusting Focus Manually" (A p. 33) "Setting White Balance" (A p. 36) 55 Recorded videos will not be played back at 30 times speed. 2SEC INTERVAL Takes a ...A frame is taken at intervals of the selected period. 0 When the recording interval is also recommended to fix the focus and white balance manually. Recorded videos will be played back at 300 times speed. 20SEC INTERVAL Takes a frame at 1-second intervals. It is set . Recorded ...
User Guide
Page 57
... unit to "OFF". Memo : 0 Recording stops when there are no changes for both are no movement within the red frame, recording will stop video recording manually, press the START/STOP button. When there are set for 5 seconds during video recording. 0 Settings of "AUTO REC" are not saved when the power is...
... unit to "OFF". Memo : 0 Recording stops when there are no changes for both are no movement within the red frame, recording will stop video recording manually, press the START/STOP button. When there are set for 5 seconds during video recording. 0 Settings of "AUTO REC" are not saved when the power is...

User Guide
Page 64
...the playback screen. For the game recording mode, refer to display the mode switching screen. PLAYBACK PLAYLIST Plays back the playlists that are marked manually are the types of time. When "AUTO" is selected, recorded video is registered, and scenes that you have created. o Switching to ...monitor. 0 Check if the recording mode is A. 0 If the mode is B still image, tap B on the recording screen to the game score settings. (GZ-EX355/EX310) "Game Score Settings" (A p. 186) DIGEST PLAYBACK From the recorded video, scenes with a smile detected, scenes with a person whose face is ...
...the playback screen. For the game recording mode, refer to display the mode switching screen. PLAYBACK PLAYLIST Plays back the playlists that are marked manually are the types of time. When "AUTO" is selected, recorded video is registered, and scenes that you have created. o Switching to ...monitor. 0 Check if the recording mode is A. 0 If the mode is B still image, tap B on the recording screen to the game score settings. (GZ-EX355/EX310) "Game Score Settings" (A p. 186) DIGEST PLAYBACK From the recorded video, scenes with a smile detected, scenes with a person whose face is ...
User Guide
Page 77
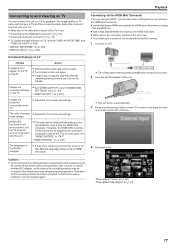
...are using an HDTV, you can connect this unit via the HDMI Mini Connector If you connect this unit cannot be guaranteed to the instruction manual of the TV in use the provided AC adapter, as turning off the camcorder by connecting to the HDMI mini connector. 0 Use a... operate in combination with the built-in conjunction with this unit again. 0 Images may operate differently depending on TV, set "HDMI CONTROL" to the instruction manual of TV and the connecting cable. " DISPLAY DATE/TIME " (A p. 234) " DISPLAY ON TV " (A p. 241) Unnatural Displays on TV Trouble Images do not...
...are using an HDTV, you can connect this unit via the HDMI Mini Connector If you connect this unit cannot be guaranteed to the instruction manual of the TV in use the provided AC adapter, as turning off the camcorder by connecting to the HDMI mini connector. 0 Use a... operate in combination with the built-in conjunction with this unit again. 0 Images may operate differently depending on TV, set "HDMI CONTROL" to the instruction manual of TV and the connecting cable. " DISPLAY DATE/TIME " (A p. 234) " DISPLAY ON TV " (A p. 241) Unnatural Displays on TV Trouble Images do not...
User Guide
Page 78
... this unit is changed. 0 These functions may not work with this unit. (For details, refer to the instruction manual of the TV.) 0 Set "HDMI CONTROL" in the CONNECTION SETTINGS menu to the instruction manual of your TV's manufacturer. Operation Method 2 1 Turn off the TV. 0 This unit turns off and on the TV...
... this unit is changed. 0 These functions may not work with this unit. (For details, refer to the instruction manual of the TV.) 0 Set "HDMI CONTROL" in the CONNECTION SETTINGS menu to the instruction manual of your TV's manufacturer. Operation Method 2 1 Turn off the TV. 0 This unit turns off and on the TV...


