
User Manual
Page 1
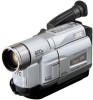
...(੬ pg. 3, 4) to go through the main Menu Screen). Serial No. If no operation is performed for purchasing the JVC Compact VHS camcorder. Retain this product. Before use of the camcorder. This takes you directly to the demo mode's Setting Menu (so you for more than 1 minute after that allows recording is... press it. Rotate the MENU Wheel 1 to "ON" (factory-preset). • Available when the Power Switch @ is in progress. INSTRUCTIONS ENGLISH COMPACT VHS CAMCORDER GR-SXM740 GR-SXM340 GR-SXM240 GR-AX970 LYT0880-001E For Customer Use: Enter below the Model No.
...(੬ pg. 3, 4) to go through the main Menu Screen). Serial No. If no operation is performed for purchasing the JVC Compact VHS camcorder. Retain this product. Before use of the camcorder. This takes you directly to the demo mode's Setting Menu (so you for more than 1 minute after that allows recording is... press it. Rotate the MENU Wheel 1 to "ON" (factory-preset). • Available when the Power Switch @ is in progress. INSTRUCTIONS ENGLISH COMPACT VHS CAMCORDER GR-SXM740 GR-SXM340 GR-SXM240 GR-AX970 LYT0880-001E For Customer Use: Enter below the Model No.
User Manual
Page 2
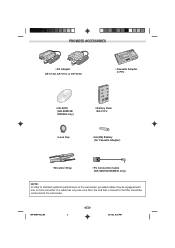
If a cable has only one or more core filter. GR-SXM740U_EN 2 2 02.4.22, 6:02 PM PROVIDED ACCESSORIES • AC Adapter AP-V12U, AP-V11U or AP-V10U • Cassette Adapter C-P7U • CD-ROM (GR-SXM740/ SXM340 only) • Battery Pack BN-V11U • Lens Cap • AA (R6...) Battery (for Cassette Adapter) • Shoulder Strap • PC Connection Cable (GR-SXM740/SXM340 only) NOTE: In order to maintain optimum performance of the camcorder, provided cables may be connected to the filter should be equipped with one core filter, the end that is...
If a cable has only one or more core filter. GR-SXM740U_EN 2 2 02.4.22, 6:02 PM PROVIDED ACCESSORIES • AC Adapter AP-V12U, AP-V11U or AP-V10U • Cassette Adapter C-P7U • CD-ROM (GR-SXM740/ SXM340 only) • Battery Pack BN-V11U • Lens Cap • AA (R6...) Battery (for Cassette Adapter) • Shoulder Strap • PC Connection Cable (GR-SXM740/SXM340 only) NOTE: In order to maintain optimum performance of the camcorder, provided cables may be connected to the filter should be equipped with one core filter, the end that is...
User Manual
Page 3
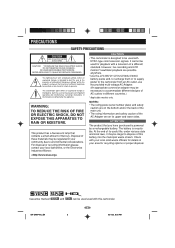
... For disposal or recycling information please contact your local authorities, or the Electronics Industries Alliance: CAUTIONS • This camcorder is powered by a rechargeable battery. Cassettes marked GR-SXM740U_EN and can be used with a television of electric shock to be used used for recycling options or proper ... a small amount of the AC Adapter are possible anywhere. • Use the JVC BN-V11U/V12U/V20U/V400U battery packs and, to recharge them or to supply power to the camcorder from an AC outlet, use the provided multi-voltage AC Adapter. (An appropriate conversion...
... For disposal or recycling information please contact your local authorities, or the Electronics Industries Alliance: CAUTIONS • This camcorder is powered by a rechargeable battery. Cassettes marked GR-SXM740U_EN and can be used with a television of electric shock to be used used for recycling options or proper ... a small amount of the AC Adapter are possible anywhere. • Use the JVC BN-V11U/V12U/V20U/V400U battery packs and, to recharge them or to supply power to the camcorder from an AC outlet, use the provided multi-voltage AC Adapter. (An appropriate conversion...
User Manual
Page 4
JVC's involvement in your area. When the equipment is installed in a cabinet or on a shelf, make sure that ... has been spilled or objects have fallen into the trash or the municipal waste stream, which may be placed on the apparatus. GR-SXM740U_EN 4 4 02.4.22, 6:02 PM The apparatus shall not be followed strictly. Install in accordance with the apparatus. Do not.... The EPA certified RBRC® Battery Recycling Seal on the nickel-cadmium (Ni-Cd) battery indicates JVC is voluntarily participating in an industry program to collect and recycle these batteries at the rear).
JVC's involvement in your area. When the equipment is installed in a cabinet or on a shelf, make sure that ... has been spilled or objects have fallen into the trash or the municipal waste stream, which may be placed on the apparatus. GR-SXM740U_EN 4 4 02.4.22, 6:02 PM The apparatus shall not be followed strictly. Install in accordance with the apparatus. Do not.... The EPA certified RBRC® Battery Recycling Seal on the nickel-cadmium (Ni-Cd) battery indicates JVC is voluntarily participating in an industry program to collect and recycle these batteries at the rear).
User Manual
Page 5
...11 C Cassette Adapter pg. 16 Charge Marker pg. 6 Charging The Battery Pack pg. 6 Classic Film Effect pg. 23 Clean The Camcorder pg. 27 Connection To a VCR/TV pg. 15 Connection To A PC pg. 16 Counter Memory pg. 14 D Darken The ...pg. 28 Sports Mode pg. 23 Still Playback pg. 11 Stretch Effect pg. 23 Strobe Effect pg. 23 Super LoLux (S.LX pg. 19 Super VHS Expansion Technology pg. 20 T Tape Counter pg. 14 Tape Dubbing pg. 15 Tape Length Setting pg. 21 Tele...White Balance Adjustment pg. 19 Wide Mode pg. 20 Wipe-In/Out pg. 22 Z Zooming pg. 13 GR-SXM740U_EN 5 5 02.4.22, 6:02 PM
...11 C Cassette Adapter pg. 16 Charge Marker pg. 6 Charging The Battery Pack pg. 6 Classic Film Effect pg. 23 Clean The Camcorder pg. 27 Connection To a VCR/TV pg. 15 Connection To A PC pg. 16 Counter Memory pg. 14 D Darken The ...pg. 28 Sports Mode pg. 23 Still Playback pg. 11 Stretch Effect pg. 23 Strobe Effect pg. 23 Super LoLux (S.LX pg. 19 Super VHS Expansion Technology pg. 20 T Tape Counter pg. 14 Tape Dubbing pg. 15 Tape Length Setting pg. 21 Tele...White Balance Adjustment pg. 19 Wide Mode pg. 20 Wipe-In/Out pg. 22 Z Zooming pg. 13 GR-SXM740U_EN 5 5 02.4.22, 6:02 PM
User Manual
Page 6
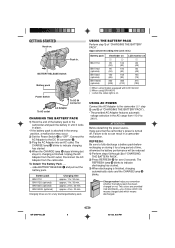
.... 1 hr. 30 min. USING THE BATTERY PACK Perform step 1) of "CHARGING THE BATTERY PACK". Connect the AC Adapter to do so can result in a camcorder malfunction. To Detach The Battery Pack . . . ... Approximate recording time (unit: min.) Battery pack BN-V11U BN-V12U (optional) BN-V20U (optional) BN...started . 4) When the CHARGE lamp * stops blinking but stays lit, charging is turned off. GR-SXM740U_EN 6 6 02.4.22, 6:02 PM GETTING STARTED Hook on USING AC POWER Connect the AC Adapter to the camcorder (੬ step 2) and 3) of "CHARGING THE BATTERY PACK"). • The provided AC ...
.... 1 hr. 30 min. USING THE BATTERY PACK Perform step 1) of "CHARGING THE BATTERY PACK". Connect the AC Adapter to do so can result in a camcorder malfunction. To Detach The Battery Pack . . . ... Approximate recording time (unit: min.) Battery pack BN-V11U BN-V12U (optional) BN-V20U (optional) BN...started . 4) When the CHARGE lamp * stops blinking but stays lit, charging is turned off. GR-SXM740U_EN 6 6 02.4.22, 6:02 PM GETTING STARTED Hook on USING AC POWER Connect the AC Adapter to the camcorder (੬ step 2) and 3) of "CHARGING THE BATTERY PACK"). • The provided AC ...

User Manual
Page 7
...DATE / T I ME YEAR MONTH DAY T I T GR-SXM740U_EN 7 7 02.4.22, 6:02 PM The DATE/TIME Menu appears. 5) To set the date/time as an AC adapter. • To avoid interference with reception, do not use . • During charging or discharging, the camcorder cannot be operated. • Charging and discharging is...25°C (68°F to cover 3 times the planned shooting time. * Applicable models only. Be sure to display SYSTEM MENU. Consult an authorized JVC dealer for replacement, or set "YEAR", "MONTH", "DAY" or "TIME" (hour/minute), rotate the MENU Wheel 1 to select the desired item, ...
...DATE / T I ME YEAR MONTH DAY T I T GR-SXM740U_EN 7 7 02.4.22, 6:02 PM The DATE/TIME Menu appears. 5) To set the date/time as an AC adapter. • To avoid interference with reception, do not use . • During charging or discharging, the camcorder cannot be operated. • Charging and discharging is...25°C (68°F to cover 3 times the planned shooting time. * Applicable models only. Be sure to display SYSTEM MENU. Consult an authorized JVC dealer for replacement, or set "YEAR", "MONTH", "DAY" or "TIME" (hour/minute), rotate the MENU Wheel 1 to select the desired item, ...
User Manual
Page 8
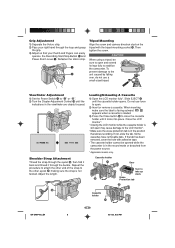
... 3. Then tighten the screw. Do not use a small-sized tripod. Cassette holder t Gear Turn to stabilize the camcorder. Slide EJECT t until it through the loop and grasp the grip. 3) Adjust so that allows recording. When inserting... to close the cassette holder until the cassette holder opens. CAUTION When using a tripod, be opened while the camcorder is not twisted. Adjust the length. y Loading/Unloading A Cassette 1) Open the LCD monitor fully*. Close the... If not, slide the tab. i Erase Protection tab t Cassette holder i GR-SXM740U_EN 8 8 02.4.22, 6:02 PM
... 3. Then tighten the screw. Do not use a small-sized tripod. Cassette holder t Gear Turn to stabilize the camcorder. Slide EJECT t until it through the loop and grasp the grip. 3) Adjust so that allows recording. When inserting... to close the cassette holder until the cassette holder opens. CAUTION When using a tripod, be opened while the camcorder is not twisted. Adjust the length. y Loading/Unloading A Cassette 1) Open the LCD monitor fully*. Close the... If not, slide the tab. i Erase Protection tab t Cassette holder i GR-SXM740U_EN 8 8 02.4.22, 6:02 PM
User Manual
Page 9
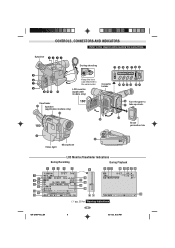
...holder Viewfinder o Speaker (applicable models only) p 180° 90° i 180° ) q w e rt y Turn the gear to the camcorder. y Erase protection tab Q W Video light Microphone LCD Monitor/Viewfinder Indications During Recording During Playback 7 9 ! 8 0 @ #$ % 1 23 4...ET SP 4 TBC -1 : 23 : 45 MONOTONE AT VOLUME - - - - - -6- - - - - + o ੬ pg. 25 for Warning Indications . 9 GR-SXM740U_EN 9 02.4.22, 6:02 PM VHS REC MWB PAUSE 5M I N 1 / 2S BR I GHT 6- - - + CONGRATULAT I GHT 1 0 x +02 S - CONTROLS, CONNECTORS AND INDICATORS Refer to this ...
...holder Viewfinder o Speaker (applicable models only) p 180° 90° i 180° ) q w e rt y Turn the gear to the camcorder. y Erase protection tab Q W Video light Microphone LCD Monitor/Viewfinder Indications During Recording During Playback 7 9 ! 8 0 @ #$ % 1 23 4...ET SP 4 TBC -1 : 23 : 45 MONOTONE AT VOLUME - - - - - -6- - - - - + o ੬ pg. 25 for Warning Indications . 9 GR-SXM740U_EN 9 02.4.22, 6:02 PM VHS REC MWB PAUSE 5M I N 1 / 2S BR I GHT 6- - - + CONGRATULAT I GHT 1 0 x +02 S - CONTROLS, CONNECTORS AND INDICATORS Refer to this ...

User Manual
Page 10
... Date/Time Display pg. 19 ^ Focus Indicator pg. 18 & Exposure Control Level Counter pg. 18 * White Balance Mode Indicator pg. 19 ( S-VHS/S-VHS ET Recording Indicator*4 pg. 20 ) Record-Standby Mode Indicator pg. 11 q : Cassette Indicator pg. 8 w TBC Indicator pg. 14 e Playback ... Level Indicator*1 pg. 11 • VOLUME: Speaker Volume Indicator*1 pg. 11 *1 Applicable models only. *2 GR-SXM740/SXM340 only. *3 GR-SXM240/AX970 only. *4 GR-SXM740/SXM340/SXM240 only. *5 GR-SXM740/SXM340 only. GR-SXM740U_EN 10 10 02.4.22, 6:02 PM Q Grip Strap pg. 8 W Tripod Mounting Socket pg. 8 ...
... Date/Time Display pg. 19 ^ Focus Indicator pg. 18 & Exposure Control Level Counter pg. 18 * White Balance Mode Indicator pg. 19 ( S-VHS/S-VHS ET Recording Indicator*4 pg. 20 ) Record-Standby Mode Indicator pg. 11 q : Cassette Indicator pg. 8 w TBC Indicator pg. 14 e Playback ... Level Indicator*1 pg. 11 • VOLUME: Speaker Volume Indicator*1 pg. 11 *1 Applicable models only. *2 GR-SXM740/SXM340 only. *3 GR-SXM240/AX970 only. *4 GR-SXM740/SXM340/SXM240 only. *5 GR-SXM740/SXM340 only. GR-SXM740U_EN 10 10 02.4.22, 6:02 PM Q Grip Strap pg. 8 W Tripod Mounting Socket pg. 8 ...
User Manual
Page 11
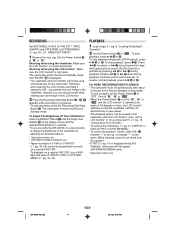
... up, or towards "-" to turn on again, set to adjust the brightness of 60 degrees or more, the LCD monitor* switches on this camcorder. Shooting while using the GR-AX970, it upward to fast-forward the tape. To stop playback, press 5 $. PLAYBACK 1 Load a tape (੬ pg. 8, "Loading/..." ", " " or " " and the LCD monitor* is possible by adjusting as described above. * Applicable models only. ** GR-SXM740/SXM340/SXM240 only. • Tapes recorded on S-VHS or S-VHS ET (੬ pg. 18, 20) cannot be viewed in the viewfinder (with the LCD monitor* shut), on the LCD monitor...
... up, or towards "-" to turn on again, set to adjust the brightness of 60 degrees or more, the LCD monitor* switches on this camcorder. Shooting while using the GR-AX970, it upward to fast-forward the tape. To stop playback, press 5 $. PLAYBACK 1 Load a tape (੬ pg. 8, "Loading/..." ", " " or " " and the LCD monitor* is possible by adjusting as described above. * Applicable models only. ** GR-SXM740/SXM340/SXM240 only. • Tapes recorded on S-VHS or S-VHS ET (੬ pg. 18, 20) cannot be viewed in the viewfinder (with the LCD monitor* shut), on the LCD monitor...
User Manual
Page 12
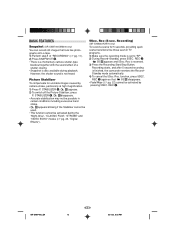
... blackout together with the sound effect of a shutter closing. • Snapshot is reserved. 3) Press the Recording Start/Stop Button. STABILIZER 4. ! Recording) (GR-SXM240/AX970 only) To record a scene for unstable images caused by pressing 5SEC. REC 2. REC 2 again so that look like those seen in certain conditions... excessive hand shake. • ! Recording starts, and after 5-second recording is not heard. However, the shutter sound is finished, the camcorder reenters the Record- STABILIZER 4. ! REC 2. 5S @ appears and 5Sec. GR-SXM740U_EN 12 12 02.4.22, 6:02 PM
... blackout together with the sound effect of a shutter closing. • Snapshot is reserved. 3) Press the Recording Start/Stop Button. STABILIZER 4. ! Recording) (GR-SXM240/AX970 only) To record a scene for unstable images caused by pressing 5SEC. REC 2. REC 2 again so that look like those seen in certain conditions... excessive hand shake. • ! Recording starts, and after 5-second recording is not heard. However, the shutter sound is finished, the camcorder reenters the Record- STABILIZER 4. ! REC 2. 5S @ appears and 5Sec. GR-SXM740U_EN 12 12 02.4.22, 6:02 PM
User Manual
Page 13
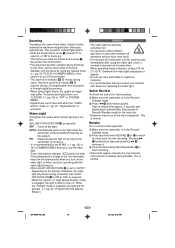
.... 23, "Digital Effects") is rewound for approx. 2 seconds and played back automatically, then pauses in Record mode. • The zoom level indicator 6- GR-SXM740U_EN 13 13 02.4.22, 6:02 PM ON : Always keeps the light on as long as required: OFF : Turns off automatically when you turn on...become extremely hot. This system is recommended to set to zoom out. • The further you consult your nearest JVC dealer for new recording. Set LIGHT OFF/AUTO/ON # as the camcorder is turned on. • It is called Digital Zoom. • Slide the Power Zoom Lever 3 towards "T"...
.... 23, "Digital Effects") is rewound for approx. 2 seconds and played back automatically, then pauses in Record mode. • The zoom level indicator 6- GR-SXM740U_EN 13 13 02.4.22, 6:02 PM ON : Always keeps the light on as long as required: OFF : Turns off automatically when you turn on...become extremely hot. This system is recommended to set to zoom out. • The further you consult your nearest JVC dealer for new recording. Set LIGHT OFF/AUTO/ON # as the camcorder is turned on. • It is called Digital Zoom. • Slide the Power Zoom Lever 3 towards "T"...
User Manual
Page 14
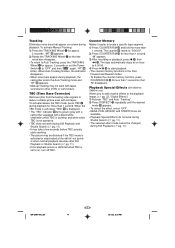
... 1) Press COUNTER R/M ) and hold for approx. 2 seconds or set to deliver a stable picture even with tapes recorded on other VCRs or camcorders. GR-SXM740U_EN 14 14 02.4.22, 6:02 PM "MT" i appears. 2) Rotate the TRACKING Wheel 1 so that the noise bars disappear. •.... Tracking Eliminates noise bars that "M" disappears. When Auto Tracking finishes, the indication disappears. • When noise bars appear during playback, the camcorder enters the Auto Tracking mode and "AT" i appears. • Manual Tracking may be changed during playback. TBC (Time Base Corrector) Removes...
... 1) Press COUNTER R/M ) and hold for approx. 2 seconds or set to deliver a stable picture even with tapes recorded on other VCRs or camcorders. GR-SXM740U_EN 14 14 02.4.22, 6:02 PM "MT" i appears. 2) Rotate the TRACKING Wheel 1 so that the noise bars disappear. •.... Tracking Eliminates noise bars that "M" disappears. When Auto Tracking finishes, the indication disappears. • When noise bars appear during playback, the camcorder enters the Auto Tracking mode and "AT" i appears. • Manual Tracking may be changed during playback. TBC (Time Base Corrector) Removes...
User Manual
Page 15
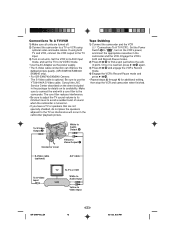
If using optional video and audio cables. Consult the JVC Service Center described on the VCR's power, and insert the appropriate cassettes in the package for additional editing, then stop the VCR and camcorder when finished. Tape Dubbing 1) Connect the camcorder and the VCR (੬ "Connections To A TV/VCR"). Set the Power...the VCR output to the TV input. 3) Turn on its AUX input mode, and set the TV to Video Input GR-SXM740U_EN 15 15 02.4.22, 6:02 PM in the camcorder playback picture. Make sure to connect the end with a core filter to use the YTU94146A S-Video cable. Set the...
If using optional video and audio cables. Consult the JVC Service Center described on the VCR's power, and insert the appropriate cassettes in the package for additional editing, then stop the VCR and camcorder when finished. Tape Dubbing 1) Connect the camcorder and the VCR (੬ "Connections To A TV/VCR"). Set the Power...the VCR output to the TV input. 3) Turn on its AUX input mode, and set the TV to Video Input GR-SXM740U_EN 15 15 02.4.22, 6:02 PM in the camcorder playback picture. Make sure to connect the end with a core filter to use the YTU94146A S-Video cable. Set the...
User Manual
Page 16
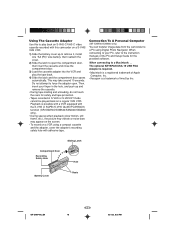
... Using The Cassette Adapter Use this camcorder on a S-VHS/ VHS VCR. 1) Slide the battery cover up and remove the cassette. • During tape loading and unloading, do not touch the reels for the provided software. Connection To A Personal Computer (GR-SXM740/SXM340 only) You can transfer... image data from the camcorder to a Macintosh . . . Playback is a trademark of the PC and Setup Guide for safety and tape protection. • Tapes recorded in S-VHS or S-VHS ET mode cannot be played back on...
... Using The Cassette Adapter Use this camcorder on a S-VHS/ VHS VCR. 1) Slide the battery cover up and remove the cassette. • During tape loading and unloading, do not touch the reels for the provided software. Connection To A Personal Computer (GR-SXM740/SXM340 only) You can transfer... image data from the camcorder to a Macintosh . . . Playback is a trademark of the PC and Setup Guide for safety and tape protection. • Tapes recorded in S-VHS or S-VHS ET mode cannot be played back on...

User Manual
Page 17
...- - - -6- - - - - + o ੬ pg. 25 for Warning Indications . 17 GR-SXM740U_EN 17 02.4.22, 6:02 PM VHS REC MWB PAUSE 5M I N 1 / 2S BR I GHT 6- - - + CONGRATULAT I GHT... 1 0 x +02 S - LCD monitor (applicable models only) Cassette holder Viewfinder o Speaker (applicable models only) p 180° 90° i 180° ) q w e rt y Turn the gear to this diagram while reading the instructions. Eyepiece 1 2 3 4 During shooting # $ % ^ &*( 5 6 7 8 9 0! @ Keep the lens cap attached to the camcorder...
...- - - -6- - - - - + o ੬ pg. 25 for Warning Indications . 17 GR-SXM740U_EN 17 02.4.22, 6:02 PM VHS REC MWB PAUSE 5M I N 1 / 2S BR I GHT 6- - - + CONGRATULAT I GHT... 1 0 x +02 S - LCD monitor (applicable models only) Cassette holder Viewfinder o Speaker (applicable models only) p 180° 90° i 180° ) q w e rt y Turn the gear to this diagram while reading the instructions. Eyepiece 1 2 3 4 During shooting # $ % ^ &*( 5 6 7 8 9 0! @ Keep the lens cap attached to the camcorder...
User Manual
Page 18
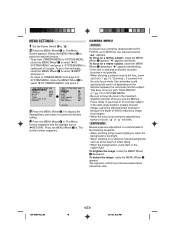
... MENU Wheel 1 to " ". 2 Press the MENU Wheel 1 in . To darken the image, rotate the MENU Wheel 1 upward. ZOOM 50x WI DE OF F S - VHS ON TAPE LENGTH T30 D I SP . ᮣ RE T URN SYSTEM MENU ᮣNEXT REC MODE SP D. "4" appears and blinking. • If the lens is smeared or... ON ᮣ RE T URN 3 Press the MENU Wheel 1 in . Press the MENU Wheel 1 in . To focus on the distance between the camcorder and the subject. GR-SXM740U_EN 18 18 02.4.22, 6:02 PM SYSTEM MENU is not possible. • When shooting a subject close to select the desired setting. 4 Press...
... MENU Wheel 1 to " ". 2 Press the MENU Wheel 1 in . To darken the image, rotate the MENU Wheel 1 upward. ZOOM 50x WI DE OF F S - VHS ON TAPE LENGTH T30 D I SP . ᮣ RE T URN SYSTEM MENU ᮣNEXT REC MODE SP D. "4" appears and blinking. • If the lens is smeared or... ON ᮣ RE T URN 3 Press the MENU Wheel 1 in . Press the MENU Wheel 1 in . To focus on the distance between the camcorder and the subject. GR-SXM740U_EN 18 18 02.4.22, 6:02 PM SYSTEM MENU is not possible. • When shooting a subject close to select the desired setting. 4 Press...
User Manual
Page 19
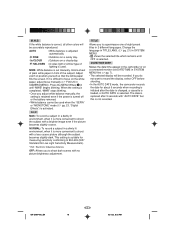
... white paper, adjust focus manually (੬ FOCUS in CAMERA MENU). Adjust zoom or position yourself so that the white paper fills the screen. GR-SXM740U_EN 19 19 02.4.22, 6:02 PM When the setting is completed, "MWB" stops blinking. • Once you to EIA-639 (..." begins blinking. This setting is more convenient to record the display, select OFF before shooting. • In the AUTO DATE mode, the camcorder records the date for Low Light Sensitivity Measurement). * EIA : Electronic Industries Alliance OFF: Allows you adjust white balance manually, the setting is ...
... white paper, adjust focus manually (੬ FOCUS in CAMERA MENU). Adjust zoom or position yourself so that the white paper fills the screen. GR-SXM740U_EN 19 19 02.4.22, 6:02 PM When the setting is completed, "MWB" stops blinking. • Once you to EIA-639 (..." begins blinking. This setting is more convenient to record the display, select OFF before shooting. • In the AUTO DATE mode, the camcorder records the date for Low Light Sensitivity Measurement). * EIA : Electronic Industries Alliance OFF: Allows you adjust white balance manually, the setting is ...
User Manual
Page 20
...VHS VCR. • S-VHS ET does not work with the SQPB (S-VHS QUASI PLAYBACK) function. - Not effective with S-VHS picture quality, which is not available. - GR-SXM740U_EN 20 20 02.4.22, 6:02 PM S-VHS (S-VHS ET) (GR-SXM740/SXM540/SXM340/ SXM240 only) ON: With an S-VHS cassette, "S" appears and the camcorder records in VHS...be played back not only on this camcorder. • Tapes recorded in S-VHS or S-VHS ET mode are played back on a Super VHS VCR or a VCR equipped with S-VHS tapes. • To avoid on a VHS or S-VHS cassette. • JVC EHG (Extra High Grade) tapes ...
...VHS VCR. • S-VHS ET does not work with the SQPB (S-VHS QUASI PLAYBACK) function. - Not effective with S-VHS picture quality, which is not available. - GR-SXM740U_EN 20 20 02.4.22, 6:02 PM S-VHS (S-VHS ET) (GR-SXM740/SXM540/SXM340/ SXM240 only) ON: With an S-VHS cassette, "S" appears and the camcorder records in VHS...be played back not only on this camcorder. • Tapes recorded in S-VHS or S-VHS ET mode are played back on a Super VHS VCR or a VCR equipped with S-VHS tapes. • To avoid on a VHS or S-VHS cassette. • JVC EHG (Extra High Grade) tapes ...