
Instructions
Page 1
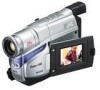
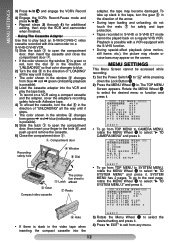
...set to "ON" (factory-preset). • Available when the Power Switch is located on the bottom of this information for purchasing the JVC Compact VHS camcorder. Dear Customer, Thank you for future reference. Model No. CONTENTS GETTING STARTED 5 ~ 9 RECORDING/PLAYBACK 9 ~ 10 BASIC FEATURES 10...AUTOMATIC DEMONSTRATION Automatic Demonstration takes place when "DEMO MODE" is set "DEMO MODE" to ensure safe use of the camcorder. INSTRUCTIONS COMPACT VHS CAMCORDER GR-SXM38U ENGLISH For Customer Use: Enter below the Model No. and Serial No. Retain this product. Serial No. ...
...set to "ON" (factory-preset). • Available when the Power Switch is located on the bottom of this information for purchasing the JVC Compact VHS camcorder. Dear Customer, Thank you for future reference. Model No. CONTENTS GETTING STARTED 5 ~ 9 RECORDING/PLAYBACK 9 ~ 10 BASIC FEATURES 10...AUTOMATIC DEMONSTRATION Automatic Demonstration takes place when "DEMO MODE" is set "DEMO MODE" to ensure safe use of the camcorder. INSTRUCTIONS COMPACT VHS CAMCORDER GR-SXM38U ENGLISH For Customer Use: Enter below the Model No. and Serial No. Retain this product. Serial No. ...

Instructions
Page 2
... Bag CB-V75 • A/V (Audio/Video) Cable • S-Video Cable Some accessories are not available in the illustration. Please consult your nearest JVC dealer for SVideo cable) QQR0491-002 or QQR1417-002 NOTE: In order to the cables. OPTIONAL ACCESSORIES • Battery Packs BN-V12U, BN-V20U,...one core filter, the end that is closest to the filter should be equipped with the core filter to the camcorder. PROVIDED ACCESSORIES PROVIDED ACCESSORIES How To Attach The Core filter Attach the core filters to maintain optimum performance of the core ...
... Bag CB-V75 • A/V (Audio/Video) Cable • S-Video Cable Some accessories are not available in the illustration. Please consult your nearest JVC dealer for SVideo cable) QQR0491-002 or QQR1417-002 NOTE: In order to the cables. OPTIONAL ACCESSORIES • Battery Packs BN-V12U, BN-V20U,...one core filter, the end that is closest to the filter should be equipped with the core filter to the camcorder. PROVIDED ACCESSORIES PROVIDED ACCESSORIES How To Attach The Core filter Attach the core filters to maintain optimum performance of the core ...

Instructions
Page 3
... and safety caution of the AC Adapter are possible anywhere. • Use the JVC BN-V10U/V12U/V20U/V400U battery packs and, to recharge them or to supply power to the camcorder from an AC outlet, use the provided multi-voltage AC Adapter. (An appropriate conversion... color television signals. For disposal or recycling information please contact your local authorities, or the Electronics Industries Alliance: CAUTIONS • This camcorder is intended to alert the user to environmental considerations. The battery is powered by a rechargeable battery. Check with your local solid waste...
... and safety caution of the AC Adapter are possible anywhere. • Use the JVC BN-V10U/V12U/V20U/V400U battery packs and, to recharge them or to supply power to the camcorder from an AC outlet, use the provided multi-voltage AC Adapter. (An appropriate conversion... color television signals. For disposal or recycling information please contact your local authorities, or the Electronics Industries Alliance: CAUTIONS • This camcorder is intended to alert the user to environmental considerations. The battery is powered by a rechargeable battery. Check with your local solid waste...

Instructions
Page 5
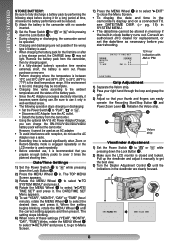
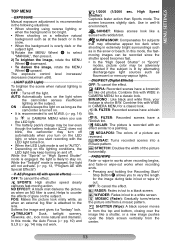
... 1 1 : 4 5 : 1 8 ? ET T30 REC SP +02 S - V 0 1 2 1X 3 ba 45 TBC 6 789! "# $ Connector Cover Viewfinder Speaker - During shooting %& () Keep the lens cap attached to the camcorder Cassette holder ~ 180° 90° + LCD monitor , Turn the gear to this diagram while reading the instructions. S-ET SP -1 : 23 : 45 AT VOLUME ੬...
... 1 1 : 4 5 : 1 8 ? ET T30 REC SP +02 S - V 0 1 2 1X 3 ba 45 TBC 6 789! "# $ Connector Cover Viewfinder Speaker - During shooting %& () Keep the lens cap attached to the camcorder Cassette holder ~ 180° 90° + LCD monitor , Turn the gear to this diagram while reading the instructions. S-ET SP -1 : 23 : 45 AT VOLUME ੬...

Instructions
Page 7
... steps 1) through 3) of "Charging the Battery Pack". 2) Press REFRESH " for a fully discharged battery pack. Unplug the AC Adapter from the camcorder. Disconnect the AC Adapter from the AC outlet. Battery Pack BN-V10U BN-V12U (optional) BN-V20U (optional) BN-V400U (optional) Charging time...3) The CHARGE lamp % blinks to "OFF" while pressing down the Lock Button #. ATTENTION: Before detaching the power source, make sure that the camcorder's power is attached wrongly, a malfunction may occur. 2) Set the Power Switch $ to indicate charging. 4) When the CHARGE lamp % stops blinking...
... steps 1) through 3) of "Charging the Battery Pack". 2) Press REFRESH " for a fully discharged battery pack. Unplug the AC Adapter from the camcorder. Disconnect the AC Adapter from the AC outlet. Battery Pack BN-V10U BN-V12U (optional) BN-V20U (optional) BN-V400U (optional) Charging time...3) The CHARGE lamp % blinks to "OFF" while pressing down the Lock Button #. ATTENTION: Before detaching the power source, make sure that the camcorder's power is attached wrongly, a malfunction may occur. 2) Set the Power Switch $ to indicate charging. 4) When the CHARGE lamp % stops blinking...
Instructions
Page 8
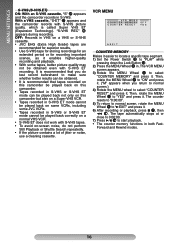
... "3TO SYSTEM MENU" and press it. 4) Rotate the MENU Wheel 1 to select "3DATE/ TIME SET" and press it . Consult an authorised JVC dealer for the first time or after a long storage period, the CHARGE lamp % may be stored in memory if the built-in SYSTEM ... is the ideal temperature range. Date/Time Settings 1) Set the Power Switch $ to " " while pressing down the Lock Button #. • During charging or discharging, the camcorder cannot be operated. • Charging and discharging are clearly focused. 45° , PAU SE 8 DA T E T I ME SET YEAR MON T H DAY T I ME 2006 6 28 ...
... "3TO SYSTEM MENU" and press it. 4) Rotate the MENU Wheel 1 to select "3DATE/ TIME SET" and press it . Consult an authorised JVC dealer for the first time or after a long storage period, the CHARGE lamp % may be stored in memory if the built-in SYSTEM ... is the ideal temperature range. Date/Time Settings 1) Set the Power Switch $ to " " while pressing down the Lock Button #. • During charging or discharging, the camcorder cannot be operated. • Charging and discharging are clearly focused. 45° , PAU SE 8 DA T E T I ME SET YEAR MON T H DAY T I ME 2006 6 28 ...

Instructions
Page 9
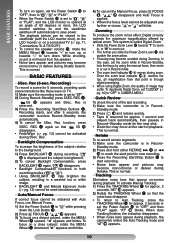
...cover the hole with the camera (do not use a small tripod. When the Power Switch $ is fully open may cause damage to stabilize the camcorder. Cassette holder ) 180° 90° 5 Tripod Mounting Align the screw and camera direction stud on the LCD monitor. 2) Press the Recording...it through the buckle. Set the Power Switch $ to " ", adjust "LCD BRIGHT" in the Record-Standby or Stop mode. 9 The camcorder is not twisted. The camcorder reenters Record-Standby mode. To Adjust The Brightness Of The LCD Monitor: When the Power Switch $ is set to the other eyelet 5, ...
...cover the hole with the camera (do not use a small tripod. When the Power Switch $ is fully open may cause damage to stabilize the camcorder. Cassette holder ) 180° 90° 5 Tripod Mounting Align the screw and camera direction stud on the LCD monitor. 2) Press the Recording...it through the buckle. Set the Power Switch $ to " ", adjust "LCD BRIGHT" in the Record-Standby or Stop mode. 9 The camcorder is not twisted. The camcorder reenters Record-Standby mode. To Adjust The Brightness Of The LCD Monitor: When the Power Switch $ is set to the other eyelet 5, ...
Instructions
Page 10
... Rec. To focus on a distant subject, rotate the MENU Wheel 1 upward. appears. 10 Retake To re-record certain segments. 1) Make sure the camcorder is not heard from that 5S _ disappears. • Fade/Wipe (੬ pg. 13) cannot be adjusted any farther or closer, " " or... " " will blink. Recording starts, and after 5 seconds, the camcorder re-enters Record-Standby mode automatically. 4) To cancel the 5Sec. Rec (5-sec. Recording) To record a scene for approx. 2 seconds. Backlight Compensation To ...
... Rec. To focus on a distant subject, rotate the MENU Wheel 1 upward. appears. 10 Retake To re-record certain segments. 1) Make sure the camcorder is not heard from that 5S _ disappears. • Fade/Wipe (੬ pg. 13) cannot be adjusted any farther or closer, " " or... " " will blink. Recording starts, and after 5 seconds, the camcorder re-enters Record-Standby mode automatically. 4) To cancel the 5Sec. Rec (5-sec. Recording) To record a scene for approx. 2 seconds. Backlight Compensation To ...
Instructions
Page 11
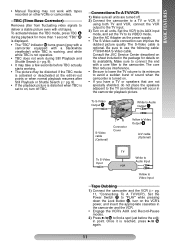
... 3/8 ( to Video Input Tape Dubbing 1) Connect the camcorder and the VCR (੬ pg. 11, "Connections To A TV/VCR"). Consult the JVC Service Center described on all units are not specially shielded, do not place the speakers adjacent to the camcorder. Connections To A TV/VCR 1) Make sure all units... not work with old tapes. Set the Power Switch $ to "PLAY" while pressing down the Lock Button #, turn off . 2) Connect the camcorder to use the following cable: YTU94146A S-Video cable. TBC (Time Base Corrector) Removes jitter from fluctuating video signals to its AUX input mode...
... 3/8 ( to Video Input Tape Dubbing 1) Connect the camcorder and the VCR (੬ pg. 11, "Connections To A TV/VCR"). Consult the JVC Service Center described on all units are not specially shielded, do not place the speakers adjacent to the camcorder. Connections To A TV/VCR 1) Make sure all units... not work with old tapes. Set the Power Switch $ to "PLAY" while pressing down the Lock Button #, turn off . 2) Connect the camcorder to use the following cable: YTU94146A S-Video cable. TBC (Time Base Corrector) Removes jitter from fluctuating video signals to its AUX input mode...
Instructions
Page 12
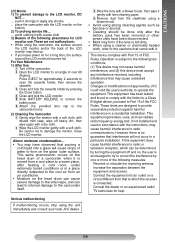
... 3 in the direction of the arrow. • During tape loading and unloading, do not touch the reels 7 for additional editing, then stop the VCR and camcorder when finished. TOP MENU E X POS URE AU TO L I DE OFF T E L E MACRO O F F 2M .W . Rotate the MENU Wheel 1 to select "3 TO ...is slack in the video tape when inserting the compact cassette into the VCR and play back an S-VHS-C/VHS-C video cassette recorded with this camcorder on a VCR using a compact cassette and the adapter, cover the adapter's recording safety hole with the S-VHS function. • During special...
... 3 in the direction of the arrow. • During tape loading and unloading, do not touch the reels 7 for additional editing, then stop the VCR and camcorder when finished. TOP MENU E X POS URE AU TO L I DE OFF T E L E MACRO O F F 2M .W . Rotate the MENU Wheel 1 to select "3 TO ...is slack in the video tape when inserting the compact cassette into the VCR and play back an S-VHS-C/VHS-C video cassette recorded with this camcorder on a VCR using a compact cassette and the adapter, cover the adapter's recording safety hole with the S-VHS function. • During special...
Instructions
Page 13
.... • In the "High Speed Shutter" or "Sports" modes, picture color may be low even though the battery indicator ( ) does not blink, the camcorder may keep turning on and off the light. SUNSET: Makes scenes look misty white, as when an ND filter is used. B. FILTER: Recorded scenes... LED light. • The battery pack's charge may be adversely affected if the subject is lit by alternating discharge-type light sources such as the camcorder is turned on. • It is recommended to set to "AUTO": • Depending on the lighting conditions, the LED light may turn off ...
.... • In the "High Speed Shutter" or "Sports" modes, picture color may be low even though the battery indicator ( ) does not blink, the camcorder may keep turning on and off the light. SUNSET: Makes scenes look misty white, as when an ND filter is used. B. FILTER: Recorded scenes... LED light. • The battery pack's charge may be adversely affected if the subject is lit by alternating discharge-type light sources such as the camcorder is turned on. • It is recommended to set to "AUTO": • Depending on the lighting conditions, the LED light may turn off ...

Instructions
Page 15
... released, the indicator soon disappears and adjustment is recommended that SCROLL in the SYSTEM MENU before shooting. • In the AUTO DATE mode, the camcorder records the date for a brief selected period of time (Animation). The date/time appears in /out cannot be performed. • This function is...the cassette is ejected. • To use this function, it is completed. OFF: On-screen indications are displayed. or wipe-in the camcorder or on the LCD monitor/viewfinder during playback or recording. TIME You can record subtle changes over an extended period of the ...
... released, the indicator soon disappears and adjustment is recommended that SCROLL in the SYSTEM MENU before shooting. • In the AUTO DATE mode, the camcorder records the date for a brief selected period of time (Animation). The date/time appears in /out cannot be performed. • This function is...the cassette is ejected. • To use this function, it is completed. OFF: On-screen indications are displayed. or wipe-in the camcorder or on the LCD monitor/viewfinder during playback or recording. TIME You can record subtle changes over an extended period of the ...
Instructions
Page 16
... (S-VHS ET) ON: With an S-VHS cassette, "S" = appears and the camcorder records in . With a VHS cassette, "S-ET" = appears and the camcorder records with S-VHS tapes. • To avoid on a VHS or S-VHS cassette. • JVC EHG (Extra High Grade) tapes are recommended for superior results. • Use ... close to 0:00:00. 7) Press 3/8 ( to select "COUNTER MEMORY" and press it enables higher-quality recording and playback. • With some JVC VCRs. • Tapes recorded in both FastForward and Rewind modes. 16 The VCR MENU screen appears. 3) Rotate the MENU Wheel 1 to start playback....
... (S-VHS ET) ON: With an S-VHS cassette, "S" = appears and the camcorder records in . With a VHS cassette, "S-ET" = appears and the camcorder records with S-VHS tapes. • To avoid on a VHS or S-VHS cassette. • JVC EHG (Extra High Grade) tapes are recommended for superior results. • Use ... close to 0:00:00. 7) Press 3/8 ( to select "COUNTER MEMORY" and press it enables higher-quality recording and playback. • With some JVC VCRs. • Tapes recorded in both FastForward and Rewind modes. 16 The VCR MENU screen appears. 3) Rotate the MENU Wheel 1 to start playback....

Instructions
Page 17
Colored bright spots appear all over 60 degrees, the EJECT button ) does not function. Consult your nearest JVC dealer. The camcorder is great. External noise and interference (from the beginning. In such cases, first disconnect its VIDEO mode or channel. &#... for head cleaning or replacement. If the indication remains, consult your nearest JVC dealer. 17 TROUBLESHOOTING TROUBLESHOOTING Before consulting your JVC dealer, please check the following to see if you can resume using the camcorder. Bright, crystal-shaped spots appear in the viewfinder. These spots...
Colored bright spots appear all over 60 degrees, the EJECT button ) does not function. Consult your nearest JVC dealer. The camcorder is great. External noise and interference (from the beginning. In such cases, first disconnect its VIDEO mode or channel. &#... for head cleaning or replacement. If the indication remains, consult your nearest JVC dealer. 17 TROUBLESHOOTING TROUBLESHOOTING Before consulting your JVC dealer, please check the following to see if you can resume using the camcorder. Bright, crystal-shaped spots appear in the viewfinder. These spots...

Instructions
Page 18
... recorded video and other than the USA Cassettes The provided AC Adapter features automatic voltage To properly use and store your nearest JVC dealer. General Battery Precautions Please make sure the cassette is to be exposed to read the following rules for long periods. ...Battery Packs The battery packs are within the tolerances shown in the chart below 35%) or extremely high (above 80%). ... do not open the camcorder's chassis. ... charge in an environment where temperatures are nickel-cadmium or nickel metal-hydride batteries. do not modify or disassemble. ... where they...
... recorded video and other than the USA Cassettes The provided AC Adapter features automatic voltage To properly use and store your nearest JVC dealer. General Battery Precautions Please make sure the cassette is to be exposed to read the following rules for long periods. ...Battery Packs The battery packs are within the tolerances shown in the chart below 35%) or extremely high (above 80%). ... do not open the camcorder's chassis. ... charge in an environment where temperatures are nickel-cadmium or nickel metal-hydride batteries. do not modify or disassemble. ... where they...
Instructions
Page 19
... • When using the unit immediately and consult your local JVC dealer. 3 Blow the lens with a blower brush, then wipe it gently with lens cleaning paper. 4 Remove dust from a cool place to Part 15 of a camcorder when it . avoid rubbing it strongly or apply any interference ...heating a cold room, under extremely humid conditions or in a particular installation. CAUTIONS LCD Monitor 1) To prevent damage to damage the monitor. place the camcorder with a soft cloth. For Your Maintenance 1) After Use 1 Turn off heavy dirt, then wipe again with a dry cloth. 2 Wipe the LCD...
... • When using the unit immediately and consult your local JVC dealer. 3 Blow the lens with a blower brush, then wipe it gently with lens cleaning paper. 4 Remove dust from a cool place to Part 15 of a camcorder when it . avoid rubbing it strongly or apply any interference ...heating a cold room, under extremely humid conditions or in a particular installation. CAUTIONS LCD Monitor 1) To prevent damage to damage the monitor. place the camcorder with a soft cloth. For Your Maintenance 1) After Use 1 Turn off heavy dirt, then wipe again with a dry cloth. 2 Wipe the LCD...
Instructions
Page 20
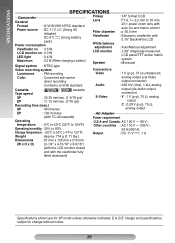
SPECIFICATIONS SPECIFICATIONS Camcorder General Format : S-VHS/VHS NTSC standard Power source : DC 11 V (Using AC Adapter) DC 6 V (Using battery pack) Power consumption Viewfinder on : 3.5 W LCD monitor ...
SPECIFICATIONS SPECIFICATIONS Camcorder General Format : S-VHS/VHS NTSC standard Power source : DC 11 V (Using AC Adapter) DC 6 V (Using battery pack) Power consumption Viewfinder on : 3.5 W LCD monitor ...
Instructions
Page 24
.... 9 Recording Format (S-VHS/ S-VHS ET).......pg. 16 Recording Mode pg. 14 Retake pg. 10 Rewind The Tape pg. 9 Charging The Battery Pack pg. 7 Clean The Camcorder pg. 19 Connection To a VCR/ TV pg. 11 Counter Memory pg. 16 D S Shoulder Strap Attachment pg. 9 Specifications pg. 20 Super LoLux (S.
.... 9 Recording Format (S-VHS/ S-VHS ET).......pg. 16 Recording Mode pg. 14 Retake pg. 10 Rewind The Tape pg. 9 Charging The Battery Pack pg. 7 Clean The Camcorder pg. 19 Connection To a VCR/ TV pg. 11 Counter Memory pg. 16 D S Shoulder Strap Attachment pg. 9 Specifications pg. 20 Super LoLux (S.


