User Manual
Page 2
...extremely important information regarding the safe use of important operating and maintenance (servicing) instructions in different countries.) CAUTIONS: ● This camcorder is designed to be of sufficient magnitude to constitute a risk of a different standard. Be sure to read thoroughly the Safety ...Precautions and Safety Instructions that follow. You are possible anywhere. ● Use the JVC BN-V306U/V312U battery packs and, to recharge them or to supply power to the camcorder from an AC outlet, use . ...read these as well. ● Basic and advanced features...
...extremely important information regarding the safe use of important operating and maintenance (servicing) instructions in different countries.) CAUTIONS: ● This camcorder is designed to be of sufficient magnitude to constitute a risk of a different standard. Be sure to read thoroughly the Safety ...Precautions and Safety Instructions that follow. You are possible anywhere. ● Use the JVC BN-V306U/V312U battery packs and, to recharge them or to supply power to the camcorder from an AC outlet, use . ...read these as well. ● Basic and advanced features...

User Manual
Page 3
...normally, or has been dropped. The apparatus shall not be placed on the apparatus. the heat may be followed strictly. When discarding batteries, environmental problems must be regulated in any containers filled with the apparatus. Do not use attachments/accessories specified by the manufacturer. 10...a bathroom or places with the cart, stand, tripod, bracket, or table specified by a newspaper, or cloth etc. Disposal of these batteries must be considered and the local rules or laws governing the disposal of mercury. Do not block the ventilation holes. (If the ventilation ...
...normally, or has been dropped. The apparatus shall not be placed on the apparatus. the heat may be followed strictly. When discarding batteries, environmental problems must be regulated in any containers filled with the apparatus. Do not use attachments/accessories specified by the manufacturer. 10...a bathroom or places with the cart, stand, tripod, bracket, or table specified by a newspaper, or cloth etc. Disposal of these batteries must be considered and the local rules or laws governing the disposal of mercury. Do not block the ventilation holes. (If the ventilation ...

User Manual
Page 5
...or ● AC Adapter AP-V10U, AP-V11U or AP-V12U ● Battery Pack BN-V306U ● Battery Mount Cover* (Already attached on the camcorder) ● Remote Control Unit RM-V717U ● CD-ROM ● AAA (R03) Battery x 2 (for remote control unit) ● USB Cable ● Memory Card... pg. 6 for attachment) ● Finger Support (੬ pg. 6 for attachment) * Attach the battery mount cover to maintain optimum performance of the camcorder, provided cables may be connected to "Charging The Battery Pack" (੬ pg. 10). If a cable has only one core filter, the end that is ...
...or ● AC Adapter AP-V10U, AP-V11U or AP-V12U ● Battery Pack BN-V306U ● Battery Mount Cover* (Already attached on the camcorder) ● Remote Control Unit RM-V717U ● CD-ROM ● AAA (R03) Battery x 2 (for remote control unit) ● USB Cable ● Memory Card... pg. 6 for attachment) ● Finger Support (੬ pg. 6 for attachment) * Attach the battery mount cover to maintain optimum performance of the camcorder, provided cables may be connected to "Charging The Battery Pack" (੬ pg. 10). If a cable has only one core filter, the end that is ...

User Manual
Page 10
... BN-V306U* 45 min. 55 min. BN-V312U 1 hr. 50 min. 2 hr. 15 min. NOTES: ● During charging, the camcorder cannot be replaced. Approximate recording time For GR-DVM96: Battery pack LCD monitor on Viewfinder on BN-V306U* 50 min. 1 hr. 05 min. BN-V856U 7 hr. 20 min. 8 hr. 35 ... AC Adapter from the AC outlet. 8 Disconnect the AC Adapter from the camcorder, then try charging again. ● If the battery operation time remains extremely short even after having been fully charged, the battery is worn out and needs to the battery pack, remove it . BN-V312U (optional) Approx. 2 hr. 40 ...
... BN-V306U* 45 min. 55 min. BN-V312U 1 hr. 50 min. 2 hr. 15 min. NOTES: ● During charging, the camcorder cannot be replaced. Approximate recording time For GR-DVM96: Battery pack LCD monitor on Viewfinder on BN-V306U* 50 min. 1 hr. 05 min. BN-V856U 7 hr. 20 min. 8 hr. 35 ... AC Adapter from the AC outlet. 8 Disconnect the AC Adapter from the camcorder, then try charging again. ● If the battery operation time remains extremely short even after having been fully charged, the battery is worn out and needs to the battery pack, remove it . BN-V312U (optional) Approx. 2 hr. 40 ...
User Manual
Page 11
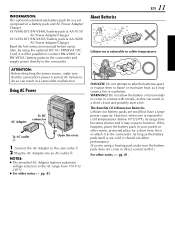
...JVC VC-VBN856U DC Cord, it will be possible to connect BN-V840U or BN-V856U battery packs to the camcorder and supply power directly to flame or excessive heat, as it should not affect performance. (If you're using a heating pad, make sure that the camcorder's power is a set composed of a battery... AC Adapter features automatic voltage selection in the AC range from 110 V to do so can result in a camcorder malfunction. WARNING! The Benefits Of Lithium-Ion Batteries Lithium-ion battery packs are small but have a large power capacity. However, when one is not cold, it may cease to...
...JVC VC-VBN856U DC Cord, it will be possible to connect BN-V840U or BN-V856U battery packs to the camcorder and supply power directly to flame or excessive heat, as it should not affect performance. (If you're using a heating pad, make sure that the camcorder's power is a set composed of a battery... AC Adapter features automatic voltage selection in the AC range from 110 V to do so can result in a camcorder malfunction. WARNING! The Benefits Of Lithium-Ion Batteries Lithium-ion battery packs are small but have a large power capacity. However, when one is not cold, it may cease to...

User Manual
Page 15
... - RETURN The Menu Screen appears. The DISPLAY Menu appears. Then perform the date/ time setting before using the AC Adapter, or while the battery pack attached to the camcorder continues to input the month, and press it twice. BALANCE CAMERA MANUAL S Y S T EM D I ME CODE CLOCK ADJ . - Repeat to ...parameter for over 24 hours to the first date/time parameter (month), the clock stops. However, if the camcorder is not used for approx. 3 months, the clock's lithium battery will become discharged and the date/time stored in memory will be used without setting the date/time. Date/Time...
... - RETURN The Menu Screen appears. The DISPLAY Menu appears. Then perform the date/ time setting before using the AC Adapter, or while the battery pack attached to the camcorder continues to input the month, and press it twice. BALANCE CAMERA MANUAL S Y S T EM D I ME CODE CLOCK ADJ . - Repeat to ...parameter for over 24 hours to the first date/time parameter (month), the clock stops. However, if the camcorder is not used for approx. 3 months, the clock's lithium battery will become discharged and the date/time stored in memory will be used without setting the date/time. Date/Time...

User Manual
Page 16
... until it recedes completely before closing the cassette holder cover. ● When the battery pack's charge is low, you may not recede. touching other parts may cause damage to the camcorder. ● Even when the camcorder is closed with a fully charged one or use AC power before continuing. 3...When resuming recording, once you wait a few seconds for the cassette holder to page 38 and 44. Wait until it . Replace the battery pack with the camcorder switched off then on the tape or a previously recorded scene will be erased (recorded over . To record on the back of the...
... until it recedes completely before closing the cassette holder cover. ● When the battery pack's charge is low, you may not recede. touching other parts may cause damage to the camcorder. ● Even when the camcorder is closed with a fully charged one or use AC power before continuing. 3...When resuming recording, once you wait a few seconds for the cassette holder to page 38 and 44. Wait until it . Replace the battery pack with the camcorder switched off then on the tape or a previously recorded scene will be erased (recorded over . To record on the back of the...

User Manual
Page 19
...Switch to "VIDEO". 2 Set the Power Switch to "Recording From The Middle Of A Tape" (੬ pg. 21). ● To turn the camcorder on again, push back and pull out the viewfinder again or close and re-open the LCD monitor. ● LCD monitor/viewfinder indications: • ...When power is supplied from a battery: the " " battery indicator is displayed. (੬ pg. 100) • When power is supplied from an AC outlet: the " " battery indicator does not appear. ● When a blank portion is left between recorded scenes on the...
...Switch to "VIDEO". 2 Set the Power Switch to "Recording From The Middle Of A Tape" (੬ pg. 21). ● To turn the camcorder on again, push back and pull out the viewfinder again or close and re-open the LCD monitor. ● LCD monitor/viewfinder indications: • ...When power is supplied from a battery: the " " battery indicator is displayed. (੬ pg. 100) • When power is supplied from an AC outlet: the " " battery indicator does not appear. ● When a blank portion is left between recorded scenes on the...

User Manual
Page 22
...Wheel toward "W" to turn on the LCD monitor with it flipped over and pushed against the camcorder body. ● LCD monitor/viewfinder indications: • When power is supplied from a battery: the " " battery indicator is displayed. (੬ pg. 100) • When power is supplied from an .... 68) ATTENTION: During Shuttle Search, parts of the screen. VIDEO PLAYBACK To control the speaker volume... This is not heard from a battery, the camcorder shuts off automatically. Turn the Power Zoom Ring toward "T" to turn up the volume, or toward "+" for forward Frame-By-Frame Playback,...
...Wheel toward "W" to turn on the LCD monitor with it flipped over and pushed against the camcorder body. ● LCD monitor/viewfinder indications: • When power is supplied from a battery: the " " battery indicator is displayed. (੬ pg. 100) • When power is supplied from an .... 68) ATTENTION: During Shuttle Search, parts of the screen. VIDEO PLAYBACK To control the speaker volume... This is not heard from a battery, the camcorder shuts off automatically. Turn the Power Zoom Ring toward "T" to turn up the volume, or toward "+" for forward Frame-By-Frame Playback,...
User Manual
Page 25
...and sound from the camcorder without inserting a tape or memory card, set the camcorder's Power Switch to...its minimum level to avoid a sudden burst of the battery pack. (੬ pg. 11) ● The... Or, press DISPLAY on the remote control to turn on the camcorder, the VCR and the TV. 5 Set the VCR to its AUX...instruction manual. 4 Turn on /off . 2 Connect the camcorder to a TV or VCR as shown in the illustration. ... as the power supply instead of sound when the camcorder is turned on. ● If you have a...as interference will occur in the camcorder playback picture. ● While the Audio/...
...and sound from the camcorder without inserting a tape or memory card, set the camcorder's Power Switch to...its minimum level to avoid a sudden burst of the battery pack. (੬ pg. 11) ● The... Or, press DISPLAY on the remote control to turn on the camcorder, the VCR and the TV. 5 Set the VCR to its AUX...instruction manual. 4 Turn on /off . 2 Connect the camcorder to a TV or VCR as shown in the illustration. ... as the power supply instead of sound when the camcorder is turned on. ● If you have a...as interference will occur in the camcorder playback picture. ● While the Audio/...

User Manual
Page 27
... recording is not possible, "O" blinks when SNAPSHOT is pressed. ● If Program AE with special effects (੬ pg. 42) is not heard from the battery pack, the camcorder shuts off automatically to "A" or "M" while pressing down the Lock Button located on the switch. 3 Open the LCD monitor fully, or pull out the... is recorded onto the tape. ● Still images taken are recorded in the memory card. D.S.C. RECORDING EN 27 Basic Shooting (D.S.C. Snapshot) You can use your camcorder as a Digital Still Camera for Camera File system).
... recording is not possible, "O" blinks when SNAPSHOT is pressed. ● If Program AE with special effects (੬ pg. 42) is not heard from the battery pack, the camcorder shuts off automatically to "A" or "M" while pressing down the Lock Button located on the switch. 3 Open the LCD monitor fully, or pull out the... is recorded onto the tape. ● Still images taken are recorded in the memory card. D.S.C. RECORDING EN 27 Basic Shooting (D.S.C. Snapshot) You can use your camcorder as a Digital Still Camera for Camera File system).

User Manual
Page 31
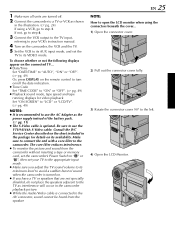
...pull out the viewfinder fully. ● The type of file, and press it. 7 Press the MENU Wheel in . CONTINUED ON NEXT PAGE SELECT Button (GR-DVM96 only) Rewind Button (3) Fast-Forward Button (5) VIDEO/MEMORY Switch Power Switch PLAY OFF A M MENU D I SPLAY OFF ON RETURN MENU Wheel Lock ...in . The Menu Screen appears. The MEMORY SELECT screen appears. 6 Rotate the MENU Wheel to step 7. 5 Press SELECT. Operation mode indicator Battery indicator EN 31 Protecting Files The Protect mode helps prevent the accidental erasure of files. The Sub Menu appears. 4 Rotate the MENU Wheel to ...
...pull out the viewfinder fully. ● The type of file, and press it. 7 Press the MENU Wheel in . CONTINUED ON NEXT PAGE SELECT Button (GR-DVM96 only) Rewind Button (3) Fast-Forward Button (5) VIDEO/MEMORY Switch Power Switch PLAY OFF A M MENU D I SPLAY OFF ON RETURN MENU Wheel Lock ...in . The Menu Screen appears. The MEMORY SELECT screen appears. 6 Rotate the MENU Wheel to step 7. 5 Press SELECT. Operation mode indicator Battery indicator EN 31 Protecting Files The Protect mode helps prevent the accidental erasure of files. The Sub Menu appears. 4 Rotate the MENU Wheel to ...

User Manual
Page 33
... steps 10 and EXECUTE RETURN 11 for all files you want to use the provided AC Adapter, as turning off the camcorder) during deletion. Also, be sure to delete. SELECT Button (GR-DVM96 only) Rewind Button (3) Fast-Forward Button (5) VIDEO/MEMORY Switch Power Switch PLAY OFF A M MENU Wheel Lock Button 1 Load a memory... type of file (IMAGE, E-MAIL CLIP or SOUND) which has been played back at the last time is protected and cannot be corrupted if the battery becomes exhausted during deletion.
... steps 10 and EXECUTE RETURN 11 for all files you want to use the provided AC Adapter, as turning off the camcorder) during deletion. Also, be sure to delete. SELECT Button (GR-DVM96 only) Rewind Button (3) Fast-Forward Button (5) VIDEO/MEMORY Switch Power Switch PLAY OFF A M MENU Wheel Lock Button 1 Load a memory... type of file (IMAGE, E-MAIL CLIP or SOUND) which has been played back at the last time is protected and cannot be corrupted if the battery becomes exhausted during deletion.

User Manual
Page 36
...6 Rotate the MENU Wheel to select "RETURN" and press it . Also, be sure to use the provided AC Adapter, as turning off the camcorder) during initialization. The FORMAT screen appears. FORMAT ERASE ALL EX I ST I SPLAY END 5 Rotate the MENU Wheel to "P" while pressing down ...becomes corrupted initialize it . EXECUTE RETURN CAUTION: Do not perform any other operation (such as the memory card may be corrupted if the battery becomes exhausted during initialization. MENU Wheel Lock Button 1 Set the VIDEO/MEMORY Switch to "MEMORY". 2 Set the Power Switch to select ...
...6 Rotate the MENU Wheel to select "RETURN" and press it . Also, be sure to use the provided AC Adapter, as turning off the camcorder) during initialization. The FORMAT screen appears. FORMAT ERASE ALL EX I ST I SPLAY END 5 Rotate the MENU Wheel to "P" while pressing down ...becomes corrupted initialize it . EXECUTE RETURN CAUTION: Do not perform any other operation (such as the memory card may be corrupted if the battery becomes exhausted during initialization. MENU Wheel Lock Button 1 Set the VIDEO/MEMORY Switch to "MEMORY". 2 Set the Power Switch to select ...

User Manual
Page 54
... the second flash is dark ( C appears) and reduces the Red-Eye effect in the dark the camcorder fires the flash and adjusts the brightness automatically. You can take a snapshot to look too bright or... too dark, adjust it is for this the camcorder automatically darkens the picture when using the flash. If "AUTO C" is set the flash to "OFF"..., refer to "OFF" or when Night-Alive mode (੬ pg. 53) is engaged, and also when the battery remaining power is set to "AUTO" with GAIN UP set to "OFF" (੬ pg. 45) and with ...
... the second flash is dark ( C appears) and reduces the Red-Eye effect in the dark the camcorder fires the flash and adjusts the brightness automatically. You can take a snapshot to look too bright or... too dark, adjust it is for this the camcorder automatically darkens the picture when using the flash. If "AUTO C" is set the flash to "OFF"..., refer to "OFF" or when Night-Alive mode (੬ pg. 53) is engaged, and also when the battery remaining power is set to "AUTO" with GAIN UP set to "OFF" (੬ pg. 45) and with ...

User Manual
Page 58
...in front of lighting. CLOUD Outdoors on the white balance settings. When the setting is usually adjusted automatically. However, more advanced camcorder operators control this function for a more professional colour/tint reproduction. - MWB Adjust the white balance manually when shooting under various ...(੬ pg. 38). ● The selected mode indicator except "AUTO" appears. If the white balance is turned off or the battery removed. The white balance is completed, resumes normal blinking. 4 Press the MENU Wheel in until begins blinking rapidly. Adjust zoom or ...
...in front of lighting. CLOUD Outdoors on the white balance settings. When the setting is usually adjusted automatically. However, more advanced camcorder operators control this function for a more professional colour/tint reproduction. - MWB Adjust the white balance manually when shooting under various ...(੬ pg. 38). ● The selected mode indicator except "AUTO" appears. If the white balance is turned off or the battery removed. The white balance is completed, resumes normal blinking. 4 Press the MENU Wheel in until begins blinking rapidly. Adjust zoom or ...
User Manual
Page 62
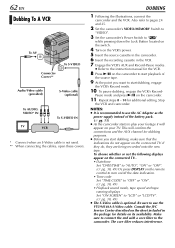
...AUTO", "ON" or "OFF". (੬ pg. 38, 49) Or, press DISPLAY on the remote control to turn on the camcorder. 11 Repeat steps 8 - 10 for additional editing. Consult the JVC Service Center described on the sheet included in the VCR. 7 Engage the VCR's AUX and Record-Pause modes. ● Refer ..., make sure that the indications do , they do not appear on the camcorder to use the YTU94146A S-Video cable. NOTES: ● It is recommended to start playback of the battery pack. (੬ pg. 11) ● As the camcorder starts to "P" while pressing down the Lock Button located on the switch. ...
...AUTO", "ON" or "OFF". (੬ pg. 38, 49) Or, press DISPLAY on the remote control to turn on the camcorder. 11 Repeat steps 8 - 10 for additional editing. Consult the JVC Service Center described on the sheet included in the VCR. 7 Engage the VCR's AUX and Record-Pause modes. ● Refer ..., make sure that the indications do , they do not appear on the camcorder to use the YTU94146A S-Video cable. NOTES: ● It is recommended to start playback of the battery pack. (੬ pg. 11) ● As the camcorder starts to "P" while pressing down the Lock Button located on the switch. ...

User Manual
Page 63
... a digital signal is sent, there is connected correctly, sometimes the image may not appear in the video unit. 8 Press 4/9 on this camcorder to start playback of the battery pack. (੬ pg. 11) ● If the remote control is used when both the player and recorder are turned off the power and make... same operation. To DV Core filter DV cable (optional) To DV IN Video unit equipped with DV connector EN 63 1 Make sure all units are JVC video units, both units. ● If a blank portion or disturbed image is played back on the tape is output from the...
... a digital signal is sent, there is connected correctly, sometimes the image may not appear in the video unit. 8 Press 4/9 on this camcorder to start playback of the battery pack. (੬ pg. 11) ● If the remote control is used when both the player and recorder are turned off the power and make... same operation. To DV Core filter DV cable (optional) To DV IN Video unit equipped with DV connector EN 63 1 Make sure all units are JVC video units, both units. ● If a blank portion or disturbed image is played back on the tape is output from the...

User Manual
Page 64
... turned off the power and make connections again. ● Digital Dubbing is performed in the sound mode recorded on the original tape, regardless of the battery pack. (੬ pg. 11) ● If the remote control is used when both the player and recorder are output from the AV or S-... cassette in the video unit. 8 Insert the recording cassette in step 9. NOTES: ● It is recommended to use the optional JVC VC-VDV204U DV cable. To prevent this camcorder's Recording Start/Stop Button again to use the AC Adapter as the power supply instead of the current "SOUND MODE" setting. (੬...
... turned off the power and make connections again. ● Digital Dubbing is performed in the sound mode recorded on the original tape, regardless of the battery pack. (੬ pg. 11) ● If the remote control is used when both the player and recorder are output from the AV or S-... cassette in the video unit. 8 Insert the recording cassette in step 9. NOTES: ● It is recommended to use the optional JVC VC-VDV204U DV cable. To prevent this camcorder's Recording Start/Stop Button again to use the AC Adapter as the power supply instead of the current "SOUND MODE" setting. (੬...

User Manual
Page 66
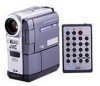
.... 66 EN USING THE REMOTE CONTROL UNIT The Full-Function Remote Control Unit can operate this camcorder from a distance as well as illustrated. 2 Insert two "AAA (R03)" size batteries in the correct direction. 3 Re-attach the battery compartment cover. 1 3 Tab 2+ - +- NOTE: The transmitted beam may not be sure to sunlight or powerful lighting...
.... 66 EN USING THE REMOTE CONTROL UNIT The Full-Function Remote Control Unit can operate this camcorder from a distance as well as illustrated. 2 Insert two "AAA (R03)" size batteries in the correct direction. 3 Re-attach the battery compartment cover. 1 3 Tab 2+ - +- NOTE: The transmitted beam may not be sure to sunlight or powerful lighting...


