

Instruction Manual
Page 3
....... • Do not raise the volume level too much, as this will If you have parked the car for purchasing a JVC product. Time countdown indicator To use these buttons for original functions again after pressing MODE, wait for 5 seconds without pressing any ... demonstration ........ 8 Setting the clock 9 RADIO OPERATIONS 10 Listening to the radio 10 Storing stations in memory 12 Tuning in to a preset station 13 CD OPERATIONS 14 Playing a CD 14 Locating a track or a particular portion on a CD 15 Selecting CD playback modes 15 Prohibiting CD ejection 16 SOUND ADJUSTMENTS 17 ...
....... • Do not raise the volume level too much, as this will If you have parked the car for purchasing a JVC product. Time countdown indicator To use these buttons for original functions again after pressing MODE, wait for 5 seconds without pressing any ... demonstration ........ 8 Setting the clock 9 RADIO OPERATIONS 10 Listening to the radio 10 Storing stations in memory 12 Tuning in to a preset station 13 CD OPERATIONS 14 Playing a CD 14 Locating a track or a particular portion on a CD 15 Selecting CD playback modes 15 Prohibiting CD ejection 16 SOUND ADJUSTMENTS 17 ...

Instruction Manual
Page 5
...preset station number increases, and the selected station is turned off. • Turns off the unit if pressed and held while listening to a CD. • Skips to the beginning of the next track or goes back to the beginning of the current (or previous) tracks if pressed... the source changes. 7 • Searches for adjusting "DEMO", "CLOCK H", "CLOCK M", "DIMMER", and "AMP GAIN" (see pages 8, 9 and 19). 5 Selects the sound mode (C-EQ: custom equalizer). Note: These buttons are not used for stations while listening to the radio. • Fast-forwards or reverses the track if pressed and held...
...preset station number increases, and the selected station is turned off. • Turns off the unit if pressed and held while listening to a CD. • Skips to the beginning of the next track or goes back to the beginning of the current (or previous) tracks if pressed... the source changes. 7 • Searches for adjusting "DEMO", "CLOCK H", "CLOCK M", "DIMMER", and "AMP GAIN" (see pages 8, 9 and 19). 5 Selects the sound mode (C-EQ: custom equalizer). Note: These buttons are not used for stations while listening to the radio. • Fast-forwards or reverses the track if pressed and held...

Instruction Manual
Page 8
ENGLISH Canceling the display demonstration 3 Select "DEMO OFF." DEMO ON 2 Select "DEMO" if not shown on the display. 4 Finish the setting. "DEMO", "CLOCK H", "CLOCK M", "DIMMER", or "AMP GAIN" appears on the display. DEMO OFF To cancel the display demonstration, follow the procedure below: 1 Press and hold SEL (select) for ...
ENGLISH Canceling the display demonstration 3 Select "DEMO OFF." DEMO ON 2 Select "DEMO" if not shown on the display. 4 Finish the setting. "DEMO", "CLOCK H", "CLOCK M", "DIMMER", or "AMP GAIN" appears on the display. DEMO OFF To cancel the display demonstration, follow the procedure below: 1 Press and hold SEL (select) for ...
Instruction Manual
Page 9
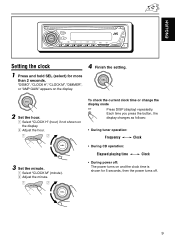
...: The power turns on the display. 2 Adjust the hour. 1 2 3 Set the minute. 1 Select "CLOCK M" (minute). 2 Adjust the minute. 1 2 To check the current clock time or change the display mode Press DISP (display) repeatedly. Each time you press the button, the display changes ...as follows: • During tuner operation: Frequency Clock • During CD operation: Elapsed playing time Clock • During power off . 9 "DEMO", "CLOCK H", "CLOCK M", "DIMMER", or "AMP GAIN" appears on the display. 4 Finish the setting. 2 Set the ...
...: The power turns on the display. 2 Adjust the hour. 1 2 3 Set the minute. 1 Select "CLOCK M" (minute). 2 Adjust the minute. 1 2 To check the current clock time or change the display mode Press DISP (display) repeatedly. Each time you press the button, the display changes ...as follows: • During tuner operation: Frequency Clock • During CD operation: Elapsed playing time Clock • During power off . 9 "DEMO", "CLOCK H", "CLOCK M", "DIMMER", or "AMP GAIN" appears on the display. 4 Finish the setting. 2 Set the ...
Instruction Manual
Page 19
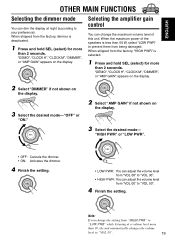
... (select) for more than 50 W, select "LOW PWR" to prevent them from "VOL 00" to "VOL 30". 19 "DEMO", "CLOCK H", "CLOCK M", "DIMMER", or "AMP GAIN" appears on the display. 3 Select the desired mode- "DEMO", "CLOCK H", "CLOCK M", "DIMMER", or "AMP GAIN" appears on the display. 2 Select "DIMMER" if not shown on the display. 3 Select the...
... (select) for more than 50 W, select "LOW PWR" to prevent them from "VOL 00" to "VOL 30". 19 "DEMO", "CLOCK H", "CLOCK M", "DIMMER", or "AMP GAIN" appears on the display. 3 Select the desired mode- "DEMO", "CLOCK H", "CLOCK M", "DIMMER", or "AMP GAIN" appears on the display. 2 Select "DIMMER" if not shown on the display. 3 Select the...


