
User Manual
Page 1
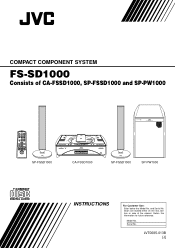
Retain this information for future reference. Model No. Serial No. LVT0685-013B [J] and Serial No. COMPACT COMPONENT SYSTEM FS-SD1000 Consists of the cabinet. which are located either on the rear, bottom or side of CA-FSSD1000, SP-FSSD1000 and SP-PW1000 REMOTE CONTROL RM-SFSSD1000J STANDBY/ON DIMMER SLEEP AUTO DISPLAY PRESET FM MODE PROGRAM RANDOM REPEAT DOOR SLIDE CD BASS TREBLE CANCEL UP SET FADE MUTING DOWN CD MD/AUX FM / AM VOLUME SP-FSSD1000 CA-FSSD1000 SP-FSSD1000 SP-PW1000 INSTRUCTIONS For Customer Use: Enter below the Model No.
Retain this information for future reference. Model No. Serial No. LVT0685-013B [J] and Serial No. COMPACT COMPONENT SYSTEM FS-SD1000 Consists of the cabinet. which are located either on the rear, bottom or side of CA-FSSD1000, SP-FSSD1000 and SP-PW1000 REMOTE CONTROL RM-SFSSD1000J STANDBY/ON DIMMER SLEEP AUTO DISPLAY PRESET FM MODE PROGRAM RANDOM REPEAT DOOR SLIDE CD BASS TREBLE CANCEL UP SET FADE MUTING DOWN CD MD/AUX FM / AM VOLUME SP-FSSD1000 CA-FSSD1000 SP-FSSD1000 SP-PW1000 INSTRUCTIONS For Customer Use: Enter below the Model No.

User Manual
Page 6
......1 Features ...1 How This Manual Is Organized 1 WARNINGS ...1 IMPORTANT CAUTIONS ...1 Getting Started 3 Accessories...3 How To Put Batteries In the Remote Control 3 Using the Remote Control...3 Connecting the FM Antenna ...4 Connecting the AM Antenna...5 Connecting the Speakers (SP-FSSD1000 6 Connecting the Powered Subwoofer (SP-PW1000 7...the Power On and Off 9 Adjusting the Brightness (DIMMER 9 Adjusting the Volume ...9 Fade-out Muting (FADE MUTING 10 Tone Control (BASS/TREBLE 10 Showing the Time (CLOCK/DISPLAY 10 Sliding the Top Cover (DOOR SLIDE 10 Using the Powered Subwoofer 11...
......1 Features ...1 How This Manual Is Organized 1 WARNINGS ...1 IMPORTANT CAUTIONS ...1 Getting Started 3 Accessories...3 How To Put Batteries In the Remote Control 3 Using the Remote Control...3 Connecting the FM Antenna ...4 Connecting the AM Antenna...5 Connecting the Speakers (SP-FSSD1000 6 Connecting the Powered Subwoofer (SP-PW1000 7...the Power On and Off 9 Adjusting the Brightness (DIMMER 9 Adjusting the Volume ...9 Fade-out Muting (FADE MUTING 10 Tone Control (BASS/TREBLE 10 Showing the Time (CLOCK/DISPLAY 10 Sliding the Top Cover (DOOR SLIDE 10 Using the Powered Subwoofer 11...
User Manual
Page 7
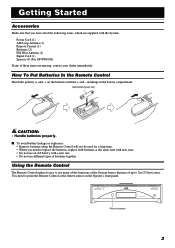
... the functions of the System from a distance of up to replace the batteries, replace both batteries at the remote sensor on the batteries with the System. Power Cord (1) AM Loop Antenna (1) Remote Control (1) Batteries (2) FM Wire Antenna (1) Signal Cord (1) Spacers (4) (For SP-PW1000) If any of the... are missing, contact your dealer immediately. STANDBY/ON OPEN/CLOSE CD - s To avoid battery leakage or explosion: • Remove batteries when the Remote Control will not be used for a long time. • When you have all of these items are supplied with the + and - You need ...
... the functions of the System from a distance of up to replace the batteries, replace both batteries at the remote sensor on the batteries with the System. Power Cord (1) AM Loop Antenna (1) Remote Control (1) Batteries (2) FM Wire Antenna (1) Signal Cord (1) Spacers (4) (For SP-PW1000) If any of the... are missing, contact your dealer immediately. STANDBY/ON OPEN/CLOSE CD - s To avoid battery leakage or explosion: • Remove batteries when the Remote Control will not be used for a long time. • When you have all of these items are supplied with the + and - You need ...

User Manual
Page 12
...direction connections to allow button operation. At the same time, the Top Cover moves backward to CD. The COMPU PLAY buttons are: On the Remote Control CD #/8 button FM/AM button MD/AUX button Automatic Power On The System automatically turns on with the following operation. • When you can...this operation does not change the function to allow the Unit's top button operation. Now you have specified. CAUTIONS: • ONLY USE THE JVC POWER CORD PROVIDED WITH THIS SYSTEM TO AVOID MALFUNCTION OR DAMAGE TO THE SYSTEM. • BE SURE TO UNPLUG THE POWER CORD FROM THE ...
...direction connections to allow button operation. At the same time, the Top Cover moves backward to CD. The COMPU PLAY buttons are: On the Remote Control CD #/8 button FM/AM button MD/AUX button Automatic Power On The System automatically turns on with the following operation. • When you can...this operation does not change the function to allow the Unit's top button operation. Now you have specified. CAUTIONS: • ONLY USE THE JVC POWER CORD PROVIDED WITH THIS SYSTEM TO AVOID MALFUNCTION OR DAMAGE TO THE SYSTEM. • BE SURE TO UNPLUG THE POWER CORD FROM THE ...
User Manual
Page 13
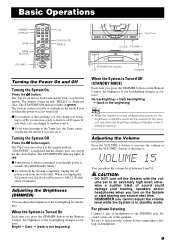
...252; DOOR SLIDE TREBLE Turning the Power On and Off Turning the System On Press the % button. If you wish, you turn on the Remote Control, the brightness of sound could damage your hearing, speakers and/or headphones when you can change to the beginning) • When the System ...always consumed even though power is displayed and the display goes out, except for the display. Basic Operations DIMMER DISPLAY BASS FADE MUTING REMOTE CONTROL RM-SFSSD1000J STANDBY/ON DIMMER SLEEP AUTO DISPLAY PRESET FM MODE PROGRAM RANDOM REPEAT DOOR SLIDE CD BASS TREBLE CANCEL UP SET FADE ...
...252; DOOR SLIDE TREBLE Turning the Power On and Off Turning the System On Press the % button. If you wish, you turn on the Remote Control, the brightness of sound could damage your hearing, speakers and/or headphones when you can change to the beginning) • When the System ...always consumed even though power is displayed and the display goes out, except for the display. Basic Operations DIMMER DISPLAY BASS FADE MUTING REMOTE CONTROL RM-SFSSD1000J STANDBY/ON DIMMER SLEEP AUTO DISPLAY PRESET FM MODE PROGRAM RANDOM REPEAT DOOR SLIDE CD BASS TREBLE CANCEL UP SET FADE ...
User Manual
Page 14
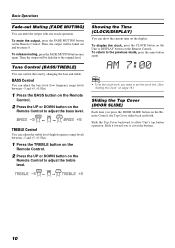
... on the Unit or DISPLAY button on the display. DOWN TREBLE UP Showing the Time (CLOCK/DISPLAY) You can show the current time on the Remote Control. Slide the Top Cover backward to the original level. To mute the output, press the FADE MUTING button on the... can adjust the bass level (low frequency range level) between -5 and +5. (0: Flat) 1 Press the TREBLE button on the Remote Control. 2 Press the UP or DOWN button on the Remote Control to adjust the treble level. Then, the output will be faded in to allow Unit's top button operation. Basic Operations Fade-out Muting (FADE...
... on the Unit or DISPLAY button on the display. DOWN TREBLE UP Showing the Time (CLOCK/DISPLAY) You can show the current time on the Remote Control. Slide the Top Cover backward to the original level. To mute the output, press the FADE MUTING button on the... can adjust the bass level (low frequency range level) between -5 and +5. (0: Flat) 1 Press the TREBLE button on the Remote Control. 2 Press the UP or DOWN button on the Remote Control to adjust the treble level. Then, the output will be faded in to allow Unit's top button operation. Basic Operations Fade-out Muting (FADE...

User Manual
Page 16
...reception sensitivity will show here only the items described in use, the display shows other sound source to turn on the Unit or the Remote Control for best reception. 12 button to FM and AM stations. After 1 second the display will be tuned in manually, automatically, or ...from frequency to . s You can be changed by pressing the FM/AM button. OR q Preset Tuning using the Remote Control (Possible only after presetting stations) Select the desired preset number using one second or more, the frequency changes down, or up, automatically until...
...reception sensitivity will show here only the items described in use, the display shows other sound source to turn on the Unit or the Remote Control for best reception. 12 button to FM and AM stations. After 1 second the display will be tuned in manually, automatically, or ...from frequency to . s You can be changed by pressing the FM/AM button. OR q Preset Tuning using the Remote Control (Possible only after presetting stations) Select the desired preset number using one second or more, the frequency changes down, or up, automatically until...

User Manual
Page 17
...seconds) 1 Select a band by pressing the FM/AM button. 2 Press the AUTO PRESET button on the display. Press the FM MODE button on the Remote Control so that the "MONO" indicator goes off. 13 This is hard to receive or noisy, you want to change the preset stations, repeat the same... the desired preset numbers. Using the Tuner Presetting Stations You can preset up to 30 FM stations and up to 15 AM stations using the Remote Control. • Preset numbers may have been set in step 2 after 2 seconds, the display returns to the broadcast frequency display. 6 Repeat above . Pressing...
...seconds) 1 Select a band by pressing the FM/AM button. 2 Press the AUTO PRESET button on the display. Press the FM MODE button on the Remote Control so that the "MONO" indicator goes off. 13 This is hard to receive or noisy, you want to change the preset stations, repeat the same... the desired preset numbers. Using the Tuner Presetting Stations You can preset up to 30 FM stations and up to 15 AM stations using the Remote Control. • Preset numbers may have been set in step 2 after 2 seconds, the display returns to the broadcast frequency display. 6 Repeat above . Pressing...
User Manual
Page 18
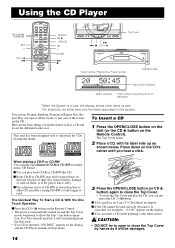
... CD-R or CD-RW recorded music CD format. If a CD is automatically turned on the display. Using the CD Player PROGRAM RANDOM SET < CD #/8 4 REMOTE CONTROL RM-SFSSD1000J STANDBY/ON DIMMER SLEEP AUTO DISPLAY PRESET FM MODE PROGRAM RANDOM REPEAT DOOR SLIDE CD BASS TREBLE CANCEL UP SET FADE MUTING DOWN...; If no CD is inserted, "NO DISC" appears on the display and the CD Player remains in this unit because of the tracks on the Remote Control. • The power is already inserted, it . I Press the CD #¥8 button on the CD. The Top Cover opens. 2 Place a CD, with its ...
... CD-R or CD-RW recorded music CD format. If a CD is automatically turned on the display. Using the CD Player PROGRAM RANDOM SET < CD #/8 4 REMOTE CONTROL RM-SFSSD1000J STANDBY/ON DIMMER SLEEP AUTO DISPLAY PRESET FM MODE PROGRAM RANDOM REPEAT DOOR SLIDE CD BASS TREBLE CANCEL UP SET FADE MUTING DOWN...; If no CD is inserted, "NO DISC" appears on the display and the CD Player remains in this unit because of the tracks on the Remote Control. • The power is already inserted, it . I Press the CD #¥8 button on the CD. The Top Cover opens. 2 Place a CD, with its ...

User Manual
Page 19
... starts playing. • Press the ¢ or > button once to skip to the beginning of the previous track. • When the > or < button on the Remote Control is kept pressing, the track number changes rapidly. (To be continued on the next page) 15 Press twice quickly to skip to the begin- I You... track number by 1. Basics of the CD begins playing. To Unload a CD Take out the CD as shown below. The playback time blinks on the Remote Control to the beginning of the tracks using the...
... starts playing. • Press the ¢ or > button once to skip to the beginning of the previous track. • When the > or < button on the Remote Control is kept pressing, the track number changes rapidly. (To be continued on the next page) 15 Press twice quickly to skip to the begin- I You... track number by 1. Basics of the CD begins playing. To Unload a CD Take out the CD as shown below. The playback time blinks on the Remote Control to the beginning of the tracks using the...

User Manual
Page 20
... #/8 button. The tracks are played in the program. In Random Play mode, repeats all the tracks. I You can see the programmed tracks on the Remote Control. I To stop mode, press the 7 button. Using the CD Player 6 Press the SET button. The System plays the tracks in the order you...the start of the programmed tracks 7 Repeat steps 5 and 6 to 7. To exit Repeat mode, press the REPEAT button until the Repeat indicator on the Remote Control. You can skip to a particular program track by pressing the 4 or ¢ button during playback, press the ¢ button to jump to program ...
... #/8 button. The tracks are played in the program. In Random Play mode, repeats all the tracks. I You can see the programmed tracks on the Remote Control. I To stop mode, press the 7 button. Using the CD Player 6 Press the SET button. The System plays the tracks in the order you...the start of the programmed tracks 7 Repeat steps 5 and 6 to 7. To exit Repeat mode, press the REPEAT button until the Repeat indicator on the Remote Control. You can skip to a particular program track by pressing the 4 or ¢ button during playback, press the ¢ button to jump to program ...

User Manual
Page 21
.... Also it is properly connected to the System. (See page 7). 1 Set the VOLUME control to the mini- I Press the BASS/TREBLE button on the Remote Control to control the tone. (See "Tone Control" on the display. Using External Equipments MD/AUX REMOTE CONTROL RM-SFSSD1000J STANDBY/ON DIMMER SLEEP AUTO DISPLAY PRESET FM MODE PROGRAM RANDOM REPEAT...
.... Also it is properly connected to the System. (See page 7). 1 Set the VOLUME control to the mini- I Press the BASS/TREBLE button on the Remote Control to control the tone. (See "Tone Control" on the display. Using External Equipments MD/AUX REMOTE CONTROL RM-SFSSD1000J STANDBY/ON DIMMER SLEEP AUTO DISPLAY PRESET FM MODE PROGRAM RANDOM REPEAT...
User Manual
Page 22
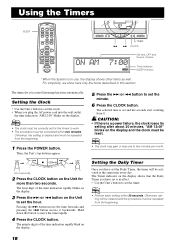
..." blinks on the display and the clock must be repeated from the beginning. 18 Then, the Unit's top buttons appear. CLOCK CD DOWN UP MULTI CONTROL CLOCK (for 2 seconds) 2 Press the CLOCK button on the display. 5 Press the ¢ or 4 button to set the minute. 6 Press the... the CLOCK button. Setting the Clock • Use the Unit's button to set for more than two seconds. Using the Timers SLEEP REMOTE CONTROL RM-SFSSD1000J STANDBY/ON DIMMER SLEEP AUTO DISPLAY PRESET FM MODE PROGRAM RANDOM REPEAT DOOR SLIDE CD BASS TREBLE CANCEL UP SET FADE MUTING DOWN...
..." blinks on the display and the clock must be repeated from the beginning. 18 Then, the Unit's top buttons appear. CLOCK CD DOWN UP MULTI CONTROL CLOCK (for 2 seconds) 2 Press the CLOCK button on the display. 5 Press the ¢ or 4 button to set the minute. 6 Press the... the CLOCK button. Setting the Clock • Use the Unit's button to set for more than two seconds. Using the Timers SLEEP REMOTE CONTROL RM-SFSSD1000J STANDBY/ON DIMMER SLEEP AUTO DISPLAY PRESET FM MODE PROGRAM RANDOM REPEAT DOOR SLIDE CD BASS TREBLE CANCEL UP SET FADE MUTING DOWN...
User Manual
Page 24
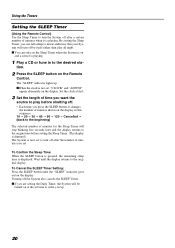
.... To Confirm the Sleep Time: When the SLEEP button is pressed, the remaining sleep time is not set, "CLOCK" and "ADJUST" appear alternately on the Remote Control. By setting the Sleep Timer, you can only set the Sleep Timer when the System is on the display in to the desired sta- IWhen... the clock is displayed. Using the Timers Setting the SLEEP Timer (Using the Remote Control) Use the Sleep Timer to turn the System off after a certain number of minutes when it changes the number of minutes you set.
.... To Confirm the Sleep Time: When the SLEEP button is pressed, the remaining sleep time is not set, "CLOCK" and "ADJUST" appear alternately on the Remote Control. By setting the Sleep Timer, you can only set the Sleep Timer when the System is on the display in to the desired sta- IWhen... the clock is displayed. Using the Timers Setting the SLEEP Timer (Using the Remote Control) Use the Sleep Timer to turn the System off after a certain number of minutes when it changes the number of minutes you set.

User Manual
Page 26
... hints given here, or the System has been physically damaged, call a qualified person, such as your dealer, for service. set to operate the Remote Control. • The path between the Remote Control and the sensor on . Unable to MIN position. no disc in . The CD skips. Poor radio reception • The antenna is disconnected...
... hints given here, or the System has been physically damaged, call a qualified person, such as your dealer, for service. set to operate the Remote Control. • The path between the Remote Control and the sensor on . Unable to MIN position. no disc in . The CD skips. Poor radio reception • The antenna is disconnected...

User Manual
Page 27
... V ~, 60 Hz 3RZHUýFRQVXPSWLRQV 31 W 'LPHQVLRQV PýìèP Pì-P5ý/!8 Pý¤P 0DVV 7.7 kg (17 lbs) Accessories Power Cord (1) AM Loop Antenna (1) Remote Control (1) Batteries R6P (SUM-3)/AA (15F) (2) FM Wire Antenna (1) Signal Cord (1) Spacers (4) (for SP-PW1000) 'HVLJQýDQGýVSHFLILFDWLRQVýDUHýVXEMHFWýWR...
... V ~, 60 Hz 3RZHUýFRQVXPSWLRQV 31 W 'LPHQVLRQV PýìèP Pì-P5ý/!8 Pý¤P 0DVV 7.7 kg (17 lbs) Accessories Power Cord (1) AM Loop Antenna (1) Remote Control (1) Batteries R6P (SUM-3)/AA (15F) (2) FM Wire Antenna (1) Signal Cord (1) Spacers (4) (for SP-PW1000) 'HVLJQýDQGýVSHFLILFDWLRQVýDUHýVXEMHFWýWR...


