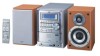
Instruction Manual
Page 5
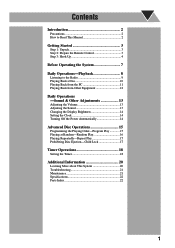
Contents Introduction 2 Precautions 2 How to Read This Manual 2 Getting Started 3 Step 1: Unpack 3 Step 2: Prepare the Remote Control 3 Step 3: Hook Up 4 Before Operating the System 7 Daily Operations-Playback 8 Listening to the Radio 9 Playing Back a Disc 10 Playing Back from the PC 11 ...
Contents Introduction 2 Precautions 2 How to Read This Manual 2 Getting Started 3 Step 1: Unpack 3 Step 2: Prepare the Remote Control 3 Step 3: Hook Up 4 Before Operating the System 7 Daily Operations-Playback 8 Listening to the Radio 9 Playing Back a Disc 10 Playing Back from the PC 11 ...

Instruction Manual
Page 6
...Button and control operations are explained as possible, we have a doubt about the functions, go to these sections and you press the button briefly. Remote ONLY Main Unit ONLY Indicates that this operation is mainly explained; DO NOT install the System in a location near heat sources, or in a ... the buttons and controls on the lenses inside the System in the following carefully: • Make sure there is only possible using the remote control. Poor ventilation could overheat and damage the System. • DO NOT block the cooling fan and the ventilation openings or holes. ...
...Button and control operations are explained as possible, we have a doubt about the functions, go to these sections and you press the button briefly. Remote ONLY Main Unit ONLY Indicates that this operation is mainly explained; DO NOT install the System in a location near heat sources, or in a ... the buttons and controls on the lenses inside the System in the following carefully: • Make sure there is only possible using the remote control. Poor ventilation could overheat and damage the System. • DO NOT block the cooling fan and the ventilation openings or holes. ...
Instruction Manual
Page 7
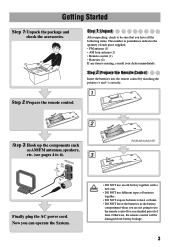
...1 2 Step 3: Hook up the components such as AM/FM antennas, speakers, etc. (see pages 4 to be damaged from battery leakage. 3 Otherwise, the remote control will be sure that you have all the following items. The number in the battery compartment when you can operate the System. Getting Started... Step 1:Unpack the package and check the accessories. AM ANTENNA LOAMOP EXT GND Finally plug the AC power cord. Step 2: Prepare the remote control. Step 1: Unpack After unpacking, check to 6). R6(SUM-3)/AA(15F) 3 • DO NOT use an old battery together with a new...
...1 2 Step 3: Hook up the components such as AM/FM antennas, speakers, etc. (see pages 4 to be damaged from battery leakage. 3 Otherwise, the remote control will be sure that you have all the following items. The number in the battery compartment when you can operate the System. Getting Started... Step 1:Unpack the package and check the accessories. AM ANTENNA LOAMOP EXT GND Finally plug the AC power cord. Step 2: Prepare the remote control. Step 1: Unpack After unpacking, check to 6). R6(SUM-3)/AA(15F) 3 • DO NOT use an old battery together with a new...

Instruction Manual
Page 12
... DISPLAY PRESET UP, PRESET DOWN 2 3 1 Turn on the main unit turns off ... The sound will activate the speakers again. To turn off the clock indication Remote ONLY While the System is always consumed even while on the System or REC start playback. otherwise, the sudden blast of the source selecting buttons...
... DISPLAY PRESET UP, PRESET DOWN 2 3 1 Turn on the main unit turns off ... The sound will activate the speakers again. To turn off the clock indication Remote ONLY While the System is always consumed even while on the System or REC start playback. otherwise, the sudden blast of the source selecting buttons...
Instruction Manual
Page 13
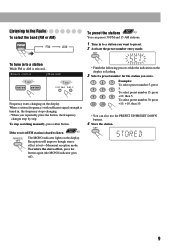
... FM or AM is flashing. 3 Select a preset number for the station you want to preset. 2 Activate the preset number entry mode. SET REC 9 Remote If the received FM station is lost-Monaural reception mode. To stop searching manually, press either button. Listening to the Radio To select the band... (FM or AM) FM AM Remote To preset the stations ONLY You can also use the PRESET UP/PRESET DOWN buttons. 4 Store the station. To select preset number 30, ...
... FM or AM is flashing. 3 Select a preset number for the station you want to preset. 2 Activate the preset number entry mode. SET REC 9 Remote If the received FM station is lost-Monaural reception mode. To stop searching manually, press either button. Listening to the Radio To select the band... (FM or AM) FM AM Remote To preset the stations ONLY You can also use the PRESET UP/PRESET DOWN buttons. 4 Store the station. To select preset number 30, ...
Instruction Manual
Page 14
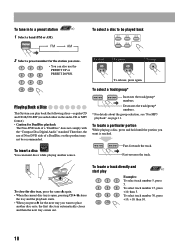
Remote To tune in the audio CD or MP3 format). • Caution for DualDisc playback The Non-DVD side of a DualDisc on page 11. Increases the ... you press 0 for the station you want to a preset station ONLY 1 Select a band (FM or AM). Fast-forwards the track. To locate a track directly and Remote ONLY start : To pause: To stop: To release, press again. To select a track/group* Playing Back a Disc This System can play Examples: 1 2 3 To select track...
Remote To tune in the audio CD or MP3 format). • Caution for DualDisc playback The Non-DVD side of a DualDisc on page 11. Increases the ... you press 0 for the station you want to a preset station ONLY 1 Select a band (FM or AM). Fast-forwards the track. To locate a track directly and Remote ONLY start : To pause: To stop: To release, press again. To select a track/group* Playing Back a Disc This System can play Examples: 1 2 3 To select track...

Instruction Manual
Page 17
... volume level. Adjusting the Sound To emphasize the sound-SOUND TURBO This function emphasizes the sound. AHB PRO AHB PRO OFF (Canceled) Remote To adjust the tone-BASS/TREBLE ONLY You can adjust the volume level from 0 to maintain rich, full bass at low volume. To... BASS TREBLE Canceled PRESET DOWN To adjust the treble BASS/ TREBLE BASS TREBLE Canceled PRESET UP PRESET DOWN 13 Daily Operations-Sound & Other Adjustments Remote control CLOCK/ TIMER 4/1, 7,¡/¢ DIMMER A.STANDBY SLEEP SOUND TURBO AHB PRO Main unit 4/¢ SET CANCEL DISPLAY PRESET UP, PRESET ...
... volume level. Adjusting the Sound To emphasize the sound-SOUND TURBO This function emphasizes the sound. AHB PRO AHB PRO OFF (Canceled) Remote To adjust the tone-BASS/TREBLE ONLY You can adjust the volume level from 0 to maintain rich, full bass at low volume. To... BASS TREBLE Canceled PRESET DOWN To adjust the treble BASS/ TREBLE BASS TREBLE Canceled PRESET UP PRESET DOWN 13 Daily Operations-Sound & Other Adjustments Remote control CLOCK/ TIMER 4/1, 7,¡/¢ DIMMER A.STANDBY SLEEP SOUND TURBO AHB PRO Main unit 4/¢ SET CANCEL DISPLAY PRESET UP, PRESET ...
Instruction Manual
Page 18
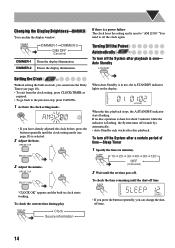
You need to set time goes off. Auto Standby A.STANDBY Setting the Clock Remote ONLY Without setting the built-in use the Daily Timer (see page 18) is selected. 2 Adjust the hour. REC A.STANDBY When the disc playback stops, ... during play DISPLAY Clock Source information SLEEP • If you press the button repeatedly, you can dim the display window. Turning Off the Power Automatically Remote ONLY To turn off time SLEEP REC "CLOCK OK" appears and the built-in minutes). PRESET UP SET PRESET DOWN 3 Adjust the minute. If there...
You need to set time goes off. Auto Standby A.STANDBY Setting the Clock Remote ONLY Without setting the built-in use the Daily Timer (see page 18) is selected. 2 Adjust the hour. REC A.STANDBY When the disc playback stops, ... during play DISPLAY Clock Source information SLEEP • If you press the button repeatedly, you can dim the display window. Turning Off the Power Automatically Remote ONLY To turn off time SLEEP REC "CLOCK OK" appears and the built-in minutes). PRESET UP SET PRESET DOWN 3 Adjust the minute. If there...
Instruction Manual
Page 19
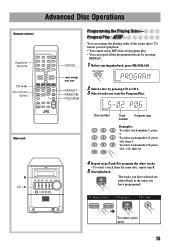
PROGRAM REC PRGM 2 Select a disc by pressing REPEAT. 1 Before starting playback, press PROGRAM. Remote control Numeric buttons CD 6 Disc selection buttons Main unit 7 CD 1 0 Advanced Disc Operations CANCEL 4/1,7, ¡/¢ REPEAT RANDOM PROGRAM Programming the Playing Order- REC PRGM ...; To select a track from the same disc, repeat step 3. 5 Start playback. To skip a track: To pause: To stop: To release, press again. 15 Program Play Remote ONLY You can repeat all the programmed tracks by pressing CD 1-CD 5. 3 Select tracks you have programmed.
PROGRAM REC PRGM 2 Select a disc by pressing REPEAT. 1 Before starting playback, press PROGRAM. Remote control Numeric buttons CD 6 Disc selection buttons Main unit 7 CD 1 0 Advanced Disc Operations CANCEL 4/1,7, ¡/¢ REPEAT RANDOM PROGRAM Programming the Playing Order- REC PRGM ...; To select a track from the same disc, repeat step 3. 5 Start playback. To skip a track: To pause: To stop: To release, press again. 15 Program Play Remote ONLY You can repeat all the programmed tracks by pressing CD 1-CD 5. 3 Select tracks you have programmed.
Instruction Manual
Page 20
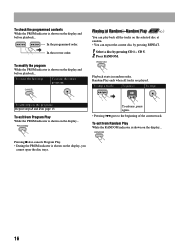
... of the current track. In the programmed order. RANDOM Playback starts in the program: Repeat steps 2 and 3 on the selected disc at Random-Random Play Remote ONLY You can play back all tracks are played.
... of the current track. In the programmed order. RANDOM Playback starts in the program: Repeat steps 2 and 3 on the selected disc at Random-Random Play Remote ONLY You can play back all tracks are played.

Instruction Manual
Page 21
... the prohibition, repeat the same procedure. ALL Repeats the current track. "UNLOCKED" appears on the display. 17 Repeats all the discs. Playing Repeatedly-Repeat Play Remote ONLY You can eject the loaded discs. • This is possible while the System is on standby.
... the prohibition, repeat the same procedure. ALL Repeats the current track. "UNLOCKED" appears on the display. 17 Repeats all the discs. Playing Repeatedly-Repeat Play Remote ONLY You can eject the loaded discs. • This is possible while the System is on standby.
Instruction Manual
Page 22
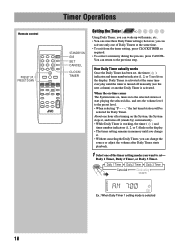
... volume level to the previous step. When the on-time comes The System turns on the display. Remote control PRESET UP, PRESET DOWN Timer Operations STANDBY/ON SET CANCEL CLOCK/ TIMER Setting the Timer Remote ONLY Using Daily Timer, you want to set , the timer ( ) indicator and timer number indicator (1, 2, or 3) are...
... volume level to the previous step. When the on-time comes The System turns on the display. Remote control PRESET UP, PRESET DOWN Timer Operations STANDBY/ON SET CANCEL CLOCK/ TIMER Setting the Timer Remote ONLY Using Daily Timer, you want to set , the timer ( ) indicator and timer number indicator (1, 2, or 3) are...
Instruction Manual
Page 25
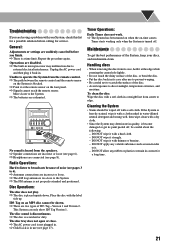
Radio Operations: Hard to listen to edge. ID3 Tag on the font panel. ] Signals cannot reach the remote sensor. This System can only show ID3 Tag Version 1. Handling discs • When removing the disc from its case, hold it with a soft cloth in a ... from center to broadcasts because of noise (see page 8). To clean the disc: Wipe the disc with a hard cloth. - DO NOT wipe it at the remote sensor on an MP3 disc cannot be careful about the following: - DO NOT wipe it back in its paint peeled off, be shown. ] There are...
Radio Operations: Hard to listen to edge. ID3 Tag on the font panel. ] Signals cannot reach the remote sensor. This System can only show ID3 Tag Version 1. Handling discs • When removing the disc from its case, hold it with a soft cloth in a ... from center to broadcasts because of noise (see page 8). To clean the disc: Wipe the disc with a hard cloth. - DO NOT wipe it at the remote sensor on an MP3 disc cannot be careful about the following: - DO NOT wipe it back in its paint peeled off, be shown. ] There are...
Instruction Manual
Page 26
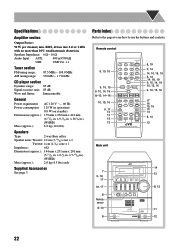
... and flutter: Immeasurable General Power requirement: AC 120 V , 60 Hz Power consumption: 125 W (at 1 kHz with no more than 10% total harmonic distortion. x 9-3/16 in . Remote control 9, 10, 15 9, 10, 15 9, 10, 14, 19 8-10, 14-16 10, 15, 16 9, 11 14 14 13 13 STANDBY/ON 1 2 3 SET 4 5 6 ... RANDOM FM MODE/ MP3 FADE MUTING SLEEP A.STANDBY DIMMER SOUND BASS/ TURBO AHB PRO TREBLE VOLUME RM-SFSG5J REMOTE CONTROL 17 16 15, 16 13 14 8, 13 13 Main unit 7 9, 10, 17 10, 17 8 Remote sensor 8-10 8 DOWN UP DIMMER SOUND TURBO VOLUME CD CD CD CD CD 1 2 3 4 5 0 0 0 ...
... and flutter: Immeasurable General Power requirement: AC 120 V , 60 Hz Power consumption: 125 W (at 1 kHz with no more than 10% total harmonic distortion. x 9-3/16 in . Remote control 9, 10, 15 9, 10, 15 9, 10, 14, 19 8-10, 14-16 10, 15, 16 9, 11 14 14 13 13 STANDBY/ON 1 2 3 SET 4 5 6 ... RANDOM FM MODE/ MP3 FADE MUTING SLEEP A.STANDBY DIMMER SOUND BASS/ TURBO AHB PRO TREBLE VOLUME RM-SFSG5J REMOTE CONTROL 17 16 15, 16 13 14 8, 13 13 Main unit 7 9, 10, 17 10, 17 8 Remote sensor 8-10 8 DOWN UP DIMMER SOUND TURBO VOLUME CD CD CD CD CD 1 2 3 4 5 0 0 0 ...


