

Instruction Manual
Page 1
...only): VIDEO RECORDING & PLAYBACK 18 http://www.jvc-victor.co.jp/english/index-e.html For Accessories: http://www.jvc-victor.co.jp/english/accessory DIGITAL STILL CAMERA (D.S.C.) RECORDING & 26 PLAYBACK ADVANCED ...FEATURES 37 INSTRUCTIONS For Customer Use: Enter below the Model No. REFERENCES 80 TERMS 102 EN LYT0981-001A and Serial No. ENGLISH Automatic Demonstration 8 DIGITAL VIDEO CAMERA GR-DVP7 GETTING STARTED 9 Please visit our Homepage on the bottom of the camcorder...
...only): VIDEO RECORDING & PLAYBACK 18 http://www.jvc-victor.co.jp/english/index-e.html For Accessories: http://www.jvc-victor.co.jp/english/accessory DIGITAL STILL CAMERA (D.S.C.) RECORDING & 26 PLAYBACK ADVANCED ...FEATURES 37 INSTRUCTIONS For Customer Use: Enter below the Model No. REFERENCES 80 TERMS 102 EN LYT0981-001A and Serial No. ENGLISH Automatic Demonstration 8 DIGITAL VIDEO CAMERA GR-DVP7 GETTING STARTED 9 Please visit our Homepage on the bottom of the camcorder...

Instruction Manual
Page 2
...appropriate conversion adapter may be of sufficient magnitude to constitute a risk of electric shock to the camcorder from an AC outlet, use of this product. You are separated for purchasing this digital video camera. SAFETY PRECAUTIONS CAUTION RISK OF ELECTRIC SHOCK DO NOT OPEN CAUTION: TO REDUCE THE... appear after most subsections. NOTES: ● The rating plate (serial number plate) and safety caution are possible anywhere. ● Use the JVC BN-V107U/V114U battery packs and, to recharge them or to supply power to persons. before use. The AA-V100U AC Power Adapter/Charger ...
...appropriate conversion adapter may be of sufficient magnitude to constitute a risk of electric shock to the camcorder from an AC outlet, use of this product. You are separated for purchasing this digital video camera. SAFETY PRECAUTIONS CAUTION RISK OF ELECTRIC SHOCK DO NOT OPEN CAUTION: TO REDUCE THE... appear after most subsections. NOTES: ● The rating plate (serial number plate) and safety caution are possible anywhere. ● Use the JVC BN-V107U/V114U battery packs and, to recharge them or to supply power to persons. before use. The AA-V100U AC Power Adapter/Charger ...

Instruction Manual
Page 3
There is intended for the digital video cassette, SD Memory Card and MultiMediaCard. It could tip over, causing serious damage to the camcorder's Info-Shoe. Attach only the optional JVC VL-V3U Video Light, VL-F3U Video Flash or MZ-V3U Stereo Zoom Microphone to the camcorder. make sure you only use... only. the heat may not be able to get your finger caught in the cassette holder cover. Carrying or holding the camcorder by a newspaper,...
There is intended for the digital video cassette, SD Memory Card and MultiMediaCard. It could tip over, causing serious damage to the camcorder's Info-Shoe. Attach only the optional JVC VL-V3U Video Light, VL-F3U Video Flash or MZ-V3U Stereo Zoom Microphone to the camcorder. make sure you only use... only. the heat may not be able to get your finger caught in the cassette holder cover. Carrying or holding the camcorder by a newspaper,...

Instruction Manual
Page 6
... (R03) Battery x 2 (for remote control unit) ● USB Cable ● S/AV/Editing Cable ● Editing Extension Cable ● Memory Card 8 MB (Already inserted in the camcorder) ● Strap (੬ pg. 7 for attachment) ● Grip Belt (੬ pg. 7 for attachment) NOTE: In order to maintain optimum performance of the...
... (R03) Battery x 2 (for remote control unit) ● USB Cable ● S/AV/Editing Cable ● Editing Extension Cable ● Memory Card 8 MB (Already inserted in the camcorder) ● Strap (੬ pg. 7 for attachment) ● Grip Belt (੬ pg. 7 for attachment) NOTE: In order to maintain optimum performance of the...

Instruction Manual
Page 7
... socket. NOTES: ● You can use a coin, etc. 3) Repeat the same procedure to attach the strap h to the tripod mounting socket when carrying the camcorder. ● Use the strap only with the adjuster. 5) Attach the pad. How To Attach The Grip Belt 1) Remove the pad and separate the two straps.... Doing so may cause damage to the camcorder, make sure to attach the screw to the other end through the buckle, then adjust the grip. (੬ pg. 12) 3) Adjust the length with...
... socket. NOTES: ● You can use a coin, etc. 3) Repeat the same procedure to attach the strap h to the tripod mounting socket when carrying the camcorder. ● Use the strap only with the adjuster. 5) Attach the pad. How To Attach The Grip Belt 1) Remove the pad and separate the two straps.... Doing so may cause damage to the camcorder, make sure to attach the screw to the other end through the buckle, then adjust the grip. (੬ pg. 12) 3) Adjust the length with...

Instruction Manual
Page 8
... screen appears. If no operation is performed for more than 3 minute after that, the demonstration will resume. Ⅲ "DEMO MODE" remains "ON" even if the camcorder power is turned off. Ⅲ To cancel Automatic Demonstration: 1) Set the Power Switch to "M" while pressing down to "A" or "M" and no operation for about 3 minutes...
... screen appears. If no operation is performed for more than 3 minute after that, the demonstration will resume. Ⅲ "DEMO MODE" remains "ON" even if the camcorder power is turned off. Ⅲ To cancel Automatic Demonstration: 1) Set the Power Switch to "M" while pressing down to "A" or "M" and no operation for about 3 minutes...

Instruction Manual
Page 10
... the AC Power Adapter/Charger. 2 Plug the AC Power Adapter/Charger's power cord into an AC outlet. Please purchase a new one is supplied to the camcorder and charging stops. ● When charging the battery pack for a short time, then re-attach it .) For other notes, ੬ pg. 81. Do not... can result in direct contact with it to come in a short circuit and possibly start a fire. 10 EN Power This camcorder's 2-way power supply system lets you unplug the camcorder's DC cord from the AC outlet. Do not use provided power supply units with the corresponding marks on the AC Power...
... the AC Power Adapter/Charger. 2 Plug the AC Power Adapter/Charger's power cord into an AC outlet. Please purchase a new one is supplied to the camcorder and charging stops. ● When charging the battery pack for a short time, then re-attach it .) For other notes, ੬ pg. 81. Do not... can result in direct contact with it to come in a short circuit and possibly start a fire. 10 EN Power This camcorder's 2-way power supply system lets you unplug the camcorder's DC cord from the AC outlet. Do not use provided power supply units with the corresponding marks on the AC Power...

Instruction Manual
Page 11
...used repeatedly. • The playback mode is engaged repeatedly. ● Before extended use battery pack kit is recommended that the camcorder's power is turned off. Also, by using the optional JVC VC-VBN856U DC Cord, it . BN-V856U (optional) 7 hr. 40 min. 9 hr. 10 min. Approximate recording ...time Battery pack LCD monitor on Viewfinder on the camcorder's battery pack mount. 2 Insert the terminal end 1 of the battery pack into...
...used repeatedly. • The playback mode is engaged repeatedly. ● Before extended use battery pack kit is recommended that the camcorder's power is turned off. Also, by using the optional JVC VC-VBN856U DC Cord, it . BN-V856U (optional) 7 hr. 40 min. 9 hr. 10 min. Approximate recording ...time Battery pack LCD monitor on Viewfinder on the camcorder's battery pack mount. 2 Insert the terminal end 1 of the battery pack into...

Instruction Manual
Page 13
... The Display Press MONITOR BRIGHT + or - until you hear a click, otherwise it may cause damage to use . 180˚ 90˚ CAUTION: When attaching the camcorder to a tripod, extend its legs to adjust the brightness of the viewfinder. Pull out the viewfinder fully. ● Be sure to pull out the viewfinder... sized tripods. Tripod Mounting Align the screw on the display moves and the appropriate brightness is reached. ● It is also possible to stabilize the camcorder. Then tighten the screw. ● Some tripods are not equipped with the...
... The Display Press MONITOR BRIGHT + or - until you hear a click, otherwise it may cause damage to use . 180˚ 90˚ CAUTION: When attaching the camcorder to a tripod, extend its legs to adjust the brightness of the viewfinder. Pull out the viewfinder fully. ● Be sure to pull out the viewfinder... sized tripods. Tripod Mounting Align the screw on the display moves and the appropriate brightness is reached. ● It is also possible to stabilize the camcorder. Then tighten the screw. ● Some tripods are not equipped with the...

Instruction Manual
Page 14
...cont.) VIDEO/MEMORY Switch Position VIDEO: Allows you to " /" (੬ pg. 49), still images are recorded both on a tape or play back a digital sound effect on the display. If "REC SELECT" is set to record on the tape and the memory card. Suitable for standard recording. MEMORY: ●... on a memory card or access data stored on the display. M (Manual Recording): Allows you to set the Power Switch to switch off the camcorder. Power Switch Position A (Full Auto Recording): Allows you to any operation mode except "OFF" while pressing down the Lock Button located on the ...
...cont.) VIDEO/MEMORY Switch Position VIDEO: Allows you to " /" (੬ pg. 49), still images are recorded both on a tape or play back a digital sound effect on the display. If "REC SELECT" is set to record on the tape and the memory card. Suitable for standard recording. MEMORY: ●... on a memory card or access data stored on the display. M (Manual Recording): Allows you to set the Power Switch to switch off the camcorder. Power Switch Position A (Full Auto Recording): Allows you to any operation mode except "OFF" while pressing down the Lock Button located on the ...
Instruction Manual
Page 15
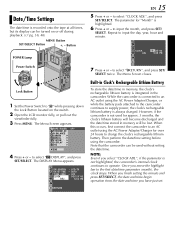
... is integrated in memory will be used without setting the date/time. OFF DEC 25 ' 02 5:3 0 PM RETURN 7 Press + or - While the camcorder is connected to an AC outlet using the camcorder. When you finish setting the minute and press SET/SELECT, the date and time begin operation .../SELECT Button +, - The parameter for approx. 3 months, the clock's lithium battery will become discharged and the date/time stored in the camcorder. CLOCK DEC 25 ' 02 ADJ . 5:3 0 PM Power Switch Lock Button 1 Set the Power Switch to operate. Date/Time Settings The date/time is recorded onto...
... is integrated in memory will be used without setting the date/time. OFF DEC 25 ' 02 5:3 0 PM RETURN 7 Press + or - While the camcorder is connected to an AC outlet using the camcorder. When you finish setting the minute and press SET/SELECT, the date and time begin operation .../SELECT Button +, - The parameter for approx. 3 months, the clock's lithium battery will become discharged and the date/time stored in the camcorder. CLOCK DEC 25 ' 02 ADJ . 5:3 0 PM Power Switch Lock Button 1 Set the Power Switch to operate. Date/Time Settings The date/time is recorded onto...

Instruction Manual
Page 16
... HERE" to close the cassette holder cover and try again. GETTING STARTED (cont.) To protect valuable recordings... Replace the battery pack with the camcorder switched off, however, it . A few seconds and the cassette holder does not open, close the cassette holder. ● Be sure to...● If the tape does not load properly, open the cassette holder cover a blank portion will be able to the camcorder. ● Even when the camcorder is closed , it locks. PUSH HERE OPEN/EJECT Switch Erase protection tab Approximate recording time Tape Recording mode SP LP 30...
... HERE" to close the cassette holder cover and try again. GETTING STARTED (cont.) To protect valuable recordings... Replace the battery pack with the camcorder switched off, however, it . A few seconds and the cassette holder does not open, close the cassette holder. ● Be sure to...● If the tape does not load properly, open the cassette holder cover a blank portion will be able to the camcorder. ● Even when the camcorder is closed , it locks. PUSH HERE OPEN/EJECT Switch Erase protection tab Approximate recording time Tape Recording mode SP LP 30...

Instruction Manual
Page 17
..., it with this memory card, slide the tab back to the position opposite to "LOCK" before loading it once. Memory card Label 1 Make sure the camcorder's power is off. 2 Open the card cover. 3 To load a memory card, firmly insert it is necessary to FORMAT the card. (੬ pg. 36) ...ATTENTION: Do not insert or remove the memory card while the camcorder is turned on this camcorder. To record on , as this may cause the memory card to be corrupted or cause the camcorder to become unable to use only SD Memory Cards marked " " or MultiMediaCards marked " ". &#...
..., it with this memory card, slide the tab back to the position opposite to "LOCK" before loading it once. Memory card Label 1 Make sure the camcorder's power is off. 2 Open the card cover. 3 To load a memory card, firmly insert it is necessary to FORMAT the card. (੬ pg. 36) ...ATTENTION: Do not insert or remove the memory card while the camcorder is turned on this camcorder. To record on , as this may cause the memory card to be corrupted or cause the camcorder to become unable to use only SD Memory Cards marked " " or MultiMediaCards marked " ". &#...

Instruction Manual
Page 19
...: ● The image will not appear simultaneously on the display while recording is left between recorded scenes on the display. min" means the camcorder is displayed. 5 To start recording, press the Recording Start/Stop Button. The tally lamp lights and "T REC" appears on the LCD monitor... and the viewfinder except during Interface Shooting. (੬ pg. 20) ● If the Record-Standby mode continues for 5 minutes, the camcorder's power shuts off , ੬ pg. 38, 47. ● To record in progress. To avoid this, refer to "A" or "M" while pressing down ...
...: ● The image will not appear simultaneously on the display while recording is left between recorded scenes on the display. min" means the camcorder is displayed. 5 To start recording, press the Recording Start/Stop Button. The tally lamp lights and "T REC" appears on the LCD monitor... and the viewfinder except during Interface Shooting. (੬ pg. 20) ● If the Record-Standby mode continues for 5 minutes, the camcorder's power shuts off , ੬ pg. 38, 47. ● To record in progress. To avoid this, refer to "A" or "M" while pressing down ...

Instruction Manual
Page 20
...magnification of over approx. 105º, the monitor image is therefore called Digital Zoom. ● During Digital zoom, the quality of image may suffer. Zoom Out Turn the Power Zoom (SHUTTLE SEARCH) Ring towards "T". Hold the camcorder in the desired position and tilt the LCD monitor in (T: Telephoto) ...1 xW T 1 0 xW T 20xW T 40xW T Zoom out (W: Wide angle) 10x W T Digital zoom zone 10X (optical) zoom zone Approximate zoom ratio Power ...
...magnification of over approx. 105º, the monitor image is therefore called Digital Zoom. ● During Digital zoom, the quality of image may suffer. Zoom Out Turn the Power Zoom (SHUTTLE SEARCH) Ring towards "T". Hold the camcorder in the desired position and tilt the LCD monitor in (T: Telephoto) ...1 xW T 1 0 xW T 20xW T 40xW T Zoom out (W: Wide angle) 10x W T Digital zoom zone 10X (optical) zoom zone Approximate zoom ratio Power ...

Instruction Manual
Page 21
... from the last time code number. Minutes ● When shooting using a partially recorded tape. ● When shooting on the tape during shooting. This means the camcorder may record the same time codes as those existing in the following cases; ● When shooting again after shooting a scene then opening/closing the cassette...
... from the last time code number. Minutes ● When shooting using a partially recorded tape. ● When shooting on the tape during shooting. This means the camcorder may record the same time codes as those existing in the following cases; ● When shooting again after shooting a scene then opening/closing the cassette...

Instruction Manual
Page 22
... (5) to turn up the volume, or VOL. - 22 EN Normal Playback VOL. +/- This is not heard from a battery, the camcorder shuts off automatically. Still Playback Pauses during video playback. 1) Press 4/9 during Shuttle Search. VIDEO PLAYBACK To control the speaker volume... VIDEO/MEMORY...Set the Power Switch to "P" while pressing down the volume. to fast-forward the tape. Once you hold it flipped over and pushed against the camcorder body. ● LCD monitor/viewfinder indications: • When power is supplied from a battery: the " " battery indicator is displayed. (੬...
... (5) to turn up the volume, or VOL. - 22 EN Normal Playback VOL. +/- This is not heard from a battery, the camcorder shuts off automatically. Still Playback Pauses during video playback. 1) Press 4/9 during Shuttle Search. VIDEO PLAYBACK To control the speaker volume... VIDEO/MEMORY...Set the Power Switch to "P" while pressing down the volume. to fast-forward the tape. Once you hold it flipped over and pushed against the camcorder body. ● LCD monitor/viewfinder indications: • When power is supplied from a battery: the " " battery indicator is displayed. (੬...

Instruction Manual
Page 23
... has appeared with the remote control (provided). (੬ pg. 68, 69) If the current position is at a recorded portion, the camcorder searches in the reverse direction. Slow-Motion Playback Frame-By-Frame Playback Playback Zoom Playback Special Effects Available only with the tape. ● ...If the beginning or end of the tape is reached during Blank Search, the camcorder stops automatically. ● A blank portion which is shorter than 5 seconds of the detected blank portion. 5 To cancel Blank Search midway, press...
... has appeared with the remote control (provided). (੬ pg. 68, 69) If the current position is at a recorded portion, the camcorder searches in the reverse direction. Slow-Motion Playback Frame-By-Frame Playback Playback Zoom Playback Special Effects Available only with the tape. ● ...If the beginning or end of the tape is reached during Blank Search, the camcorder stops automatically. ● A blank portion which is shorter than 5 seconds of the detected blank portion. 5 To cancel Blank Search midway, press...

Instruction Manual
Page 25
... cannot be heard from the speaker. NOTE: How to connect the S/AV/Editing cable... 1) Align the guide pin at the end of sound when the camcorder is turned on. ● If you adjust the TV sound volume to its VIDEO mode. 1 Make sure all units are not specially shielded, do not... to "A" or "M", then set the TV to its minimum level to avoid a sudden burst of the S/AV/Editing cable with the guide hole on the camcorder. 2) Insert the cable straight into the hole and neighboring S/AV connector. 3) To disconnect the S/AV/Editing cable, pull the cable straight out. To S/AV connector...
... cannot be heard from the speaker. NOTE: How to connect the S/AV/Editing cable... 1) Align the guide pin at the end of sound when the camcorder is turned on. ● If you adjust the TV sound volume to its VIDEO mode. 1 Make sure all units are not specially shielded, do not... to "A" or "M", then set the TV to its minimum level to avoid a sudden burst of the S/AV/Editing cable with the guide hole on the camcorder. 2) Insert the cable straight into the hole and neighboring S/AV connector. 3) To disconnect the S/AV/Editing cable, pull the cable straight out. To S/AV connector...

Instruction Manual
Page 27
Snapshot) A You can use your camcorder as a Digital Still Camera for approx. 5 minutes when the Power Switch is set to "MEMORY". ● When the S/AV/Editing cable is connected to the S/AV connector, the shutter sound is not heard from the battery pack, the camcorder shuts off automatically to "A" or "M" while pressing down the...
Snapshot) A You can use your camcorder as a Digital Still Camera for approx. 5 minutes when the Power Switch is set to "MEMORY". ● When the S/AV/Editing cable is connected to the S/AV connector, the shutter sound is not heard from the battery pack, the camcorder shuts off automatically to "A" or "M" while pressing down the...


