
other
Page 1
... no signal output from COMPONENT OUT. Is this model have an Auto Clock Setting. My DR-MV100B is distorted, press OUTPUT STATUS repeatedly until "Hello" stops flashing before it will flash "Hello" as shown on the tray. c Please wait until the picture appears normally to record on page 16 of your owner's manual and follow the directions for Clock Set. If you attempt to use to change the resolution setting. c Press OUTPUT STATUS button...
... no signal output from COMPONENT OUT. Is this model have an Auto Clock Setting. My DR-MV100B is distorted, press OUTPUT STATUS repeatedly until "Hello" stops flashing before it will flash "Hello" as shown on the tray. c Please wait until the picture appears normally to record on page 16 of your owner's manual and follow the directions for Clock Set. If you attempt to use to change the resolution setting. c Press OUTPUT STATUS button...
Instructions
Page 4
... pool; This product should be retained for long periods of the polarized or grounding-type plug. Do not defeat the safety purpose of time. 14. Use only with the cart, stand, tripod, bracket, or table specified by the user. Servicing is required when the apparatus has been damaged in installation such as powersupply cord or plug is used, use can be placed...
... pool; This product should be retained for long periods of the polarized or grounding-type plug. Do not defeat the safety purpose of time. 14. Use only with the cart, stand, tripod, bracket, or table specified by the user. Servicing is required when the apparatus has been damaged in installation such as powersupply cord or plug is used, use can be placed...

Instructions
Page 5
... to Recorder 13 Connecting a Digital Camcorder 13 Initial Setup Wizard 14 Using the Home Menu 15 Initial Settings 15 General Settings 16 Language Settings 17 Audio Settings 18 Lock (Parental Control) Settings 18-20 Recording Settings 20 Disc Settings 21-22 TV VIEWING Channel Selection 22 Channel Selection with Channel List menu .22 General Explanation of On-Screen Display .23 Displaying Information While Watching TV . .23 Displaying Disc Information on-screen . . . . .23 PLAYBACK Remote Control Function 24 Playing a Tape 24 Playing a DVD 24 VCR Playback Options 25 DVD or Video...
... to Recorder 13 Connecting a Digital Camcorder 13 Initial Setup Wizard 14 Using the Home Menu 15 Initial Settings 15 General Settings 16 Language Settings 17 Audio Settings 18 Lock (Parental Control) Settings 18-20 Recording Settings 20 Disc Settings 21-22 TV VIEWING Channel Selection 22 Channel Selection with Channel List menu .22 General Explanation of On-Screen Display .23 Displaying Information While Watching TV . .23 Displaying Disc Information on-screen . . . . .23 PLAYBACK Remote Control Function 24 Playing a Tape 24 Playing a DVD 24 VCR Playback Options 25 DVD or Video...
Instructions
Page 6
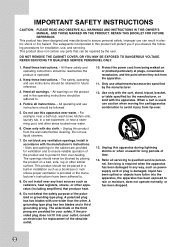
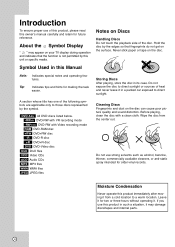
... cause poor picture quality and sound distortion. DVD ALL All DVD discs listed below. -RWVR DVD-RW with VR recording mode -RWVideo DVD-RW with a clean cloth. Do not use this product in this product immediately after moving it . Before playing, clean the disc with Video recording mode RAM DVD-RAM disc +RW DVD+RW disc -R DVD-R disc +R DVD+R disc DVD DVD-Video disc DivX DivX files VCD Video CDs ACD Audio CDs MP3 MP3 files WMA WMA files JPEG JPEG files Cleaning Discs Fingerprints and...
... cause poor picture quality and sound distortion. DVD ALL All DVD discs listed below. -RWVR DVD-RW with VR recording mode -RWVideo DVD-RW with a clean cloth. Do not use this product in this product immediately after moving it . Before playing, clean the disc with Video recording mode RAM DVD-RAM disc +RW DVD+RW disc -R DVD-R disc +R DVD+R disc DVD DVD-Video disc DivX DivX files VCD Video CDs ACD Audio CDs MP3 MP3 files WMA WMA files JPEG JPEG files Cleaning Discs Fingerprints and...
Instructions
Page 8
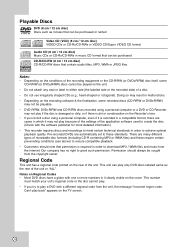
... condensation on the recording software & the finalization, some CD-R/RW (or DVD±R/RW) discs cannot be sought from the Internet. Notes on the cover. This number must match your unit's regional code or the disc cannot play because of the settings of the application software used to create the disc. (Check with one or more numbers in it clearly visible on Regional Codes • Most DVD discs have a globe...
... condensation on the recording software & the finalization, some CD-R/RW (or DVD±R/RW) discs cannot be sought from the Internet. Notes on the cover. This number must match your unit's regional code or the disc cannot play because of the settings of the application software used to create the disc. (Check with one or more numbers in it clearly visible on Regional Codes • Most DVD discs have a globe...

Instructions
Page 9
... and other rights owners. IN CASE OF 525 PROGRESSIVE SCAN PICTURE PROBLEMS, IT IS RECOMMENDED THAT THE USER SWITCH THE CONNECTION TO THE 'STANDARD DEFINITION' OUTPUT. IF THERE ARE QUESTIONS REGARDING YOUR TV SET COMPATIBILITY WITH THIS MODEL 525p DVD+VCR RECORDER, PLEASE CONTACT OUR CUSTOMER SERVICE CENTER. 5 CPRM recordings can only be made on DVD-RW discs formatted in VR mode and CPRM recordings can only be recorded using this copyright protection...
... and other rights owners. IN CASE OF 525 PROGRESSIVE SCAN PICTURE PROBLEMS, IT IS RECOMMENDED THAT THE USER SWITCH THE CONNECTION TO THE 'STANDARD DEFINITION' OUTPUT. IF THERE ARE QUESTIONS REGARDING YOUR TV SET COMPATIBILITY WITH THIS MODEL 525p DVD+VCR RECORDER, PLEASE CONTACT OUR CUSTOMER SERVICE CENTER. 5 CPRM recordings can only be made on DVD-RW discs formatted in VR mode and CPRM recordings can only be recorded using this copyright protection...

Instructions
Page 11
.... TITLE Displays the disc's Title menu, if available. c HOME Accesses or removes the HOME menu. Adjusts manually the tape's picture onscreen. Detach the battery cover on the Marker Search menu. Inputs channel numbers. JVC TV Control Buttons DISC MENU/LIST Accesses menu on or off. - PLAY (N) Starts playback. SEARCH Displays Marker Search menu. Angle: About 30° in a menu. - Displays information of the Remote Sensor. TV STANDBY/ON: Turns the TV on a DVD disc, Title List or Playlist menu. c d b BACKWARD / FORWARD (m/M) - SUBTITLE Selects a subtitle language...
.... TITLE Displays the disc's Title menu, if available. c HOME Accesses or removes the HOME menu. Adjusts manually the tape's picture onscreen. Detach the battery cover on the Marker Search menu. Inputs channel numbers. JVC TV Control Buttons DISC MENU/LIST Accesses menu on or off. - PLAY (N) Starts playback. SEARCH Displays Marker Search menu. Angle: About 30° in a menu. - Displays information of the Remote Sensor. TV STANDBY/ON: Turns the TV on a DVD disc, Title List or Playlist menu. c d b BACKWARD / FORWARD (m/M) - SUBTITLE Selects a subtitle language...

Instructions
Page 13
... other equipment there are using the cable converter. To view or record a CATV channel 1. Tune the TV to the cable output channel. (Example: CH3) 3. The DVD image could be distorted during playback. Position the units away from your TV and attach it is connected directly to the TV and tune the TV to the correct video input channel. • Do not connect the Recorder's AUDIO OUTPUT jack to the jack...
... other equipment there are using the cable converter. To view or record a CATV channel 1. Tune the TV to the cable output channel. (Example: CH3) 3. The DVD image could be distorted during playback. Position the units away from your TV and attach it is connected directly to the TV and tune the TV to the correct video input channel. • Do not connect the Recorder's AUDIO OUTPUT jack to the jack...

Instructions
Page 15
...) supports both video and audio on your system can change the resolution (480i, 480p, 720p, 1080i or 1080p) for this choice is compatible with HDMI-HDCP specifications. - It's impossible copy protected-DVD title's playback in non-HDCP devices. • For best performance, directly connect the HDMI output to 48 kHz so your TV. When this unit. - Please read TV's owner's manual then set correctly for the HDMI output using a HDMI cable. 1. Check the operating instructions...
...) supports both video and audio on your system can change the resolution (480i, 480p, 720p, 1080i or 1080p) for this choice is compatible with HDMI-HDCP specifications. - It's impossible copy protected-DVD title's playback in non-HDCP devices. • For best performance, directly connect the HDMI output to 48 kHz so your TV. When this unit. - Please read TV's owner's manual then set correctly for the HDMI output using a HDMI cable. 1. Check the operating instructions...

Instructions
Page 19
... Input: Displays DV Input mode. (See page 39) 4. Initial Settings Setup • Start: Displays Setup menu. Select [Setup] > [Start] and press ENTER. 3. Press RETURN (O) or HOME to the previous level. 15 Press HOME and the Home menu appears. 2. Music (See page 30) • DISC: Displays [Music List] menu for playback and recording of three levels to customize the settings provided. Plays back DVD-Video disc (page 26-27). HOOKUP AND SETTINGS Using the Home Menu From the Home Menu screen you can access all the Media for disc...
... Input: Displays DV Input mode. (See page 39) 4. Initial Settings Setup • Start: Displays Setup menu. Select [Setup] > [Start] and press ENTER. 3. Press RETURN (O) or HOME to the previous level. 15 Press HOME and the Home menu appears. 2. Music (See page 30) • DISC: Displays [Music List] menu for playback and recording of three levels to customize the settings provided. Plays back DVD-Video disc (page 26-27). HOOKUP AND SETTINGS Using the Home Menu From the Home Menu screen you can access all the Media for disc...
Instructions
Page 20
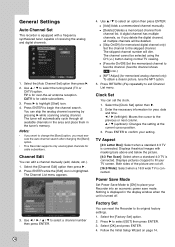
... for cable subscribers. Select [OK] and press ENTER. 4. Clock Set You can reset the Recorder to the skipped channel. Press ENTER to place your setting. Power Save Mode Set Power Save Mode to [ON] to confirm your Recorder into an economic power save mode. Nothing is displayed in the tuner's memory. Press B to exit Channel List menu. Use v / V to select an option then press ENTER. [Add] Adds a unmemorized channel manually. [Delete] Deletes a memorized channel from channel...
... for cable subscribers. Select [OK] and press ENTER. 4. Clock Set You can reset the Recorder to the skipped channel. Press ENTER to place your setting. Power Save Mode Set Power Save Mode to [ON] to confirm your Recorder into an economic power save mode. Nothing is displayed in the tuner's memory. Press B to exit Channel List menu. Use v / V to select an option then press ENTER. [Add] Adds a unmemorized channel manually. [Delete] Deletes a memorized channel from channel...
Instructions
Page 22
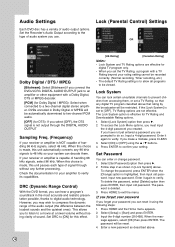
... a new password as shown in [Lock System] above . 18 Set the Recorder's Audio Output according to verify. DRC (Dynamic Range Control) With the DVD format, you can enter or change the password, press ENTER when the [Change] option is to allow all programs to verify. Enter it again to be restricted. Set Password You can reset it using the v / V buttons. 4. To change password. 1. Press HOME and the Home menu appears. 2. Select [Setup] > [Start] and press...
... a new password as shown in [Lock System] above . 18 Set the Recorder's Audio Output according to verify. DRC (Dynamic Range Control) With the DVD format, you can enter or change the password, press ENTER when the [Change] option is to allow all programs to verify. Enter it again to be restricted. Set Password You can reset it using the v / V buttons. 4. To change password. 1. Press HOME and the Home menu appears. 2. Select [Setup] > [Start] and press...

Instructions
Page 24
... - Use v / V to exit the menu. Some digital camcorders have a camcorder using 32kHz/12-bit sound connected to the front panel DV IN jack. the other information program, talk shows, music videos, and variety program. [C]: Program intended for children under age 8. [C8+]: Program generally considered acceptable for children 8 years and over to set the picture quality for VCR recording; Follow step 2 as shown in [Lock System] above . 3. DV Record Audio You need...
... - Use v / V to exit the menu. Some digital camcorders have a camcorder using 32kHz/12-bit sound connected to the front panel DV IN jack. the other information program, talk shows, music videos, and variety program. [C]: Program intended for children under age 8. [C8+]: Program generally considered acceptable for children 8 years and over to set the picture quality for VCR recording; Follow step 2 as shown in [Lock System] above . 3. DV Record Audio You need...

Instructions
Page 26
... B. 2. Channel Selection with Channel List menu Note: All the downloaded videos from Divx® VOD service at www.divx.com/vod. Number and - (dash) buttons Use Number (0-9) and - (dash) buttons to select a [TV (CATV)], [DTV (CADTV)], [Favorite] or [ALL]. FAV. on the Remote Control or CH v/V on this unit. Displaying Channel List and Changing Channel 1. Switching Channel List Four types of the channel list. 2. TV (CATV): Shows all analog and digital channels...
... B. 2. Channel Selection with Channel List menu Note: All the downloaded videos from Divx® VOD service at www.divx.com/vod. Number and - (dash) buttons Use Number (0-9) and - (dash) buttons to select a [TV (CATV)], [DTV (CADTV)], [Favorite] or [ALL]. FAV. on the Remote Control or CH v/V on this unit. Displaying Channel List and Changing Channel 1. Switching Channel List Four types of the channel list. 2. TV (CATV): Shows all analog and digital channels...

Instructions
Page 27
.... Indicates program title, start time and end time of the program while viewing digital channel. There may be changed using the menu. 1. Indicates current date and time. Channel Information Icon (DTV caption icon) Indicates that the current channel contains the DTV multiple audio languages. Press DISPLAY once to select an audio language. 3. General Explanation of On-Screen Display Some DVDs require specific operation or allow only limited operation during VCR recording. When this occurs, is wide or 4:3 picture format...
.... Indicates program title, start time and end time of the program while viewing digital channel. There may be changed using the menu. 1. Indicates current date and time. Channel Information Icon (DTV caption icon) Indicates that the current channel contains the DTV multiple audio languages. Press DISPLAY once to select an audio language. 3. General Explanation of On-Screen Display Some DVDs require specific operation or allow only limited operation during VCR recording. When this occurs, is wide or 4:3 picture format...

Instructions
Page 28
... disc tray closes automatically and unit turns off , it cannot make recordings using HOME menu. 4. Press EJECT, OPEN/CLOSE (Z) to stop the playback, press STOP (x). To stop playback. • If the tape reaches the end before you should reset the remote control code described above. If you change the batteries of the Remote Control with the playback side down on the front panel display window, press STANDBY/ON once. 3. The new code setup on the unit to start , press PLAY (N) or Starts playback using S-VHS format tapes...
... disc tray closes automatically and unit turns off , it cannot make recordings using HOME menu. 4. Press EJECT, OPEN/CLOSE (Z) to stop the playback, press STOP (x). To stop playback. • If the tape reaches the end before you should reset the remote control code described above. If you change the batteries of the Remote Control with the playback side down on the front panel display window, press STANDBY/ON once. 3. The new code setup on the unit to start , press PLAY (N) or Starts playback using S-VHS format tapes...

Instructions
Page 37
... play a DVD-R, DVD+R, or DVD+RW (Video mode) in a regular DVD player. Notes for how to record. Please disable/ adjust the TV Rating (See page 19) or the Parental Lock (See page 18) before you finalize the disc. Default quality, sufficient for each recording and determine the picture quality and how much space the recording will present the following message: "Cannot Record-No Input Signal". This means that are received, the program cannot be changed...
... play a DVD-R, DVD+R, or DVD+RW (Video mode) in a regular DVD player. Notes for how to record. Please disable/ adjust the TV Rating (See page 19) or the Parental Lock (See page 18) before you finalize the disc. Default quality, sufficient for each recording and determine the picture quality and how much space the recording will present the following message: "Cannot Record-No Input Signal". This means that are received, the program cannot be changed...
Instructions
Page 38
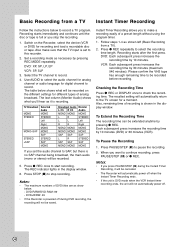
... Pause the Recording 1. The table below to record a TV program. To Extend the Recording Time The recording time can be recorded on the Recorder, select the device (VCR or DVD) for digital channel to record. Use AUDIO to select the audio channel for analog channel or audio language for recording and load a recordable disc or tape. DVD-R/RW/DVD-RAM: 99 - Press z REC repeatedly to record. 4. Recording starts immediately and continues until the disc or tape is full or you set to this recorder. 2. TV Broadcast...
... Pause the Recording 1. The table below to record a TV program. To Extend the Recording Time The recording time can be recorded on the Recorder, select the device (VCR or DVD) for digital channel to record. Use AUDIO to select the audio channel for analog channel or audio language for recording and load a recordable disc or tape. DVD-R/RW/DVD-RAM: 99 - Press z REC repeatedly to record. 4. Recording starts immediately and continues until the disc or tape is full or you set to this recorder. 2. TV Broadcast...

Instructions
Page 39
... Channel] - Use AUDIO to select the audio channel for AV1 input timer recording. 4. Press HOME and the Home menu appears. 2. Choose a channel or [OFF] for analog channel to record before the recording actually starts. • Use v / V to select a program you to record up to save the program. 6. Press RETURN (O) to edit the selected program. Set the recording end time. • [Mode] - Choose a date up to erase on the front panel display. • The Recorder will appear. • [Media...
... Channel] - Use AUDIO to select the audio channel for AV1 input timer recording. 4. Press HOME and the Home menu appears. 2. Choose a channel or [OFF] for analog channel to record before the recording actually starts. • Use v / V to select a program you to record up to save the program. 6. Press RETURN (O) to edit the selected program. Set the recording end time. • [Mode] - Choose a date up to erase on the front panel display. • The Recorder will appear. • [Media...

Instructions
Page 43
... can connect a DV-equipped camcorder to control the camcorder using a single DV cable for a while after turnning the camcorder off , and then on the kinds. Picture disturbance on the TV screen, the PLAY & RECORD functions won't work. Make sure your camcorder, you may remain displayed on the front panel of audio, video, data and control signals. It may occur if the source component pauses playback or plays an unrecorded section of DV input mode...
... can connect a DV-equipped camcorder to control the camcorder using a single DV cable for a while after turnning the camcorder off , and then on the kinds. Picture disturbance on the TV screen, the PLAY & RECORD functions won't work. Make sure your camcorder, you may remain displayed on the front panel of audio, video, data and control signals. It may occur if the source component pauses playback or plays an unrecorded section of DV input mode...


