
Instruction Manual
Page 3
... following conditions: a) When the power supply cord or plug is operated. - If you are the same. This will often require extensive work by the Operation Manual, as VCR's, and DVD players, you to service this product through openings as opening or removing covers may touch dangerous voltage points or short out...
... following conditions: a) When the power supply cord or plug is operated. - If you are the same. This will often require extensive work by the Operation Manual, as VCR's, and DVD players, you to service this product through openings as opening or removing covers may touch dangerous voltage points or short out...
Instruction Manual
Page 8
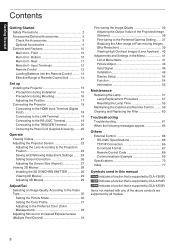
... of Fast-moving Images (Blur Reduction 39 Viewing High Contrast Images (Lens Aperture) . 40 Adjustments and Settings in this manual 4 indicates a function that is supported by DLA-X950R. 5 indicates a function that is supported by DLA-X750R. 6 indicates a function that is supported by all models. 8 Items not marked with any of Menu Items 41... Remote Control Code 68 Communications Example 69 Specifications 70 Index 77 Symbols used in the Menu 41 List of the above symbols are supported by DLA-X550R. Rear 11 Main Unit - Front 10 Main Unit -
... of Fast-moving Images (Blur Reduction 39 Viewing High Contrast Images (Lens Aperture) . 40 Adjustments and Settings in this manual 4 indicates a function that is supported by DLA-X950R. 5 indicates a function that is supported by DLA-X750R. 6 indicates a function that is supported by all models. 8 Items not marked with any of Menu Items 41... Remote Control Code 68 Communications Example 69 Specifications 70 Index 77 Symbols used in the Menu 41 List of the above symbols are supported by DLA-X550R. Rear 11 Main Unit - Front 10 Main Unit -
Instruction Manual
Page 10
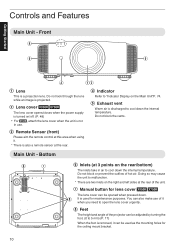
... 4 5 The lens cover can be used for maintenance purposes. A Lens This is projected. Do not look through the lens while an image is a projection lens. G Manual button for the ceiling mount bracket. 10 You can be opened when pressed down. D Indicator Refer to open the lens cover urgently. Do not block...
... 4 5 The lens cover can be used for maintenance purposes. A Lens This is projected. Do not look through the lens while an image is a projection lens. G Manual button for the ceiling mount bracket. 10 You can be opened when pressed down. D Indicator Refer to open the lens cover urgently. Do not block...
Instruction Manual
Page 18
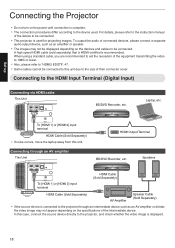
... output device, such as an AV amplifier or divider, the video image may not be displayed depending on the devices and cables to the instruction manual of their connector cover. Set up Connecting the Projector 0 Do not turn on the power until connection is complete. 0 The connection procedures differ according to...
... output device, such as an AV amplifier or divider, the video image may not be displayed depending on the devices and cables to the instruction manual of their connector cover. Set up Connecting the Projector 0 Do not turn on the power until connection is complete. 0 The connection procedures differ according to...
Instruction Manual
Page 22
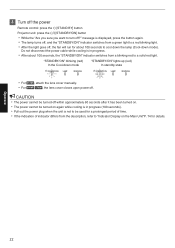
... lamp (Cool-down mode "STANDBY/ON" lights up (red) In standby state STANDBY/ON LAMP WARNING STANDBY/ON LAMP WARNING . 0 For 6, attach the lens cover manually. 0 For 4 5, the lens cover closes upon power off ?" CAUTION 0 The power cannot be turned off within approximately 60 seconds after it has been turned on...
... lamp (Cool-down mode "STANDBY/ON" lights up (red) In standby state STANDBY/ON LAMP WARNING STANDBY/ON LAMP WARNING . 0 For 6, attach the lens cover manually. 0 For 4 5, the lens cover closes upon power off ?" CAUTION 0 The power cannot be turned off within approximately 60 seconds after it has been turned on...
Instruction Manual
Page 28
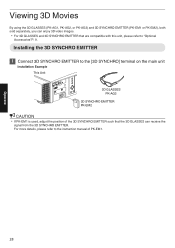
... Installation Example This Unit 3D GLASSES PK-AG3 3D SYNCHRO EMITTER PK-EM2 . Installing the 3D SYNCHRO EMITTER 1 Connect 3D SYNCHRO EMITTER to the instruction manual of the 3D SYNCHRO EMITTER such that are compatible with this unit, please refer to "Optional Accessories"P. 9. Operate Viewing 3D Movies By using the 3D...
... Installation Example This Unit 3D GLASSES PK-AG3 3D SYNCHRO EMITTER PK-EM2 . Installing the 3D SYNCHRO EMITTER 1 Connect 3D SYNCHRO EMITTER to the instruction manual of the 3D SYNCHRO EMITTER such that are compatible with this unit, please refer to "Optional Accessories"P. 9. Operate Viewing 3D Movies By using the 3D...
Instruction Manual
Page 29
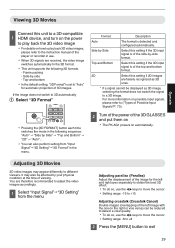
... on the power to play back the 3D video image 0 For details on how to play back 3D video images, please refer to the instruction manual of the player or recorder in the menu. Side-by Side Select this setting if the 3D input signal is detected and configured automatically. Adjusting...
... on the power to play back the 3D video image 0 For details on how to play back 3D video images, please refer to the instruction manual of the player or recorder in the menu. Side-by Side Select this setting if the 3D input signal is detected and configured automatically. Adjusting...
Instruction Manual
Page 35
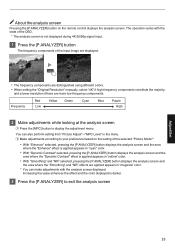
... can make adjustments with the state of the input image are displayed. . 0 The frequency components are distinguished using different colors. 0 When setting the "Original Resolution" manually, select "4K" if high-frequency components constitute the majority, and a lower resolution if there are applied appears in "magenta" color. * You can also perform setting...
... can make adjustments with the state of the input image are displayed. . 0 The frequency components are distinguished using different colors. 0 When setting the "Original Resolution" manually, select "4K" if high-frequency components constitute the majority, and a lower resolution if there are applied appears in "magenta" color. * You can also perform setting...
Instruction Manual
Page 36
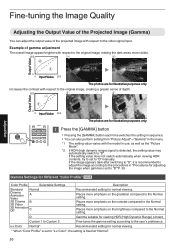
... image, creating a greater sense of the projected image with respect to the original image, making the dark areas more emphasis on the contrast compared to "D" manually. If the setting value does not switch automatically when viewing HDR contents, try to set to the Normal setting. Places more emphasis on the brightness...
... image, creating a greater sense of the projected image with respect to the original image, making the dark areas more emphasis on the contrast compared to "D" manually. If the setting value does not switch automatically when viewing HDR contents, try to set to the Normal setting. Places more emphasis on the brightness...
Instruction Manual
Page 40
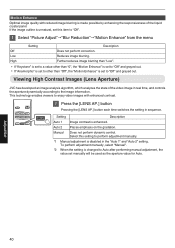
... Auto after performing manual adjustment, the value set to "Off". 1 Select "Picture Adjust"""Blur Reduction"""Motion Enhance" from the menu Off Low High Setting Description Does not perform correction. Setting Description Auto 1 Image contrast is disabled in the "Auto 1" and "Auto 2" setting. Viewing High Contrast Images (Lens Aperture) JVC has developed an...
... Auto after performing manual adjustment, the value set to "Off". 1 Select "Picture Adjust"""Blur Reduction"""Motion Enhance" from the menu Off Low High Setting Description Does not perform correction. Setting Description Auto 1 Image contrast is disabled in the "Auto 1" and "Auto 2" setting. Viewing High Contrast Images (Lens Aperture) JVC has developed an...
Instruction Manual
Page 44
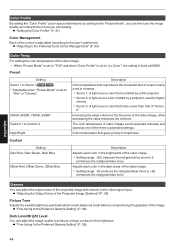
... in cinemas. 0 Xenon 1: A light source color that gives priority to the Preferred Gamma Setting" (P. 38) 44 The color temperature of video images can be adjusted manually and saved as one of a xenon lamp used in the brightness. Æ "Fine-tuning to brightness. Adjust/Set Color Profile By setting the "Color Profile...
... in cinemas. 0 Xenon 1: A light source color that gives priority to the Preferred Gamma Setting" (P. 38) 44 The color temperature of video images can be adjusted manually and saved as one of a xenon lamp used in the brightness. Æ "Fine-tuning to brightness. Adjust/Set Color Profile By setting the "Color Profile...
Instruction Manual
Page 55
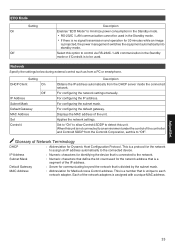
... for communicating beyond the network that is divided by the subnet mask. Default Gateway : Server for Dynamic Host Configuration Protocol. For configuring the network settings manually. For configuring the subnet mask. Applies the network settings. This is a protocol for identifying the device that define the bit count used . Network Specify the...
... for communicating beyond the network that is divided by the subnet mask. Default Gateway : Server for Dynamic Host Configuration Protocol. For configuring the network settings manually. For configuring the subnet mask. Applies the network settings. This is a protocol for identifying the device that define the bit count used . Network Specify the...
Instruction Manual
Page 62
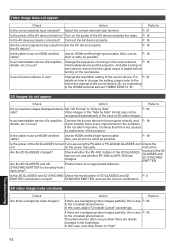
...images. Video images in the "Side by Set "3D Format" to "High" Troubleshooting 62 Is the cable in the case of the projector. on ? manual of 3D GLASSES and 3D P. 9 EMITTER combination correct? In this case, set "HDMI2 EDID" to "B". 3D images do not appear Check Action Refer to...output is stable before turning on each other? Is an intermediate device (AV amplifier, Connect the source device to the instruction manual of the AV device turned on the power manually. P. 18 Is the power of the AV device and play the video. SYNCHRO EMITTER, and use ? In this ...
...images. Video images in the "Side by Set "3D Format" to "High" Troubleshooting 62 Is the cable in the case of the projector. on ? manual of 3D GLASSES and 3D P. 9 EMITTER combination correct? In this case, set "HDMI2 EDID" to "B". 3D images do not appear Check Action Refer to...output is stable before turning on each other? Is an intermediate device (AV amplifier, Connect the source device to the instruction manual of the AV device turned on the power manually. P. 18 Is the power of the AV device and play the video. SYNCHRO EMITTER, and use ? In this ...
Instruction Manual
Page 63
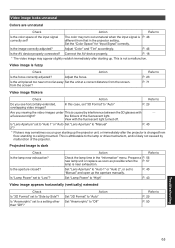
...Check Is "3D Format" set to "Side by malfunction of the projector. Is "Anamorphic" set to "Auto 1" or "Auto Set "Lens Aperture" to "Manual" 2"? Action Set "3D Format" to "Auto" Set "Anamorphic" to "Off" Refer to P. 29 P. 50 Troubleshooting 63 Is the unit placed too near ... the AV device properly connected? Video image is not a malfunction. In this case, set to "Manual" and open up the projector unit, or immediately after starting up the aperture manually. Projected image is P. 46 different from the screen? The color may appear slightly reddish immediately after ...
...Check Is "3D Format" set to "Side by malfunction of the projector. Is "Anamorphic" set to "Auto 1" or "Auto Set "Lens Aperture" to "Manual" 2"? Action Set "3D Format" to "Auto" Set "Anamorphic" to "Off" Refer to P. 29 P. 50 Troubleshooting 63 Is the unit placed too near ... the AV device properly connected? Video image is not a malfunction. In this case, set to "Manual" and open up the projector unit, or immediately after starting up the aperture manually. Projected image is P. 46 different from the screen? The color may appear slightly reddish immediately after ...
