

Instructions
Page 4
... in this product for the physical condition to your physical condition, please stop watching immediately and consult a physician if necessary. - When watching 3D images, it is no problem with replacement parts needed to a place which could be impaired. - As the visual sense is a high pressure... through vents (ventilation holes), etc. Exposure of about 5-15 minutes every 30-60 minutes and let your dealer, or the nearest authorized JVC service center. - Do not look at the illumination lamp directly by its function (such as found in regard to the picture element....
... in this product for the physical condition to your physical condition, please stop watching immediately and consult a physician if necessary. - When watching 3D images, it is no problem with replacement parts needed to a place which could be impaired. - As the visual sense is a high pressure... through vents (ventilation holes), etc. Exposure of about 5-15 minutes every 30-60 minutes and let your dealer, or the nearest authorized JVC service center. - Do not look at the illumination lamp directly by its function (such as found in regard to the picture element....

Instructions
Page 11
... out the full potential of the projector when playing movies on the 3D System" in the video quality and signal processing capability of color reproduction, cross-talk, viewing angles, and video processing performance. JVC projectors, DLA-X90R and DLA-X70R, are "a proof of high definition and high image quality", ... partnership with the aim to "faithfully reproduce images at home according to the intentions of the film director" during playback of 2D or 3D images, and they are equipped with the THX mode, which is limited to front projection only. 11 CAUTION In order for cinema viewing ...
... out the full potential of the projector when playing movies on the 3D System" in the video quality and signal processing capability of color reproduction, cross-talk, viewing angles, and video processing performance. JVC projectors, DLA-X90R and DLA-X70R, are "a proof of high definition and high image quality", ... partnership with the aim to "faithfully reproduce images at home according to the intentions of the film director" during playback of 2D or 3D images, and they are equipped with the THX mode, which is limited to front projection only. 11 CAUTION In order for cinema viewing ...
Instructions
Page 14
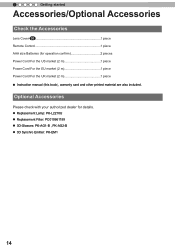
... Check the Accessories Lens Cover 30 1 piece Remote Control 1 piece AAA size Batteries (for details. ● Replacement Lamp: PK-L2210U ● Replacement Filter: PC010661199 ● 3D-Glasses: PK-AG1-B , PK-AG2-B ● 3D Synchro Emitter: PK-EM1 14
... Check the Accessories Lens Cover 30 1 piece Remote Control 1 piece AAA size Batteries (for details. ● Replacement Lamp: PK-L2210U ● Replacement Filter: PC010661199 ● 3D-Glasses: PK-AG1-B , PK-AG2-B ● 3D Synchro Emitter: PK-EM1 14
Instructions
Page 19
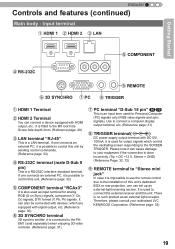
...or rear projection, one connects an external PC, it can set up an external light receiving section. If one can cause damage to your authorized JVC KENWOOD Corporation. (Reference page: 33) 19 Screw hole depth 3mm. (Reference page: 29) ③ LAN terminal "RJ-45" This is...M3 lock hole. Input terminal ① HDMI 1 ② HDMI 2 ③ LAN Getting Started ⑤ COMPONENT ④ RS-232C ⑨ REMOTE ⑥ 3D SYNCHRO ⑦ PC ⑧ TRIGGER ① HDMI 1 Terminal ② HDMI 2 Terminal You can also be connected with signal output, etc. (Reference page: 30) ...
...or rear projection, one connects an external PC, it can set up an external light receiving section. If one can cause damage to your authorized JVC KENWOOD Corporation. (Reference page: 33) 19 Screw hole depth 3mm. (Reference page: 29) ③ LAN terminal "RJ-45" This is...M3 lock hole. Input terminal ① HDMI 1 ② HDMI 2 ③ LAN Getting Started ⑤ COMPONENT ④ RS-232C ⑨ REMOTE ⑥ 3D SYNCHRO ⑦ PC ⑧ TRIGGER ① HDMI 1 Terminal ② HDMI 2 Terminal You can also be connected with signal output, etc. (Reference page: 30) ...
Instructions
Page 20
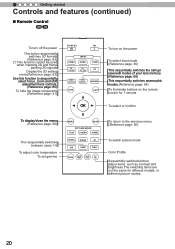
.... PC LENS. HIDE LIGHT To turn off the power This button sequentially switches 3D formats (Reference page: 63) (*) This function cannot be used when inputting 2D and frame packing 3D signals Display the 3D setting menu(Reference page: 63) Use this function to the previous menu (Reference...page: 50) This sequentially switches between users 1-5 To adjust color temperature To set gamma MENU BACK PICTURE MODE FILM CINEMA ANIME NATURAL STAGE 3D THX USER C.M.D. To return to sequentially select focus, zoom and shift adjustment lens controls. (Reference page: 65) To hide the image ...
.... PC LENS. HIDE LIGHT To turn off the power This button sequentially switches 3D formats (Reference page: 63) (*) This function cannot be used when inputting 2D and frame packing 3D signals Display the 3D setting menu(Reference page: 63) Use this function to the previous menu (Reference...page: 50) This sequentially switches between users 1-5 To adjust color temperature To set gamma MENU BACK PICTURE MODE FILM CINEMA ANIME NATURAL STAGE 3D THX USER C.M.D. To return to sequentially select focus, zoom and shift adjustment lens controls. (Reference page: 65) To hide the image ...
Instructions
Page 21
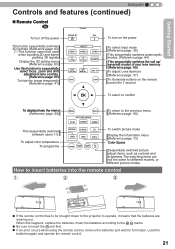
... remote control ① ② ③ ● If the remote control has to be used when inputting 2D and frame packing 3D signals Display the 3D setting menu (Reference page: 63) Use this happens, replace the batteries. Insert the batteries according to the marks. ● Be... the previous menu (Reference page: 50) This sequentially switches between users 1-5. HIDE LIGHT To turn off the power This button sequentially switches 3D formats (Reference page: 63) (*) This function cannot be brought closer to the projector to sequentially select focus, zoom and shift adjustment lens...
... remote control ① ② ③ ● If the remote control has to be used when inputting 2D and frame packing 3D signals Display the 3D setting menu (Reference page: 63) Use this happens, replace the batteries. Insert the batteries according to the marks. ● Be... the previous menu (Reference page: 50) This sequentially switches between users 1-5. HIDE LIGHT To turn off the power This button sequentially switches 3D formats (Reference page: 63) (*) This function cannot be brought closer to the projector to sequentially select focus, zoom and shift adjustment lens...
Instructions
Page 26
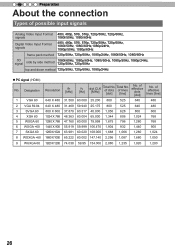
..., 720p/60Hz, 1080i/50Hz, 1080i/60Hz,1080p/24Hz, 1080p/50Hz, 1080p/60Hz frame pack method 720p/50Hz, 720p/60Hz, 1080p/24Hz, 1080i/50Hz, 1080i/60Hz 3D signal side by side method 1080i/60Hz, 1080p/60Hz, 1080i/50Hz, 1080p/50Hz, 1080p/24Hz, 720p/50Hz, 720p/60Hz top and down method 720p/50Hz...
..., 720p/60Hz, 1080i/50Hz, 1080i/60Hz,1080p/24Hz, 1080p/50Hz, 1080p/60Hz frame pack method 720p/50Hz, 720p/60Hz, 1080p/24Hz, 1080i/50Hz, 1080i/60Hz 3D signal side by side method 1080i/60Hz, 1080p/60Hz, 1080i/50Hz, 1080p/50Hz, 1080p/24Hz, 720p/50Hz, 720p/60Hz top and down method 720p/50Hz...
Instructions
Page 28
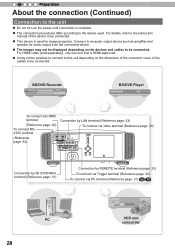
... terminal (Reference page: 30) 232C terminal STANDBY/ON (Reference page: 32) 1 HDMI 2 RS-232-C CR/PR CB/PB Y INPUT OK 3D SYNCHRO PC TRIGGER REMOTE CONTROL MENU BACK Connection by 3D SYNCHRO terminal (Reference page: 31) Connection by LAN terminal (Reference page: 33) (Reference page: 29) To connect RS- 2 Preparation About the...
... terminal (Reference page: 30) 232C terminal STANDBY/ON (Reference page: 32) 1 HDMI 2 RS-232-C CR/PR CB/PB Y INPUT OK 3D SYNCHRO PC TRIGGER REMOTE CONTROL MENU BACK Connection by 3D SYNCHRO terminal (Reference page: 31) Connection by LAN terminal (Reference page: 33) (Reference page: 29) To connect RS- 2 Preparation About the...
Instructions
Page 29
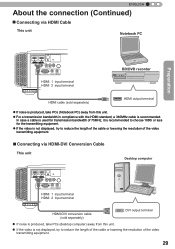
...9632; Connecting via HDMI-DVI Conversion Cable This unit Desktop computer 1 HDMI 2 RS-232-C CR/PR CB/PB Y STANDBY/ON INPUT OK 3D SYNCHRO PC TRIGGER REMOTE CONTROL MENU BACK HDMI 1 input terminal HDMI 2 input terminal HDMI-DVI conversion cable (sold separately) DVI output terminal &#... ■ Connecting via HDMI Cable This unit Notebook PC Preparation 1 HDMI 2 RS-232-C CR/PR CB/PB Y STANDBY/ON INPUT OK 3D SYNCHRO PC TRIGGER REMOTE CONTROL MENU BACK HDMI 1 input terminal HDMI 2 input terminal BD/DVD recorder HDMI cable (sold separately) HDMI output terminal ...
...9632; Connecting via HDMI-DVI Conversion Cable This unit Desktop computer 1 HDMI 2 RS-232-C CR/PR CB/PB Y STANDBY/ON INPUT OK 3D SYNCHRO PC TRIGGER REMOTE CONTROL MENU BACK HDMI 1 input terminal HDMI 2 input terminal HDMI-DVI conversion cable (sold separately) DVI output terminal &#... ■ Connecting via HDMI Cable This unit Notebook PC Preparation 1 HDMI 2 RS-232-C CR/PR CB/PB Y STANDBY/ON INPUT OK 3D SYNCHRO PC TRIGGER REMOTE CONTROL MENU BACK HDMI 1 input terminal HDMI 2 input terminal BD/DVD recorder HDMI cable (sold separately) HDMI output terminal ...
Instructions
Page 30
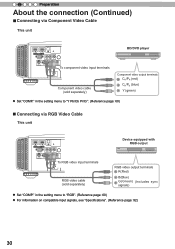
...(Continued) ■ Connecting via RGB Video Cable This unit 1 HDMI 2 RS-232-C CR/PR CB/PB Y STANDBY/ON INPUT OK 3D SYNCHRO PC TRIGGER REMOTE CONTROL To RGB video MENU BACK input terminals RGB video cable (sold separately) BD/DVD player Component video output terminals CR...9632; Connecting via Component Video Cable This unit STANDBY/ON INPUT OK C 1 HDMI 2 RS-232-C CR/PR CB/PB Y MENU BACK 3D SYNCHRO PC TRIGGER REMOTE CONTROL To component video input terminals Component video cable (sold separately) Device equipped with RGB output RGB video output terminals R(Red...
...(Continued) ■ Connecting via RGB Video Cable This unit 1 HDMI 2 RS-232-C CR/PR CB/PB Y STANDBY/ON INPUT OK 3D SYNCHRO PC TRIGGER REMOTE CONTROL To RGB video MENU BACK input terminals RGB video cable (sold separately) BD/DVD player Component video output terminals CR...9632; Connecting via Component Video Cable This unit STANDBY/ON INPUT OK C 1 HDMI 2 RS-232-C CR/PR CB/PB Y MENU BACK 3D SYNCHRO PC TRIGGER REMOTE CONTROL To component video input terminals Component video cable (sold separately) Device equipped with RGB output RGB video output terminals R(Red...

Instructions
Page 31
...ENGLISH About the connection (Continued) ■ Connecting via PC Cable 90 70 This unit Preparation 1 HDMI 2 RS-232-C CR/PR CB/PB Y 3D SYNCHRO PC TRIGGER REMOTE CONTROL STANDBY/ON INPUT OK MENU BACK Notebook PC To PC input terminal PC cable(sold separately). ● The PK-EM1... infrared sometimes affects other infrared communication devices. ● 3D glasses (PK-AG1-B, PK-AG2-B) is an optional device, and is a dedicated terminal for broadcasting in public places may infringe the rights of...
...ENGLISH About the connection (Continued) ■ Connecting via PC Cable 90 70 This unit Preparation 1 HDMI 2 RS-232-C CR/PR CB/PB Y 3D SYNCHRO PC TRIGGER REMOTE CONTROL STANDBY/ON INPUT OK MENU BACK Notebook PC To PC input terminal PC cable(sold separately). ● The PK-EM1... infrared sometimes affects other infrared communication devices. ● 3D glasses (PK-AG1-B, PK-AG2-B) is an optional device, and is a dedicated terminal for broadcasting in public places may infringe the rights of...
Instructions
Page 32
... voltage of menu [5] "Function". (Reference page: 72) ■ Connected by RS-232C connection cable This unit 1 HDMI 2 CR/PR CB/PB Y 3D SYNCHRO PC TRIGGER REMOTE CONTROL STANDBY/ON INPUT OK MENU BACK RS-232C connection cable (sold separately) Trigger input terminal ( Φ 3.5) ● Do not ... the connection (Continued) ■ Connecting via Trigger Cable This unit STANDBY/ON 1 HDMI 2 RS-232-C CR/PR CB/PB Y INPUT OK 3D SYNCHRO PC To Trigger output terminal TRIGGER REMOTE CONTROL MENU BACK Screen CAUTION Trigger cable (sold separately) RS-232C terminal 32
... voltage of menu [5] "Function". (Reference page: 72) ■ Connected by RS-232C connection cable This unit 1 HDMI 2 CR/PR CB/PB Y 3D SYNCHRO PC TRIGGER REMOTE CONTROL STANDBY/ON INPUT OK MENU BACK RS-232C connection cable (sold separately) Trigger input terminal ( Φ 3.5) ● Do not ... the connection (Continued) ■ Connecting via Trigger Cable This unit STANDBY/ON 1 HDMI 2 RS-232-C CR/PR CB/PB Y INPUT OK 3D SYNCHRO PC To Trigger output terminal TRIGGER REMOTE CONTROL MENU BACK Screen CAUTION Trigger cable (sold separately) RS-232C terminal 32
Instructions
Page 33
... for questions concerning the network connection. ■ Connected by a REMOTE terminal This unit 1 HDMI 2 RS-232-C CR/PR CB/PB Y 3D SYNCHRO PC TRIGGER REMOTE CONTROL STANDBY/ON INPUT OK MENU BACK connection cable(sold separately) External infrared sensor (sold separately) ● For an external... ENGLISH About the connection (Continued) ■ Connected by LAN terminal This unit HUB 1 HDMI 2 RS-232-C CR/PR CB/PB Y 3D SYNCHRO PC TRIGGER REMOTE CONTROL connection cable (sold separately) STANDBY/ON INPUT OK MENU BACK Network Server ● The network is not used to...
... for questions concerning the network connection. ■ Connected by a REMOTE terminal This unit 1 HDMI 2 RS-232-C CR/PR CB/PB Y 3D SYNCHRO PC TRIGGER REMOTE CONTROL STANDBY/ON INPUT OK MENU BACK connection cable(sold separately) External infrared sensor (sold separately) ● For an external... ENGLISH About the connection (Continued) ■ Connected by LAN terminal This unit HUB 1 HDMI 2 RS-232-C CR/PR CB/PB Y 3D SYNCHRO PC TRIGGER REMOTE CONTROL connection cable (sold separately) STANDBY/ON INPUT OK MENU BACK Network Server ● The network is not used to...
Instructions
Page 34
CAUTION ● When you have connected the equipment, connect the projector power cord. 1 HDMI 2 RS-232-C CR/PR CB/PB Y 3D SYNCHRO PC TRIGGER REMOTE CONTROL STANDBY/ON INPUT OK MENU BACK 1 Connect the power cord supplied with the unit power input terminal 2 Connect to the ...
CAUTION ● When you have connected the equipment, connect the projector power cord. 1 HDMI 2 RS-232-C CR/PR CB/PB Y 3D SYNCHRO PC TRIGGER REMOTE CONTROL STANDBY/ON INPUT OK MENU BACK 1 Connect the power cord supplied with the unit power input terminal 2 Connect to the ...

Instructions
Page 36
HIDE LIGHT MENU BACK PICTURE MODE FILM CINEMA ANIME NATURAL STAGE 3D THX USER C.M.D. PC 2 Play back the selected device 3 Adjust the zoom (screen size) Lens Control LENS Zoom WARNING LAMP STANDBY/ON Select Back Exit Adjust ... also select the input mode by pressing the up/down buttons CONTROL LENS MEMORY ANAMO. 3 Operation Basic Operation 6 1 STAND BY ON HDMI 1 INPUT HDMI 2 3D FORMAT 3D SETTING COMP. Basic operation procedures Once you use the product Projection without removing the lens cover may cause the product to turn on the unit...
HIDE LIGHT MENU BACK PICTURE MODE FILM CINEMA ANIME NATURAL STAGE 3D THX USER C.M.D. PC 2 Play back the selected device 3 Adjust the zoom (screen size) Lens Control LENS Zoom WARNING LAMP STANDBY/ON Select Back Exit Adjust ... also select the input mode by pressing the up/down buttons CONTROL LENS MEMORY ANAMO. 3 Operation Basic Operation 6 1 STAND BY ON HDMI 1 INPUT HDMI 2 3D FORMAT 3D SETTING COMP. Basic operation procedures Once you use the product Projection without removing the lens cover may cause the product to turn on the unit...
Instructions
Page 38
...BACK 2 Select "Input Signal" "Aspect (Video)" ① Select ② Confirm Input Signal HDMI COMP. PC Picture Position Aspect (Video) Mask Progressive 3D Setting 4:3 off of the video D Adjustment of the keystone correction A Setting the Screen Size The projected image can change the screen size of the ... and Projected Image by Different Screen Size 1 Project the image MENU BACK PICTURE MODE FILM CINEMA ANIME NATURAL STAGE 3D THX USER C.M.D. 4:3 video signal GAMMA COLOR TEMP COLOR P.FILE PIC. 3 Operation Basic Operation (continued) STAND BY ON HDMI 1 INPUT HDMI...
...BACK 2 Select "Input Signal" "Aspect (Video)" ① Select ② Confirm Input Signal HDMI COMP. PC Picture Position Aspect (Video) Mask Progressive 3D Setting 4:3 off of the video D Adjustment of the keystone correction A Setting the Screen Size The projected image can change the screen size of the ... and Projected Image by Different Screen Size 1 Project the image MENU BACK PICTURE MODE FILM CINEMA ANIME NATURAL STAGE 3D THX USER C.M.D. 4:3 video signal GAMMA COLOR TEMP COLOR P.FILE PIC. 3 Operation Basic Operation (continued) STAND BY ON HDMI 1 INPUT HDMI...
Instructions
Page 39
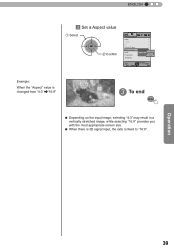
PC Picture Position Aspect (Video) Mask Progressive 3D Setting 16:9 off Auto 4:3 16:9 Custom Exit MENU Select Operate Back BACK Example: When the "Aspect" value is changed from "4:3" "16:9" 3 To end MENU ● Depending on the input image, selecting "4:3" may result in a vertically stretched image, while selecting "16:9" provides you with the most appropriate screen size. ● When there is 3D signal input, the ratio is fixed to "16:9". ENGLISH 3 Set a Aspect value ① Select ② Confirm Input Signal HDMI COMP. Operation 39
PC Picture Position Aspect (Video) Mask Progressive 3D Setting 16:9 off Auto 4:3 16:9 Custom Exit MENU Select Operate Back BACK Example: When the "Aspect" value is changed from "4:3" "16:9" 3 To end MENU ● Depending on the input image, selecting "4:3" may result in a vertically stretched image, while selecting "16:9" provides you with the most appropriate screen size. ● When there is 3D signal input, the ratio is fixed to "16:9". ENGLISH 3 Set a Aspect value ① Select ② Confirm Input Signal HDMI COMP. Operation 39
Instructions
Page 40
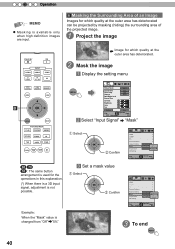
..." value is available only when high definition images are input. ADJ. Image for the operations in this explanation. (*) When there is a 3D input signal, adjustment is used for which quality at the outer area has deteriorated. 2 Mask the image 1 Display the setting menu MENU Picture... Adjust Picture Mode Color Profile Color Temp. GAMMA COLOR TEMP COLOR P.FILE PIC. PC LENS. PC Picture Position Aspect (Video) Mask Progressive 3D Setting 16:9 Off Auto 2.5% 5% Off Custom Exit MENU Select Operate Back BACK 90 70 X307 : The same button arrangement is not possible...
..." value is available only when high definition images are input. ADJ. Image for the operations in this explanation. (*) When there is a 3D input signal, adjustment is used for which quality at the outer area has deteriorated. 2 Mask the image 1 Display the setting menu MENU Picture... Adjust Picture Mode Color Profile Color Temp. GAMMA COLOR TEMP COLOR P.FILE PIC. PC LENS. PC Picture Position Aspect (Video) Mask Progressive 3D Setting 16:9 Off Auto 2.5% 5% Off Custom Exit MENU Select Operate Back BACK 90 70 X307 : The same button arrangement is not possible...
Instructions
Page 41
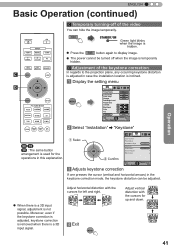
... Select "Installation" "Keystone" 90 70 X307 : The same button arrangement is used for left and right. ● When there is a 3D input signal, adjustment is not possible. MENU Adjust vertical distortion with the cursors for the operations in this explanation. ① Selec Installation Lens Control...adjusted in the keystone correction mode, the keystone distortion can hide the image temporarily. STAND BY ON HDMI 1 INPUT HDMI 2 3D FORMAT 3D SETTING COMP. D Adjustment of the video You can be turned off of the keystone correction In regards to display image. ●...
... Select "Installation" "Keystone" 90 70 X307 : The same button arrangement is used for left and right. ● When there is a 3D input signal, adjustment is not possible. MENU Adjust vertical distortion with the cursors for the operations in this explanation. ① Selec Installation Lens Control...adjusted in the keystone correction mode, the keystone distortion can hide the image temporarily. STAND BY ON HDMI 1 INPUT HDMI 2 3D FORMAT 3D SETTING COMP. D Adjustment of the video You can be turned off of the keystone correction In regards to display image. ●...
Instructions
Page 45
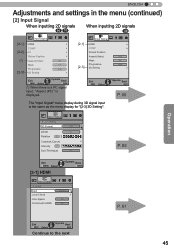
...BACK Continue to the next 45 Picture Position Aspect(Video) 16:9 Mask Off Progressive Auto [2-3] 3D Setting Exit MENU Select Operate Back BACK P. 60 The "Input Signal" menu display during 3D signal input is displayed. ENGLISH Adjustments and settings in the menu (continued) [2] Input Signal ...2D signals 90 70 30 Input Signal [2-1] HDMI COMP. [2-2] PC Picture Position (*) Aspect(Video) 16:9 Mask Off Progressive Auto [2-3] 3D Setting Exit MENU Select Operate Back BACK (*) When there is a PC signal input, "Aspect (PC)" is the same as the menu display for...
...BACK Continue to the next 45 Picture Position Aspect(Video) 16:9 Mask Off Progressive Auto [2-3] 3D Setting Exit MENU Select Operate Back BACK P. 60 The "Input Signal" menu display during 3D signal input is displayed. ENGLISH Adjustments and settings in the menu (continued) [2] Input Signal ...2D signals 90 70 30 Input Signal [2-1] HDMI COMP. [2-2] PC Picture Position (*) Aspect(Video) 16:9 Mask Off Progressive Auto [2-3] 3D Setting Exit MENU Select Operate Back BACK (*) When there is a PC signal input, "Aspect (PC)" is the same as the menu display for...
