
Instructions
Page 3
..., and the point where they may be blocked by the manufacturer or with a three-wire plug. - Do not place this causes condensation, by the Operation Manual, as a bookcase or rack unless proper ventilation is used replacement and above Front 200 mm and above parts specified by placing the product on or...
..., and the point where they may be blocked by the manufacturer or with a three-wire plug. - Do not place this causes condensation, by the Operation Manual, as a bookcase or rack unless proper ventilation is used replacement and above Front 200 mm and above parts specified by placing the product on or...
Instructions
Page 14
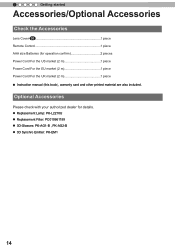
... confirm 2 pieces Power Cord For the US market (2 m 1 piece Power Cord For the EU market (2 m 1 piece Power Cord For the UK market (2 m 1 piece ● Instruction manual (this book), warranty card and other printed material are also included.
... confirm 2 pieces Power Cord For the US market (2 m 1 piece Power Cord For the EU market (2 m 1 piece Power Cord For the UK market (2 m 1 piece ● Instruction manual (this book), warranty card and other printed material are also included.

Instructions
Page 15
... do not look inside during normal use. ⑦ Feet The height (0 to 5 mm) can be adjusted by turning the foot. Bottom ⑤ Inlets ⑥ Manual button for maintenance and not used for lens cover 90 70 ⑤ Inlets (at two points on the rear/ bottom) In order to cool the... of the unit. (*) There are inlets at 3 points on the right and left sides of the rear side. (Reference page: 16) ⑦ Feet ⑥ Manual operation button of hot air. Please do not block the vents. ② Remote receiver (front) Please aim the remote control at the rear. Getting Started...
... do not look inside during normal use. ⑦ Feet The height (0 to 5 mm) can be adjusted by turning the foot. Bottom ⑤ Inlets ⑥ Manual button for maintenance and not used for lens cover 90 70 ⑤ Inlets (at two points on the rear/ bottom) In order to cool the... of the unit. (*) There are inlets at 3 points on the right and left sides of the rear side. (Reference page: 16) ⑦ Feet ⑥ Manual operation button of hot air. Please do not block the vents. ② Remote receiver (front) Please aim the remote control at the rear. Getting Started...
Instructions
Page 28
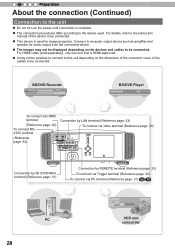
... depending on the dimension of the connector cover of the device to be connected. ● This device is used . For details, refer to the instruction manual of the cables to be connected.
... depending on the dimension of the connector cover of the device to be connected. ● This device is used . For details, refer to the instruction manual of the cables to be connected.

Instructions
Page 63
Use the UP/DOWN keys to display the adjustment gauge window. In such cases, configure the signal manually. (*) It is projected as a 2D signal. Settings: Auto, Side by Side Top and Bottom 2D 2D/3D On Off Parallax Crosstalk Cancel White Red Green ...
Use the UP/DOWN keys to display the adjustment gauge window. In such cases, configure the signal manually. (*) It is projected as a 2D signal. Settings: Auto, Side by Side Top and Bottom 2D 2D/3D On Off Parallax Crosstalk Cancel White Red Green ...

Instructions
Page 73
.... Use the UP and DOWN keys to select items. Press the [BACK] key to return to the previous screen. The network settings are being done manually. Displays video image input terminal. The firmware version is displayed. Displays upon HDMI/COMP. Displays the lamp use time. Displays the color bit depth concerning...
.... Use the UP and DOWN keys to select items. Press the [BACK] key to return to the previous screen. The network settings are being done manually. Displays video image input terminal. The firmware version is displayed. Displays upon HDMI/COMP. Displays the lamp use time. Displays the color bit depth concerning...
