
Instruction Manual
Page 1
... 3 T ZOOM W SHIFT FOCUS ON KEYSTONE SHUTTER OFF T DIGITAL ZOOM W RM-MQX1G REMOTE CONTROL UNIT (Lenses are not supplied.) LCT0963-002A Model No. SUPER PROJECTOR MANUEL D'INSTRUCTIONS : SUPER PROJECTEUR DLA-QX1G INSTRUCTIONS ENGLISH FRANÇAIS For Customer Use: Enter below the Serial No. Conservez cette information à titre d'information. which is located on...
... 3 T ZOOM W SHIFT FOCUS ON KEYSTONE SHUTTER OFF T DIGITAL ZOOM W RM-MQX1G REMOTE CONTROL UNIT (Lenses are not supplied.) LCT0963-002A Model No. SUPER PROJECTOR MANUEL D'INSTRUCTIONS : SUPER PROJECTEUR DLA-QX1G INSTRUCTIONS ENGLISH FRANÇAIS For Customer Use: Enter below the Serial No. Conservez cette information à titre d'information. which is located on...
Instruction Manual
Page 3
INSTRUCTIONS SUPER PROJECTOR DLA-QX1G ENGLISH
INSTRUCTIONS SUPER PROJECTOR DLA-QX1G ENGLISH

Instruction Manual
Page 4
... and can radiate radio frequency energy and, if not installed and used in accordance with high-intensity or high-contrast on a screen. NOTE: This equipment has been tested and found to comply with... long time or an abnormally bright video picture to be burned in to the D-ILA device. Before using it, read and follow all instructions carefully to take full advantage ... not approved by JVC could be projected. Use special care when projecting video games or computer program images. About the plug (U.S.A. Refer servicing to Part 15 of this projector. only) This projector is no problem...
... and can radiate radio frequency energy and, if not installed and used in accordance with high-intensity or high-contrast on a screen. NOTE: This equipment has been tested and found to comply with... long time or an abnormally bright video picture to be burned in to the D-ILA device. Before using it, read and follow all instructions carefully to take full advantage ... not approved by JVC could be projected. Use special care when projecting video games or computer program images. About the plug (U.S.A. Refer servicing to Part 15 of this projector. only) This projector is no problem...

Instruction Manual
Page 6
... gas is provided and the manufacturer's instructions have been adhered to personal injury. For any unqualified person to insert the plug into this projector. If installation is equipped with high pressure inside of the grounded plug. - Slots and openings in the cabinet are not likely to be placed in a built-in a fire...
... gas is provided and the manufacturer's instructions have been adhered to personal injury. For any unqualified person to insert the plug into this projector. If installation is equipped with high pressure inside of the grounded plug. - Slots and openings in the cabinet are not likely to be placed in a built-in a fire...

Instruction Manual
Page 7
...is designed for electromagnetic compatibility we recommend to be connected to the power cord. In order to keep the best performance and furthermore for professional projector appliances and can be connected to reach a power point, then obtain an appropriate safety approved extension lead or adapter or consult your plug, proceed... If the plug fitted is not suitable for example purpose built broadcasting or recording studio), and the rural outdoors environment (far away from this projector does not have a wall outlet plug attached. This equipment is in your wall outlet.
...is designed for electromagnetic compatibility we recommend to be connected to the power cord. In order to keep the best performance and furthermore for professional projector appliances and can be connected to reach a power point, then obtain an appropriate safety approved extension lead or adapter or consult your plug, proceed... If the plug fitted is not suitable for example purpose built broadcasting or recording studio), and the rural outdoors environment (far away from this projector does not have a wall outlet plug attached. This equipment is in your wall outlet.
Instruction Manual
Page 8
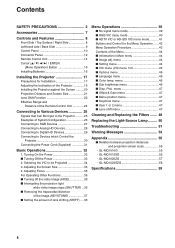
...Function 22 Effective Range and Distance of the Remote Control Unit 24 Connecting to Various Devices 25 Signals that Can Be Input to the Projector .......... 25 Examples of the Menu 44 I Information in Main menu 44 I Image adj. menu 46 I Sub brightness menu 46 I...10 Connector Panel 12 Remote Control Unit 14 Cursor (5/ ∞/ 2/ 3) / ENTER (Menu Operation) Button 16 Installing Batteries 16 Installing the Projector 17 Precautions for the Menu Operation ...... 42 Menu Operation Procedure 43 Contents of System Configuration 26 Connecting to RGB Devices 27 Connecting to Analog HD...
...Function 22 Effective Range and Distance of the Remote Control Unit 24 Connecting to Various Devices 25 Signals that Can Be Input to the Projector .......... 25 Examples of the Menu 44 I Information in Main menu 44 I Image adj. menu 46 I Sub brightness menu 46 I...10 Connector Panel 12 Remote Control Unit 14 Cursor (5/ ∞/ 2/ 3) / ENTER (Menu Operation) Button 16 Installing Batteries 16 Installing the Projector 17 Precautions for the Menu Operation ...... 42 Menu Operation Procedure 43 Contents of System Configuration 26 Connecting to RGB Devices 27 Connecting to Analog HD...

Instruction Manual
Page 9
PK-Q01HSDG A board to be used for adding HDTV signal (Y, Pb, and Pr video signal) input function to the projector. 7 if any item is missing, please contact your dealer. LOCK OPERATE MODE BLAICGKHT UNLOCK ENTER MENU EXIT VIC 1 VIC 2 VIC 3 T ZOOMW SHIFT KEYSTONE FOCUS T ON ... lens 3 : 1 to 7 : 1 zoom lens • Video Interface Card (VIC) PK-Q01HAG A board to be used for adding HD-SDI video signal input function to the projector. Accessories The following accessories are included with this...
PK-Q01HSDG A board to be used for adding HDTV signal (Y, Pb, and Pr video signal) input function to the projector. 7 if any item is missing, please contact your dealer. LOCK OPERATE MODE BLAICGKHT UNLOCK ENTER MENU EXIT VIC 1 VIC 2 VIC 3 T ZOOMW SHIFT KEYSTONE FOCUS T ON ... lens 3 : 1 to 7 : 1 zoom lens • Video Interface Card (VIC) PK-Q01HAG A board to be used for adding HD-SDI video signal input function to the projector. Accessories The following accessories are included with this...

Instruction Manual
Page 10
... foot to 7 : 1 zoom lens For attaching or replacing the lens, consult your dealer who performed the installation and adjustments of your projector. 8 For details, refer to "To remove the handles" on page 9. 2 Adjustable feet They are set at this sensor. For details...operating with the remote control unit, aim it is 50° horizontally, and 15° vertically. 8 Lens mount Attach a projection lens separately sold to this projector, use them if necessary. Controls and Features Front Side / Top Surface / Right Side 1 2 9 8 1 STAND BY OPERATE VIC SELECT 1 2 MODE...
... foot to 7 : 1 zoom lens For attaching or replacing the lens, consult your dealer who performed the installation and adjustments of your projector. 8 For details, refer to "To remove the handles" on page 9. 2 Adjustable feet They are set at this sensor. For details...operating with the remote control unit, aim it is 50° horizontally, and 15° vertically. 8 Lens mount Attach a projection lens separately sold to this projector, use them if necessary. Controls and Features Front Side / Top Surface / Right Side 1 2 9 8 1 STAND BY OPERATE VIC SELECT 1 2 MODE...

Instruction Manual
Page 11
If this area to cover the screw holes. To remove the handles Remove two screws fixing the handle to the projector with a hex wrench. • Keep the handles and screws for the light-source lamp power supply. CAUTIONS • Be careful as the MAIN POWER switch ... or malfunction. This fan continues running as long as paper, cloth or soft cushion could be drawn in or exhausted air is placed around the projector, heat may build up inside , which warm air comes out.
If this area to cover the screw holes. To remove the handles Remove two screws fixing the handle to the projector with a hex wrench. • Keep the handles and screws for the light-source lamp power supply. CAUTIONS • Be careful as the MAIN POWER switch ... or malfunction. This fan continues running as long as paper, cloth or soft cushion could be drawn in or exhausted air is placed around the projector, heat may build up inside , which warm air comes out.

Instruction Manual
Page 12
... buttons Use these buttons. The effective operating range of angles is about 32.8 ft (10 m) from the menu mode. Refer to this projector. Memo While in stand-by mode. The menu appears or disappears on the operations, refer to correct a trapezoidal distortion of cool-down mode...and 15° vertically. W (Wide) : The projected screen size increases. For details on the operations, refer to enter or exit from each of this projector has the zooming function.) T (Tele) : The projected screen size decreases. For details on the operations, refer to page 37. 4 VIC SELECT 1, ...
... buttons Use these buttons. The effective operating range of angles is about 32.8 ft (10 m) from the menu mode. Refer to this projector. Memo While in stand-by mode. The menu appears or disappears on the operations, refer to correct a trapezoidal distortion of cool-down mode...and 15° vertically. W (Wide) : The projected screen size increases. For details on the operations, refer to enter or exit from each of this projector has the zooming function.) T (Tele) : The projected screen size decreases. For details on the operations, refer to page 37. 4 VIC SELECT 1, ...

Instruction Manual
Page 13
... Use this button in the menu mode. ENGLISH 11 After the cooling-down mode, the projection cannot be trouble in the shutter function. 04 The projector is turned off the MAIN POWER switch while in the cool-down mode. For details on . Also, do not block any of the lamp. ... input. 10 The lamp goes off during projection. 20 Trouble in the light-source lamp power supply. 21 Trouble in the power supply of the projector. 22 Trouble in the power supply of the fan. 23 Trouble in cooling process of R-device. 24 Trouble in cooling process of G-device. 25 ...
... Use this button in the menu mode. ENGLISH 11 After the cooling-down mode, the projection cannot be trouble in the shutter function. 04 The projector is turned off the MAIN POWER switch while in the cool-down mode. For details on . Also, do not block any of the lamp. ... input. 10 The lamp goes off during projection. 20 Trouble in the light-source lamp power supply. 21 Trouble in the power supply of the projector. 22 Trouble in the power supply of the fan. 23 Trouble in cooling process of R-device. 24 Trouble in cooling process of G-device. 25 ...
Instruction Manual
Page 14
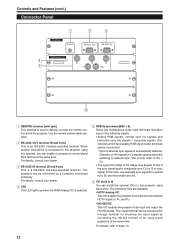
...signals, and horizontal sync (H) signals / composite signals (Cs). (Devices which have analog RGB signal output terminals can enable a computer to this projector using this case, use separate sync signals for using these slots. For details, consult your dealer. 3 RS-232C IN terminal (D-sub 9 pin... jack) This terminal is used as a line through terminal for checking the input signal by a computer connected externally. When another DLA-QX1G is connected to control plural DLA-QX1Gs at the same time. The priority order is H/V > Cs. • The uppermost edge of H/V signals or Cs signals ...
...signals, and horizontal sync (H) signals / composite signals (Cs). (Devices which have analog RGB signal output terminals can enable a computer to this projector using this case, use separate sync signals for using these slots. For details, consult your dealer. 3 RS-232C IN terminal (D-sub 9 pin... jack) This terminal is used as a line through terminal for checking the input signal by a computer connected externally. When another DLA-QX1G is connected to control plural DLA-QX1Gs at the same time. The priority order is H/V > Cs. • The uppermost edge of H/V signals or Cs signals ...

Instruction Manual
Page 15
... Pr ı Å ı HD-SDI VIC IN OUT ENGLISH How to install the optional VICs 1 Remove the slot panel from the slot of the projector. 1) Remove two screws on the slot panel, one on each end, from the unused VIC slot. • When replacing the slot panel, set it to... the projector with two screws attached to the projector. After inserting the VIC into the slot, fasten it with the arrow up (indicated on inner surface of the VIC are input...
... Pr ı Å ı HD-SDI VIC IN OUT ENGLISH How to install the optional VICs 1 Remove the slot panel from the slot of the projector. 1) Remove two screws on the slot panel, one on each end, from the unused VIC slot. • When replacing the slot panel, set it to... the projector with two screws attached to the projector. After inserting the VIC into the slot, fasten it with the arrow up (indicated on inner surface of the VIC are input...

Instruction Manual
Page 16
...use . 14 buttons Use these buttons. The OPERATE indicator lights up . For details on the operations, refer to turn on the projector. Memo 8 DIGITAL ZOOM T/W buttons Not in use it as the cursor button, press it to select menu items or adjust settings... FOCUS ON KEYSTONE SHUTTER OFF T DIGITAL ZOOM W RM-MQX1G REMOTE CONTROL UNIT 1 2 3 4 5 6 7 8 9 p 1 Remote control's signal transmitter 2 OPERATE button When the projector is in stand-by mode, press this button for one of the projected video image. +: The focus point becomes more to page 34. 7 FOCUS +/- When...
...use . 14 buttons Use these buttons. The OPERATE indicator lights up . For details on the operations, refer to turn on the projector. Memo 8 DIGITAL ZOOM T/W buttons Not in use it as the cursor button, press it to select menu items or adjust settings... FOCUS ON KEYSTONE SHUTTER OFF T DIGITAL ZOOM W RM-MQX1G REMOTE CONTROL UNIT 1 2 3 4 5 6 7 8 9 p 1 Remote control's signal transmitter 2 OPERATE button When the projector is in stand-by mode, press this button for one of the projected video image. +: The focus point becomes more to page 34. 7 FOCUS +/- When...

Instruction Manual
Page 17
... Ô UNLOCK switch When this terminal and the REMOTE terminal on the projection. buttons do not work only when the lens unit attached to this projector has the zooming function.) T (Tele) : The projected screen size decreases. For details on the operation, refer to page 37. For details on... work only when the lens unit attached to this terminal. w ZOOM T/W buttons Use these buttons to adjust the height of the projection screen when projectors are operating the menu. buttons Use these buttons to adjust the projected screen size. (They work . r EXIT button Use this button to turn...
... Ô UNLOCK switch When this terminal and the REMOTE terminal on the projection. buttons do not work only when the lens unit attached to this projector has the zooming function.) T (Tele) : The projected screen size decreases. For details on the operation, refer to page 37. For details on... work only when the lens unit attached to this terminal. w ZOOM T/W buttons Use these buttons to adjust the height of the projection screen when projectors are operating the menu. buttons Use these buttons to adjust the projected screen size. (They work . r EXIT button Use this button to turn...

Instruction Manual
Page 18
... 2 2 UNLOCK ENTER EXIT 2 MENU VIC 2 VIC 3 1 When using batteries If batteries are used for a prolonged period of time. • When the batteries are for this projector has only one of batteries as the ENTER button : Press the button straight down when the menu is displayed, use the button in the remote...
... 2 2 UNLOCK ENTER EXIT 2 MENU VIC 2 VIC 3 1 When using batteries If batteries are used for a prolonged period of time. • When the batteries are for this projector has only one of batteries as the ENTER button : Press the button straight down when the menu is displayed, use the button in the remote...

Instruction Manual
Page 19
... 80% (no condensation) Allowable storage temperature range: -10°C to +60°C (14°F to direct sunlight. • Temperature is high or humidity is much water, humidity or dust. • The projector may be subjected to oil smoke or cigarette smoke. • On a soft surface such as a carpet or cushion. • The...
... 80% (no condensation) Allowable storage temperature range: -10°C to +60°C (14°F to direct sunlight. • Temperature is high or humidity is much water, humidity or dust. • The projector may be subjected to oil smoke or cigarette smoke. • On a soft surface such as a carpet or cushion. • The...

Instruction Manual
Page 20
....) Precautions for Installation (Cont.) I Observe the following when hanging the projector from the shelf for maintenance. 305 mm (12") or more STAND BY OPERATE HIDE VIC SELECT 1 KEY STONE 2 3 EXIT MENU T ZOOM FOCUS ENTER W CONTROL REMOTE... and maintenance purposes, a suitable facility is recommended that the projector be fixed to its stand with bolts. • When mounting the projector to the ceiling, first install a special shelf and then place the projector on it is necessary to easily lift and lower the projector from the ceiling • To prevent falling or overturning...
....) Precautions for Installation (Cont.) I Observe the following when hanging the projector from the shelf for maintenance. 305 mm (12") or more STAND BY OPERATE HIDE VIC SELECT 1 KEY STONE 2 3 EXIT MENU T ZOOM FOCUS ENTER W CONTROL REMOTE... and maintenance purposes, a suitable facility is recommended that the projector be fixed to its stand with bolts. • When mounting the projector to the ceiling, first install a special shelf and then place the projector on it is necessary to easily lift and lower the projector from the ceiling • To prevent falling or overturning...

Instruction Manual
Page 21
Installing the Projector (Cont.) Adjusting the Inclination of the Projector The vertical angle and the leveling of the projector can be adjusted with the adjustable feet on the bottom of 0° to 3.5°. +3.5 Extend Shorten I Adjusting the vertical angle of the projector Lift the projector, rotate the front adjustable feet, and adjust the vertical angle within the range of the projector. I Leveling the projector Lift the projector, rotate the adjustable feet, and adjust the horizontal angle until the projector is level. +4.5˚ -4.5˚ Extend Shorten ENGLISH 19
Installing the Projector (Cont.) Adjusting the Inclination of the Projector The vertical angle and the leveling of the projector can be adjusted with the adjustable feet on the bottom of 0° to 3.5°. +3.5 Extend Shorten I Adjusting the vertical angle of the projector Lift the projector, rotate the front adjustable feet, and adjust the vertical angle within the range of the projector. I Leveling the projector Lift the projector, rotate the adjustable feet, and adjust the horizontal angle until the projector is level. +4.5˚ -4.5˚ Extend Shorten ENGLISH 19

Instruction Manual
Page 22
... first install the frame specially designed for ventilation. • For the stack configuration, you need to fix the lens mechanism when the projector was used together (stack configuration). STAND BY OPERATE HIDE VIC SELECT 1 KEY STONE 2 3 EXIT MENU T ZOOM FOCUS ENTER W ... RGB Analog VIC R G Y B H/CS • The brightness of stability and efficiency for the stack configuration. Using two or more projectors together, high image brightness can enjoy the projection through the glass STAND BY OPERATE HIDE VIC SELECT 1 KEY STONE 2 3 EXIT MENU T ZOOM FOCUS ...
... first install the frame specially designed for ventilation. • For the stack configuration, you need to fix the lens mechanism when the projector was used together (stack configuration). STAND BY OPERATE HIDE VIC SELECT 1 KEY STONE 2 3 EXIT MENU T ZOOM FOCUS ENTER W ... RGB Analog VIC R G Y B H/CS • The brightness of stability and efficiency for the stack configuration. Using two or more projectors together, high image brightness can enjoy the projection through the glass STAND BY OPERATE HIDE VIC SELECT 1 KEY STONE 2 3 EXIT MENU T ZOOM FOCUS ...


