Instruction Manual
Page 1
... panneau latéral du coffret de l'appareil. No de modèle Serial No. Model No. No de série DLA-QX1G LOCK UNLOCK OPERATE HIDE BACK LIGHT ENTER EXIT MENU VIC 1 VIC 2 VIC 3 T ZOOM W SHIFT FOCUS ON KEYSTONE SHUTTER OFF T DIGITAL ZOOM W RM-MQX1G REMOTE CONTROL UNIT (Lenses are not supplied.) LCT0963-002A Conservez cette information à titre d'information. Retain this information for future...
... panneau latéral du coffret de l'appareil. No de modèle Serial No. Model No. No de série DLA-QX1G LOCK UNLOCK OPERATE HIDE BACK LIGHT ENTER EXIT MENU VIC 1 VIC 2 VIC 3 T ZOOM W SHIFT FOCUS ON KEYSTONE SHUTTER OFF T DIGITAL ZOOM W RM-MQX1G REMOTE CONTROL UNIT (Lenses are not supplied.) LCT0963-002A Conservez cette information à titre d'information. Retain this information for future...

Instruction Manual
Page 4
... limits are unable to satisfy FCC rule. only) This projector is no problem with high-intensity or high-contrast on a screen. If you for a long time or an abnormally bright video picture to radio communications. Before using it, read and follow all instructions carefully to qualified service personnel. SAFETY PRECAUTIONS IMPORTANT INFORMATION WARNING : TO PREVENT FIRE OR SHOCK HAZARDS, DO NOT EXPOSE...
... limits are unable to satisfy FCC rule. only) This projector is no problem with high-intensity or high-contrast on a screen. If you for a long time or an abnormally bright video picture to radio communications. Before using it, read and follow all instructions carefully to qualified service personnel. SAFETY PRECAUTIONS IMPORTANT INFORMATION WARNING : TO PREVENT FIRE OR SHOCK HAZARDS, DO NOT EXPOSE...

Instruction Manual
Page 5
..., ask the service technician to perform safety checks to defeat the safeguards incorporated into the projection lens while the illumination lamp is turned on the product and in the operating instructions should use this product, observe the following basic rules for its installation, use liquid cleaners or aerosol cleaners. When replacement parts are covered by the Operation Manual, as the original part. Upon completion of controls may cause...
..., ask the service technician to perform safety checks to defeat the safeguards incorporated into the projection lens while the illumination lamp is turned on the product and in the operating instructions should use this product, observe the following basic rules for its installation, use liquid cleaners or aerosol cleaners. When replacement parts are covered by the Operation Manual, as the original part. Upon completion of controls may cause...

Instruction Manual
Page 6
... or short out parts that your eyesight can result in a fire or electric shock. This will fit only into the inside the light-source lamp (lamp unit) of the product and protect it to your home, consult your product dealer. - attaching it from other power supply voltage, power cable must not be blocked or covered. (The openings should be operated only with a three...
... or short out parts that your eyesight can result in a fire or electric shock. This will fit only into the inside the light-source lamp (lamp unit) of the product and protect it to your home, consult your product dealer. - attaching it from other power supply voltage, power cable must not be blocked or covered. (The openings should be operated only with a three...
Instruction Manual
Page 8
... Cleaning and Replacing the Filters ....... 48 Replacing the Light-Source Lamp ......... 50 Troubleshooting 51 Warning Messages 53 Appendix 55 I Color temp. Adjusting Focus 35 For Operating Other Functions 36 I Turning off the video image (HIDE 36 I Interrupting the projection light while video image stops (SHUTTER) .. 36 I Removing the trapezoidal distortion of the image (KEYSTONE 37 I Setting the amount of lens shifting (SHIFT) .... 38 Menu Operations 39 I No signal menu mode 39 I RGB VIC menu mode 40 I HDTV VIC or HD-SDI VIC menu mode 41 Buttons and Control...
... Cleaning and Replacing the Filters ....... 48 Replacing the Light-Source Lamp ......... 50 Troubleshooting 51 Warning Messages 53 Appendix 55 I Color temp. Adjusting Focus 35 For Operating Other Functions 36 I Turning off the video image (HIDE 36 I Interrupting the projection light while video image stops (SHUTTER) .. 36 I Removing the trapezoidal distortion of the image (KEYSTONE 37 I Setting the amount of lens shifting (SHIFT) .... 38 Menu Operations 39 I No signal menu mode 39 I RGB VIC menu mode 40 I HDTV VIC or HD-SDI VIC menu mode 41 Buttons and Control...

Instruction Manual
Page 9
...;2) (for checking operation) (For USA) (For Europe) Power code [approx. 9.8 ft (3.0 m)] Remote control cable [approx. 49.2 ft (15 m)] Protective cap (×8) (for covering the screw holes) ENGLISH Information on separately sold items • Projection lens GL-MQ1010G GL-MQ1015SG GL-MQ1020ZG GL-MQ1023SZG 1 : 1 fixed-focus lens 1.5 : 1 fixed-focus lens 2.1 : 1 to 4.9 : 1 zoom lens 3 : 1 to 7 : 1 zoom lens • Video Interface Card (VIC) PK-Q01HAG A board to be used for adding HDTV signal (Y, Pb, and Pr video signal) input function...
...;2) (for checking operation) (For USA) (For Europe) Power code [approx. 9.8 ft (3.0 m)] Remote control cable [approx. 49.2 ft (15 m)] Protective cap (×8) (for covering the screw holes) ENGLISH Information on separately sold items • Projection lens GL-MQ1010G GL-MQ1015SG GL-MQ1020ZG GL-MQ1023SZG 1 : 1 fixed-focus lens 1.5 : 1 fixed-focus lens 2.1 : 1 to 4.9 : 1 zoom lens 3 : 1 to 7 : 1 zoom lens • Video Interface Card (VIC) PK-Q01HAG A board to be used for adding HDTV signal (Y, Pb, and Pr video signal) input function...

Instruction Manual
Page 10
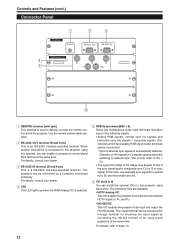
... MENU T ZOOM FOCUS W ENTER CONTROL REMOTE RS-232C OUT RS-232C IN R G H/CS RGB Analog VIC BV 7 21 6 5 1 2 3 4 1 Handles They are set in the range of your projector. 8 Turn the foot to "Control Panel" on . Adjustment can remove them . The effective operating distance of the remote control is the main power switch. An additional remote sensor is 50° horizontally, and 15° vertically. 8 Lens mount Attach a projection lens separately sold to 7 : 1 zoom lens For...
... MENU T ZOOM FOCUS W ENTER CONTROL REMOTE RS-232C OUT RS-232C IN R G H/CS RGB Analog VIC BV 7 21 6 5 1 2 3 4 1 Handles They are set in the range of your projector. 8 Turn the foot to "Control Panel" on . Adjustment can remove them . The effective operating distance of the remote control is the main power switch. An additional remote sensor is 50° horizontally, and 15° vertically. 8 Lens mount Attach a projection lens separately sold to 7 : 1 zoom lens For...

Instruction Manual
Page 11
... BY OPERATE VIC SELECT 1 2 MODE KEY STONE 3 EXIT MENU T ZOOM FOCUS W ENTER 9 To remove the handles Remove two screws fixing the handle to "Precautions for future use. STAND BY OPERATE VIC SELECT 1 2 MODE KEY STONE 3 EXIT MENU T ZOOM FOCUS W ENTER Then, attach the supplied protective caps to "Cleaning and Replacing the Filters" on pages 17 and 18. For details, refer to cover the screw holes. Deposition of dirt on . Controls and Features...
... BY OPERATE VIC SELECT 1 2 MODE KEY STONE 3 EXIT MENU T ZOOM FOCUS W ENTER 9 To remove the handles Remove two screws fixing the handle to "Precautions for future use. STAND BY OPERATE VIC SELECT 1 2 MODE KEY STONE 3 EXIT MENU T ZOOM FOCUS W ENTER Then, attach the supplied protective caps to "Cleaning and Replacing the Filters" on pages 17 and 18. For details, refer to cover the screw holes. Deposition of dirt on . Controls and Features...

Instruction Manual
Page 12
... (Video Input Card) installed into the cool-down mode: If you press the OPERATE button, the projector is provided on the operations, refer to set or adjust the value. For details on the screen. Refer to adjust the focus of this projector has the zooming function.) T (Tele) : The projected screen size decreases. e 1 OPERATE indicator ON: When the projector is in the menu mode to select an item or to page 34. 5 Cursor (5/∞/2/3) button Use...
... (Video Input Card) installed into the cool-down mode: If you press the OPERATE button, the projector is provided on the operations, refer to set or adjust the value. For details on the screen. Refer to adjust the focus of this projector has the zooming function.) T (Tele) : The projected screen size decreases. e 1 OPERATE indicator ON: When the projector is in the menu mode to select an item or to page 34. 5 Cursor (5/∞/2/3) button Use...

Instruction Manual
Page 13
... may be started again. Controls and Features (cont.) Control Panel (Cont.) 1 234 5 678 STAND BY OPERATE HIDE VIC SELECT 1 KEY STONE 2 3 EXIT 9p q w MENU T + ZOOM FOCUS ENTER W - e q STAND BY Indicator On : When in the lamp unit. Also use it to the previous menu. Do not turn off during projection. 20 Trouble in the light-source lamp power supply. 21 Trouble in the power supply of the projector. 22 Trouble in the power supply of the fan. 23 Trouble in...
... may be started again. Controls and Features (cont.) Control Panel (Cont.) 1 234 5 678 STAND BY OPERATE HIDE VIC SELECT 1 KEY STONE 2 3 EXIT 9p q w MENU T + ZOOM FOCUS ENTER W - e q STAND BY Indicator On : When in the lamp unit. Also use it to the previous menu. Do not turn off during projection. 20 Trouble in the light-source lamp power supply. 21 Trouble in the power supply of the projector. 22 Trouble in the power supply of the fan. 23 Trouble in...
Instruction Manual
Page 14
... horizontal sync (H) signals / composite signals (Cs). (Devices which have analog RGB signal output terminals can be controlled by connecting the HD-SDI monitor or for vertical sync (V) and horizontal sync (H). 6 VIC slots (x 2) You can enable a computer to be input the conventional HDTV signal (Y, Pb, and Pr). • HD-SDI VIC This VIC enables the projector to control plural DLA-QX1Gs at the same time. Use the remote control cable supplied...
... horizontal sync (H) signals / composite signals (Cs). (Devices which have analog RGB signal output terminals can be controlled by connecting the HD-SDI monitor or for vertical sync (V) and horizontal sync (H). 6 VIC slots (x 2) You can enable a computer to be input the conventional HDTV signal (Y, Pb, and Pr). • HD-SDI VIC This VIC enables the projector to control plural DLA-QX1Gs at the same time. Use the remote control cable supplied...

Instruction Manual
Page 16
... desired VIC (Video Input Card) installed into cool-down mode (the STAND BY indicator is blinking): Even if you press the OPERATE button, the projector is not turned on the projector. When using this button is used in the menu mode. For details on the operations, refer to page 34. 7 FOCUS +/- Memo 8 DIGITAL ZOOM T/W buttons Not in use it as the cursor button, press it to adjust the focus of these buttons to display the hierarchical menus...
... desired VIC (Video Input Card) installed into cool-down mode (the STAND BY indicator is blinking): Even if you press the OPERATE button, the projector is not turned on the projector. When using this button is used in the menu mode. For details on the operations, refer to page 34. 7 FOCUS +/- Memo 8 DIGITAL ZOOM T/W buttons Not in use it as the cursor button, press it to adjust the focus of these buttons to display the hierarchical menus...

Instruction Manual
Page 17
....) Remote Control Unit (Cont.) EN UNLOCK EX y t r e w q KEYSTON O RM-MQX1G REMOTE CONTROL UNIT LOCK UNLOCK LOCK OPERATE MODE BACK LIGHT ENTER EXIT MENU VIC 1 VIC 2 VIC 3 T ZOOM W SHIFT FOCUS ON KEYSTONE SHUTTER OFF T DIGITAL ZOOM W RM-MQX1G REMOTE CONTROL UNIT 1 2 3 4 5 6 7 8 9 p ENGLISH 9 SHUTTER ON/OFF buttons Use these buttons to adjust the projected screen size. (They work only when the lens unit attached to this button to turn off the projection. For details on the operation, refer to page 36. t LOCK Ô UNLOCK switch...
....) Remote Control Unit (Cont.) EN UNLOCK EX y t r e w q KEYSTON O RM-MQX1G REMOTE CONTROL UNIT LOCK UNLOCK LOCK OPERATE MODE BACK LIGHT ENTER EXIT MENU VIC 1 VIC 2 VIC 3 T ZOOM W SHIFT FOCUS ON KEYSTONE SHUTTER OFF T DIGITAL ZOOM W RM-MQX1G REMOTE CONTROL UNIT 1 2 3 4 5 6 7 8 9 p ENGLISH 9 SHUTTER ON/OFF buttons Use these buttons to adjust the projected screen size. (They work only when the lens unit attached to this button to turn off the projection. For details on the operation, refer to page 36. t LOCK Ô UNLOCK switch...

Instruction Manual
Page 22
... down by your dealer or service center. • When using the buttons on the remote control unit or the setting menu, the shift center lock pin might not have been removed. This allows you to use the lens with the shift function. 20 Installing the Projector (Cont.) Installing the Projector against the Screen The projector should be placed so that the video image is projected through the plural glasses. •...
... down by your dealer or service center. • When using the buttons on the remote control unit or the setting menu, the shift center lock pin might not have been removed. This allows you to use the lens with the shift function. 20 Installing the Projector (Cont.) Installing the Projector against the Screen The projector should be placed so that the video image is projected through the plural glasses. •...
Instruction Manual
Page 32
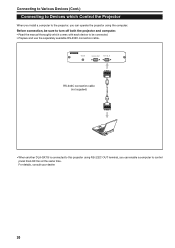
...-232C connection cable (not supplied) • When another DLA-QX1G is connected to control plural DLA-QX1Gs at the same time. For details, consult your dealer. 30 Before connection, be connected. • Prepare and use the separately available RS-232C connection cable. Connecting to Various Devices (Cont.) Connecting to Devices which comes with each device to be sure to turn off both the projector and computer. • Read the manual...
...-232C connection cable (not supplied) • When another DLA-QX1G is connected to control plural DLA-QX1Gs at the same time. For details, consult your dealer. 30 Before connection, be connected. • Prepare and use the separately available RS-232C connection cable. Connecting to Various Devices (Cont.) Connecting to Devices which comes with each device to be sure to turn off both the projector and computer. • Read the manual...

Instruction Manual
Page 33
I To use the projector • Remove the lens cap before using the projector. 3 (For U.S.A. STAND BY OPERATE VIC SELECT 1 2 MODE KEY STONE 3 EXIT MENU T ZOOM FOCUS W ENTER CONTROL REMOTE RS-232C OUT RS-232C IN R G H/CS RGB Analog VIC BV 1 Insert the supplied power cord into the power input terminal of the projector. 1. Insert the plug of the supplied power cord into the power input terminal (AC IN ) of the projector. only) Turn the plug to the...
I To use the projector • Remove the lens cap before using the projector. 3 (For U.S.A. STAND BY OPERATE VIC SELECT 1 2 MODE KEY STONE 3 EXIT MENU T ZOOM FOCUS W ENTER CONTROL REMOTE RS-232C OUT RS-232C IN R G H/CS RGB Analog VIC BV 1 Insert the supplied power cord into the power input terminal of the projector. 1. Insert the plug of the supplied power cord into the power input terminal (AC IN ) of the projector. only) Turn the plug to the...

Instruction Manual
Page 46
... not be displayed correctly for projection (resizing display). Frequency V : Shows the vertical frequency of the RGB signal being received. menu Image adj. Panel : The video image is then enlarged to a virtually full screen size of 0 to the next sub menu. Press the ENTER button to go to 255. I Image adj. Resize : Adjusts the position and size of D-ILA device for some input signals. I Information in RGB VIC menu Ex. Menu Image adj...
... not be displayed correctly for projection (resizing display). Frequency V : Shows the vertical frequency of the RGB signal being received. menu Image adj. Panel : The video image is then enlarged to a virtually full screen size of 0 to the next sub menu. Press the ENTER button to go to 255. I Image adj. Resize : Adjusts the position and size of D-ILA device for some input signals. I Information in RGB VIC menu Ex. Menu Image adj...
Instruction Manual
Page 52
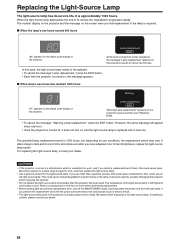
... video image is turned on the projection screen and the word "Warning" blinks. • To cancel the message " Warning Lamp replacement," press the EXIT button. CAUTIONS • If the projector is set up in this case, the light-source lamp needs to a place large enough for work, and then replace the light-source lamp. • Use a genuine product for work , turn off , it does not turn on the status code display of one . If you perform the replacement work with a new one hour...
... video image is turned on the projection screen and the word "Warning" blinks. • To cancel the message " Warning Lamp replacement," press the EXIT button. CAUTIONS • If the projector is set up in this case, the light-source lamp needs to a place large enough for work, and then replace the light-source lamp. • Use a genuine product for work , turn off , it does not turn on the status code display of one . If you perform the replacement work with a new one hour...
Instruction Manual
Page 53
.... Troubleshooting Solutions to common problems related to your dealer to arrange for a replacement lamp. • Check the installed position. • Turn off the MAIN POWER switch, remove any blocking objects, and turn on the MAIN POWER switch again. • Select the correct inputs with the remote control unit's FOCUS +/- Input the appropriate signal. • Adjust brightness on the menu. • Adjust focus with VIC SELECT (or VIC) 1,2, and 3 buttons. • Connect the devices correctly. • Set connected...
.... Troubleshooting Solutions to common problems related to your dealer to arrange for a replacement lamp. • Check the installed position. • Turn off the MAIN POWER switch, remove any blocking objects, and turn on the MAIN POWER switch again. • Select the correct inputs with the remote control unit's FOCUS +/- Input the appropriate signal. • Adjust brightness on the menu. • Adjust focus with VIC SELECT (or VIC) 1,2, and 3 buttons. • Connect the devices correctly. • Set connected...

Instruction Manual
Page 54
... video image bows or distorts. Troubleshooting (Cont.) Symptom Specific colors fail to AC outlet and turn on the main power again. The upper part of batteries correctly (+ to turn off by pressing the remote control unit's HIDE button? • Are all video signals being input correctly? • Is the shift center lock pin for vertical sync (V) and horizontal sync (H) signals. • Input signals with new batteries. • Remove any shielding objects. • Use the remote control...
... video image bows or distorts. Troubleshooting (Cont.) Symptom Specific colors fail to AC outlet and turn on the main power again. The upper part of batteries correctly (+ to turn off by pressing the remote control unit's HIDE button? • Are all video signals being input correctly? • Is the shift center lock pin for vertical sync (V) and horizontal sync (H) signals. • Input signals with new batteries. • Remove any shielding objects. • Use the remote control...


