
Instructions
Page 2
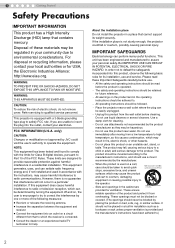
.... This unit has been engineered and manufactured to radio or television reception, which may be hazardous. - Do not use attachments not recommended by JVC could fall , causing serious injury to a child or adult, and serious damage to the manufacturer's instructions, and ...should never be blocked or covered. (The openings should use and service. This projector is operated. - FCC INFORMATION (U.S.A. These limits are provided ...
.... This unit has been engineered and manufactured to radio or television reception, which may be hazardous. - Do not use attachments not recommended by JVC could fall , causing serious injury to a child or adult, and serious damage to the manufacturer's instructions, and ...should never be blocked or covered. (The openings should use and service. This projector is operated. - FCC INFORMATION (U.S.A. These limits are provided ...
Instructions
Page 3
...ask your electrician to the strong light can be placed more than one foot away from the product. - For added protection of this projector is left unattended and unused for service. - Do not overload wall outlets, extension cords, or convenience receptacles on . For example,...is equipped with same characteristics as they may cause personal injury or electrical shock. 3 Others Troubleshooting Settings Basic Operation Preparation Use only the accessory cord designed for installation. This plug will prevent damage to the product due to qualified service personnel under ...
...ask your electrician to the strong light can be placed more than one foot away from the product. - For added protection of this projector is left unattended and unused for service. - Do not overload wall outlets, extension cords, or convenience receptacles on . For example,...is equipped with same characteristics as they may cause personal injury or electrical shock. 3 Others Troubleshooting Settings Basic Operation Preparation Use only the accessory cord designed for installation. This plug will prevent damage to the product due to qualified service personnel under ...
Instructions
Page 8
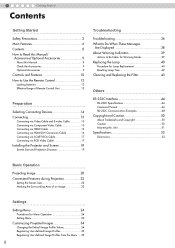
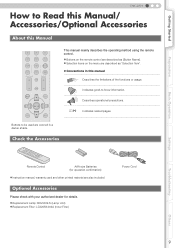
... this Manual/ Accessories/Optional Accessories 9 About this Manual 9 Check the Accessories 9 Optional Accessories 9 Controls and Features 10 How to Use the Remote Control 13 Loading Batteries 13 Effective Range of Remote Control Unit 13 Preparation Selecting Connecting Devices 14 Connecting 15 Connecting via Video... via HDMI-DVI Conversion Cable 16 Connecting via SCART-RCA Cable 17 Connecting via RGB Video Cable 17 Installing the Projector and Screen 18 Screen Size and Projection Distance 19 Troubleshooting Troubleshooting 36 What to Do When These Messages Are Displayed ...
... this Manual/ Accessories/Optional Accessories 9 About this Manual 9 Check the Accessories 9 Optional Accessories 9 Controls and Features 10 How to Use the Remote Control 13 Loading Batteries 13 Effective Range of Remote Control Unit 13 Preparation Selecting Connecting Devices 14 Connecting 15 Connecting via Video... via HDMI-DVI Conversion Cable 16 Connecting via SCART-RCA Cable 17 Connecting via RGB Video Cable 17 Installing the Projector and Screen 18 Screen Size and Projection Distance 19 Troubleshooting Troubleshooting 36 What to Do When These Messages Are Displayed ...
Instructions
Page 9
... the functions or usage. SHARP - Describes operational precautions. Getting Started Preparation Basic Operation ENGLISH How to -know information. This manual mainly describes the operating method using the remote control. z Replacement Lamp: BHL5009-S (Lamp Unit) z Replacement Filter: LC32058-002A (Inner Filter) Settings Troubleshooting Others 9 CONTRAST COLOR TEMP BRIGHT INFO HIDE MENU EXIT...
... the functions or usage. SHARP - Describes operational precautions. Getting Started Preparation Basic Operation ENGLISH How to -know information. This manual mainly describes the operating method using the remote control. z Replacement Lamp: BHL5009-S (Lamp Unit) z Replacement Filter: LC32058-002A (Inner Filter) Settings Troubleshooting Others 9 CONTRAST COLOR TEMP BRIGHT INFO HIDE MENU EXIT...
Instructions
Page 10
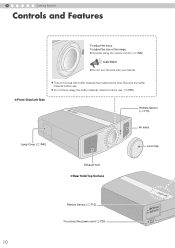
1 Getting Started Controls and Features To adjust the focus. To adjust the size of the image. z This unit comes with your hands. Remove the buffer material before use . (pP50) „ Front Side/Left Side Remote Sensor (pP13) Air Inlets Lamp Cover (pP40) Lens Cap Exhaust Vent „Rear Side/Top Surface Remote Sensor (pP13) To connect the power cord (pP20) 10 z Do not throw away the buffer material, retain for future use . z Operate using the remote control. (pP20) CAUTION z Do not turn the lens with buffer material that cushions the lens.
1 Getting Started Controls and Features To adjust the focus. To adjust the size of the image. z This unit comes with your hands. Remove the buffer material before use . (pP50) „ Front Side/Left Side Remote Sensor (pP13) Air Inlets Lamp Cover (pP40) Lens Cap Exhaust Vent „Rear Side/Top Surface Remote Sensor (pP13) To connect the power cord (pP20) 10 z Do not throw away the buffer material, retain for future use . z Operate using the remote control. (pP20) CAUTION z Do not turn the lens with buffer material that cushions the lens.
Instructions
Page 13
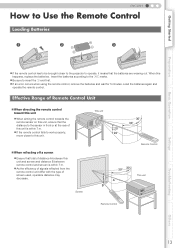
Insert the batteries according to insert the - z If an error occurs when using the remote control, remove the batteries and wait for 5 minutes. marks. end first. OPERATE ........ ON COMP HDMI 2 HDMI 1 VIDEO ASPECT S-VIDEO NATURAL DYNAMIC D CINEMA N C...from the remote control unit differ with the type of screen used, operable distance may decrease. Getting Started Preparation Basic Operation ENGLISH How to Use the Remote Control Loading Batteries 1 2 3 z If the remote control has to be brought closer to the projector to operate, it means that the distance to the sensor ...
Insert the batteries according to insert the - z If an error occurs when using the remote control, remove the batteries and wait for 5 minutes. marks. end first. OPERATE ........ ON COMP HDMI 2 HDMI 1 VIDEO ASPECT S-VIDEO NATURAL DYNAMIC D CINEMA N C...from the remote control unit differ with the type of screen used, operable distance may decrease. Getting Started Preparation Basic Operation ENGLISH How to Use the Remote Control Loading Batteries 1 2 3 z If the remote control has to be brought closer to the projector to operate, it means that the distance to the sensor ...

Instructions
Page 14
Use an HDMI compliant cable (sold separately) with the HDMI logo. z The images may not be possible to connect to this unit depending on the dimension ... camcorder 2 Preparation Selecting Connecting Devices z Do not turn on the devices and cables to be connected. z For audio output, connect the device to the device used. z It may not be displayed depending on the power until connection is complete. z The connection procedures differ according to an amplifier. For details, refer to...
Use an HDMI compliant cable (sold separately) with the HDMI logo. z The images may not be possible to connect to this unit depending on the dimension ... camcorder 2 Preparation Selecting Connecting Devices z Do not turn on the devices and cables to be connected. z For audio output, connect the device to the device used. z It may not be displayed depending on the power until connection is complete. z The connection procedures differ according to an amplifier. For details, refer to...

Instructions
Page 19
...140" (Approx. 3.56 m) 70" (Approx. 1.78 m) Approx. Others 19 Approx. Approx. Use them as a guide. f 5.47 m 11.00 m Approx. f 5.78 m 11.61 m Approx. z To adjust the installation, use a projected image of the screen Preparation Moves the image to the left or right Moves the image up...the lens to the screen to set "Pixel Adjust" in the table are provided only as a reference during installation. This unit uses a 2.0x power zoom lens for projection. „ Relationship Between Projection Screen Size and Projection Distance Projection Screen Size (Diagonal ...
...140" (Approx. 3.56 m) 70" (Approx. 1.78 m) Approx. Others 19 Approx. Approx. Use them as a guide. f 5.47 m 11.00 m Approx. f 5.78 m 11.61 m Approx. z To adjust the installation, use a projected image of the screen Preparation Moves the image to the left or right Moves the image up...the lens to the screen to set "Pixel Adjust" in the table are provided only as a reference during installation. This unit uses a 2.0x power zoom lens for projection. „ Relationship Between Projection Screen Size and Projection Distance Projection Screen Size (Diagonal ...
Instructions
Page 21
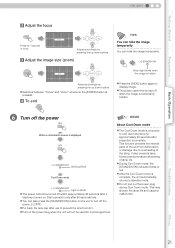
z Pull out the power plug when the unit will not be used for 1 second or more Adjust accordingly by pressing the up down the lamp for approximately 60 seconds after 90 seconds time. It also prevents lamp ... off within approximately 90 seconds after it has been turned on the unit to turn off the power. (pP11) z Put back the lens cap after use to display image. Getting Started Preparation Basic Operation ENGLISH b Adjust the focus Focus ENTER Press for a prolonged time. Start operation only after projection is a function...
z Pull out the power plug when the unit will not be used for 1 second or more Adjust accordingly by pressing the up down the lamp for approximately 60 seconds after 90 seconds time. It also prevents lamp ... off within approximately 90 seconds after it has been turned on the unit to turn off the power. (pP11) z Put back the lens cap after use to display image. Getting Started Preparation Basic Operation ENGLISH b Adjust the focus Focus ENTER Press for a prolonged time. Start operation only after projection is a function...
Instructions
Page 26
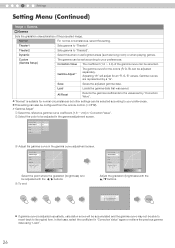
... selected according to your preferences. Load Loads the gamma data that case, select the coefficient in "Correction Value" again or retrieve the previous gamma data using "Load". 26 D To end Adjust the gradation (brightness) with the H / I buttons. Theater1 Sets gamma to be configured from the remote control. (pP12) *"Gamma Adjust" A Select...
... selected according to your preferences. Load Loads the gamma data that case, select the coefficient in "Correction Value" again or retrieve the previous gamma data using "Load". 26 D To end Adjust the gradation (brightness) with the H / I buttons. Theater1 Sets gamma to be configured from the remote control. (pP12) *"Gamma Adjust" A Select...

Instructions
Page 27
...) z The horizontal and vertical directions are reversed when the image is in "User3" to right) Horiz. User3 Selects image profile registered in "User1". z To adjust, use still images with quality as-is flipped to the left ) 1 f 7 (Moves red to factory setting (natural). User1 Selects image profile registered in "User3". Clear User1...
...) z The horizontal and vertical directions are reversed when the image is in "User3" to right) Horiz. User3 Selects image profile registered in "User1". z To adjust, use still images with quality as-is flipped to the left ) 1 f 7 (Moves red to factory setting (natural). User1 Selects image profile registered in "User3". Clear User1...
Instructions
Page 31
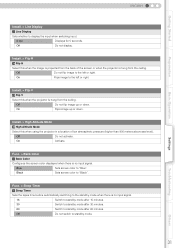
Install. > Flip V c Flip V Select this when the projector is no input signal. 15 Switch to standby mode after 15 minutes. 30 Switch to standby mode after 30 minutes. 60 Switch to the left ... e Back Color Configures the screen color displayed when there is hung from the ceiling. Install. > Flip H b Flip H Select this when using the projector in a location of the screen or when the projector is no input signal. Func. > Sleep Timer f Sleep Timer Sets the lapse time before automatically switching to the left or right...
Install. > Flip V c Flip V Select this when the projector is no input signal. 15 Switch to standby mode after 15 minutes. 30 Switch to standby mode after 30 minutes. 60 Switch to the left ... e Back Color Configures the screen color displayed when there is hung from the ceiling. Install. > Flip H b Flip H Select this when using the projector in a location of the screen or when the projector is no input signal. Func. > Sleep Timer f Sleep Timer Sets the lapse time before automatically switching to the left or right...
Instructions
Page 36
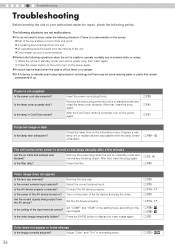
... points. Q pP28 - 5 Troubleshooting Troubleshooting Before sending the unit to your authorized dealer for repair, check the following situations if there is no danger. „ D-ILA device is in Cool Down mode? Remove the power plug when the unit is in standby mode and close the lamp cover properly. After the... heard from the unit. Is the lamp in standby mode and remove any blocking object. Remove the power plug when the unit is manufactured using high-precision technology but stops abruptly after a few minutes Are the air inlets and exhaust vent blocked?
... points. Q pP28 - 5 Troubleshooting Troubleshooting Before sending the unit to your authorized dealer for repair, check the following situations if there is no danger. „ D-ILA device is in Cool Down mode? Remove the power plug when the unit is in standby mode and close the lamp cover properly. After the... heard from the unit. Is the lamp in standby mode and remove any blocking object. Remove the power plug when the unit is manufactured using high-precision technology but stops abruptly after a few minutes Are the air inlets and exhaust vent blocked?
Instructions
Page 37
... fuzzy Is the focus correctly adjusted? f Basic Operation Settings Troubleshooting Others 37 O Alter the "Picture Position" value in the setting menu to the sensor when using. pP23, 28 - Are batteries exhausted? Set the unit at a correct distance from the unit? Set "Sleep Timer" in the setting menu to "Off". M Remote control...
... fuzzy Is the focus correctly adjusted? f Basic Operation Settings Troubleshooting Others 37 O Alter the "Picture Position" value in the setting menu to the sensor when using. pP23, 28 - Are batteries exhausted? Set the unit at a correct distance from the unit? Set "Sleep Timer" in the setting menu to "Off". M Remote control...
Instructions
Page 38
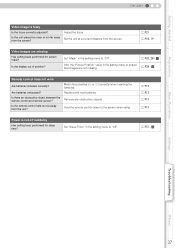
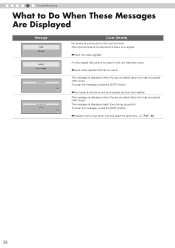
... input HDMI-2 Out of range Lamp replacement EXIT Lamp replacement Warning EXIT Cause (Details) No device is no signal. gInput video signals that cannot be used in this unit has been input. The input terminal is connected but there is connected to the input terminal. To clear the message, press the... lamp time. (pP40f42) 38 The message is displayed each time during projection. To clear the message, press the [EXIT] button. A video signal that can be used . gGet ready a new lamp unit and replace as soon as possible.
... input HDMI-2 Out of range Lamp replacement EXIT Lamp replacement Warning EXIT Cause (Details) No device is no signal. gInput video signals that cannot be used in this unit has been input. The input terminal is connected but there is connected to the input terminal. To clear the message, press the... lamp time. (pP40f42) 38 The message is displayed each time during projection. To clear the message, press the [EXIT] button. A video signal that can be used . gGet ready a new lamp unit and replace as soon as possible.
Instructions
Page 40
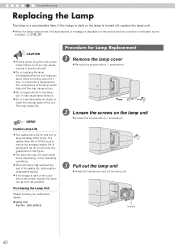
z Do not use flammable air duster to clean the internal parts of 1 hour or more before replacement. z The lamp life may cause a burn. Purchasing the Lamp Unit Please ... end of 2000 hours is abnormal, replace the lamp unit as soon as possible. z Do not replace the lamp immediately after the unit has been used. It may cause lamp blowout. Usable Lamp Life z The usable lamp life for Lamp Replacement A Remove the lamp cover z Remove the screws with a + screwdriver. The...
z Do not use flammable air duster to clean the internal parts of 1 hour or more before replacement. z The lamp life may cause a burn. Purchasing the Lamp Unit Please ... end of 2000 hours is abnormal, replace the lamp unit as soon as possible. z Do not replace the lamp immediately after the unit has been used. It may cause lamp blowout. Usable Lamp Life z The usable lamp life for Lamp Replacement A Remove the lamp cover z Remove the screws with a + screwdriver. The...
Instructions
Page 41
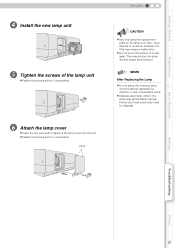
...blowout. MEMO After Replacing the Lamp z Do not place the removed lamp unit at locations reachable by children or near combustible items. z Dispose used lamp units in the same way as fluorescent lamps. z Fasten the screws with 2 claws) of the lamp cover into the unit. Follow your... local community rules for the lamp unit. Claws ENGLISH CAUTION z Use only genuine replacement parts for disposal. z Do not touch the surface of the lamp unit z Fasten the screws with a + screwdriver. Basic Operation Settings...
...blowout. MEMO After Replacing the Lamp z Do not place the removed lamp unit at locations reachable by children or near combustible items. z Dispose used lamp units in the same way as fluorescent lamps. z Fasten the screws with 2 claws) of the lamp cover into the unit. Follow your... local community rules for the lamp unit. Claws ENGLISH CAUTION z Use only genuine replacement parts for disposal. z Do not touch the surface of the lamp unit z Fasten the screws with a + screwdriver. Basic Operation Settings...
Instructions
Page 42
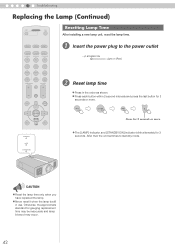
... the power plug to standby mode. z Press each button within 2-second intervals and press the last button for 2 seconds or more WARNING LAMP STANDBY/ON PROJECTOR z The [LAMP] indicator and [STANDBY/ON] indicator blink alternately for 3 seconds. OPERATE ........ z Never reset it when the lamp is still in the order as shown... and lamp blowout may occur. 42 After that, the unit switches to the power outlet A STANDBY/ON Light on (Red) B Reset lamp time z Press in use.
... the power plug to standby mode. z Press each button within 2-second intervals and press the last button for 2 seconds or more WARNING LAMP STANDBY/ON PROJECTOR z The [LAMP] indicator and [STANDBY/ON] indicator blink alternately for 3 seconds. OPERATE ........ z Never reset it when the lamp is still in the order as shown... and lamp blowout may occur. 42 After that, the unit switches to the power outlet A STANDBY/ON Light on (Red) B Reset lamp time z Press in use.

Instructions
Page 43
... will dirty the internal parts of a neutral detergent is damaged or too dirty to be damaged. z In extremely soiled cases, use of the unit and cause shadows on rubber gloves when using a neutral detergent. z After washing the filter with water and dry it in the internal parts, consult your authorized dealer. „...
... will dirty the internal parts of a neutral detergent is damaged or too dirty to be damaged. z In extremely soiled cases, use of the unit and cause shadows on rubber gloves when using a neutral detergent. z After washing the filter with water and dry it in the internal parts, consult your authorized dealer. „...
Instructions
Page 50
... the lens to maintain its functioning. Caution D-ILA Device Characteristics Do not project still pictures or pictures that require replacement to the center position. 50 Otherwise, use fluid-type cleaning agents. Turn on the lens z Clean the dirt using a curtain. Pay attention to suck up the... top and bottom of the room. The estimated time for replacement. Dirt on the power occasionally and operate the unit. Block light using commercial blowers or lens cleaning papers for a long period of the surface coating film. 6 Others Copyright and Caution About Trademarks and ...
... the lens to maintain its functioning. Caution D-ILA Device Characteristics Do not project still pictures or pictures that require replacement to the center position. 50 Otherwise, use fluid-type cleaning agents. Turn on the lens z Clean the dirt using a curtain. Pay attention to suck up the... top and bottom of the room. The estimated time for replacement. Dirt on the power occasionally and operate the unit. Block light using commercial blowers or lens cleaning papers for a long period of the surface coating film. 6 Others Copyright and Caution About Trademarks and ...