Instruction Manual
Page 5
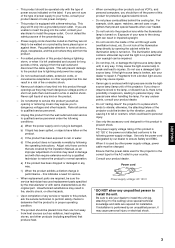
... plug. Use only the power cord designated by opening or removing covers may cause injures. - This will fit only into the projection lens while the illumination lamp is so powerful that produce heat. - e) If the product has been dropped or damaged in any kind into... f ) When the product exhibits a distinct change in impaired eyesight. - Exposure of fire or electric shock. - Do not "ceiling-mount" the projector to a place which could be broken by the vibration, possibly causing it to be impaired. - This product should be sure the service technician has used...
... plug. Use only the power cord designated by opening or removing covers may cause injures. - This will fit only into the projection lens while the illumination lamp is so powerful that produce heat. - e) If the product has been dropped or damaged in any kind into... f ) When the product exhibits a distinct change in impaired eyesight. - Exposure of fire or electric shock. - Do not "ceiling-mount" the projector to a place which could be broken by the vibration, possibly causing it to be impaired. - This product should be sure the service technician has used...

Instruction Manual
Page 6
...14 Precautions for using batteries 14 Installing the Projector 15 Precautions for Installation 15 Adjusting the Inclination of the Projector 16 Installing the Projector against the Screen............17 Projection Distance and Screen Size 18 Setting the Amount of Lens Shifting 19 Effective Range and Distance of the... 21 When installing (adjusting/setting) the unit............21 Connecting to Various Devices.... 22 Signals that Can Be Input to the Projector 22 Connecting to Video Devices 24 Connecting to Hi-Vision Devices/DVD Players .....25 Connecting to Other Devices 26 Connecting to ...
...14 Precautions for using batteries 14 Installing the Projector 15 Precautions for Installation 15 Adjusting the Inclination of the Projector 16 Installing the Projector against the Screen............17 Projection Distance and Screen Size 18 Setting the Amount of Lens Shifting 19 Effective Range and Distance of the... 21 When installing (adjusting/setting) the unit............21 Connecting to Various Devices.... 22 Signals that Can Be Input to the Projector 22 Connecting to Video Devices 24 Connecting to Hi-Vision Devices/DVD Players .....25 Connecting to Other Devices 26 Connecting to ...

Instruction Manual
Page 8
... power cord is the main power switch. CAUTION • When replacing the fuse, use the same rating and type. A lens-hole blind cover (black one) is installed when the projector is installed. (Power source protection) To replace the fuse, refer to +7°. When you a low-temperature burn. 2...possibly causing a fire. CAUTION • Please consult your authorized dealer or service center for information about attaching an optional lens. 8 Lens cap This is turned on, the projector goes into stand-by state, and the STAND BY indicator on the control panel comes on or the cooling fan is...
... power cord is the main power switch. CAUTION • When replacing the fuse, use the same rating and type. A lens-hole blind cover (black one) is installed when the projector is installed. (Power source protection) To replace the fuse, refer to +7°. When you a low-temperature burn. 2...possibly causing a fire. CAUTION • Please consult your authorized dealer or service center for information about attaching an optional lens. 8 Lens cap This is turned on, the projector goes into stand-by state, and the STAND BY indicator on the control panel comes on or the cooling fan is...

Instruction Manual
Page 9
... page 19. For details, refer to "Adjusting the Inclination of Lens Shifting" on page 16. q Rear adjustable foot (for leveling the projector) It is the air inlet. r Lens shift knob cap When you have mounted a lens that uses the lens shift function, open this slot. e Control panel For details, refer... to "Control Panel on the Projector" on page 11. Left-hand Side / Rear ...
... page 19. For details, refer to "Adjusting the Inclination of Lens Shifting" on page 16. q Rear adjustable foot (for leveling the projector) It is the air inlet. r Lens shift knob cap When you have mounted a lens that uses the lens shift function, open this slot. e Control panel For details, refer... to "Control Panel on the Projector" on page 11. Left-hand Side / Rear ...
Instruction Manual
Page 19
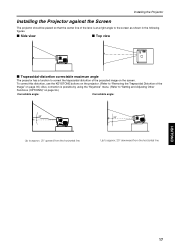
...VIDEO MENU STAND BY OPERATE KEYSTONE VOLUME PRESET LAMP TEMP HIDE ESCAPE I Trapezoidal-distortion correctable maximum angle The projector has a function to correct the trapezoidal distortion of the lens is possible by using the "Keystone" menu. (Refer to the screen as shown in the following figures.... To correct this distortion, use the KEYSTONE buttons on the projector. (Refer to "Removing the Trapezoidal Distortion of the Image...
...VIDEO MENU STAND BY OPERATE KEYSTONE VOLUME PRESET LAMP TEMP HIDE ESCAPE I Trapezoidal-distortion correctable maximum angle The projector has a function to correct the trapezoidal distortion of the lens is possible by using the "Keystone" menu. (Refer to the screen as shown in the following figures.... To correct this distortion, use the KEYSTONE buttons on the projector. (Refer to "Removing the Trapezoidal Distortion of the Image...
Instruction Manual
Page 20
...This value is a guide (reference) one of the optional lenses to become pale and dim. I Optional Lenses This projector does not include a lens. GL-M2915SG Powered focus, short focal length (subject ratio 1.5:1), powered image adjustment (2% zoom), includes manual vertical shift ...function, 30%-55% influence GL-M2920ZG Powered zoom/powered focus lens (subject ratio 2:1-3:1), 50% influence. Use a curtain or other means to install the projector within the range of adjustable angles (up/down adjustment angle: +7° ; horizontal adjustment angle...
...This value is a guide (reference) one of the optional lenses to become pale and dim. I Optional Lenses This projector does not include a lens. GL-M2915SG Powered focus, short focal length (subject ratio 1.5:1), powered image adjustment (2% zoom), includes manual vertical shift ...function, 30%-55% influence GL-M2920ZG Powered zoom/powered focus lens (subject ratio 2:1-3:1), 50% influence. Use a curtain or other means to install the projector within the range of adjustable angles (up/down adjustment angle: +7° ; horizontal adjustment angle...

Instruction Manual
Page 21
ESPAÑOL ITALIANO FRANÇAIS DEUTSH ENGLISH Installing the Projector Setting the Amount of explanation. wrench supplied. 5 Turn the cap to the left: The lens shifts downward. 4 Tighten the SHIFT LOCK fixing bolt firmly. Approx. 55% Approx. 50% Approx. 30% 19 Use the hex. The illustration ...in an up and down direction. SHIFT LOCK fixing bolt LENS SHIFT knob I Projected screen position image by amount of the projector to 55%. • After finishing the lens shift setting, tighten the SHIFT LOCK fixing bolt firmly so that the lens will not move. 1 Turn the cap on the top...
ESPAÑOL ITALIANO FRANÇAIS DEUTSH ENGLISH Installing the Projector Setting the Amount of explanation. wrench supplied. 5 Turn the cap to the left: The lens shifts downward. 4 Tighten the SHIFT LOCK fixing bolt firmly. Approx. 55% Approx. 50% Approx. 30% 19 Use the hex. The illustration ...in an up and down direction. SHIFT LOCK fixing bolt LENS SHIFT knob I Projected screen position image by amount of the projector to 55%. • After finishing the lens shift setting, tighten the SHIFT LOCK fixing bolt firmly so that the lens will not move. 1 Turn the cap on the top...

Instruction Manual
Page 32
...into a wall outlet. • Use the supplied power cord with the lens cap attached. Doing so can get hot and cause injury. 30 Connecting to the lens when the projector is not used. • Do not operate the projector with the ferrite core only. • Do not remove the ferrite ... a wet hand. LAMP HIDE TEMP UP DOWN Power cord (supplied) Ferrite core 2 Insert the main plug of the projector. Removing the Lens Cap Remove the lens cap before using the projector. CAUTIONS To prevent fire and electric shock, observe the following: • When you do not use mains voltage other...
...into a wall outlet. • Use the supplied power cord with the lens cap attached. Doing so can get hot and cause injury. 30 Connecting to the lens when the projector is not used. • Do not operate the projector with the ferrite core only. • Do not remove the ferrite ... a wet hand. LAMP HIDE TEMP UP DOWN Power cord (supplied) Ferrite core 2 Insert the main plug of the projector. Removing the Lens Cap Remove the lens cap before using the projector. CAUTIONS To prevent fire and electric shock, observe the following: • When you do not use mains voltage other...

Instruction Manual
Page 36
... unit FOCUS 5. Setting the Screen Aspect Ratio Set in the middle of 16:9 is to "S" (4:3) * If a 4:3 image is no button on the lens unit (optional) you are using a 16:9 screen: Press the "W" button. Remote control unit T DIGITAL ZOOM W 4. When a screen aspect ratio of ...the screen. To reduce the screen size Press the ZOOM T (Tele) button. Basic Operations I Projector's buttons PRESET button EXIT button LAMP TEMP HIDE KEYSTONE PRESET STAND BY OPERATE PC VIDEO MENU EXIT ENTER I Remote control unit SCREEN W/S button FOCUS +/-...
... unit FOCUS 5. Setting the Screen Aspect Ratio Set in the middle of 16:9 is to "S" (4:3) * If a 4:3 image is no button on the lens unit (optional) you are using a 16:9 screen: Press the "W" button. Remote control unit T DIGITAL ZOOM W 4. When a screen aspect ratio of ...the screen. To reduce the screen size Press the ZOOM T (Tele) button. Basic Operations I Projector's buttons PRESET button EXIT button LAMP TEMP HIDE KEYSTONE PRESET STAND BY OPERATE PC VIDEO MENU EXIT ENTER I Remote control unit SCREEN W/S button FOCUS +/-...

Instruction Manual
Page 66
...• Set connected devices correctly. - signal input or an error may be no computer's graphic board. Troubleshooting Solutions to common problems related to your projector are image signals • If this happens, turn on the MAIN POWER switch. turn on the MAIN POWER switch again. connected devices? • ...freezes. • Was the FREEZE button on again. or light level is low. • Is the lamp life near its end? • Remove the lens cap. 30 • Check the lamp use time after replacing with a new lamp. 32, 58, 59, 62 Light is not • Is the ...
...• Set connected devices correctly. - signal input or an error may be no computer's graphic board. Troubleshooting Solutions to common problems related to your projector are image signals • If this happens, turn on the MAIN POWER switch. turn on the MAIN POWER switch again. connected devices? • ...freezes. • Was the FREEZE button on again. or light level is low. • Is the lamp life near its end? • Remove the lens cap. 30 • Check the lamp use time after replacing with a new lamp. 32, 58, 59, 62 Light is not • Is the ...

Instruction Manual
Page 67
...unit as insecticides. - Do not wipe vigorously. - Do not use liquid cleaning agents. Use a TBC or a device with commercially available lens blowers or lens cleaning paper (for cleaning glasses and cameras). does not work. • Match the polarities of batteries correctly (+ to the correct dedicated ... This device uses a computer. I Maintenance • Stains on the cabinet These should be cleaned off by the combination lighting of the projector's indicators. For the warning contents and the action to be notified by pressing • Turn on the menu. If the cabinet is ...
...unit as insecticides. - Do not wipe vigorously. - Do not use liquid cleaning agents. Use a TBC or a device with commercially available lens blowers or lens cleaning paper (for cleaning glasses and cameras). does not work. • Match the polarities of batteries correctly (+ to the correct dedicated ... This device uses a computer. I Maintenance • Stains on the cabinet These should be cleaned off by the combination lighting of the projector's indicators. For the warning contents and the action to be notified by pressing • Turn on the menu. If the cabinet is ...

Instruction Manual
Page 72
... : 3, during video input) Horizontal frequency : 15 kHz ~ 105 kHz Vertical frequency : 50 Hz ~ 100 Hz 1 W (monaural), 1-5/8" (4 cm) round type micro-speaker × 1 I Input terminals [AV... × 5 (for controlling this projector with ±2% zooming/shift function) GL-M2920ZG: × 1.5 zoom lens (2:1 to 3:1) (zooming function) GL-M2930SZG: × 1.9 zoom lens (2.9 to 5.5:1) (zooming/shift function... mechanism system • Projection method D-ILA® (Direct Drive Image Light Amplifier) method (Reflective-type active-matrix method) • D-ILA® device 0.9" (2.3 cm) measured...
... : 3, during video input) Horizontal frequency : 15 kHz ~ 105 kHz Vertical frequency : 50 Hz ~ 100 Hz 1 W (monaural), 1-5/8" (4 cm) round type micro-speaker × 1 I Input terminals [AV... × 5 (for controlling this projector with ±2% zooming/shift function) GL-M2920ZG: × 1.5 zoom lens (2:1 to 3:1) (zooming function) GL-M2930SZG: × 1.9 zoom lens (2.9 to 5.5:1) (zooming/shift function... mechanism system • Projection method D-ILA® (Direct Drive Image Light Amplifier) method (Reflective-type active-matrix method) • D-ILA® device 0.9" (2.3 cm) measured...

Instruction Manual
Page 74
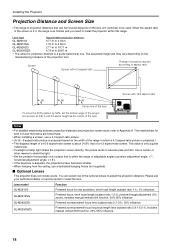
Specifications Outside dimensions I Top 20 (505)*1 Unit: inch (mm) *1: Protrusion excluded *2: Lens excluded EXIT ENTER LAMP TEMP HIDE KEYSTONE PRESET STAND BY OPERATE PC VIDEO MENU 14-5/8 (369 ) 15-1/2 (393)*2 5-1/4 (133) I Front 20 (505)*1 I Side 15-1/2 (393)*2 10-1/2 (265) 8-3/8 (212) 2-1/8 (53) 2-1/8 15-1/2 (392) (52) 2-7/8 (70) 10-1/8 (256) 10-1/2 (265) 72
Specifications Outside dimensions I Top 20 (505)*1 Unit: inch (mm) *1: Protrusion excluded *2: Lens excluded EXIT ENTER LAMP TEMP HIDE KEYSTONE PRESET STAND BY OPERATE PC VIDEO MENU 14-5/8 (369 ) 15-1/2 (393)*2 5-1/4 (133) I Front 20 (505)*1 I Side 15-1/2 (393)*2 10-1/2 (265) 8-3/8 (212) 2-1/8 (53) 2-1/8 15-1/2 (392) (52) 2-7/8 (70) 10-1/8 (256) 10-1/2 (265) 72

Instruction Manual
Page 78
...lens unit GL-M2915SG (1.5:1): Projection screen size (Diagonal length) 55" (approx. 139.7 cm) 60" (approx. 152.4 cm) 65" (approx. 165.1 cm) 70" (approx. 177.8 cm) 75" (approx. 190.5 cm) 80" (approx. 203.2 cm) 85" (approx. 215.9 cm) 90" (approx. 228.6 cm) 95" (approx. 241.3 cm) 100... 50" (approx. 127.0 cm) 60" (approx. 152.4 cm) 70" (approx. 177.8 cm) 80" (approx. 203.2 cm) 90" (approx. 228.6 cm) 100" (approx. 254.0 cm) 110" (approx. 279.4 cm) 120" (approx. 304.8 cm) 130" (approx. 330.2 cm) 140" (approx. 355.6 cm) 150...12.96 (3.95) 13.68 (4.17) --- Use them as reference when setting the projector.
...lens unit GL-M2915SG (1.5:1): Projection screen size (Diagonal length) 55" (approx. 139.7 cm) 60" (approx. 152.4 cm) 65" (approx. 165.1 cm) 70" (approx. 177.8 cm) 75" (approx. 190.5 cm) 80" (approx. 203.2 cm) 85" (approx. 215.9 cm) 90" (approx. 228.6 cm) 95" (approx. 241.3 cm) 100... 50" (approx. 127.0 cm) 60" (approx. 152.4 cm) 70" (approx. 177.8 cm) 80" (approx. 203.2 cm) 90" (approx. 228.6 cm) 100" (approx. 254.0 cm) 110" (approx. 279.4 cm) 120" (approx. 304.8 cm) 130" (approx. 330.2 cm) 140" (approx. 355.6 cm) 150...12.96 (3.95) 13.68 (4.17) --- Use them as reference when setting the projector.

Instruction Manual
Page 79
...For lens unit GL-M2920ZG (2 to 3:1): Projection screen size (Diagonal length) 40" (approx. 101.6 cm) 42" (approx. 106.7 cm) 50" (approx. 127.0 cm) 60" (approx. 152.4 cm) 70" (approx. 177.8 cm) 80" (approx. 203.2 cm) 100" ...) 49.80 (15.18) 51.87 (15.81) 62.17 (18.95) 64.24 (19.58) For lens unit GL-M2930SZG (2.9 to 5.5:1): Projection screen size (Diagonal length) 40" (approx. 101.6 cm) 50" (approx.... 127.0 cm) 60" (approx. 152.4 cm) 70" (approx. 177.8 cm) 80" (approx. 203.2 cm) 100" (approx. 254.0 cm) 150" (approx. 381.0 cm) 200" (approx. 508.0 cm) 240" (approx. 609.6 cm) 250" ...
...For lens unit GL-M2920ZG (2 to 3:1): Projection screen size (Diagonal length) 40" (approx. 101.6 cm) 42" (approx. 106.7 cm) 50" (approx. 127.0 cm) 60" (approx. 152.4 cm) 70" (approx. 177.8 cm) 80" (approx. 203.2 cm) 100" ...) 49.80 (15.18) 51.87 (15.81) 62.17 (18.95) 64.24 (19.58) For lens unit GL-M2930SZG (2.9 to 5.5:1): Projection screen size (Diagonal length) 40" (approx. 101.6 cm) 50" (approx.... 127.0 cm) 60" (approx. 152.4 cm) 70" (approx. 177.8 cm) 80" (approx. 203.2 cm) 100" (approx. 254.0 cm) 150" (approx. 381.0 cm) 200" (approx. 508.0 cm) 240" (approx. 609.6 cm) 250" ...