

Instruction Manual
Page 2
...off and on a circuit different from that cannot support its installation, use . - About the installation place Do not install the projector in a place that to defeat the safeguards incorporated into the outlet, contact your personal safety. The safety and operating instructions should be...These limits are unable to Part 15 of these Important Safeguards carefully before the product is encourage to try to correct the interference by JVC could fall or overturn, possibly causing personal injury. If this product, observe the following measures: ● Reorient or relocate the ...
...off and on a circuit different from that cannot support its installation, use . - About the installation place Do not install the projector in a place that to defeat the safeguards incorporated into the outlet, contact your personal safety. The safety and operating instructions should be...These limits are unable to Part 15 of these Important Safeguards carefully before the product is encourage to try to correct the interference by JVC could fall or overturn, possibly causing personal injury. If this product, observe the following measures: ● Reorient or relocate the ...
Instruction Manual
Page 3
... and protect it from the wall outlet before This plug will prevent damage to the product due to dangerous voltages and other hazards. - Place the projector near water. Do not use an air-conditioner so that are the same. Pay which may result in damage and will often require extensive 150...
... and protect it from the wall outlet before This plug will prevent damage to the product due to dangerous voltages and other hazards. - Place the projector near water. Do not use an air-conditioner so that are the same. Pay which may result in damage and will often require extensive 150...
Instruction Manual
Page 4
...of high brightness or high contrast, such as found in video games and computer programs. Over a long period of time it on frequency of this projector is still visible after adjustment. - Please power it might become tired, as VCR's, and DVD players, you see a double image, please adjust...prevent shock. - Please stop watching immediately and consult a physician if necessary. - It is unclear, please consult your dealer, or the nearest authorized JVC service center. - If your eyes to the strong light can vary greatly depending on and let it should turn off the power of use , ...
...of high brightness or high contrast, such as found in video games and computer programs. Over a long period of time it on frequency of this projector is still visible after adjustment. - Please power it might become tired, as VCR's, and DVD players, you see a double image, please adjust...prevent shock. - Please stop watching immediately and consult a physician if necessary. - It is unclear, please consult your dealer, or the nearest authorized JVC service center. - If your eyes to the strong light can vary greatly depending on and let it should turn off the power of use , ...
Instruction Manual
Page 5
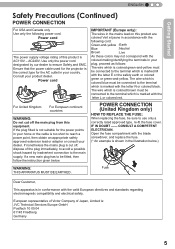
...country. AC240V. Power cord For United Kingdom For European continent countries WARNING: Do not cut off the main plug from this product is : JVC Technical Services Europe GmbH Postfach 10 05 04 61145 Friedberg Germany 5 The wire which is colored blue must be sure to use only a ... dealer. Open the fuse compartment with the letter L or colored red. Consult your dealer. If the plug fitted is not suitable for the projector is in the illustration below . If a new main plug has to be connected to the terminal which is marked with the blade screwdriver, ...
...country. AC240V. Power cord For United Kingdom For European continent countries WARNING: Do not cut off the main plug from this product is : JVC Technical Services Europe GmbH Postfach 10 05 04 61145 Friedberg Germany 5 The wire which is colored blue must be sure to use only a ... dealer. Open the fuse compartment with the letter L or colored red. Consult your dealer. If the plug fitted is not suitable for the projector is in the illustration below . If a new main plug has to be connected to the terminal which is marked with the blade screwdriver, ...
Instruction Manual
Page 10
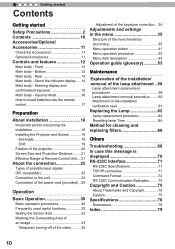
... to insert batteries into the remote control 17 Preparation About installation 18 IImportant points concerning the installation 18 Installing the Projector and Screen 19 Set Angle 19 Shift 19 Fixation of the projector 20 Screen Size and Projection Distance......... 21 Effective Range of Remote Control Unit.... 21 About the connection 22 Types...
... to insert batteries into the remote control 17 Preparation About installation 18 IImportant points concerning the installation 18 Installing the Projector and Screen 19 Set Angle 19 Shift 19 Fixation of the projector 20 Screen Size and Projection Distance......... 21 Effective Range of Remote Control Unit.... 21 About the connection 22 Types...
Instruction Manual
Page 17
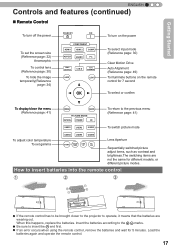
... wearing out. How to insert batteries into the remote control ① ② ③ ● If the remote control has to be brought closer to the projector to the previous menu (Reference page: 41) To switch picture mode To adjust color temperature To set the screen size (Reference page: 32) Anamorphic To...
... wearing out. How to insert batteries into the remote control ① ② ③ ● If the remote control has to be brought closer to the projector to the previous menu (Reference page: 41) To switch picture mode To adjust color temperature To set the screen size (Reference page: 32) Anamorphic To...

Instruction Manual
Page 19
...) Set Angle As shown in the illustration, this unit and the screen perpendicular to do so may be other . ENGLISH About installation (Continued) Installing the Projector and Screen While installing, please place this unit can be installed with a tilted angle, but for some areas there might cause equipment failure. Failing to...
...) Set Angle As shown in the illustration, this unit and the screen perpendicular to do so may be other . ENGLISH About installation (Continued) Installing the Projector and Screen While installing, please place this unit can be installed with a tilted angle, but for some areas there might cause equipment failure. Failing to...

Instruction Manual
Page 20
.... ● Do not tilt this unit more than ±5 degrees from side to side when using. ● Regardless whether the unit is still under guarantee, JVC is not liable for any product damage caused by mounting the unit with nonJVC ceiling fittings or when the environment is not suitable for ceiling... (M5 screws) to perform mounting. ● Depth of the screw holes (screw length) is higher than 13 mm. 2 Preparation About installation (Continued) Fixation of the projector Measures to the surrounding temperature. Use screws shorter than 23 mm but longer than expected. 20
.... ● Do not tilt this unit more than ±5 degrees from side to side when using. ● Regardless whether the unit is still under guarantee, JVC is not liable for any product damage caused by mounting the unit with nonJVC ceiling fittings or when the environment is not suitable for ceiling... (M5 screws) to perform mounting. ● Depth of the screw holes (screw length) is higher than 13 mm. 2 Preparation About installation (Continued) Fixation of the projector Measures to the surrounding temperature. Use screws shorter than 23 mm but longer than expected. 20
Instruction Manual
Page 26
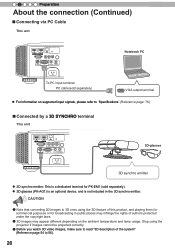
CAUTION ● Note that converting 2D images to 3D ones using the projector if images cannot be projected correctly. ● Before you watch 3D video images, make sure to "Specifications".(Reference page: 76) ■ Connected by a 3D SYNCHRO ...
CAUTION ● Note that converting 2D images to 3D ones using the projector if images cannot be projected correctly. ● Before you watch 3D video images, make sure to "Specifications".(Reference page: 76) ■ Connected by a 3D SYNCHRO ...

Instruction Manual
Page 29
... than the indicated power voltage. ● Do not damage, break or modify the power cord. CAUTION ● When you have connected the equipment, connect the projector power cord. 1 HDMI 2 RS-232-C CR/PR CB/PB Y 3D SYNCHRO PC TRIGGER REMOTE CONTROL STANDBY/ON INPUT OK MENU BACK 1 1 Connect the power cord...
... than the indicated power voltage. ● Do not damage, break or modify the power cord. CAUTION ● When you have connected the equipment, connect the projector power cord. 1 HDMI 2 RS-232-C CR/PR CB/PB Y 3D SYNCHRO PC TRIGGER REMOTE CONTROL STANDBY/ON INPUT OK MENU BACK 1 1 Connect the power cord...

Instruction Manual
Page 49
... direction and display area of the video images. (Depending on the signal, there is normally no need to be appended with a shift correction of the projector's projection, one can switch horizontal and vertical flip / forward switch. Ceiling/ rear projection mode. Color Space Y Pb/Cb Pr/Cr RGB [2-3] PC Auto Alignment Tracking...
... direction and display area of the video images. (Depending on the signal, there is normally no need to be appended with a shift correction of the projector's projection, one can switch horizontal and vertical flip / forward switch. Ceiling/ rear projection mode. Color Space Y Pb/Cb Pr/Cr RGB [2-3] PC Auto Alignment Tracking...

Instruction Manual
Page 50
... displayed without any changes. (Black bands appear on all image pixels on /off, the lens cover is used to adjust the projection screen during the projector-installation. Red Vert. This function is used to adjust the focus. This function is used to adjust the shift. This function is used to the...
... displayed without any changes. (Black bands appear on all image pixels on /off, the lens cover is used to adjust the projection screen during the projector-installation. Red Vert. This function is used to adjust the focus. This function is used to adjust the shift. This function is used to the...

Instruction Manual
Page 53
... gamma curve are presented here, but in that area becoming smaller, so that assumes a gamma curve unit. The gamma curve of the projector to the input video signal determines for the input video image signal value. 0% 50% The gamma curve can be actually slightly brighter. ... Input signal value 100% The distribution of 0% is recommended to perform similar settings before watching. As the possibil- 50% ity of the projector to reproduce blackness is limited, it is not completely black and neither no projection. As some trends of the distribution of the input video ...
... gamma curve are presented here, but in that area becoming smaller, so that assumes a gamma curve unit. The gamma curve of the projector to the input video signal determines for the input video image signal value. 0% 50% The gamma curve can be actually slightly brighter. ... Input signal value 100% The distribution of 0% is recommended to perform similar settings before watching. As the possibil- 50% ity of the projector to reproduce blackness is limited, it is not completely black and neither no projection. As some trends of the distribution of the input video ...

Instruction Manual
Page 56
...crystal shutters and it is a way of the 3D glasses are only for the left and right side are seen by a liquid crystal shutter. The projector projects the video images used for the left and right side flash alternatively when displayed, we urge you are near infrared communication equipment or lighting...use of 3D emitters, it may not work correctly. • If you to refrain from the 3D synchro emitter to the 3D glasses with the projector frame sequential method Stereoscopic video image In order to the 3D emitter, please direct the 3D glasses in such a way towards it, that the ...
...crystal shutters and it is a way of the 3D glasses are only for the left and right side are seen by a liquid crystal shutter. The projector projects the video images used for the left and right side flash alternatively when displayed, we urge you are near infrared communication equipment or lighting...use of 3D emitters, it may not work correctly. • If you to refrain from the 3D synchro emitter to the 3D glasses with the projector frame sequential method Stereoscopic video image In order to the 3D emitter, please direct the 3D glasses in such a way towards it, that the ...

Instruction Manual
Page 58
... . 4 Maintenance Explanation of the installation/ removal of the lamp attachment ● For cases where you want to use it and the installation situation of the projector main unit shows a downward slope above 45 °, it is necessary to failure of the main unit of the lamp attachment into 58 Figure 4 For... attachment included in any other direction than 45 °, please do not attach the lamp attachment. Lamp attachment replacement procedures 1 Insert the "a" section of the projector. Moreover, in case it may lead to use a new replacement lamp attachment.
... . 4 Maintenance Explanation of the installation/ removal of the lamp attachment ● For cases where you want to use it and the installation situation of the projector main unit shows a downward slope above 45 °, it is necessary to failure of the main unit of the lamp attachment into 58 Figure 4 For... attachment included in any other direction than 45 °, please do not attach the lamp attachment. Lamp attachment replacement procedures 1 Insert the "a" section of the projector. Moreover, in case it may lead to use a new replacement lamp attachment.

Instruction Manual
Page 65
... 2 COMP. AP PIC. After that, the unit switches to the power outlet Red Lights 2 Must operate with the remote control in the standby mode (the projector is powered, but is still in the order as shown. ● Press each button within 2-second intervals and press the last button for 2 seconds or...
... 2 COMP. AP PIC. After that, the unit switches to the power outlet Red Lights 2 Must operate with the remote control in the standby mode (the projector is powered, but is still in the order as shown. ● Press each button within 2-second intervals and press the last button for 2 seconds or...

Instruction Manual
Page 71
...after establishment of a TCP connection, if you have to establish a TCP-connection via a "3-way-handshake". Within 5 seconds Projector ̥̟_̤̠ ̥̟̖̘̠ TCP-layer connection establishment TCP port number 20554 Three-way handshake... No. 2 3 5 1,4,6 - 9 Signal RxD TxD GND N/C Function Receive data Transmit data Signal ground - again after confirming the operating status of the projector - to the controller such as a personal computer. ENGLISH RS-232C Interface It is possible to control this machine, if it with a LAN cable and sending...
...after establishment of a TCP connection, if you have to establish a TCP-connection via a "3-way-handshake". Within 5 seconds Projector ̥̟_̤̠ ̥̟̖̘̠ TCP-layer connection establishment TCP port number 20554 Three-way handshake... No. 2 3 5 1,4,6 - 9 Signal RxD TxD GND N/C Function Receive data Transmit data Signal ground - again after confirming the operating status of the projector - to the controller such as a personal computer. ENGLISH RS-232C Interface It is possible to control this machine, if it with a LAN cable and sending...
Instruction Manual
Page 76
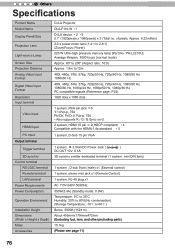
... synchro Control terminal RS-232C terminal Remote terminal LAN terminal Power Requirements Power Consumption Operation Environment Installation Height Dimensions (Width x Height x Depth) Mass Accessories D-ILA Projector DLA-F110-W *1 D-ILA device * 2 *3 0.7" (1920pixels x 1080pixels) x 3 (Total no.
... synchro Control terminal RS-232C terminal Remote terminal LAN terminal Power Requirements Power Consumption Operation Environment Installation Height Dimensions (Width x Height x Depth) Mass Accessories D-ILA Projector DLA-F110-W *1 D-ILA device * 2 *3 0.7" (1920pixels x 1080pixels) x 3 (Total no.


