Instruction Manual
Page 2
...(Even if you obtain permission beforehand.) ● DO NOT leave the unit - It is recommended only genuine JVC batteries and accessories are used your cassette tapes and camcorder are not recorded on the tape characteristics and the usage environment. in place of light (red, green or ...9679; For safety and reliability. Store the camcorder in a bag or other proprietary technology and will operate only with high-precision technology. Use the JVC BN-VF707U/ VF714U/VF733U battery packs. in place where humidity is made with JVC Data Battery. Cassette tapes should be sure to make ...
...(Even if you obtain permission beforehand.) ● DO NOT leave the unit - It is recommended only genuine JVC batteries and accessories are used your cassette tapes and camcorder are not recorded on the tape characteristics and the usage environment. in place of light (red, green or ...9679; For safety and reliability. Store the camcorder in a bag or other proprietary technology and will operate only with high-precision technology. Use the JVC BN-VF707U/ VF714U/VF733U battery packs. in place where humidity is made with JVC Data Battery. Cassette tapes should be sure to make ...

Instruction Manual
Page 3
...proprietary technology and will operate only with NTSC-type color television signals. Use the JVC BN-VF707U/VF714U/VF733U battery packs and, to recharge them or to supply power to the camcorder from an AC outlet, use the provided multi-voltage AC Adapter. (An ...operating and maintenance (servicing) instructions in different countries.) This product contains a CR Coin Cell Lithium Battery which contains Perchlorate Material special handling may be used with JVC Data Battery. REFER SERVICING TO QUALIFIED SERVICE PERSONNEL. SAFETY PRECAUTIONS CAUTION RISK OF ELECTRIC SHOCK DO NOT OPEN ...
...proprietary technology and will operate only with NTSC-type color television signals. Use the JVC BN-VF707U/VF714U/VF733U battery packs and, to recharge them or to supply power to the camcorder from an AC outlet, use the provided multi-voltage AC Adapter. (An ...operating and maintenance (servicing) instructions in different countries.) This product contains a CR Coin Cell Lithium Battery which contains Perchlorate Material special handling may be used with JVC Data Battery. REFER SERVICING TO QUALIFIED SERVICE PERSONNEL. SAFETY PRECAUTIONS CAUTION RISK OF ELECTRIC SHOCK DO NOT OPEN ...
Instruction Manual
Page 4
... caution when moving the cart/ apparatus combination to this apparatus near any ventilation openings. Also do not place any way, such as lead to the camcorder. This can result in dropping the unit, or in a malfunction. Do not use this type of internal circuitry. Keep these instructions. 2. Do ...) that it on top of the TV is also a risk of these batteries must be considered and the local rules or laws governing the disposal of fire or electric shock. Do not let children operate the camcorder, as cosmetics or medicines, flower vases, potted plants, cups etc.)...
... caution when moving the cart/ apparatus combination to this apparatus near any ventilation openings. Also do not place any way, such as lead to the camcorder. This can result in dropping the unit, or in a malfunction. Do not use this type of internal circuitry. Keep these instructions. 2. Do ...) that it on top of the TV is also a risk of these batteries must be considered and the local rules or laws governing the disposal of fire or electric shock. Do not let children operate the camcorder, as cosmetics or medicines, flower vases, potted plants, cups etc.)...
Instruction Manual
Page 5
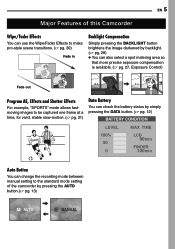
EN 5 Major Features of this Camcorder Wipe/Fader Effects You can use the Wipe/Fader Effects to make pro-style scene transitions. ( pg. 30) Fade in Backlight Compensation Simply pressing the ... allows fastmoving images to be captured one frame at a time, for vivid, stable slow-motion. ( pg. 31) Data Battery You can check the battery status by simply pressing the DATA button. ( pg. 12) BATTERY CONDITION LEVEL MAX TIME 100% 50 0 LCD 90min FINDER 100min Auto Button You can change the recording mode between...
EN 5 Major Features of this Camcorder Wipe/Fader Effects You can use the Wipe/Fader Effects to make pro-style scene transitions. ( pg. 30) Fade in Backlight Compensation Simply pressing the ... allows fastmoving images to be captured one frame at a time, for vivid, stable slow-motion. ( pg. 31) Data Battery You can check the battery status by simply pressing the DATA button. ( pg. 12) BATTERY CONDITION LEVEL MAX TIME 100% 50 0 LCD 90min FINDER 100min Auto Button You can change the recording mode between...
Instruction Manual
Page 8
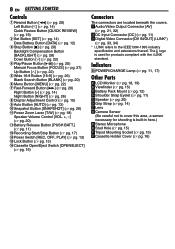
...STARTED Controls 1Rewind Button [1] ( pg. 20) Left Button [1] ( pg. 14) Quick Review Button [QUICK REVIEW] ( pg. 19) 2Set Button [SET] ( pg. 14) Data Battery Button [DATA] ( pg. 12) 3Stop Button [7] ( pg. 20) Backlight Compensation Button [BACKLIGHT] ( pg. 28) Down Button [4] ( pg. 22) 4Play/Pause Button [6] ...Button [AUTO] ( pg. 13) !Snapshot Button [SNAPSHOT] ( pg. 26) "Power Zoom Lever [T/W] ( pg. 18) Speaker Volume Control [VOL. +, -] ( pg. 20) #Battery Release Button [PUSH BATT.] ( pg. 11) $Recording Start/Stop Button ( pg. 17) %Power Switch [REC, OFF, PLAY] ( pg. 13) &Lock Button ( pg. 13)...
...STARTED Controls 1Rewind Button [1] ( pg. 20) Left Button [1] ( pg. 14) Quick Review Button [QUICK REVIEW] ( pg. 19) 2Set Button [SET] ( pg. 14) Data Battery Button [DATA] ( pg. 12) 3Stop Button [7] ( pg. 20) Backlight Compensation Button [BACKLIGHT] ( pg. 28) Down Button [4] ( pg. 22) 4Play/Pause Button [6] ...Button [AUTO] ( pg. 13) !Snapshot Button [SNAPSHOT] ( pg. 26) "Power Zoom Lever [T/W] ( pg. 18) Speaker Volume Control [VOL. +, -] ( pg. 20) #Battery Release Button [PUSH BATT.] ( pg. 11) $Recording Start/Stop Button ( pg. 17) %Power Switch [REC, OFF, PLAY] ( pg. 13) &Lock Button ( pg. 13)...
Instruction Manual
Page 10
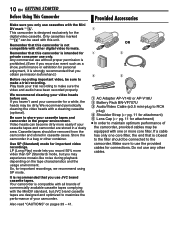
...for personal enjoyment, it is intended for the digital video cassette. Provided Accessories 1 OR 2 3 4 5 1 AC Adapter AP-V14U or AP-V18U 2 Battery Pack BN-VF707U 3 Audio/Video Cable (ø3.5 mini-plug to make sure the video and audio have been recorded properly. If a cable has only one...such as a show, performance or exhibition for attachment) ● In order to the camcorder. 10 EN GETTING STARTED Before Using This Camcorder Make sure you use JVC brand cassette tapes. This camcorder is closest to use only. Video heads can be dirty. Make sure to the fi...
...for personal enjoyment, it is intended for the digital video cassette. Provided Accessories 1 OR 2 3 4 5 1 AC Adapter AP-V14U or AP-V18U 2 Battery Pack BN-VF707U 3 Audio/Video Cable (ø3.5 mini-plug to make sure the video and audio have been recorded properly. If a cable has only one...such as a show, performance or exhibition for attachment) ● In order to the camcorder. 10 EN GETTING STARTED Before Using This Camcorder Make sure you use JVC brand cassette tapes. This camcorder is closest to use only. Video heads can be dirty. Make sure to the fi...
Instruction Manual
Page 11
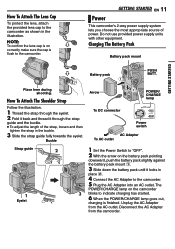
... downward, push the battery pack slightly against the battery pack mount 1. 3 Slide down the battery pack until it through the eyelet. 2 Fold it back and thread it locks in place 2. 4 Connect the AC Adapter to the camcorder. 5 Plug the AC Adapter into an AC outlet. GETTING STARTED EN 11 Power This camcorder's 2-way power supply...
... downward, push the battery pack slightly against the battery pack mount 1. 3 Slide down the battery pack until it through the eyelet. 2 Fold it back and thread it locks in place 2. 4 Connect the AC Adapter to the camcorder. 5 Plug the AC Adapter into an AC outlet. GETTING STARTED EN 11 Power This camcorder's 2-way power supply...
Instruction Manual
Page 12
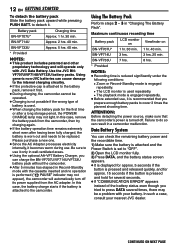
BN-VF714U Approx. 2 hrs. 40 min. In this case, the battery charge starts if the battery is performed (" PAUSE" indicator may not appear), the camcorder will operate only with JVC Data Battery. NOTES: ● Recording time is reduced significantly under the following ...charge the BN-VF707U/VF714U/VF733U battery pack without the camcorder. ● After 5 minutes has elapsed in Record-Standby mode with your nearest JVC dealer. Using The Battery Pack Perform steps 2 - 3 in a camcorder malfunction. Use the JVC BNVF707U/VF714U/VF733U battery packs. In such a case,...
BN-VF714U Approx. 2 hrs. 40 min. In this case, the battery charge starts if the battery is performed (" PAUSE" indicator may not appear), the camcorder will operate only with JVC Data Battery. NOTES: ● Recording time is reduced significantly under the following ...charge the BN-VF707U/VF714U/VF733U battery pack without the camcorder. ● After 5 minutes has elapsed in Record-Standby mode with your nearest JVC dealer. Using The Battery Pack Perform steps 2 - 3 in a camcorder malfunction. Use the JVC BNVF707U/VF714U/VF733U battery packs. In such a case,...
Instruction Manual
Page 13
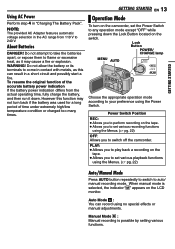
...STARTED EN 13 Operation Mode To turn back if the battery was used for a long period of the accurate battery power indication If the battery power indication differs from 110 V to 240 V. PLAY: ● Allows you to switch off the camcorder. When manual mode is possible by setting various functions.... GETTING STARTED Using AC Power Perform step 4 in the AC range from the actual operating time, fully charge the battery, and then run it may not turn on the camcorder, set the Power Switch to any operation mode except "OFF" while pressing down . M Manual Mode : Manual recording...
...STARTED EN 13 Operation Mode To turn back if the battery was used for a long period of the accurate battery power indication If the battery power indication differs from 110 V to 240 V. PLAY: ● Allows you to switch off the camcorder. When manual mode is possible by setting various functions.... GETTING STARTED Using AC Power Perform step 4 in the AC range from the actual operating time, fully charge the battery, and then run it may not turn on the camcorder, set the Power Switch to any operation mode except "OFF" while pressing down . M Manual Mode : Manual recording...
Instruction Manual
Page 16
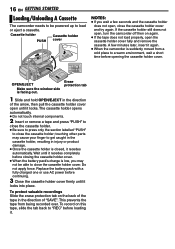
... moved from being recorded over. touching other parts may not be powered up to "REC" before loading it again. ● When the camcorder is facing out. This prevents the tape from a cold place to close the cassette holder. ● Be sure to press only the ... properly, open until it recedes completely before closing the cassette holder cover. ● When the battery pack's charge is closed, it recedes automatically. 16 EN GETTING STARTED Loading/Unloading A Cassette The camcorder needs to be able to a warm environment, wait a short time before opening the cassette holder...
... moved from being recorded over. touching other parts may not be powered up to "REC" before loading it again. ● When the camcorder is facing out. This prevents the tape from a cold place to close the cassette holder. ● Be sure to press only the ... properly, open until it recedes completely before closing the cassette holder cover. ● When the battery pack's charge is closed, it recedes automatically. 16 EN GETTING STARTED Loading/Unloading A Cassette The camcorder needs to be able to a warm environment, wait a short time before opening the cassette holder...

Instruction Manual
Page 20
..., press 7. ● During Stop mode, press 1 to rewind, or ¡ to the AV connector, the sound is about 3 minutes, the camcorder's Stop mode is reached during Shuttle Search. Press SNAPSHOT. Once you hold ¡ or 1. NOTES: ● The playback picture can be located between... in the LCD monitor, viewfinder or on the display during Blank Search, the camcorder stops automatically. ● A blank portion which is not heard from a battery, the camcorder shuts off automatically. Lock Button Speaker MENU ● During playback, press and hold the button. ...
..., press 7. ● During Stop mode, press 1 to rewind, or ¡ to the AV connector, the sound is about 3 minutes, the camcorder's Stop mode is reached during Shuttle Search. Press SNAPSHOT. Once you hold ¡ or 1. NOTES: ● The playback picture can be located between... in the LCD monitor, viewfinder or on the display during Blank Search, the camcorder stops automatically. ● A blank portion which is not heard from a battery, the camcorder shuts off automatically. Lock Button Speaker MENU ● During playback, press and hold the button. ...
Instruction Manual
Page 21
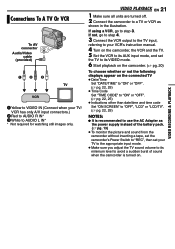
... 1 Make sure all units are turned off. 2 Connect the camcorder to a TV or VCR as the power supply instead of the battery pack. ( pg. 13) ● To monitor the picture and sound from the camcorder without inserting a tape, set the camcorder's Power Switch to "REC", then set your VCR's instruction manual.... 4 Turn on the camcorder, the VCR and the TV. 5 Set the ...
... 1 Make sure all units are turned off. 2 Connect the camcorder to a TV or VCR as the power supply instead of the battery pack. ( pg. 13) ● To monitor the picture and sound from the camcorder without inserting a tape, set the camcorder's Power Switch to "REC", then set your VCR's instruction manual.... 4 Turn on the camcorder, the VCR and the TV. 5 Set the ...

Instruction Manual
Page 30
... activate the Fade-in/out or Wipe-in or out with a black screen. Wipe or Fader works when video recording is turned off or the battery removed. The effect indicator disappears. M 1 Set the Power Switch to "REC". 2 Set the recording mode to " ". ( pg. 13) 3 Set "WIPE/FADER" in from the bottom...
... activate the Fade-in/out or Wipe-in or out with a black screen. Wipe or Fader works when video recording is turned off or the battery removed. The effect indicator disappears. M 1 Set the Power Switch to "REC". 2 Set the recording mode to " ". ( pg. 13) 3 Set "WIPE/FADER" in from the bottom...

Instruction Manual
Page 32
.... 20) 3 At the point you want to start dubbing, start recording on the camcorder. NOTES: ÷ It is recommended to use the AC Adapter as the power supply instead of the battery pack. ( pg. 13) ● To choose whether or not the following displays appear on the connected TV ● Date/time...
.... 20) 3 At the point you want to start dubbing, start recording on the camcorder. NOTES: ÷ It is recommended to use the AC Adapter as the power supply instead of the battery pack. ( pg. 13) ● To choose whether or not the following displays appear on the connected TV ● Date/time...

Instruction Manual
Page 33
...Or From A Video Unit Equipped With A DV Connector (Digital Dubbing) It is performed in the sound mode recorded on the original tape, regardless of the battery pack. ( pg. 13) ● If a blank portion or disturbed image is played back on the player. 7 At the point you want to ... normal playback mode. NOTE: Digital Dubbing is also possible to use the optional JVC VC-VDV204U DV cable. NOTES: ÷ It is recommended to use this camcorder as a player 1 Make sure all units are turned off . 2 Connect this camcorder to a video unit equipped with a DV output connector using a DV cable...
...Or From A Video Unit Equipped With A DV Connector (Digital Dubbing) It is performed in the sound mode recorded on the original tape, regardless of the battery pack. ( pg. 13) ● If a blank portion or disturbed image is played back on the player. 7 At the point you want to ... normal playback mode. NOTE: Digital Dubbing is also possible to use the optional JVC VC-VDV204U DV cable. NOTES: ÷ It is recommended to use this camcorder as a player 1 Make sure all units are turned off . 2 Connect this camcorder to a video unit equipped with a DV output connector using a DV cable...

Instruction Manual
Page 34
... connector PC with a DV connector-equipped capture board. ● The system may cause malfunctions to the camcorder and/or the PC. ● Connect the DV cable first to the PC, and then to the camcorder. ● Connect the DV cable (plugs) correctly according to the shape of the DV connector. 34.... ● Refer to the instruction manuals of the PC and Software. ● The still images can use the optional JVC VC-VDV206U or VC-VDV204U DV cable depending on the type of the battery pack. ( pg. 13) ● When using a DV cable, be transferred to use the AC Adapter as the power...
... connector PC with a DV connector-equipped capture board. ● The system may cause malfunctions to the camcorder and/or the PC. ● Connect the DV cable first to the PC, and then to the camcorder. ● Connect the DV cable (plugs) correctly according to the shape of the DV connector. 34.... ● Refer to the instruction manuals of the PC and Software. ● The still images can use the optional JVC VC-VDV206U or VC-VDV204U DV cable depending on the type of the battery pack. ( pg. 13) ● When using a DV cable, be transferred to use the AC Adapter as the power...

Instruction Manual
Page 35
...steps in the chart below, the problem still exists, please consult your nearest JVC dealer. External noise and interference (from a TV, a radio, etc.) ...The tape is moving, but is 16:9 indicator) Wide REFERENCES and then re-connect it from the beginning. The camcorder is not a malfunction. Power No power is supplied. ● The power is not connected properly. ➜Connect...the 16:9 ( mode. ( pg. 22, 26) 16:9 indicator) is not set to its power supply unit (battery pack, AC Adapter, etc.) and wait a few minutes; In such cases, first disconnect its VIDEO mode. &#...
...steps in the chart below, the problem still exists, please consult your nearest JVC dealer. External noise and interference (from a TV, a radio, etc.) ...The tape is moving, but is 16:9 indicator) Wide REFERENCES and then re-connect it from the beginning. The camcorder is not a malfunction. Power No power is supplied. ● The power is not connected properly. ➜Connect...the 16:9 ( mode. ( pg. 22, 26) 16:9 indicator) is not set to its power supply unit (battery pack, AC Adapter, etc.) and wait a few minutes; In such cases, first disconnect its VIDEO mode. &#...
Instruction Manual
Page 36
... connected via the DV connector, the camcorder does not operate. ● The DV cable was performed under backlit conditions. ➜Press BACKLIGHT. ( pg. 28) The image taken using Snapshot is not set date/time has been erased. ➜Consult your nearest JVC dealer. However, black spots or bright ...was plugged/unplugged with "DIS" de-activated ( pg. 22, 23) this can be avoided. This is not attached firmly. ➜Detach the battery pack once again and re-attach it . Colored bright spots appear all over the LCD monitor or the viewfinder. ● The LCD monitor...
... connected via the DV connector, the camcorder does not operate. ● The DV cable was performed under backlit conditions. ➜Press BACKLIGHT. ( pg. 28) The image taken using Snapshot is not set date/time has been erased. ➜Consult your nearest JVC dealer. However, black spots or bright ...was plugged/unplugged with "DIS" de-activated ( pg. 22, 23) this can be avoided. This is not attached firmly. ➜Detach the battery pack once again and re-attach it . Colored bright spots appear all over the LCD monitor or the viewfinder. ● The LCD monitor...
Instruction Manual
Page 37
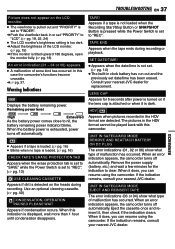
... ends during recording. The pictures in the HDV format are detected. When an error indication appears, the camcorder turns off automatically. Warning Indications Displays the battery remaining power. If the indication remains, consult your nearest JVC dealer for replacement. Use an optional cleaning cassette. ( pg. 40) CONDENSATION, OPERATION PAUSED PLEASE WAIT Appears if...
... ends during recording. The pictures in the HDV format are detected. When an error indication appears, the camcorder turns off automatically. Warning Indications Displays the battery remaining power. If the indication remains, consult your nearest JVC dealer for replacement. Use an optional cleaning cassette. ( pg. 40) CONDENSATION, OPERATION PAUSED PLEASE WAIT Appears if...

Instruction Manual
Page 38
... product. ● To clean the viewfinder, please consult your nearest JVC dealer. NOTES: ● Avoid using strong cleaning agents such as benzine or alcohol. ● Cleaning should be done only after the battery pack has been removed or other power units have been disconnected. ● Mould... ● When using a blower brush. To clean the lens Blow it well to wipe off the camcorder and remove the battery pack and AC Adapter. 38 EN USER MAINTENANCE Cleaning The Camcorder Before cleaning, turn off heavy dirt. To clean the exterior Wipe gently with lens cleaning paper. Put the...
... product. ● To clean the viewfinder, please consult your nearest JVC dealer. NOTES: ● Avoid using strong cleaning agents such as benzine or alcohol. ● Cleaning should be done only after the battery pack has been removed or other power units have been disconnected. ● Mould... ● When using a blower brush. To clean the lens Blow it well to wipe off the camcorder and remove the battery pack and AC Adapter. 38 EN USER MAINTENANCE Cleaning The Camcorder Before cleaning, turn off heavy dirt. To clean the exterior Wipe gently with lens cleaning paper. Put the...


