Instruction Manual
Page 2
... remote controlled. Ne pas exposer l'appareil à la pluie ni à l'humidité. The power can be of sufficient magnitude to persons. Commutateur STANDBY/ON ! If this appliance to provide reasonable protection against harmful interference in a residential installation. Changes or modifications not expressly approved by the manufacturer for a Class B digital device, pursuant to part 15 of important operating and maintenance (servicing) instructions...
... remote controlled. Ne pas exposer l'appareil à la pluie ni à l'humidité. The power can be of sufficient magnitude to persons. Commutateur STANDBY/ON ! If this appliance to provide reasonable protection against harmful interference in a residential installation. Changes or modifications not expressly approved by the manufacturer for a Class B digital device, pursuant to part 15 of important operating and maintenance (servicing) instructions...

Instruction Manual
Page 3
VIDEO IN DVD, VIDEO IN VCR 16 Selecting the Analog or Digital Input Mode 17 Sound Adjustments 18 Attenuating the Input Signal 18 Turning Off the Subwoofer 18 Reinforcing the Bass 18 Sound Adjustments Using MULTI JOG Dial 19 Sound Adjustments Using Remote Control 20 Adjusting Speaker Output Levels Using Test Tone 20 Adjusting Subwoofer Output Level 21 Tuner Operations 22 Tuning in to Stations Manually 22 Using Preset Tuning 22 To Store the Preset Stations 22 To Tune in the Remote Control 10 Basic Operations 11 Turning On the Power 11 Selecting the Source to a Preset Station...
VIDEO IN DVD, VIDEO IN VCR 16 Selecting the Analog or Digital Input Mode 17 Sound Adjustments 18 Attenuating the Input Signal 18 Turning Off the Subwoofer 18 Reinforcing the Bass 18 Sound Adjustments Using MULTI JOG Dial 19 Sound Adjustments Using Remote Control 20 Adjusting Speaker Output Levels Using Test Tone 20 Adjusting Subwoofer Output Level 21 Tuner Operations 22 Tuning in to Stations Manually 22 Using Preset Tuning 22 To Store the Preset Stations 22 To Tune in the Remote Control 10 Basic Operations 11 Turning On the Power 11 Selecting the Source to a Preset Station...

Instruction Manual
Page 8
... initial settings. 6 To subwoofer input Powered subwoofer To center speaker To right front speaker To right surround speaker To left front speaker To left surround speaker 7 How to connect speaker cords For each speaker, connect the (+) and (-) terminals on the rear panel to the (+) and (-) terminals marked on the rear panel, using a cable with RCA pin plugs (not supplied). • Refer also to the manual supplied with your listening conditions. Normally place it in the digital software. By connecting a subwoofer...
... initial settings. 6 To subwoofer input Powered subwoofer To center speaker To right front speaker To right surround speaker To left front speaker To left surround speaker 7 How to connect speaker cords For each speaker, connect the (+) and (-) terminals on the rear panel to the (+) and (-) terminals marked on the rear panel, using a cable with RCA pin plugs (not supplied). • Refer also to the manual supplied with your listening conditions. Normally place it in the digital software. By connecting a subwoofer...
Instruction Manual
Page 11
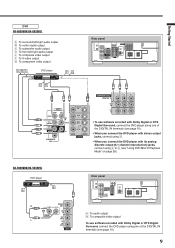
... audio output ‰ To composite video output Ï To S-video output Ì To component video output ABC DVD player DVD DE FG Rear panel Y PB PR MONITOR OUT AUDIO MONITOR OUT RIGHT FRONT SUB WOOFER SURR (REAR) RIGHT LEFT DVD IN CENTER DVD IN OUT (REC) VCR IN (PLAY) LEFT VIDEO S-VIDEO SUBWOOFER OUT ANTENNA FM 75 COAXIAL DVD IN VCR IN AM • To use software encoded with Dolby Digital or DTS Digital Surround, connect the DVD player using one of the DIGITAL IN terminals (see "Using DVD MULTI Playback Mode...
... audio output ‰ To composite video output Ï To S-video output Ì To component video output ABC DVD player DVD DE FG Rear panel Y PB PR MONITOR OUT AUDIO MONITOR OUT RIGHT FRONT SUB WOOFER SURR (REAR) RIGHT LEFT DVD IN CENTER DVD IN OUT (REC) VCR IN (PLAY) LEFT VIDEO S-VIDEO SUBWOOFER OUT ANTENNA FM 75 COAXIAL DVD IN VCR IN AM • To use software encoded with Dolby Digital or DTS Digital Surround, connect the DVD player using one of the DIGITAL IN terminals (see "Using DVD MULTI Playback Mode...

Instruction Manual
Page 12
... the power cord with wet hands. • Do not pull on the rear. Rear panel Putting Batteries in the Remote Control When the component has a digital coaxial output terminal, connect it to the DIGITAL 2 (CD) terminal, using the digital optical cable (not supplied). DIGITAL 1 (DVD) DIGITAL 2 ( CD ) Before using the remote control, put in "Analog connections" (see page 9). 3 Replace the cover. DIGITAL 2 (optical): For CD player • When you want to operate the DVD player using the AV COMPU LINK remote control system, connect the DVD player...
... the power cord with wet hands. • Do not pull on the rear. Rear panel Putting Batteries in the Remote Control When the component has a digital coaxial output terminal, connect it to the DIGITAL 2 (CD) terminal, using the digital optical cable (not supplied). DIGITAL 1 (DVD) DIGITAL 2 ( CD ) Before using the remote control, put in "Analog connections" (see page 9). 3 Replace the cover. DIGITAL 2 (optical): For CD player • When you want to operate the DVD player using the AV COMPU LINK remote control system, connect the DVD player...
Instruction Manual
Page 13
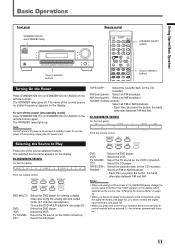
... between FM and AM. DIMMER INPUT DIGITAL INPUT ANALOG INPUT ATT DIGITAL DIGITAL SURROUND PRO LOGIC SPEAKERS SUBWOOFER OUT ON/OFF ON/OFF FM/AM TUNING FM/AM RESET FM MODE MEMORY Source selection buttons Remote control A/V CONTROL RECEIVER 1 2 3 4 5 6 7/P 8 9 10 0 10 TA/NEWS/INFO DISPLAY MODE STANDBY/ON AUDIO Source selection buttons Turning On the Power Press STANDBY/ON (or STANDBY/ON AUDIO on the display. DVD: VCR: TV SOUND: CD*: TAPE/CDR*: FM/AM*: Select the DVD player. FM/AM* (remote control): Select an FM or AM broadcast. •...
... between FM and AM. DIMMER INPUT DIGITAL INPUT ANALOG INPUT ATT DIGITAL DIGITAL SURROUND PRO LOGIC SPEAKERS SUBWOOFER OUT ON/OFF ON/OFF FM/AM TUNING FM/AM RESET FM MODE MEMORY Source selection buttons Remote control A/V CONTROL RECEIVER 1 2 3 4 5 6 7/P 8 9 10 0 10 TA/NEWS/INFO DISPLAY MODE STANDBY/ON AUDIO Source selection buttons Turning On the Power Press STANDBY/ON (or STANDBY/ON AUDIO on the display. DVD: VCR: TV SOUND: CD*: TAPE/CDR*: FM/AM*: Select the DVD player. FM/AM* (remote control): Select an FM or AM broadcast. •...

Instruction Manual
Page 22
... speaker output levels and the subwoofer output level. • You can adjust the effect level for Pro Logic II Music- Select "PANORAMA ON" to +10 in 1 step interval). • "0" is the initial setting. Sound Adjustments Using Remote Control You can also use the test tone to "NONE" (see page 15). 20 TEST FRONT L CENTER SURR L SOUND TEST 1 4 7/P 10 A/V CONTROL RECEIVER FRONT L FRONT R 2 3 CENTER SUBWFR 5 6 SURR L SURR R 8 9 LEVEL 0 10 100 DISPLAY MODE FRONT R SUBWFR SURR R LEVEL +/- Notes: • You cannot adjust the center speaker output level...
... speaker output levels and the subwoofer output level. • You can adjust the effect level for Pro Logic II Music- Select "PANORAMA ON" to +10 in 1 step interval). • "0" is the initial setting. Sound Adjustments Using Remote Control You can also use the test tone to "NONE" (see page 15). 20 TEST FRONT L CENTER SURR L SOUND TEST 1 4 7/P 10 A/V CONTROL RECEIVER FRONT L FRONT R 2 3 CENTER SUBWFR 5 6 SURR L SURR R 8 9 LEVEL 0 10 100 DISPLAY MODE FRONT R SUBWFR SURR R LEVEL +/- Notes: • You cannot adjust the center speaker output level...

Instruction Manual
Page 28
... are playing back any Surround/DSP modes; Creating Realistic Sound Fields Make sure that you have set the speaker information correctly (see pages 15 and 16). • If only the front speakers are connected, you cannot use Surround/DSP modes. • You cannot use Surround/DSP modes (SURROUND and DSP buttons do not work). Front panel DSP SURROUND STANDBY STANDBY/ON SURROUND DSP SURROUND/DSP OFF RX-6030V AUDIO/VIDEO CONTROL RECEIVER DIGITAL AUTO ANALOG LINEAR PCM DIGITAL SPK 1 2 ONE TOUCH OPERATION BASS BOOST INPUT...
... are playing back any Surround/DSP modes; Creating Realistic Sound Fields Make sure that you have set the speaker information correctly (see pages 15 and 16). • If only the front speakers are connected, you cannot use Surround/DSP modes. • You cannot use Surround/DSP modes (SURROUND and DSP buttons do not work). Front panel DSP SURROUND STANDBY STANDBY/ON SURROUND DSP SURROUND/DSP OFF RX-6030V AUDIO/VIDEO CONTROL RECEIVER DIGITAL AUTO ANALOG LINEAR PCM DIGITAL SPK 1 2 ONE TOUCH OPERATION BASS BOOST INPUT...

Instruction Manual
Page 34
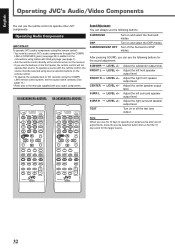
... can use the following buttons for the tuner operations: 1 - 10, +10 FM MODE Select a preset channel number directly. • For channel number 5, press 5. • For channel number 15, press +10, then 5. • For channel number 20, press +10, then 10. Adjust the left front speaker output level. Change the FM reception mode. 32 CENTER = LEVEL +/- Operating JVC's Audio/Video Components You can use the remote control to the connections using cables with your target source. After pressing SOUND, you can use the 10 keys to the manuals supplied with...
... can use the following buttons for the tuner operations: 1 - 10, +10 FM MODE Select a preset channel number directly. • For channel number 5, press 5. • For channel number 15, press +10, then 5. • For channel number 20, press +10, then 10. Adjust the left front speaker output level. Change the FM reception mode. 32 CENTER = LEVEL +/- Operating JVC's Audio/Video Components You can use the remote control to the connections using cables with your target source. After pressing SOUND, you can use the 10 keys to the manuals supplied with...

Instruction Manual
Page 36
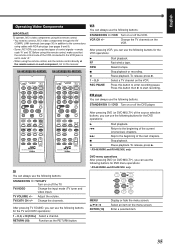
... REW FF REC PAUSE DISPLAY MODE CD-DISC TAPE/CDR CD DVD FM/AM TV SOUND VCR ANALOG /DIGITAL FM MODE SURROUND DSP DIMMER TV/VIDEO SURROUND /DSP OFF MUTING VCR CH TV/CATV CH TV VOLUME VOLUME REMOTE CONTROL RM-SRX6030J TV You can always use the following buttons: STANDBY/ON DVD Turn on the menu screen. VCR You can always use the following buttons for the VCR operations: 3 FF REW 7 8 1 - 9, 0 REC PAUSE...
... REW FF REC PAUSE DISPLAY MODE CD-DISC TAPE/CDR CD DVD FM/AM TV SOUND VCR ANALOG /DIGITAL FM MODE SURROUND DSP DIMMER TV/VIDEO SURROUND /DSP OFF MUTING VCR CH TV/CATV CH TV VOLUME VOLUME REMOTE CONTROL RM-SRX6030J TV You can always use the following buttons: STANDBY/ON DVD Turn on the menu screen. VCR You can always use the following buttons for the VCR operations: 3 FF REW 7 8 1 - 9, 0 REC PAUSE...

Instruction Manual
Page 39
... volume. Press STANDBY/ON on the front panel to turn off the receiver. 2. Operating Other Manufacturers' Video Equipment/Troubleshooting Troubleshooting Use this chart to help you solve daily operational problems. If there is selected. An incorrect source is any problem you intend. Speakers are not connected properly. After unplugging the power cord, consult your dealer. No test tone is selected. Speaker signal cables are incorrect. An incorrect input mode (analog or digital) is available. Ignition noise from speakers. Select the correct source...
... volume. Press STANDBY/ON on the front panel to turn off the receiver. 2. Operating Other Manufacturers' Video Equipment/Troubleshooting Troubleshooting Use this chart to help you solve daily operational problems. If there is selected. An incorrect source is any problem you intend. Speakers are not connected properly. After unplugging the power cord, consult your dealer. No test tone is selected. Speaker signal cables are incorrect. An incorrect input mode (analog or digital) is available. Ignition noise from speakers. Select the correct source...

Instruction Manual
Page 42
... plus a letter of explanation of the problem to the nearest JVC Factory Service Center, the name and location of which will repair or replace defective parts at JVC authorized service centers. Products which have other than a service facility authorized by the toll-free number. LIMITED WARRANTY AUDIO-2 JVC COMPANY OF AMERICA warrants this product and all parts thereof, except as set forth below ONLY TO THE ORIGINAL PURCHASER...
... plus a letter of explanation of the problem to the nearest JVC Factory Service Center, the name and location of which will repair or replace defective parts at JVC authorized service centers. Products which have other than a service facility authorized by the toll-free number. LIMITED WARRANTY AUDIO-2 JVC COMPANY OF AMERICA warrants this product and all parts thereof, except as set forth below ONLY TO THE ORIGINAL PURCHASER...

Instruction Manual
Page 46
... DE BRUITS RADIOELECTRIQUES APPLICABLES AUX APPAREILS NUMERIQUES DE CLASSE B PRESCRITES DANS LA NORME SUR LE MATERIEL BROUILLEUR; Veiller également à ce que l'air circule le mieux possible comme illustré. DO NOT REMOVE COVER (OR BACK) NO USER SERVICEABLE PARTS INSIDE. Connect the equipment into an outlet on the level surface. Le commutateur STANDBY/ON ne coupe...
... DE BRUITS RADIOELECTRIQUES APPLICABLES AUX APPAREILS NUMERIQUES DE CLASSE B PRESCRITES DANS LA NORME SUR LE MATERIEL BROUILLEUR; Veiller également à ce que l'air circule le mieux possible comme illustré. DO NOT REMOVE COVER (OR BACK) NO USER SERVICEABLE PARTS INSIDE. Connect the equipment into an outlet on the level surface. Le commutateur STANDBY/ON ne coupe...

Instruction Manual
Page 47
... 6 Connecting Audio/Video Components 7 Analog Connections 7 Digital Connections 10 Connecting the Power Cord 10 Putting Batteries in to Play 11 Changing the Source Name 12 Selecting Different Sources for RX-5030VBK/RX-5032VSL BASSBOOST button DVD MULTI button 1 VIDEO IN DVD, VIDEO IN VCR 16 Selecting the Analog or Digital Input Mode 17 Sound Adjustments 18 Attenuating the Input Signal 18 Turning Off the Subwoofer 18 Reinforcing the Bass 18 Sound Adjustments Using MULTI JOG Dial 19 Sound Adjustments Using Remote Control 20 Adjusting Speaker Output Levels Using Test Tone...
... 6 Connecting Audio/Video Components 7 Analog Connections 7 Digital Connections 10 Connecting the Power Cord 10 Putting Batteries in to Play 11 Changing the Source Name 12 Selecting Different Sources for RX-5030VBK/RX-5032VSL BASSBOOST button DVD MULTI button 1 VIDEO IN DVD, VIDEO IN VCR 16 Selecting the Analog or Digital Input Mode 17 Sound Adjustments 18 Attenuating the Input Signal 18 Turning Off the Subwoofer 18 Reinforcing the Bass 18 Sound Adjustments Using MULTI JOG Dial 19 Sound Adjustments Using Remote Control 20 Adjusting Speaker Output Levels Using Test Tone...

Instruction Manual
Page 52
... a center speaker, and a pair of a powered subwoofer to the SUBWOOFER OUT jack on the rear panel, using a cable with RCA pin plugs (not supplied). • Refer also to obtain the best possible Surround effects with your subwoofer. After connecting the front, center, surround speakers and/ or a subwoofer, set the speaker setting information properly to the manual supplied with a SPEAKER IMPEDANCE as indicated by the speaker terminals. 7 Speaker layout diagram Left front speaker Center speaker Right front Subwoofer speaker 7 Connection diagram SUBWOOFER OUT Left surround speaker...
... a center speaker, and a pair of a powered subwoofer to the SUBWOOFER OUT jack on the rear panel, using a cable with RCA pin plugs (not supplied). • Refer also to obtain the best possible Surround effects with your subwoofer. After connecting the front, center, surround speakers and/ or a subwoofer, set the speaker setting information properly to the manual supplied with a SPEAKER IMPEDANCE as indicated by the speaker terminals. 7 Speaker layout diagram Left front speaker Center speaker Right front Subwoofer speaker 7 Connection diagram SUBWOOFER OUT Left surround speaker...

Instruction Manual
Page 56
... Digital Input Mode" on page 17. DIGITAL IN Notes: • When shipped from the connecting cables and the antenna. Digital coaxial cable Digital optical cable IMPORTANT: • When connecting a video component using the remote control, aim the remote control directly at the same time. • Do not expose batteries to the video jack on the front panel. 1 On the back of the digital terminals using a digital coaxial cable (not supplied) or digital optical cable (not supplied). Keep the power cord away from the factory...
... Digital Input Mode" on page 17. DIGITAL IN Notes: • When shipped from the connecting cables and the antenna. Digital coaxial cable Digital optical cable IMPORTANT: • When connecting a video component using the remote control, aim the remote control directly at the same time. • Do not expose batteries to the video jack on the front panel. 1 On the back of the digital terminals using a digital coaxial cable (not supplied) or digital optical cable (not supplied). Keep the power cord away from the factory...

Instruction Manual
Page 72
... use Surround/DSP modes (SURROUND and DSP buttons do not work). To adjust the speaker output level and select Panorama control for each input signal" on the display. The adjustment is memorized for Pro Logic II Music, see pages 19 to and start playing. • When playing back software encoded with side-wall image (see page 17). 2 Press SURROUND. The appropriate Surround mode will be activated according to enjoy "wraparound" sound effect with Dolby Digital and DTS Digital Surround, select...
... use Surround/DSP modes (SURROUND and DSP buttons do not work). To adjust the speaker output level and select Panorama control for each input signal" on the display. The adjustment is memorized for Pro Logic II Music, see pages 19 to and start playing. • When playing back software encoded with side-wall image (see page 17). 2 Press SURROUND. The appropriate Surround mode will be activated according to enjoy "wraparound" sound effect with Dolby Digital and DTS Digital Surround, select...
Instruction Manual
Page 78
...DVD SLEEP REW FF REC PAUSE DISPLAY MODE CD-DISC Sound Adjustment You can always use the buttons on the receiver. • If you can use the following buttons: SURROUND DSP SURROUND/DSP OFF Turn on and select the DSP modes. FRONT L = LEVEL +/- Adjust the center speaker output level. Operating Audio Components IMPORTANT: To operate JVC's audio components using this remote control: • You need to connect JVC's audio components through the COMPU LINK-4 (SYNCHRO) jacks (see page 7). • Aim the remote control directly at the remote sensor on the front panel, the remote...
...DVD SLEEP REW FF REC PAUSE DISPLAY MODE CD-DISC Sound Adjustment You can always use the buttons on the receiver. • If you can use the following buttons: SURROUND DSP SURROUND/DSP OFF Turn on and select the DSP modes. FRONT L = LEVEL +/- Adjust the center speaker output level. Operating Audio Components IMPORTANT: To operate JVC's audio components using this remote control: • You need to connect JVC's audio components through the COMPU LINK-4 (SYNCHRO) jacks (see page 7). • Aim the remote control directly at the remote sensor on the front panel, the remote...
Instruction Manual
Page 81
... code "A." • When using this remote control, make sure that the remote control code of control signals-remote code "A" and "B." RX-6030VBK/RX-6032VSL RX-5030VBK/RX-5032VSL TV CATV A/V CONTROL STANDBY/ON RECEIVER TEST 1 FRONT L FRONT R AUDIO 2 3 4 MENU 7/P CENTER SUBWFR TV/CATV 5 6 SURR L SURR R VCR 8 9 ENTER LEVEL 10 0 10 RETURN TA/NEWS/INFO 100 DVD SLEEP REW FF REC PAUSE DISPLAY MODE CD-DISC TAPE/CDR CD DVD DVD MULTI FM/AM TV SOUND VCR ANALOG /DIGITAL FM MODE SURROUND DSP SURROUND...
... code "A." • When using this remote control, make sure that the remote control code of control signals-remote code "A" and "B." RX-6030VBK/RX-6032VSL RX-5030VBK/RX-5032VSL TV CATV A/V CONTROL STANDBY/ON RECEIVER TEST 1 FRONT L FRONT R AUDIO 2 3 4 MENU 7/P CENTER SUBWFR TV/CATV 5 6 SURR L SURR R VCR 8 9 ENTER LEVEL 10 0 10 RETURN TA/NEWS/INFO 100 DVD SLEEP REW FF REC PAUSE DISPLAY MODE CD-DISC TAPE/CDR CD DVD DVD MULTI FM/AM TV SOUND VCR ANALOG /DIGITAL FM MODE SURROUND DSP SURROUND...

Instruction Manual
Page 84
.... Select the correct input mode (analog or digital). Stop the playback source. 3. If speaker wiring is too far away. Press STANDBY/ON on the receiver again, unplug the AC power cord, then plug it back in again. Remove the obstruction. Replace batteries in microcomputer is not functioning correctly. "DSP MICOM NG" starts flashing on the front panel, then check the speaker wiring. Remote control does not work. Speaker signal cables are heard unequally. The station is...
.... Select the correct input mode (analog or digital). Stop the playback source. 3. If speaker wiring is too far away. Press STANDBY/ON on the receiver again, unplug the AC power cord, then plug it back in again. Remove the obstruction. Replace batteries in microcomputer is not functioning correctly. "DSP MICOM NG" starts flashing on the front panel, then check the speaker wiring. Remote control does not work. Speaker signal cables are heard unequally. The station is...


