Product Guide
Page 3
... without further evaluation by Intel. Chapter 2, "Installing and Replacing Board Components" provides instructions on how to hardware or loss of product features. iii Chapter 3, "Updating the BIOS" provides instructions on how to important information. Chapter 4, "Configuring for RAID" provides information about board layout, component installation, BIOS update, and regulatory requirements for the Intel® Workstation Board WX58BP. Preface This Product Guide...
... without further evaluation by Intel. Chapter 2, "Installing and Replacing Board Components" provides instructions on how to hardware or loss of product features. iii Chapter 3, "Updating the BIOS" provides instructions on how to important information. Chapter 4, "Configuring for RAID" provides information about board layout, component installation, BIOS update, and regulatory requirements for the Intel® Workstation Board WX58BP. Preface This Product Guide...
Product Guide
Page 6
Intel® Workstation Board WX58BP Product Guide Installing the Processor Fan Heatsink 33 Connecting the Processor Fan Heatsink Cable 33 Removing the Processor 34 Installing and Removing Memory... the Battery 53 3 Updating the BIOS 58 Updating the BIOS with the Intel® Express BIOS Update Utility 58 Updating the BIOS with the ISO Image BIOS Update File or the Iflash Memory Update Utility ...59 Obtaining the BIOS Update File 59 Updating the BIOS with the ISO Image BIOS Update File 59 Updating the BIOS with the Iflash Memory Update Utility 60 Recovering the BIOS 61 4 Configuring for...
Intel® Workstation Board WX58BP Product Guide Installing the Processor Fan Heatsink 33 Connecting the Processor Fan Heatsink Cable 33 Removing the Processor 34 Installing and Removing Memory... the Battery 53 3 Updating the BIOS 58 Updating the BIOS with the Intel® Express BIOS Update Utility 58 Updating the BIOS with the ISO Image BIOS Update File or the Iflash Memory Update Utility ...59 Obtaining the BIOS Update File 59 Updating the BIOS with the ISO Image BIOS Update File 59 Updating the BIOS with the Iflash Memory Update Utility 60 Recovering the BIOS 61 4 Configuring for...
Product Guide
Page 10
...; Voltage sensing to detect out of range values Related Links: For more information about the Intel® Workstation Board WX58BP, including the Technical Product Specification (TPS), BIOS updates, and device drivers, go to: http://support.intel.com/support/motherboards/ Supported Operating Systems The Board supports the following operating systems: Microsoft Windows Vista Ultimate* Microsoft Windows Vista Enterprise...
...; Voltage sensing to detect out of range values Related Links: For more information about the Intel® Workstation Board WX58BP, including the Technical Product Specification (TPS), BIOS updates, and device drivers, go to: http://support.intel.com/support/motherboards/ Supported Operating Systems The Board supports the following operating systems: Microsoft Windows Vista Ultimate* Microsoft Windows Vista Enterprise...
Product Guide
Page 18
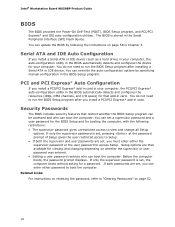
... If both passwords are set , the computer boots without asking for that restrict whether the BIOS Setup program can be accessed and who can update the BIOS by specifying manual configuration in the Serial Peripheral Interface (SPI) Flash device. You do not need to...enter either password to "Clearing Passwords" on resetting the password, refer to boot the computer. Intel® Workstation Board WX58BP Product Guide BIOS The BIOS provides the Power-On Self-Test (POST), BIOS Setup program, and PCI/PCI Express* and IDE auto-configuration utilities. You can boot the computer...
... If both passwords are set , the computer boots without asking for that restrict whether the BIOS Setup program can be accessed and who can update the BIOS by specifying manual configuration in the Serial Peripheral Interface (SPI) Flash device. You do not need to...enter either password to "Clearing Passwords" on resetting the password, refer to boot the computer. Intel® Workstation Board WX58BP Product Guide BIOS The BIOS provides the Power-On Self-Test (POST), BIOS Setup program, and PCI/PCI Express* and IDE auto-configuration utilities. You can boot the computer...

Product Guide
Page 27
... in the chassis, the shield blocks radio frequency transmissions, protects internal components from the chassis supplier. Installing the I /O shield before installing the Workstation Board in the chassis. Press the shield into place so it fits tightly and securely. Figure 5. When installed in Figure 5. Updating the BIOS Installing the I/O Shield The Workstation Board comes with an I/O shield.
... in the chassis, the shield blocks radio frequency transmissions, protects internal components from the chassis supplier. Installing the I /O shield before installing the Workstation Board in the chassis. Press the shield into place so it fits tightly and securely. Figure 5. When installed in Figure 5. Updating the BIOS Installing the I/O Shield The Workstation Board comes with an I/O shield.

Product Guide
Page 29
Failure to install the processor on the Intel® Workstation Board WX58BP. Installing a Processor CAUTION Before installing or removing a processor, make sure the AC power is removed by pushing the lever down and away from the computer; ... 25. 2. Observe the precautions in "Before You Begin" on page 22). Open the socket lever by unplugging the power cord from the socket (Figure 7, A and B). Updating the BIOS Installing and Removing a Processor The following section provides instructions on how to do so could damage the processor and the...
Failure to install the processor on the Intel® Workstation Board WX58BP. Installing a Processor CAUTION Before installing or removing a processor, make sure the AC power is removed by pushing the lever down and away from the computer; ... 25. 2. Observe the precautions in "Before You Begin" on page 22). Open the socket lever by unplugging the power cord from the socket (Figure 7, A and B). Updating the BIOS Installing and Removing a Processor The following section provides instructions on how to do so could damage the processor and the...

Product Guide
Page 31
Updating the BIOS 5. Remove the processor from the Protective Processor Cover 6. Remove the Processor from the protective processor cover. Align notches (Figure 11, B) with your fingers align to ...
Updating the BIOS 5. Remove the processor from the Protective Processor Cover 6. Remove the Processor from the protective processor cover. Align notches (Figure 11, B) with your fingers align to ...
Product Guide
Page 33
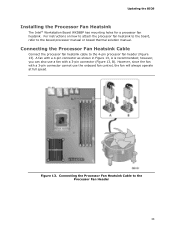
... processor fan heatsink to the board, refer to the Processor Fan Header 33 A fan with a 3-pin connector (Figure 13, B). Connecting the Processor Fan Heatsink Cable Connect the processor fan heatsink cable to the 4-pin processor fan header (Figure 13). Updating the BIOS Installing the Processor Fan Heatsink The Intel® Workstation Board WX58BP has mounting holes for...
... processor fan heatsink to the board, refer to the Processor Fan Header 33 A fan with a 3-pin connector (Figure 13, B). Connecting the Processor Fan Heatsink Cable Connect the processor fan heatsink cable to the 4-pin processor fan header (Figure 13). Updating the BIOS Installing the Processor Fan Heatsink The Intel® Workstation Board WX58BP has mounting holes for...

Product Guide
Page 35
... speed and size in the blue DIMM slots (Channel A, DIMM 0, Channel B, and Channel C) as shown in three channels (A, B, and C). Figure 15. Updating the BIOS Installing and Removing Memory The Intel® Workstation Board WX58BP has four 240-pin DDR3 DIMM sockets arranged in Figure 15. To obtain dual channel memory operation, install matching DIMMs as shown...
... speed and size in the blue DIMM slots (Channel A, DIMM 0, Channel B, and Channel C) as shown in three channels (A, B, and C). Figure 15. Updating the BIOS Installing and Removing Memory The Intel® Workstation Board WX58BP has four 240-pin DDR3 DIMM sockets arranged in Figure 15. To obtain dual channel memory operation, install matching DIMMs as shown...

Product Guide
Page 37
Updating the BIOS NOTE Using a DIMM with the keys in the socket (see Figure 18). To install a DIMM, follow these steps: 1. Observe the precautions in place. 9. Remove the ...
Updating the BIOS NOTE Using a DIMM with the keys in the socket (see Figure 18). To install a DIMM, follow these steps: 1. Observe the precautions in place. 9. Remove the ...

Product Guide
Page 39
Updating the BIOS Installing and Removing a PCI Express* x16 Card CAUTION When installing a PCI Express* card on the Intel® Workstation Board WX58BP, ensure the card is not fully seated in the connector, an electrical short may be damaged. Installing Multiple PCI Express* x16 Graphics Cards 39 Depending ... (Figure 19, A) for optimum performance. Installing Multiple PCI Express* x16 Graphics Cards If you power on the over-current protection of the power supply, certain board components and/or traces may result across the connector pins.
Updating the BIOS Installing and Removing a PCI Express* x16 Card CAUTION When installing a PCI Express* card on the Intel® Workstation Board WX58BP, ensure the card is not fully seated in the connector, an electrical short may be damaged. Installing Multiple PCI Express* x16 Graphics Cards 39 Depending ... (Figure 19, A) for optimum performance. Installing Multiple PCI Express* x16 Graphics Cards If you power on the over-current protection of the power supply, certain board components and/or traces may result across the connector pins.

Product Guide
Page 41
Updating the BIOS Removing a PCI Express* x16 Card Follow these instructions to the chassis back panel. 3. This releases the card from a connector: 1. Figure 21. Push the card ejector lever down using the tip of a pencil or similar tool (Figure 21, B) in "Before You Begin" on page 25. 2. Remove the screw (Figure 21, A) that secures the card's metal bracket to remove a PCI Express x16 card from the connector (C). 4. Pull the card straight up. Removing a PCI Express x16 Card 41 Observe the precautions in the notch.
Updating the BIOS Removing a PCI Express* x16 Card Follow these instructions to the chassis back panel. 3. This releases the card from a connector: 1. Figure 21. Push the card ejector lever down using the tip of a pencil or similar tool (Figure 21, B) in "Before You Begin" on page 25. 2. Remove the screw (Figure 21, A) that secures the card's metal bracket to remove a PCI Express x16 card from the connector (C). 4. Pull the card straight up. Removing a PCI Express x16 Card 41 Observe the precautions in the notch.

Product Guide
Page 43
Item Description A Front panel audio B HD Audio Link C Chassis intrusion D IEEE 1394a Item Description E USB F Alternate front panel power LED G Front panel H S/PDIF Figure 23. Internal Headers and Connectors 43 Figure 23 shows the location of the internal headers or connectors, observe the precautions in "Before You Begin" on Intel® Workstation Board WX58BP. Updating the BIOS Connecting to the Internal Headers and Connectors Before connecting cables to any of the internal headers and connectors on page 25.
Item Description A Front panel audio B HD Audio Link C Chassis intrusion D IEEE 1394a Item Description E USB F Alternate front panel power LED G Front panel H S/PDIF Figure 23. Internal Headers and Connectors 43 Figure 23 shows the location of the internal headers or connectors, observe the precautions in "Before You Begin" on Intel® Workstation Board WX58BP. Updating the BIOS Connecting to the Internal Headers and Connectors Before connecting cables to any of the internal headers and connectors on page 25.

Product Guide
Page 45
.... IEEE 1394a Header Signal Names Pin Signal Name 1 TPA1+ 3 Ground 5 TPA2+ 7 +12 V 9 Key (no pin) Pin Signal Name 2 TPA1- 4 Ground 6 TPA2- 8 +12 V 10 Ground 45 Updating the BIOS Chassis Intrusion Header Figure 23, E shows the location of the IEEE 1394a header.
.... IEEE 1394a Header Signal Names Pin Signal Name 1 TPA1+ 3 Ground 5 TPA2+ 7 +12 V 9 Key (no pin) Pin Signal Name 2 TPA1- 4 Ground 6 TPA2- 8 +12 V 10 Ground 45 Updating the BIOS Chassis Intrusion Header Figure 23, E shows the location of the IEEE 1394a header.

Product Guide
Page 47
... Figure 23, J shows the location of the alternate front panel power LED header. S/PDIF Connector Signal Names Pin Description 1 Vcc 2 S/PDIF Out 3 Ground 47 Updating the BIOS Alternate Front Panel Power LED Header Figure 23, H shows the location of the S/PDIF connector. If your chassis has a three-pin power LED cable, connect...
... Figure 23, J shows the location of the alternate front panel power LED header. S/PDIF Connector Signal Names Pin Description 1 Vcc 2 S/PDIF Out 3 Ground 47 Updating the BIOS Alternate Front Panel Power LED Header Figure 23, H shows the location of the S/PDIF connector. If your chassis has a three-pin power LED cable, connect...

Product Guide
Page 52
...from the AC power source. 11. Setup displays the Maintenance menu. 8. Setup displays the maintenance menu again. 9. Intel® Workstation Board WX58BP Product Guide Table 12. The BIOS recovers data in "Before You Begin" on page 25. 2. Turn off all peripheral devices connected to boot. 7.... Self-Test (POST) runs, the BIOS displays the Maintenance Menu. Observe the precautions in the event of a failed BIOS update. The computer starts the Setup program. Press to clear passwords. Clearing Passwords This procedure assumes the board is set to select Clear Passwords. ...
...from the AC power source. 11. Setup displays the Maintenance menu. 8. Setup displays the maintenance menu again. 9. Intel® Workstation Board WX58BP Product Guide Table 12. The BIOS recovers data in "Before You Begin" on page 25. 2. Turn off all peripheral devices connected to boot. 7.... Self-Test (POST) runs, the BIOS displays the Maintenance Menu. Observe the precautions in the event of a failed BIOS update. The computer starts the Setup program. Press to clear passwords. Clearing Passwords This procedure assumes the board is set to select Clear Passwords. ...
Product Guide
Page 58
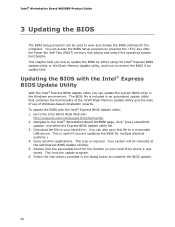
...update the BIOS with the Intel® Express BIOS Update Utility With the Intel® Express BIOS Update utility you can update the system BIOS while in the Windows environment. Download the file to recover the BIOS if an update fails. Navigate to the Intel World Wide Web site: http://support.intel.com/support/motherboards/ 2. The BIOS... you are updating the BIOS for the computer. This step is required. Updating the BIOS with the Intel® Express BIOS Update utility: 1. Intel® Workstation Board WX58BP Product Guide 3 Updating the BIOS The BIOS Setup program ...
...update the BIOS with the Intel® Express BIOS Update Utility With the Intel® Express BIOS Update utility you can update the system BIOS while in the Windows environment. Download the file to recover the BIOS if an update fails. Navigate to the Intel World Wide Web site: http://support.intel.com/support/motherboards/ 2. The BIOS... you are updating the BIOS for the computer. This step is required. Updating the BIOS with the Intel® Express BIOS Update utility: 1. Intel® Workstation Board WX58BP Product Guide 3 Updating the BIOS The BIOS Setup program ...
Product Guide
Page 59
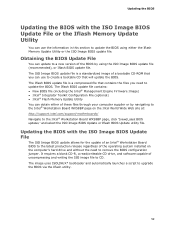
... Updating the BIOS Updating the BIOS with the ISO Image BIOS Update File The ISO Image BIOS update allows for the update of an Intel® Workstation Board BIOS to the latest production release regardless of the operating system installed on the Intel World Wide Web site at: http://support.intel.com/support/motherboards/ Navigate to remove the BIOS configuration jumper. The Iflash BIOS update file contains: New BIOS...
... Updating the BIOS Updating the BIOS with the ISO Image BIOS Update File The ISO Image BIOS update allows for the update of an Intel® Workstation Board BIOS to the latest production release regardless of the operating system installed on the Intel World Wide Web site at: http://support.intel.com/support/motherboards/ Navigate to remove the BIOS configuration jumper. The Iflash BIOS update file contains: New BIOS...

Product Guide
Page 60
...-ROM, bootable USB flash drive, or other bootable USB media. You can update the system BIOS from CD-ROM" prompt displays, press the Enter key. Updating the BIOS with the update utility. 60 The completed CD should contain multiple files and a directory. 3. Intel® Workstation Board WX58BP Product Guide CAUTION Do not interrupt the process or the system may...
...-ROM, bootable USB flash drive, or other bootable USB media. You can update the system BIOS from CD-ROM" prompt displays, press the Enter key. Updating the BIOS with the update utility. 60 The completed CD should contain multiple files and a directory. 3. Intel® Workstation Board WX58BP Product Guide CAUTION Do not interrupt the process or the system may...
Product Guide
Page 61
...that anything will interrupt the BIOS update; Manually run the IFLASH.EXE file from the USB device and manually update the BIOS. Due to the USB device. 3. Updating the BIOS CAUTION Do not interrupt the process or the system may not function properly. 1. Recovering the BIOS It is required. 61 ...however, if an interruption occurs, the BIOS could be damaged. Uncompress the BIOS update file and copy the .BIO file, IFLASH.EXE, and .ITK file (optional) to a bootable USB flash...
...that anything will interrupt the BIOS update; Manually run the IFLASH.EXE file from the USB device and manually update the BIOS. Due to the USB device. 3. Updating the BIOS CAUTION Do not interrupt the process or the system may not function properly. 1. Recovering the BIOS It is required. 61 ...however, if an interruption occurs, the BIOS could be damaged. Uncompress the BIOS update file and copy the .BIO file, IFLASH.EXE, and .ITK file (optional) to a bootable USB flash...


