User Guide
Page 3
...; Product code SE7520BD2SCSID2 ƒ Product code SE7520BD2VD2 ƒ Product code SE7520BD2SATAD2 This manual applies to http://support.intel.com/support/motherboards/server/SE7520BD2/. Six versions of these products. ✏ NOTES Most diagrams in the Intel® Server Board SE7520BD2 Technical Product Specification. This document provides a brief overview of the features of the board/chassis, a list...
...; Product code SE7520BD2SCSID2 ƒ Product code SE7520BD2VD2 ƒ Product code SE7520BD2SATAD2 This manual applies to http://support.intel.com/support/motherboards/server/SE7520BD2/. Six versions of these products. ✏ NOTES Most diagrams in the Intel® Server Board SE7520BD2 Technical Product Specification. This document provides a brief overview of the features of the board/chassis, a list...
User Guide
Page 13
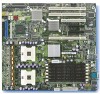
The following table provides an overview of important components and connections on the server board. Intel® Server Board SE7520BD2 Six product codes for the Server Board SE7520BD2 are available. Intel® Server Board SE7520BD2 User Guide 13 1 Server Board Features This chapter briefly describes the main features of the Intel® Server Board SE7520BD2, provides a photograph of the product, a list of the server board features, and diagrams showing the location of the differences between them, by product code. Figure 1.
The following table provides an overview of important components and connections on the server board. Intel® Server Board SE7520BD2 Six product codes for the Server Board SE7520BD2 are available. Intel® Server Board SE7520BD2 User Guide 13 1 Server Board Features This chapter briefly describes the main features of the Intel® Server Board SE7520BD2, provides a photograph of the product, a list of the server board features, and diagrams showing the location of the differences between them, by product code. Figure 1.

User Guide
Page 28
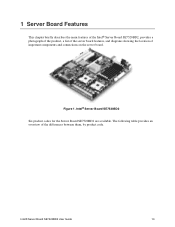
...-static wrist strap and conductive foam pad (recommended) Installing and Removing Memory The silkscreen on the board for this manual show product code SE7520BD2. 2 Hardware Installations and Upgrades Before You Begin Before working with your server product, pay close attention to complete a procedure, differences are... noted. See "Memory" for a link to the list of this manual. ✏ NOTES Most diagrams in this server board. Intel® Server Board SE7520BD2 User Guide 28 See "Additional Information and Software" for a discussion of the board.
...-static wrist strap and conductive foam pad (recommended) Installing and Removing Memory The silkscreen on the board for this manual show product code SE7520BD2. 2 Hardware Installations and Upgrades Before You Begin Before working with your server product, pay close attention to complete a procedure, differences are... noted. See "Memory" for a link to the list of this manual. ✏ NOTES Most diagrams in this server board. Intel® Server Board SE7520BD2 User Guide 28 See "Additional Information and Software" for a discussion of the board.
User Guide
Page 29
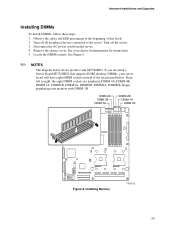
See Figure 6. ✏ NOTES The diagram below . Disconnect the AC power cord from the server. 4. Installing Memory TP00722 29 Turn off all peripheral devices connected to right, the eight DIMM sockets are using a Server Board SE7520BD2 that supports DDR2 memory DIMMs, your server board will have eight DIMM sockets instead of this book... Installing DIMMs To install DIMMs, follow these steps: 1. Observe the safety and ESD precautions at the beginning of the six pictured below shows product code SE7520BD2. DIMM 2A DIMM 3B DIMM 3A DIMM 2B DIMM 1A DIMM 1B Figure 6.
See Figure 6. ✏ NOTES The diagram below . Disconnect the AC power cord from the server. 4. Installing Memory TP00722 29 Turn off all peripheral devices connected to right, the eight DIMM sockets are using a Server Board SE7520BD2 that supports DDR2 memory DIMMs, your server board will have eight DIMM sockets instead of this book... Installing DIMMs To install DIMMs, follow these steps: 1. Observe the safety and ESD precautions at the beginning of the six pictured below shows product code SE7520BD2. DIMM 2A DIMM 3B DIMM 3A DIMM 2B DIMM 1A DIMM 1B Figure 6.
User Guide
Page 44
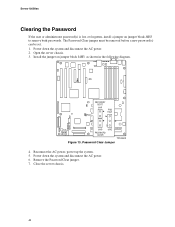
... Utilities Clearing the Password If the user or administrator password(s) is lost or forgotten, install a jumper on jumper block J4H3, as shown in the following diagram. The Password Clear jumper must be removed before a new password(s) can be set. 1. Open the server chassis. 3. Password Clear Jumper 4. Reconnect the AC power, power...
... Utilities Clearing the Password If the user or administrator password(s) is lost or forgotten, install a jumper on jumper block J4H3, as shown in the following diagram. The Password Clear jumper must be removed before a new password(s) can be set. 1. Open the server chassis. 3. Password Clear Jumper 4. Reconnect the AC power, power...

User Guide
Page 45
... disconnect the AC power. 6. Open the server. 3. Return the CMOS Clear jumper to the Force Erase position, covering pins 2 and 3, as shown in the following diagram. Server Utilities Clearing the CMOS If you are not able to access the BIOS setup screens, the Clear CMOS jumper will need to be used...
... disconnect the AC power. 6. Open the server. 3. Return the CMOS Clear jumper to the Force Erase position, covering pins 2 and 3, as shown in the following diagram. Server Utilities Clearing the CMOS If you are not able to access the BIOS setup screens, the Clear CMOS jumper will need to be used...


