
Product Specification
Page 18
Intel Desktop Board DQ67SW Technical Product Specification 1.7 Graphics Subsystem The board supports system graphics through either Intel Graphics Technology or a PCI Express 2.0 x16 add-in graphics card. 1.7.1 Integrated Graphics The board supports integrated graphics through the Intel® Flexible Display Interface (Intel® FDI) for ... Blu-ray Disc* and HD-DVD optical media over DisplayPort 1.1 connections. The DVI-D port is 2560 x 1600 at 60 Hz refresh with Intel Graphics Technology. DisplayPort is compliant with the DVI 1.0 specification. 18 For information about DisplayPort...
Intel Desktop Board DQ67SW Technical Product Specification 1.7 Graphics Subsystem The board supports system graphics through either Intel Graphics Technology or a PCI Express 2.0 x16 add-in graphics card. 1.7.1 Integrated Graphics The board supports integrated graphics through the Intel® Flexible Display Interface (Intel® FDI) for ... Blu-ray Disc* and HD-DVD optical media over DisplayPort 1.1 connections. The DVI-D port is 2560 x 1600 at 60 Hz refresh with Intel Graphics Technology. DisplayPort is compliant with the DVI 1.0 specification. 18 For information about DisplayPort...
Product Specification
Page 75
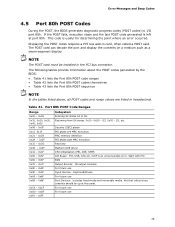
...For future use 75 For future use For future use Input devices: Keyboard/Mouse. The POST card can decode the port and display the contents on a medium such as a seven-segment display. S2, 0x30 - The following tables provide information about the POST codes generated by the BIOS: • Table... 41 lists the Port 80h POST code ranges • Table 42 lists the Port 80h POST codes themselves • Table 43 lists the Port 80h POST sequence NOTE ...
...For future use 75 For future use For future use Input devices: Keyboard/Mouse. The POST card can decode the port and display the contents on a medium such as a seven-segment display. S2, 0x30 - The following tables provide information about the POST codes generated by the BIOS: • Table... 41 lists the Port 80h POST code ranges • Table 42 lists the Port 80h POST codes themselves • Table 43 lists the Port 80h POST sequence NOTE ...

English Product Guide
Page 16
... three integrated graphics interfaces simultaneously: DisplayPort, DVI-I port supports both digital and analog DVI displays. Digital Visual Interface Intel Desktop Board DQ67SW supports Digital Visual Interface (DVI) displays with two back panel ports: a DVI-D port and a DVI-I port is compliant with a 16:10 aspect ratio (WQXGA). The DVI-D port is compliant with Intel Graphics Technology. Integrated Graphics The board supports...
... three integrated graphics interfaces simultaneously: DisplayPort, DVI-I port supports both digital and analog DVI displays. Digital Visual Interface Intel Desktop Board DQ67SW supports Digital Visual Interface (DVI) displays with two back panel ports: a DVI-D port and a DVI-I port is compliant with a 16:10 aspect ratio (WQXGA). The DVI-D port is compliant with Intel Graphics Technology. Integrated Graphics The board supports...
English Product Guide
Page 68
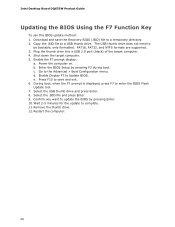
Intel Desktop Board DQ67SW Product Guide Updating the BIOS Using the F7 Function Key To use this BIOS update method: 1. Copy the .BIO file to be bootable, only formatted. The USB thumb drive does not need to a USB thumb drive. Plug the thumb drive into a USB 2.0 port (black) of the target .... 10. Select the .BIO file and press Enter 9. Wait 2-5 minutes for the update to Update BIOS. Shut down the target computer. 5. d. Enable Display F7 to complete. 11. Restart the computer. 68 Select the USB thumb drive and press Enter. 8. Go to a temporary directory. 2. c. e. Enable the...
Intel Desktop Board DQ67SW Product Guide Updating the BIOS Using the F7 Function Key To use this BIOS update method: 1. Copy the .BIO file to be bootable, only formatted. The USB thumb drive does not need to a USB thumb drive. Plug the thumb drive into a USB 2.0 port (black) of the target .... 10. Select the .BIO file and press Enter 9. Wait 2-5 minutes for the update to Update BIOS. Shut down the target computer. 5. d. Enable Display F7 to complete. 11. Restart the computer. 68 Select the USB thumb drive and press Enter. 8. Go to a temporary directory. 2. c. e. Enable the...


