
User Manual (English)
Page 3
... the remote control 9 Programming a universal remote control to work with your TV . . . . 9 Making connections 9 Connecting the power 9 Installing the ferrite core 9 Connecting an outdoor antenna 10 Connecting cable TV 10 Connecting satellite TV via a satellite TV box 11 Connecting a VCR 11 Connecting a camcorder or game console 12 Connecting an HDMI device 12 Connecting a DVI device 12 Connecting a component video device 13 Connecting a computer using DVI 13 Connecting a digital audio amplifier 13 Connecting an analog audio amplifier 13 Turning on your TV for the first time 14...
... the remote control 9 Programming a universal remote control to work with your TV . . . . 9 Making connections 9 Connecting the power 9 Installing the ferrite core 9 Connecting an outdoor antenna 10 Connecting cable TV 10 Connecting satellite TV via a satellite TV box 11 Connecting a VCR 11 Connecting a camcorder or game console 12 Connecting an HDMI device 12 Connecting a DVI device 12 Connecting a component video device 13 Connecting a computer using DVI 13 Connecting a digital audio amplifier 13 Connecting an analog audio amplifier 13 Turning on your TV for the first time 14...
User Manual (English)
Page 7
... your TV exhibits a distinct change the location of cable entry as a fixed blue, green, or red point. When this TV from the power outlet and refer servicing to provide some protection against voltage surges and built-up static charges. Non-active pixels The LCD panel contains almost 3 million thin-film transistors, which provide exceptionally sharp video quality. Heat on the top of the plasma TV The...
... your TV exhibits a distinct change the location of cable entry as a fixed blue, green, or red point. When this TV from the power outlet and refer servicing to provide some protection against voltage surges and built-up static charges. Non-active pixels The LCD panel contains almost 3 million thin-film transistors, which provide exceptionally sharp video quality. Heat on the top of the plasma TV The...
User Manual (English)
Page 8
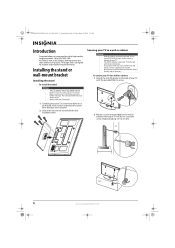
... secure the screw into dry wall, if necessary. Installing the stand or wall-mount bracket Installing the stand To install the stand: Warnings • Your TV screen is designed for reliable and trouble-free performance. Leave the screw head protruding 1/4" (6.35 mm). Wall Cabinet 4 www.insigniaproducts.com To secure your TV to a wall or cabinet: 1 Attach the anti-fall resulting in plasma TV design and is heavy. NS-P42Q-P501Q-P502Q-10A_09-0100_MAN_V1_English...
... secure the screw into dry wall, if necessary. Installing the stand or wall-mount bracket Installing the stand To install the stand: Warnings • Your TV screen is designed for reliable and trouble-free performance. Leave the screw head protruding 1/4" (6.35 mm). Wall Cabinet 4 www.insigniaproducts.com To secure your TV to a wall or cabinet: 1 Attach the anti-fall resulting in plasma TV design and is heavy. NS-P42Q-P501Q-P502Q-10A_09-0100_MAN_V1_English...
User Manual (English)
Page 9
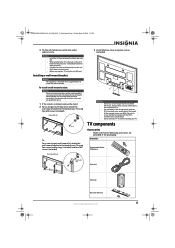
... use by a UL Listed wall-mount bracket. To reduce the risk of your TV. To install a wall-mount bracket: Warning These servicing instructions are qualified to do not perform any servicing other than the standard dimension, because they may differ. Warning • Install the TV close to the wall so that contained in the packaging: Accessories Remote control with two AAA batteries Screw-holder ring Power cord Ferrite core Base cover with the VESA standard screw specifications...
... use by a UL Listed wall-mount bracket. To reduce the risk of your TV. To install a wall-mount bracket: Warning These servicing instructions are qualified to do not perform any servicing other than the standard dimension, because they may differ. Warning • Install the TV close to the wall so that contained in the packaging: Accessories Remote control with two AAA batteries Screw-holder ring Power cord Ferrite core Base cover with the VESA standard screw specifications...
User Manual (English)
Page 11
... jacks. 5 DVI AUDIO IN R-AUDIO-L For more information, see "Connecting an outdoor antenna" on page 10 or "Connecting cable TV" on or off the sound. For more information, see "Selecting a channel" on page 13. 4 EX-LINK Used for an outdoor antenna or cable TV to select a sub-channel. When you are using one) or unplug the power cord. To disconnect power, turn off the surge protector (if you turn off (standby mode). Press...
... jacks. 5 DVI AUDIO IN R-AUDIO-L For more information, see "Connecting an outdoor antenna" on page 10 or "Connecting cable TV" on or off the sound. For more information, see "Selecting a channel" on page 13. 4 EX-LINK Used for an outdoor antenna or cable TV to select a sub-channel. When you are using one) or unplug the power cord. To disconnect power, turn off the surge protector (if you turn off (standby mode). Press...
User Manual (English)
Page 13
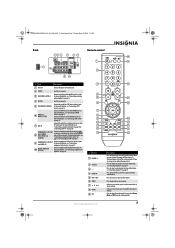
... program your universal remote control's instructions to try codes for other remote controls are available online at a time. Tips • If your TV for an extended period of the universal remote control, and the model number is often visible on the front of time, turn off the surge protector (if you can manually program it using the Insignia TV remote to "teach" the commands one ) or unplug the power cord from interference. To install...
... program your universal remote control's instructions to try codes for other remote controls are available online at a time. Tips • If your TV for an extended period of the universal remote control, and the model number is often visible on the front of time, turn off the surge protector (if you can manually program it using the Insignia TV remote to "teach" the commands one ) or unplug the power cord from interference. To install...
User Manual (English)
Page 17
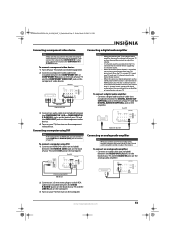
... a DVD player and the source is connected to an HDMI jack on your TV, only 2-channel sound is using DVI: 1 Connect an HDMI/DVI cable (not included) between the HDMI IN 2(DVI) jack on the back of TV Connecting a digital audio amplifier Notes • • • • When you connect your TV to a digital audio amplifier, decrease the volume level on your TV and use the amplifier controls to adjust the volume. If you connect the video to the COMPONENT IN 1 video jacks, connect...
... a DVD player and the source is connected to an HDMI jack on your TV, only 2-channel sound is using DVI: 1 Connect an HDMI/DVI cable (not included) between the HDMI IN 2(DVI) jack on the back of TV Connecting a digital audio amplifier Notes • • • • When you connect your TV to a digital audio amplifier, decrease the volume level on your TV and use the amplifier controls to adjust the volume. If you connect the video to the COMPONENT IN 1 video jacks, connect...
User Manual (English)
Page 18
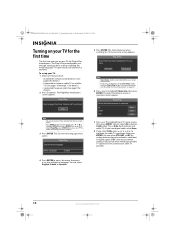
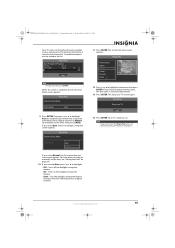
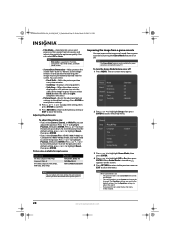
Plug & Play Menu Language, Store Demo, Channels, and Time will be set to Store Demo mode, reset the Plug & Play option. Plug & Play Sets the menu language. To set up your TV: 1 Make sure that you have: • Installed the remote control batteries. (See page 8 for details.) • Connected an antenna, cable TV, or satellite TV. (See pages 10 through setting up basic settings including the menu language, TV signal source, the channel list, and time. The Plug&Play introduction screen appears. Press or to select Plug&Play, press ENTER, then press or...
Plug & Play Menu Language, Store Demo, Channels, and Time will be set to Store Demo mode, reset the Plug & Play option. Plug & Play Sets the menu language. To set up your TV: 1 Make sure that you have: • Installed the remote control batteries. (See page 8 for details.) • Connected an antenna, cable TV, or satellite TV. (See pages 10 through setting up basic settings including the menu language, TV signal source, the channel list, and time. The Plug&Play introduction screen appears. Press or to select Plug&Play, press ENTER, then press or...
User Manual (English)
Page 19
... receive a digital channel signal, the time zone is stored in the list. The Set the time zone screen appears. www.insigniaproducts.com 15 The channel information is selected automatically. 13 Press ENTER. Clock Mode : Auto 9 Press ENTER, then press or to highlight Auto (to automatically set the time using time information from a digital channel. 11 Press ENTER. Scrambled channels are not stored in the channel list. Plug & Play Auto Program in your viewing area. If you want to reset the Plug & Play...
... receive a digital channel signal, the time zone is stored in the list. The Set the time zone screen appears. www.insigniaproducts.com 15 The channel information is selected automatically. 13 Press ENTER. Clock Mode : Auto 9 Press ENTER, then press or to highlight Auto (to automatically set the time using time information from a digital channel. 11 Press ENTER. Scrambled channels are not stored in the channel list. Plug & Play Auto Program in your viewing area. If you want to reset the Plug & Play...
User Manual (English)
Page 21
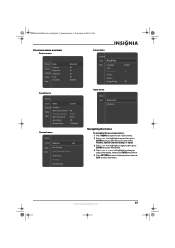
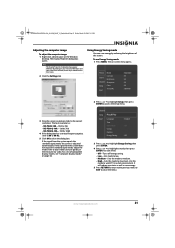
... : Stereo Auto Volume : Off Speaker Select : TV Speaker Channel menu Sound Channel Antenna : Air Setup Input Auto Program Clear Scrambled Channel Channel List Fine Tune Signal Strength Setup menu Channel Setup Plug & Play Input Language Time Game Mode V-Chip Caption Energy Saving : English : Off : Off Input menu Setup Input Source List Edit Name Navigating the menus To navigate the on-screen menus: 1 Press MENU to open the on-screen menu. 2 Press or to highlight a menu, then press ENTER to close the menu. You can select Picture, Sound, Channel, Setup, or Input. 3 Press...
... : Stereo Auto Volume : Off Speaker Select : TV Speaker Channel menu Sound Channel Antenna : Air Setup Input Auto Program Clear Scrambled Channel Channel List Fine Tune Signal Strength Setup menu Channel Setup Plug & Play Input Language Time Game Mode V-Chip Caption Energy Saving : English : Off : Off Input menu Setup Input Source List Edit Name Navigating the menus To navigate the on-screen menus: 1 Press MENU to open the on-screen menu. 2 Press or to highlight a menu, then press ENTER to close the menu. You can select Picture, Sound, Channel, Setup, or Input. 3 Press...
User Manual (English)
Page 22
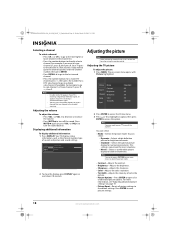
... picture display for normal environments. Your TV displays status information, such as the channel number, type of red in the picture. • Picture Options-Press ENTER to the channel in the channel scanning. Displaying additional information To display additional information: 1 Press DISPLAY. Adjusting the TV picture To adjust the picture: 1 Press MENU. or VOL+) to turn off the sound. Picture Mode Sound Channel Contrast Brightness Sharpness Setup Input Color Tint (G/R) : Standard : 95 : 45 : 50 : 50 : G50/R50 2 Press ENTER to access the Picture menu...
... picture display for normal environments. Your TV displays status information, such as the channel number, type of red in the picture. • Picture Options-Press ENTER to the channel in the channel scanning. Displaying additional information To display additional information: 1 Press DISPLAY. Adjusting the TV picture To adjust the picture: 1 Press MENU. or VOL+) to turn off the sound. Picture Mode Sound Channel Contrast Brightness Sharpness Setup Input Color Tint (G/R) : Standard : 95 : 45 : 50 : 50 : G50/R50 2 Press ENTER to access the Picture menu...
User Manual (English)
Page 23
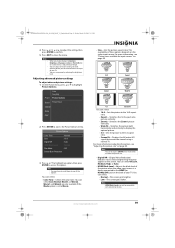
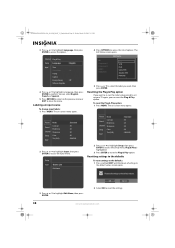
... Picture menu, press or to Movie. • Size-Sets the picture aspect ratio. Note You may appear on the video input source. Warm1 and Warm2 are only available if the Mode option is set to highlight Picture Options. You can select Off, Low, Medium, High, or Auto. • HDMI Black Level-Adjusts the black level of your TV. Picture Options Color Tone : Normal Size : 16:9 Digital NR : Auto HDMI Black Level : Normal Film Mode : Off Screen Burn...
... Picture menu, press or to Movie. • Size-Sets the picture aspect ratio. Note You may appear on the video input source. Warm1 and Warm2 are only available if the Mode option is set to highlight Picture Options. You can select Off, Low, Medium, High, or Auto. • HDMI Black Level-Adjusts the black level of your TV. Picture Options Color Tone : Normal Size : 16:9 Digital NR : Auto HDMI Black Level : Normal Film Mode : Off Screen Burn...
User Manual (English)
Page 24
... and cannot be permanently burned into the screen. Channel Setup Plug & Play Input Language Time Game Mode V-Chip Caption Energy Saving : English : Off : Off 3 Press or to highlight Game Mode, then press ENTER. 4 Press or to move the picture up or down. You can improve the image and sound from all sources and adjusts the picture for too long, the image may be changed . To reset the picture to the default setting, press or to...
... and cannot be permanently burned into the screen. Channel Setup Plug & Play Input Language Time Game Mode V-Chip Caption Energy Saving : English : Off : Off 3 Press or to highlight Game Mode, then press ENTER. 4 Press or to move the picture up or down. You can improve the image and sound from all sources and adjusts the picture for too long, the image may be changed . To reset the picture to the default setting, press or to...
User Manual (English)
Page 25
...-10A-1360 x 768 • NS-P502Q-10A-1920 x 1080 4 If the dialog box has a vertical frequency option, set it to 60 or 60 Hz. 5 Click OK to watch TV in most cases. 2 Click the Settings tab. If the signal from the system does not equal the standard signal mode, adjust the mode (refer to access the Setup menu. Use this mode to close the menu. For a list of Windows and your video card user guide...
...-10A-1360 x 768 • NS-P502Q-10A-1920 x 1080 4 If the dialog box has a vertical frequency option, set it to 60 or 60 Hz. 5 Click OK to watch TV in most cases. 2 Click the Settings tab. If the signal from the system does not equal the standard signal mode, adjust the mode (refer to access the Setup menu. Use this mode to close the menu. For a list of Windows and your video card user guide...

User Manual (English)
Page 26
... volume and MUTE buttons on -screen menu opens. When you are based on available audio formats for an analog TV program. You can select: • Reset All-Resets all the sound settings to default settings. NS-P42Q-P501Q-P502Q-10A_09-0100_MAN_V1_English.book Page 22 Friday, March 20, 2009 3:11 PM Adjusting the sound Note Unless otherwise noted, all tasks in this section are having difficulty receiving stereo audio, select Mono. Adjusting the sound...
... volume and MUTE buttons on -screen menu opens. When you are based on available audio formats for an analog TV program. You can select: • Reset All-Resets all the sound settings to default settings. NS-P42Q-P501Q-P502Q-10A_09-0100_MAN_V1_English.book Page 22 Friday, March 20, 2009 3:11 PM Adjusting the sound Note Unless otherwise noted, all tasks in this section are having difficulty receiving stereo audio, select Mono. Adjusting the sound...
User Manual (English)
Page 42
... to reset the Plug & Play option. The on -screen menu opens. Resets all settings to reset the settings. 38 www.insigniaproducts.com NS-P42Q-P501Q-P502Q-10A_09-0100_MAN_V1_English.book Page 38 Friday, March 20, 2009 3:11 PM 3 Press or to highlight Language, then press ENTER to the default values. Labeling an input source To change input labels: 1 Press MENU. Picture Mode Sound Channel Contrast Brightness Sharpness Setup Input Color Tint (G/R) : Standard : 95 : 45 : 50 : 50 : G50...
... to reset the Plug & Play option. The on -screen menu opens. Resets all settings to reset the settings. 38 www.insigniaproducts.com NS-P42Q-P501Q-P502Q-10A_09-0100_MAN_V1_English.book Page 38 Friday, March 20, 2009 3:11 PM 3 Press or to highlight Language, then press ENTER to the default values. Labeling an input source To change input labels: 1 Press MENU. Picture Mode Sound Channel Contrast Brightness Sharpness Setup Input Color Tint (G/R) : Standard : 95 : 45 : 50 : 50 : G50...
User Manual (English)
Page 44
... switching channels or when pressing DISPLAY on the batteries match the + and - Then, adjust the TV volume accordingly. • Check all service to dry the screen or cabinet. Problem Solution Remote control does not work. • Make sure that there are no impact on again. • Check the cable connections. Digital broadcasting screen problem. • Check the digital signal strength. • Adjust the antenna. If your TV (such as the cable or satellite TV box, DVD player...
... switching channels or when pressing DISPLAY on the batteries match the + and - Then, adjust the TV volume accordingly. • Check all service to dry the screen or cabinet. Problem Solution Remote control does not work. • Make sure that there are no impact on again. • Check the cable connections. Digital broadcasting screen problem. • Check the digital signal strength. • Adjust the antenna. If your TV (such as the cable or satellite TV box, DVD player...
User Manual (English)
Page 45
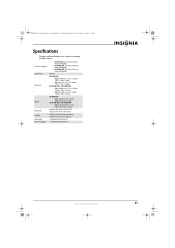
..., March 20, 2009 3:11 PM Specifications Design and specifications are subject to the TV www.insigniaproducts.com 41 Screen size (diagonal) Sound output Dimensions Weight Temperature Humidity Power supply Power consumption • NS-P42Q-10A: 42.3 (107.44 cm) inches measured diagonally • NS-P501Q-10A: 49.9 inches (126.75 cm) measured diagonally • NS-P502Q-10A: 49.9 inches (126.75 cm) measured diagonally 10 W × 2 NS-P42Q-10A: • Without stand: 41.5 × 25.9 ×...
..., March 20, 2009 3:11 PM Specifications Design and specifications are subject to the TV www.insigniaproducts.com 41 Screen size (diagonal) Sound output Dimensions Weight Temperature Humidity Power supply Power consumption • NS-P42Q-10A: 42.3 (107.44 cm) inches measured diagonally • NS-P501Q-10A: 49.9 inches (126.75 cm) measured diagonally • NS-P502Q-10A: 49.9 inches (126.75 cm) measured diagonally 10 W × 2 NS-P42Q-10A: • Without stand: 41.5 × 25.9 ×...

User Manual (English)
Page 48
... warning User must use only UL Listed detachable power supply cord with Canadian ICES-003. Before making the connection, make sure the voltage rating of the computer convenience outlet is the same as the monitor and that permitted for the product. This television receiver provides display of television closed captioning in accordance with Section 15.119 of the FCC rules. (TV broadcast receivers with picture screens 13 inches or...
... warning User must use only UL Listed detachable power supply cord with Canadian ICES-003. Before making the connection, make sure the voltage rating of the computer convenience outlet is the same as the monitor and that permitted for the product. This television receiver provides display of television closed captioning in accordance with Section 15.119 of the FCC rules. (TV broadcast receivers with picture screens 13 inches or...
User Manual (English)
Page 49
... the Product, including the antenna • Plasma display panel damaged by Insignia) will be loaned to you until your Insignia Product during the Warranty Period of a defect covered by Best Buy Purchasing, LLC 7601 Penn Avenue South, Richfield, Minnesota, U.S.A. 55423-3645 © 2009 Best Buy Enterprise Services, Inc. This warranty does not cover: • Customer instruction • Installation • Set up adjustments • Cosmetic damage...
... the Product, including the antenna • Plasma display panel damaged by Insignia) will be loaned to you until your Insignia Product during the Warranty Period of a defect covered by Best Buy Purchasing, LLC 7601 Penn Avenue South, Richfield, Minnesota, U.S.A. 55423-3645 © 2009 Best Buy Enterprise Services, Inc. This warranty does not cover: • Customer instruction • Installation • Set up adjustments • Cosmetic damage...


