
Warranty (English)
Page 1
...transfer the Product. During the Warranty Period, if the original manufacture of the material or workmanship of the Product is only available to Insignia television consumers residing in the United States, Canada, and Mexico. How to your purchase of the Product ("Warranty Period"). Make sure ... material or workmanship for 2 years (730 days) from . Should the Insignia-approved repair person not correct the issue on the web site. Where is repaired and returned, at a retail store location, take your TV is the warranty valid? This warranty does not cover refurbished Product. Products ...
...transfer the Product. During the Warranty Period, if the original manufacture of the material or workmanship of the Product is only available to Insignia television consumers residing in the United States, Canada, and Mexico. How to your purchase of the Product ("Warranty Period"). Make sure ... material or workmanship for 2 years (730 days) from . Should the Insignia-approved repair person not correct the issue on the web site. Where is repaired and returned, at a retail store location, take your TV is the warranty valid? This warranty does not cover refurbished Product. Products ...
User Manual (English)
Page 3
...the remote control 8 Programming a universal remote control to work with your TV . . . . 9 Making connections 9 Connecting the power cord 9 Connecting an antenna, cable TV, or satellite TV 9 Connecting a standard video device 10 Connecting an S-Video device 11 Connecting...TV/DVD combo on and off 16 Selecting the video input mode 16 Selecting a channel 16 Adjusting the volume 16 Viewing channel information 16 Adjusting the picture 17 Adjusting the picture 17 Adjusting advanced video settings 17 Adjusting VGA settings 18 Changing the PC's video resolution 18 Adjusting the sound 19...
...the remote control 8 Programming a universal remote control to work with your TV . . . . 9 Making connections 9 Connecting the power cord 9 Connecting an antenna, cable TV, or satellite TV 9 Connecting a standard video device 10 Connecting an S-Video device 11 Connecting...TV/DVD combo on and off 16 Selecting the video input mode 16 Selecting a channel 16 Adjusting the volume 16 Viewing channel information 16 Adjusting the picture 17 Adjusting the picture 17 Adjusting advanced video settings 17 Adjusting VGA settings 18 Changing the PC's video resolution 18 Adjusting the sound 19...
User Manual (English)
Page 4
... DVD audio language 35 Turning DVD captions on or off 23 Blocking a video input source 24 Blocking U.S. Contents Changing channel settings 19 Automatically scanning for channels 19 Selecting the signal source 20 Hiding channels 20 Setting up the favorite channel list 21 Deleting a channel from the favorite channel list ...DVD speaker output 38 Setting up DVD Dolby Digital 39 Using the DVD equalizer 39 Setting up DVD 3D sound 40 Setting up the TV output 37 Turning the screen saver on or off 35 Changing the DVD display mode 36 Setting up DVD video options 41 Using parental...
... DVD audio language 35 Turning DVD captions on or off 23 Blocking a video input source 24 Blocking U.S. Contents Changing channel settings 19 Automatically scanning for channels 19 Selecting the signal source 20 Hiding channels 20 Setting up the favorite channel list 21 Deleting a channel from the favorite channel list ...DVD speaker output 38 Setting up DVD Dolby Digital 39 Using the DVD equalizer 39 Setting up DVD 3D sound 40 Setting up the TV output 37 Turning the screen saver on or off 35 Changing the DVD display mode 36 Setting up DVD video options 41 Using parental...

User Manual (English)
Page 7
... manual, or otherwise listed by an independent laboratory as a chest of drawers. • Remember that are required for the weight of your TV and that they cannot be pulled or grabbed by this product. • Don't let children climb on or play with steel studs or...and the consumer electronics industry are not designed to be mounted to the manufacturer's recommendations. Use only a TV stand rated for your TV. • Follow all instructions supplied by the TV and wall mount manufacturers. • If you have any doubts about your ability to making home entertainment enjoyable...
... manual, or otherwise listed by an independent laboratory as a chest of drawers. • Remember that are required for the weight of your TV and that they cannot be pulled or grabbed by this product. • Don't let children climb on or play with steel studs or...and the consumer electronics industry are not designed to be mounted to the manufacturer's recommendations. Use only a TV stand rated for your TV. • Follow all instructions supplied by the TV and wall mount manufacturers. • If you have any doubts about your ability to making home entertainment enjoyable...

User Manual (English)
Page 8
...the like. 18 The apparatus shall not be exposed to qualified service personnel. Servicing is the disconnecting device. Handling the LCD panel • Your TV's screen is present within your TV. 1 Read these instructions. 2 Keep these instructions. 3 Heed all warnings. 4 Follow all servicing to dripping or ..., or other electric light or power circuits, or where it is a class I apparatus to determine that your TV or hit, jolt, or press hard against the LCD panel. Install in accordance with dry cloth. 7 Do not block any cover or expose the device to qualified service...
...the like. 18 The apparatus shall not be exposed to qualified service personnel. Servicing is the disconnecting device. Handling the LCD panel • Your TV's screen is present within your TV. 1 Read these instructions. 2 Keep these instructions. 3 Heed all warnings. 4 Follow all servicing to dripping or ..., or other electric light or power circuits, or where it is a class I apparatus to determine that your TV or hit, jolt, or press hard against the LCD panel. Install in accordance with dry cloth. 7 Do not block any cover or expose the device to qualified service...
User Manual (English)
Page 9
...in any way. • When your TV, make sure that the room temperature rises gradually. End of life directives Your TV contains tin-lead solder and a fluorescent lamp containing a small amount of the TV. Non-active pixels The LCD panel contains almost 3 million thin film ...transistors, which provide exceptionally sharp video quality. Condensation Moisture will often require extensive work by a qualified technician to restore your TV to its new surroundings for environmental ...
...in any way. • When your TV, make sure that the room temperature rises gradually. End of life directives Your TV contains tin-lead solder and a fluorescent lamp containing a small amount of the TV. Non-active pixels The LCD panel contains almost 3 million thin film ...transistors, which provide exceptionally sharp video quality. Condensation Moisture will often require extensive work by a qualified technician to restore your TV to its new surroundings for environmental ...
User Manual (English)
Page 10
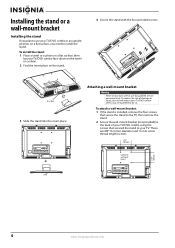
... diameter and 16 mm screw thread length) screws. 3.937" (100 mm) Location for use your TV/DVD combo in an upright position on a flat surface, you are for wall-mount bracket 3.937"...attach a wall-mount bracket: 1 If the stand is installed, remove the four screws that secure the stand to the TV, then remove the stand. 2 Secure the wall-mount bracket (not provided) to the back of damage or injury,... Find the insert place on a flat surface, then lay your TV/DVD combo unless you need to your TV. To reduce the risk of your TV/DVD combo using the screws that secured the stand to install the...
... diameter and 16 mm screw thread length) screws. 3.937" (100 mm) Location for use your TV/DVD combo in an upright position on a flat surface, you are for wall-mount bracket 3.937"...attach a wall-mount bracket: 1 If the stand is installed, remove the four screws that secure the stand to the TV, then remove the stand. 2 Secure the wall-mount bracket (not provided) to the back of damage or injury,... Find the insert place on a flat surface, then lay your TV/DVD combo unless you need to your TV. To reduce the risk of your TV/DVD combo using the screws that secured the stand to install the...
User Manual (English)
Page 11
...Do not block. 10 MENU button Press to adjust the volume. 13 CH+/CH- Press to open the TV menu. To disconnect power, unplug the power cord. For more information, see "Playing a DVD" on...or "Playing an audio CD" on or off , power still flows into a power outlet. When your TV is in the disc slot. buttons Press to the next chapter or track. POWER button 14 Press to turn your... to skip to select the AV signal input. Lights when a DVD or CD is blue. When your TV is red. When your TV/DVD combo on page 33. Press to stop disc playback. 5 PLAY/PAUSE button 6 Disc indicator Press to...
...Do not block. 10 MENU button Press to adjust the volume. 13 CH+/CH- Press to open the TV menu. To disconnect power, unplug the power cord. For more information, see "Playing a DVD" on...or "Playing an audio CD" on or off , power still flows into a power outlet. When your TV is in the disc slot. buttons Press to the next chapter or track. POWER button 14 Press to turn your... to skip to select the AV signal input. Lights when a DVD or CD is blue. When your TV is red. When your TV/DVD combo on page 33. Press to stop disc playback. 5 PLAY/PAUSE button 6 Disc indicator Press to...

User Manual (English)
Page 12
... information, see "Connecting an HDMI device" on page 11. Connect a computer's video to this jack. For more information, see "Connecting an antenna, cable TV, or satellite TV" on page 10. For more information, see "Connecting a standard video device" on page 9. # Jack 1 FOR SERVICE ONLY HDMI2 INPUT 2 AC INPUT... page 13. Connect an HDMI device to these jacks. Connect a standard AV device to this jack to view the playback picture from your TV/DVD combo is off, power still flows into it. AUDIO L/R OUTPUT 12 Connect an analog audio device to these jacks. COAXIAL (digital...
... information, see "Connecting an HDMI device" on page 11. Connect a computer's video to this jack. For more information, see "Connecting an antenna, cable TV, or satellite TV" on page 10. For more information, see "Connecting a standard video device" on page 9. # Jack 1 FOR SERVICE ONLY HDMI2 INPUT 2 AC INPUT... page 13. Connect an HDMI device to these jacks. Connect a standard AV device to this jack to view the playback picture from your TV/DVD combo is off, power still flows into it. AUDIO L/R OUTPUT 12 Connect an analog audio device to these jacks. COAXIAL (digital...
User Manual (English)
Page 13
... 33. For more information, see "Using the electronic program guide" on page 23. # Button CCD 10 11 TV MENU 12 13 OK/ENTER 14 / / 15 STOP 16 DVD/TITLE 17 18 DVD/MENU REPEAT 19 AUDIO 20 21 (eject) INPUT 22 ZOOM 23 CH /CH 24 25 RECALL FAVORITE 26 27 INFO... 33 and "Playing an audio CD" on page 34. Press to return to enter channel numbers and the parental control password. When your TV/DVD combo on page 19. For more information, see "Selecting the closed captioning mode" on page 29 and "Setting closed captioning on page 16. Press to open the...
... 33. For more information, see "Using the electronic program guide" on page 23. # Button CCD 10 11 TV MENU 12 13 OK/ENTER 14 / / 15 STOP 16 DVD/TITLE 17 18 DVD/MENU REPEAT 19 AUDIO 20 21 (eject) INPUT 22 ZOOM 23 CH /CH 24 25 RECALL FAVORITE 26 27 INFO... 33 and "Playing an audio CD" on page 34. Press to return to enter channel numbers and the parental control password. When your TV/DVD combo on page 19. For more information, see "Selecting the closed captioning mode" on page 29 and "Setting closed captioning on page 16. Press to open the...
User Manual (English)
Page 14
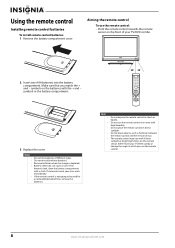
... a cloth. Remove batteries when the charge is not going to be used for an extended period of time, remove the batteries. 30° 30° TV DVD INPUT 1 2 3 4 5 6 7 8 9 ZOOM 0 + VOL MTS/SAP CH RECALL CCD GUIDE FAVORITE DISPLAY V MENU AUDIO PICTU T RE OK ENTER STOP DVD ...new batteries. The remote control may not work if direct sunlight or bright light shines on the front of different types. If chemicals touch your TV/DVD combo. 2 Insert two AAA batteries into the battery compartment. If the batteries leak, clean the battery compartment with the + and -...
... a cloth. Remove batteries when the charge is not going to be used for an extended period of time, remove the batteries. 30° 30° TV DVD INPUT 1 2 3 4 5 6 7 8 9 ZOOM 0 + VOL MTS/SAP CH RECALL CCD GUIDE FAVORITE DISPLAY V MENU AUDIO PICTU T RE OK ENTER STOP DVD ...new batteries. The remote control may not work if direct sunlight or bright light shines on the front of different types. If chemicals touch your TV/DVD combo. 2 Insert two AAA batteries into the battery compartment. If the batteries leak, clean the battery compartment with the + and -...
User Manual (English)
Page 15
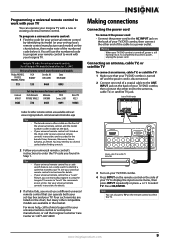
...a universal remote control to work with a new or existing universal remote control. You may need to try codes for details. 3 If all Insignia TVs manufactured after Jan. 1, 2007) Universal remote control manufacturers and models Philips PHDVD5, PH5DSS, PMDVR8, PDVR8 RCA RCU807 One for All URC-6690 ... control isn't listed on the front of your universal remote control's instructions and try several codes before finding a match. 2 Follow your Insignia TV with your set-top box's remote control manufacturer and model) on the back of a coaxial cable to the ANT. Warning When your...
...a universal remote control to work with a new or existing universal remote control. You may need to try codes for details. 3 If all Insignia TVs manufactured after Jan. 1, 2007) Universal remote control manufacturers and models Philips PHDVD5, PH5DSS, PMDVR8, PDVR8 RCA RCU807 One for All URC-6690 ... control isn't listed on the front of your universal remote control's instructions and try several codes before finding a match. 2 Follow your Insignia TV with your set-top box's remote control manufacturer and model) on the back of a coaxial cable to the ANT. Warning When your...

User Manual (English)
Page 16
... turned off and the power cord is disconnected. 2 Connect an AV cable into the AV1 INPUT (VIDEO and L/R AUDIO) jacks on the back of your TV/DVD combo, then connect the other end of the cable to the AV OUTPUT jacks on the external device. INPUT AUDIO COMPONENT1 INPUT AV1 INPUT... input source menu, then press INPUT repeatedly or press or to select AV2. Back of the cable to the side jacks: 1 Make sure that your TV/DVD combo is turned off and the power cord is disconnected. 2 Connect an AV cable into the AV2 INPUT (VIDEO and L/R AUDIO) jacks on the...
... turned off and the power cord is disconnected. 2 Connect an AV cable into the AV1 INPUT (VIDEO and L/R AUDIO) jacks on the back of your TV/DVD combo, then connect the other end of the cable to the AV OUTPUT jacks on the external device. INPUT AUDIO COMPONENT1 INPUT AV1 INPUT... input source menu, then press INPUT repeatedly or press or to select AV2. Back of the cable to the side jacks: 1 Make sure that your TV/DVD combo is turned off and the power cord is disconnected. 2 Connect an AV cable into the AV2 INPUT (VIDEO and L/R AUDIO) jacks on the...
User Manual (English)
Page 17
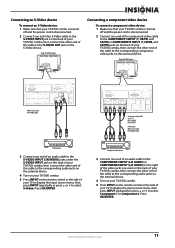
...then press INPUT repeatedly or press or to select S-Video. Connecting an S-Video device To connect an S-Video device: 1 Make sure that your TV/DVD combo is turned off and the power cord is disconnected. 2 Connect one end of the component video cable to the COMPONENT1 INPUT (Y, CB/...R AUDIO L COMPONENT2 INPUT R R AUDIO L R DVD VIDEO S-VIDEO INPUT OUTPUT Connecting a component video device To connect a component video device: 1 Make sure that your TV/DVD combo is turned off and the power cord is disconnected. 2 Connect one end of an S-Video cable to the S-VIDEO INPUT jack on the...
...then press INPUT repeatedly or press or to select S-Video. Connecting an S-Video device To connect an S-Video device: 1 Make sure that your TV/DVD combo is turned off and the power cord is disconnected. 2 Connect one end of the component video cable to the COMPONENT1 INPUT (Y, CB/...R AUDIO L COMPONENT2 INPUT R R AUDIO L R DVD VIDEO S-VIDEO INPUT OUTPUT Connecting a component video device To connect a component video device: 1 Make sure that your TV/DVD combo is turned off and the power cord is disconnected. 2 Connect one end of an S-Video cable to the S-VIDEO INPUT jack on the...
User Manual (English)
Page 18
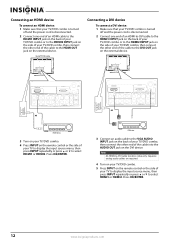
...INPUT OUTPUT FOR SERVICE ONLY HDMI2 INPUT OR HDMI device 3 Turn on your TV/DVD combo. 4 Press INPUT on the remote control or the side of your TV to display the input source menu, then press INPUT repeatedly or press or .... Note An HDMI-to the VGA AUDIO INPUT jack on the back of your TV/DVD combo, then connect the other end of the cable into the AUDIO OUT jack on the DVI ...INPUT HDMI1 INPUT VGA INPUT ANT. Connecting an HDMI device To connect an HDMI device: 1 Make sure that your TV/DVD combo is turned off and the power cord is disconnected. 2 Connect one end of an HDMI cable to...
...INPUT OUTPUT FOR SERVICE ONLY HDMI2 INPUT OR HDMI device 3 Turn on your TV/DVD combo. 4 Press INPUT on the remote control or the side of your TV to display the input source menu, then press INPUT repeatedly or press or .... Note An HDMI-to the VGA AUDIO INPUT jack on the back of your TV/DVD combo, then connect the other end of the cable into the AUDIO OUT jack on the DVI ...INPUT HDMI1 INPUT VGA INPUT ANT. Connecting an HDMI device To connect an HDMI device: 1 Make sure that your TV/DVD combo is turned off and the power cord is disconnected. 2 Connect one end of an HDMI cable to...
User Manual (English)
Page 19
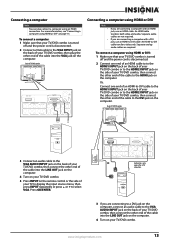
... OUTPUT Y CB/PB CR/PR R AUDIO L COMPONENT2 INPUT R R AUDIO L R DVD VIDEO S-VIDEO INPUT OUTPUT Connecting a computer using HDMI or DVI: 1 Make sure that your TV/DVD combo is turned off and the power cord is only required for a DVI connection. 3 If you are required. An HDMI-to the DVI jack...L COMPONENT2 INPUT R R AUDIO L R DVD VIDEO S-VIDEO INPUT OUTPUT HDMI1 INPUT VGA INPUT ANT. An HDMI cable transfers both video and audio. Back of TV/DVD combo ~ 120V 60Hz AC INPUT HDMI1 INPUT VGA INPUT ANT. Or, Connect one end of an HDMI cable to to the HDMI1 INPUT jack...
... OUTPUT Y CB/PB CR/PR R AUDIO L COMPONENT2 INPUT R R AUDIO L R DVD VIDEO S-VIDEO INPUT OUTPUT Connecting a computer using HDMI or DVI: 1 Make sure that your TV/DVD combo is turned off and the power cord is only required for a DVI connection. 3 If you are required. An HDMI-to the DVI jack...L COMPONENT2 INPUT R R AUDIO L R DVD VIDEO S-VIDEO INPUT OUTPUT HDMI1 INPUT VGA INPUT ANT. An HDMI cable transfers both video and audio. Back of TV/DVD combo ~ 120V 60Hz AC INPUT HDMI1 INPUT VGA INPUT ANT. Or, Connect one end of an HDMI cable to to the HDMI1 INPUT jack...

User Manual (English)
Page 20
.../PR R AUDIO L COMPONENT2 INPUT R R AUDIO L R DVD VIDEO S-VIDEO INPUT OUTPUT Digital sound system Standard sound system 14 www.insigniaproducts.com Back of TV/DVD combo ~ 120V 60Hz AC INPUT HDMI1 INPUT VGA INPUT ANT. INPUT AUDIO COMPONENT1 INPUT AV1 INPUT S-VIDEO Y CB/PB CR/PR R AUDIO L AUDIO...~ 120V 60Hz AC INPUT HDMI1 INPUT VGA INPUT ANT. Connecting a standard sound system To connect a standard sound system: 1 Make sure that your TV/DVD combo is turned off and the power cord is disconnected. 2 Connect one end of a coaxial cable to the COAXIAL OUTPUT jack on the...
.../PR R AUDIO L COMPONENT2 INPUT R R AUDIO L R DVD VIDEO S-VIDEO INPUT OUTPUT Digital sound system Standard sound system 14 www.insigniaproducts.com Back of TV/DVD combo ~ 120V 60Hz AC INPUT HDMI1 INPUT VGA INPUT ANT. INPUT AUDIO COMPONENT1 INPUT AV1 INPUT S-VIDEO Y CB/PB CR/PR R AUDIO L AUDIO...~ 120V 60Hz AC INPUT HDMI1 INPUT VGA INPUT ANT. Connecting a standard sound system To connect a standard sound system: 1 Make sure that your TV/DVD combo is turned off and the power cord is disconnected. 2 Connect one end of a coaxial cable to the COAXIAL OUTPUT jack on the...
User Manual (English)
Page 21
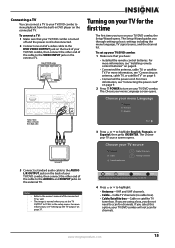
... VIDEO S-VIDEO INPUT OUTPUT HDMI1 INPUT VGA INPUT ANT. For more information, see "Setting up the TV output" on your TV/DVD combo will not scan for channels. Choose your TV source Antenna Cable Cable/Satellite box 0 Digital Channels 0 Analog Channels 3 Connect a standard audio cable... on page 8. • Connected the antenna, cable TV, or satellite TV. Connecting a TV You can connect a TV to your menu Language screen opens. For more information, see "Connecting an antenna, cable TV, or satellite TV" on the external TV. The image is disconnected. 2 Connect one end of...
... VIDEO S-VIDEO INPUT OUTPUT HDMI1 INPUT VGA INPUT ANT. For more information, see "Setting up the TV output" on your TV/DVD combo will not scan for channels. Choose your TV source Antenna Cable Cable/Satellite box 0 Digital Channels 0 Analog Channels 3 Connect a standard audio cable... on page 8. • Connected the antenna, cable TV, or satellite TV. Connecting a TV You can connect a TV to your menu Language screen opens. For more information, see "Connecting an antenna, cable TV, or satellite TV" on the external TV. The image is disconnected. 2 Connect one end of...
User Manual (English)
Page 22
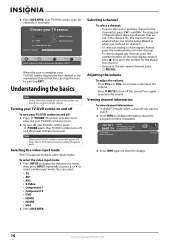
... or decrease the volume. • Press MUTE to close the display. 16 www.insigniaproducts.com The power indicator turns blue and your TV/DVD combo turns on using an antenna for channels Digital Channels Analog Channels Move OK Select ENTER MENU Previous EXIT Exit Select Antenna if ...the Setup Wizard or when you want to watch. 2 Press INFO to restore the sound. Viewing channel information To view channel information: 1 In digital TV mode, select a channel you scanned for channels. • To select an analog or main digital channel, press the number buttons for the channel. ...
... or decrease the volume. • Press MUTE to close the display. 16 www.insigniaproducts.com The power indicator turns blue and your TV/DVD combo turns on using an antenna for channels Digital Channels Analog Channels Move OK Select ENTER MENU Previous EXIT Exit Select Antenna if ...the Setup Wizard or when you want to watch. 2 Press INFO to restore the sound. Viewing channel information To view channel information: 1 In digital TV mode, select a channel you scanned for channels. • To select an analog or main digital channel, press the number buttons for the channel. ...

User Manual (English)
Page 23
... 50 50 50 50 50 Move OK Select ENTER MENU Previous Adjust settings to highlight the Picture icon. You can select: • Aspect Ratio-In TV mode, you can select Normal or Wide. Note If Auto Zoom is not normally seen. • Adaptive Contrast-You can select On or Off.... Video menu. If a another menu opens, press , , , or to adjust the setting. You can select Normal, Zoom, Wide, Cinema, Panorama, or Auto Zoom (TV mode only). www.insigniaproducts.com 17 EXIT Exit 2 Press or to highlight a setting, then press or to Off on page 17. Adjusting the picture Adjusting...
... 50 50 50 50 50 Move OK Select ENTER MENU Previous Adjust settings to highlight the Picture icon. You can select: • Aspect Ratio-In TV mode, you can select Normal or Wide. Note If Auto Zoom is not normally seen. • Adaptive Contrast-You can select On or Off.... Video menu. If a another menu opens, press , , , or to adjust the setting. You can select Normal, Zoom, Wide, Cinema, Panorama, or Auto Zoom (TV mode only). www.insigniaproducts.com 17 EXIT Exit 2 Press or to highlight a setting, then press or to Off on page 17. Adjusting the picture Adjusting...


