
Warranty (English)
Page 1
... or workmanship of the Product is valid only to the original purchaser of a defect covered by an authorized Insignia repair center or store personnel, Insignia will have an Insignia-approved repair person dispatched to your home. Products and parts replaced under this warranty apply. This warranty lasts ... or rebuilt parts; To obtain in the United States. Where is printed on the receipt you until your purchase of your TV is only available to Insignia television consumers residing in -home warranty service for a period of two (2) years from the date of the Product ("Warranty Period...
... or workmanship of the Product is valid only to the original purchaser of a defect covered by an authorized Insignia repair center or store personnel, Insignia will have an Insignia-approved repair person dispatched to your home. Products and parts replaced under this warranty apply. This warranty lasts ... or rebuilt parts; To obtain in the United States. Where is printed on the receipt you until your purchase of your TV is only available to Insignia television consumers residing in -home warranty service for a period of two (2) years from the date of the Product ("Warranty Period...
User Manual (English)
Page 3
... Important safety instructions 2 Warnings 2 Cautions 3 Introduction 4 Installing the stand or wall-mount bracket 4 Installing the stand 4 Installing a wall-mount bracket 4 TV components 5 Accessories 5 Cleaning cloth 5 Front 5 Back 6 Side 6 Remote control 7 Using the remote control 8 Installing the remote control batteries 8 Aiming ... Connecting a digital audio amplifier 14 Connecting an analog audio amplifier 14 Turning on your TV for the first time 15 Understanding the basics 15 Turning your TV on or off 15 Selecting the video input source 15 On-screen menu overview 16 ...
... Important safety instructions 2 Warnings 2 Cautions 3 Introduction 4 Installing the stand or wall-mount bracket 4 Installing the stand 4 Installing a wall-mount bracket 4 TV components 5 Accessories 5 Cleaning cloth 5 Front 5 Back 6 Side 6 Remote control 7 Using the remote control 8 Installing the remote control batteries 8 Aiming ... Connecting a digital audio amplifier 14 Connecting an analog audio amplifier 14 Turning on your TV for the first time 15 Understanding the basics 15 Turning your TV on or off 15 Selecting the video input source 15 On-screen menu overview 16 ...
User Manual (English)
Page 4
... DTV signal strength 22 Setting parental controls 23 Setting or changing the password 23 Setting parental control levels 23 Blocking unrated TV 25 Downloading rating information 26 Locking control buttons 26 Using closed captioning 27 Viewing closed captioning 27 Selecting the closed captioning... Programming your remote control 31 Troubleshooting remote control programming 35 Manufacturers' codes 35 Maintaining 47 Cleaning the TV cabinet 47 Cleaning the TV screen 47 Troubleshooting 47 Specifications 48 Legal notices 49 Two-year limited warranty 51 ii www.insigniaproducts.com
... DTV signal strength 22 Setting parental controls 23 Setting or changing the password 23 Setting parental control levels 23 Blocking unrated TV 25 Downloading rating information 26 Locking control buttons 26 Using closed captioning 27 Viewing closed captioning 27 Selecting the closed captioning... Programming your remote control 31 Troubleshooting remote control programming 35 Manufacturers' codes 35 Maintaining 47 Cleaning the TV cabinet 47 Cleaning the TV screen 47 Troubleshooting 47 Specifications 48 Legal notices 49 Two-year limited warranty 51 ii www.insigniaproducts.com

User Manual (English)
Page 5
... to making home entertainment enjoyable and safe. Use only a wall mount rated for the weight of your TV and that has been recommended by this TV manufacturer, listed in mind The issue The home theater entertainment experience is appropriate. Some wall mounts are unsure..., ask a professional installer. • TVs can become excited while watching a program, especially on a "larger-than-life" TV. At least two people are inappropriately placed on dressers, bookcases, shelves, desks, speakers, chests, or...
... to making home entertainment enjoyable and safe. Use only a wall mount rated for the weight of your TV and that has been recommended by this TV manufacturer, listed in mind The issue The home theater entertainment experience is appropriate. Some wall mounts are unsure..., ask a professional installer. • TVs can become excited while watching a program, especially on a "larger-than-life" TV. At least two people are inappropriately placed on dressers, bookcases, shelves, desks, speakers, chests, or...
User Manual (English)
Page 6
..., unplug it can fall into your doctor after rinsing for your TV or hit, jolt, or press hard against the LCD panel. Servicing is left unattended and unused for long periods of broken glass. • If the LCD panel is damaged, liquid has been spilled or objects have the ... only with grounding-type plug is made of the obsolete outlet. 10 Protect the power cord from lightning and power line surges. Handling the LCD panel • Your TV's screen is a class I apparatus to a mains socket outlet with a protective earthing connection. 17 Remote control batteries should not be exposed...
..., unplug it can fall into your doctor after rinsing for your TV or hit, jolt, or press hard against the LCD panel. Servicing is left unattended and unused for long periods of broken glass. • If the LCD panel is damaged, liquid has been spilled or objects have the ... only with grounding-type plug is made of the obsolete outlet. 10 Protect the power cord from lightning and power line surges. Handling the LCD panel • Your TV's screen is a class I apparatus to a mains socket outlet with a protective earthing connection. 17 Remote control batteries should not be exposed...
User Manual (English)
Page 7
... as a fixed blue, green, or red point. In such cases, change in your local power company. Non-active pixels The LCD panel contains almost 3 million thin film transistors, which provide exceptionally sharp video quality. If you are covered by the operating instructions because... servicing to its new surroundings for environmental reasons. Occasionally, a few non-active pixels may also form during the summer if the TV is grounded to find a recycler in performance. For disposal or recycling information, contact your local authorities or the Electronic Industries Alliance...
... as a fixed blue, green, or red point. In such cases, change in your local power company. Non-active pixels The LCD panel contains almost 3 million thin film transistors, which provide exceptionally sharp video quality. If you are covered by the operating instructions because... servicing to its new surroundings for environmental reasons. Occasionally, a few non-active pixels may also form during the summer if the TV is grounded to find a recycler in performance. For disposal or recycling information, contact your local authorities or the Electronic Industries Alliance...
User Manual (English)
Page 8
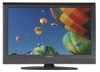
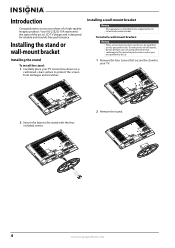
... designed for use by UL Listed wall mount bracket. To reduce the risk of hazards, do not perform any servicing other than that contained in LCD TV design and is intended to be supported by qualified service personnel only. To install a wall-mount bracket: Warning These servicing instructions are qualified to do... instructions unless you are for reliable and trouble-free performance. Introduction Congratulations on a cushioned, clean surface to protect the screen from damages and scratches. Your NS-L322Q-10A represents the state of a high-quality Insignia product.
... designed for use by UL Listed wall mount bracket. To reduce the risk of hazards, do not perform any servicing other than that contained in LCD TV design and is intended to be supported by qualified service personnel only. To install a wall-mount bracket: Warning These servicing instructions are qualified to do... instructions unless you are for reliable and trouble-free performance. Introduction Congratulations on a cushioned, clean surface to protect the screen from damages and scratches. Your NS-L322Q-10A represents the state of a high-quality Insignia product.
User Manual (English)
Page 9
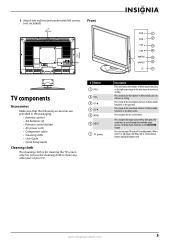
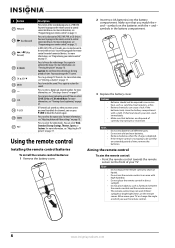
.... Do not use the cleaning cloth to the next higher channel. Press to go to clean any other part of your TV is for cleaning the TV screen only. To disconnect power, unplug the power cord. www.insigniaproducts.com 5 In Menu mode, functions as the OK/... to decrease a setting. 3 Attach the wall-mount bracket with M6 screws (not included). Front 7.87" (200 mm) 1 2 7.87" (200 mm) 3 4 5 6 7 TV components Accessories Make sure that the following accessories are provided in the packaging: • Remote control • AA batteries (2) • Remote control holder • AC...
.... Do not use the cleaning cloth to the next higher channel. Press to go to clean any other part of your TV is for cleaning the TV screen only. To disconnect power, unplug the power cord. www.insigniaproducts.com 5 In Menu mode, functions as the OK/... to decrease a setting. 3 Attach the wall-mount bracket with M6 screws (not included). Front 7.87" (200 mm) 1 2 7.87" (200 mm) 3 4 5 6 7 TV components Accessories Make sure that the following accessories are provided in the packaging: • Remote control • AA batteries (2) • Remote control holder • AC...
User Manual (English)
Page 10
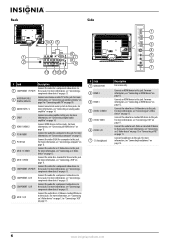
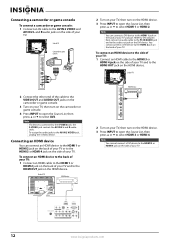
...more information, see "Connecting an S-Video device" on page 10. For more information, see "Connecting an outdoor antenna" on page 9 or "Connecting cable TV" on page 13. For more information, see "Connecting a component video device" on page 13. For more information, see "Connecting a computer" on page...information, see "Connecting a VCR" on page 11. For more information, see "Connecting a VCR" on page 11. Connect an antenna or cable TV to this jack. Connect an HDMI device to this jack. For more information, see "Connecting an HDMI device" on page 13. For more ...
...more information, see "Connecting an S-Video device" on page 10. For more information, see "Connecting an outdoor antenna" on page 9 or "Connecting cable TV" on page 13. For more information, see "Connecting a component video device" on page 13. For more information, see "Connecting a computer" on page...information, see "Connecting a VCR" on page 11. For more information, see "Connecting a VCR" on page 11. Connect an antenna or cable TV to this jack. Connect an HDMI device to this jack. For more information, see "Connecting an HDMI device" on page 13. For more ...
User Manual (English)
Page 11
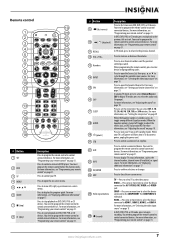
... Remote control 19 1 20 2 21 3 22 4 23 5 24 6 TV VIDEO COMP HDMI 25 7 26 8 27 9 28 10 29 11 30 12 31 32 13 14 33 15 34 16 35 17 36 18 37 # Button 1 SET... 2 DVD 3 TV 4 MENU 5 6 GUIDE 7 (stop playback on page 15. Press to ...connected devices. For more information, see "Programming your remote control" on page 17. In analog TV mode, press to cycle through the available input sources. Press one or more information, see "...
... Remote control 19 1 20 2 21 3 22 4 23 5 24 6 TV VIDEO COMP HDMI 25 7 26 8 27 9 28 10 29 11 30 12 31 32 13 14 33 15 34 16 35 17 36 18 37 # Button 1 SET... 2 DVD 3 TV 4 MENU 5 6 GUIDE 7 (stop playback on page 15. Press to ...connected devices. For more information, see "Programming your remote control" on page 17. In analog TV mode, press to cycle through the available input sources. Press one or more information, see "...
User Manual (English)
Page 12
... to list all the recorded programs in an area with a cloth. The remote control may damage the TV screen. # Button 27 PVR/LIST 28 (fast forward) 29 / forward) (skip 30 /FREEZE 31 CH /CH 32 MUTE 33 - 34 CCD 35 P-LOCK 36 ZOOM 37 PICT Description Press to turn closed captioning" on... page 17. For more information, see "Programming your TV. In DVD, DVR, PVR, or CD mode, press to skip forward to restore...
... to list all the recorded programs in an area with a cloth. The remote control may damage the TV screen. # Button 27 PVR/LIST 28 (fast forward) 29 / forward) (skip 30 /FREEZE 31 CH /CH 32 MUTE 33 - 34 CCD 35 P-LOCK 36 ZOOM 37 PICT Description Press to turn closed captioning" on... page 17. For more information, see "Programming your TV. In DVD, DVR, PVR, or CD mode, press to skip forward to restore...

User Manual (English)
Page 13
... remote control to wall mount the remote control holder, make sure that can put the remote control in Step 1. Insignia TV codes for universal remote controls (for all Insignia TVs manufactured after Jan. 1, 2007) Universal remote control manufacturers and models Philips PHDVD5, PH5DSS, PMDVR8, PDVR8 RCA RCU807 ...75 ohm and 300 ohm. 75 ohm cable 300 ohm cable www.insigniaproducts.com 9 If you want to work with your Insignia TV. For more help, call the Insignia Customer Care Center at a time. Tips • If your universal remote control has a code search feature, run a ...
... remote control to wall mount the remote control holder, make sure that can put the remote control in Step 1. Insignia TV codes for universal remote controls (for all Insignia TVs manufactured after Jan. 1, 2007) Universal remote control manufacturers and models Philips PHDVD5, PH5DSS, PMDVR8, PDVR8 RCA RCU807 ...75 ohm and 300 ohm. 75 ohm cable 300 ohm cable www.insigniaproducts.com 9 If you want to work with your Insignia TV. For more help, call the Insignia Customer Care Center at a time. Tips • If your universal remote control has a code search feature, run a ...
User Manual (English)
Page 14
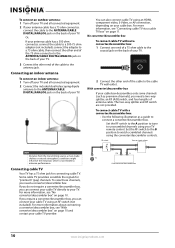
... natural atmospheric conditions might influence the reception, which is not related to antenna performance. You can connect your cable TV directly to your TV. No converter/descrambler box To connect cable TV without a converter/descrambler box: 1 Connect one end of a 75 ohm cable to the coaxial jack on your...some channels (such as a guide to connect a converter/descrambler box. Set the RF switch to the B position to watch scrambled channels using your TV remote control. Or, If your antenna cable has a 300 ohm connector, connect the cable to a 300-75 ohm adapter (not included), connect the...
... natural atmospheric conditions might influence the reception, which is not related to antenna performance. You can connect your cable TV directly to your TV. No converter/descrambler box To connect cable TV without a converter/descrambler box: 1 Connect one end of a 75 ohm cable to the coaxial jack on your...some channels (such as a guide to connect a converter/descrambler box. Set the RF switch to the B position to watch scrambled channels using your TV remote control. Or, If your antenna cable has a 300 ohm connector, connect the cable to a 300-75 ohm adapter (not included), connect the...
User Manual (English)
Page 15
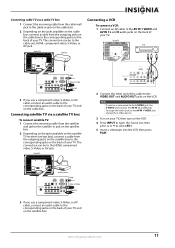
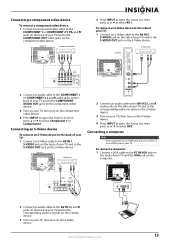
... a VCR To connect a VCR: 1 Connect an AV cable to the AV IN 1 VIDEO and AV IN 1 L and R audio jacks on the back of your TV. Satellite receiver HDMI Video or S-Video Component 3 If you use a component video, S-Video, or AV cable, connect an audio cable to the corresponding jacks on... the back of your TV. Connecting cable TV via a satellite TV box To connect satellite TV: 1 Connect the incoming cable from the satellite wall jack to the satellite-in jack on the cable box. 2 Depending on ...
... a VCR To connect a VCR: 1 Connect an AV cable to the AV IN 1 VIDEO and AV IN 1 L and R audio jacks on the back of your TV. Satellite receiver HDMI Video or S-Video Component 3 If you use a component video, S-Video, or AV cable, connect an audio cable to the corresponding jacks on... the back of your TV. Connecting cable TV via a satellite TV box To connect satellite TV: 1 Connect the incoming cable from the satellite wall jack to the satellite-in jack on the cable box. 2 Depending on ...
User Manual (English)
Page 16
... the Source List, then press or to select HDMI 1 or HDMI 2. You cannot connect a DVI device to the HDMI 2 jack on the side of your TV. 12 www.insigniaproducts.com Connecting an HDMI device You can connect a DVI device to the HDMI 1 jack on the camcorder or game console. 4 Press INPUT... other end of the cable to the VIDEO OUT and AUDIO OUT jacks on the camcorder or game console. 3 Turn on your TV, then turn on the back of your TV and to the HDMI OUT jack on the DVI device. To assign the audio jacks to the S-VIDEO jack, the S-VIDEO...
... the Source List, then press or to select HDMI 1 or HDMI 2. You cannot connect a DVI device to the HDMI 2 jack on the side of your TV. 12 www.insigniaproducts.com Connecting an HDMI device You can connect a DVI device to the HDMI 1 jack on the camcorder or game console. 4 Press INPUT... other end of the cable to the VIDEO OUT and AUDIO OUT jacks on the camcorder or game console. 3 Turn on your TV, then turn on the back of your TV and to the HDMI OUT jack on the DVI device. To assign the audio jacks to the S-VIDEO jack, the S-VIDEO...
User Manual (English)
Page 17
... device 2 Connect an audio cable to the AV IN 2 L and R audio jacks on the side of your TV and to the corresponding audio out jacks on the S-Video device. 3 Turn on your TV, then turn on the S-Video device. 4 Press INPUT to open the Source List, then press or to select AV1.... Connecting a computer Note If the computer has an HDMI jack, you can connect it to an HDMI jack on the component video device. Back of TV Component video device 4 Press INPUT to open the Source List, then press or to select AV2. Connecting a component video device To connect a component video device...
... device 2 Connect an audio cable to the AV IN 2 L and R audio jacks on the side of your TV and to the corresponding audio out jacks on the S-Video device. 3 Turn on your TV, then turn on the S-Video device. 4 Press INPUT to open the Source List, then press or to select AV1.... Connecting a computer Note If the computer has an HDMI jack, you can connect it to an HDMI jack on the component video device. Back of TV Component video device 4 Press INPUT to open the Source List, then press or to select AV2. Connecting a component video device To connect a component video device...
User Manual (English)
Page 18
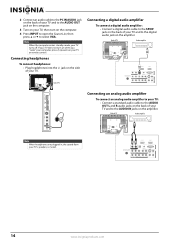
... Connecting a digital audio amplifier To connect a digital audio amplifier: • Connect a digital audio cable to the SPDIF jack on the back of your TV or remote control. If your TV does not turn on the computer. 4 Press INPUT to open the Source List, then press or to select VGA. Back of... TV Audio amplifier Side of TV Connecting an analog audio amplifier To connect an analog audio amplifier to your TV: • Connect a standard audio cable to the AUDIO OUT L and R audio jacks on the back...
... Connecting a digital audio amplifier To connect a digital audio amplifier: • Connect a digital audio cable to the SPDIF jack on the back of your TV or remote control. If your TV does not turn on the computer. 4 Press INPUT to open the Source List, then press or to select VGA. Back of... TV Audio amplifier Side of TV Connecting an analog audio amplifier To connect an analog audio amplifier to your TV: • Connect a standard audio cable to the AUDIO OUT L and R audio jacks on the back...
User Manual (English)
Page 19
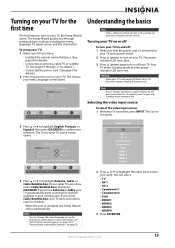
... EXIT EXIT 3 Press or to highlight English, Français, or Español, then press OK/ENTER to turn on your TV, the Setup Wizard opens. The Choose your menu Language screen opens. The power indicator LED turns blue. 3 Press (power) again to confirm your.... The Setup Wizard guides you chose Cable/Satellite box, your want. To set up basic settings including the menu language, TV signal source, and the channel list. Note You can select: • TV • AV 1 • AV 2 • Component 1 • Component 2 • VGA • HDMI 1 • HDMI 2 • HDMI 3 • ...
... EXIT EXIT 3 Press or to highlight English, Français, or Español, then press OK/ENTER to turn on your TV, the Setup Wizard opens. The Choose your menu Language screen opens. The power indicator LED turns blue. 3 Press (power) again to confirm your.... The Setup Wizard guides you chose Cable/Satellite box, your want. To set up basic settings including the menu language, TV signal source, and the channel list. Note You can select: • TV • AV 1 • AV 2 • Component 1 • Component 2 • VGA • HDMI 1 • HDMI 2 • HDMI 3 • ...
User Manual (English)
Page 20
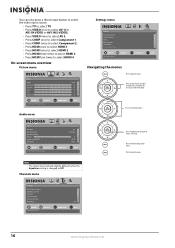
...EXIT Settings menu Settings Parental Controls Closed Caption Time Menu Settings Input labels Computer Settings PICTURE AUDIO CHANNELS SETTINGS MOVE OK ENTER SELECT Set various TV options MENU PREVIOUS EXIT EXIT Navigating the menus Press to the previous screen. Press to select menu items. Press to Off . Note The... to move the on-screen cursor left or right. You can also press a direct input button to select the video input source. • Press TV to select TV. • Press VIDEO once to select AV 1(for AV1 IN VIDEO or AV1 IN S-VIDEO). • Press VIDEO twice to select AV 2. &#...
...EXIT Settings menu Settings Parental Controls Closed Caption Time Menu Settings Input labels Computer Settings PICTURE AUDIO CHANNELS SETTINGS MOVE OK ENTER SELECT Set various TV options MENU PREVIOUS EXIT EXIT Navigating the menus Press to the previous screen. Press to select menu items. Press to Off . Note The... to move the on-screen cursor left or right. You can also press a direct input button to select the video input source. • Press TV to select TV. • Press VIDEO once to select AV 1(for AV1 IN VIDEO or AV1 IN S-VIDEO). • Press VIDEO twice to select AV 2. &#...
User Manual (English)
Page 21
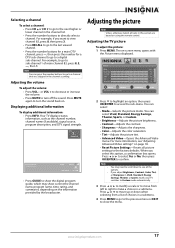
...more information, see all tasks in this option, a confirmation box opens. For example, to go to access the sub-menu. Your TV displays status information, such as the channel number, channel name (if available), signal source, program description, and DTV signal strength. Adjusting ... • Press the number buttons to directly select a channel. Displaying additional information To display additional information: • Press INFO. Adjusting the TV picture To adjust the picture: 1 Press MENU. If you adjust Brightness, Contrast, Color, Tint, or Sharpness in Vivid, Standard, Energy Savings...
...more information, see all tasks in this option, a confirmation box opens. For example, to go to access the sub-menu. Your TV displays status information, such as the channel number, channel name (if available), signal source, program description, and DTV signal strength. Adjusting ... • Press the number buttons to directly select a channel. Displaying additional information To display additional information: • Press INFO. Adjusting the TV picture To adjust the picture: 1 Press MENU. If you adjust Brightness, Contrast, Color, Tint, or Sharpness in Vivid, Standard, Energy Savings...


