

User Manual (English)
Page 3
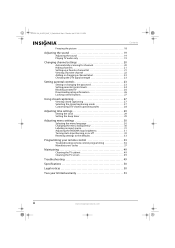
...safety instructions 2 Warnings 2 Cautions 3 Introduction 4 Installing a wall-mount bracket 4 TV components 5 Accessories 5 Cleaning cloth 5 Front 5 Back 5 Side 6 Remote control 6 Using the remote control 7 Installing the remote control batteries 7 Aiming the remote control 8 Using the remote control holder 8 Programming a universal remote control to work with your TV . . . . 8 Making connections 9 Connecting the power 9 Connecting an outdoor antenna 9 Connecting cable TV 9 Connecting satellite TV via a satellite TV box 10 Connecting a VCR 10 Connecting a camcorder or game...
...safety instructions 2 Warnings 2 Cautions 3 Introduction 4 Installing a wall-mount bracket 4 TV components 5 Accessories 5 Cleaning cloth 5 Front 5 Back 5 Side 6 Remote control 6 Using the remote control 7 Installing the remote control batteries 7 Aiming the remote control 8 Using the remote control holder 8 Programming a universal remote control to work with your TV . . . . 8 Making connections 9 Connecting the power 9 Connecting an outdoor antenna 9 Connecting cable TV 9 Connecting satellite TV via a satellite TV box 10 Connecting a VCR 10 Connecting a camcorder or game...
User Manual (English)
Page 4
... Downloading rating information 26 Locking control buttons 27 Using closed captioning 27 Viewing closed captioning 27 Selecting the closed captioning mode 27 Customizing DTV closed captioning styles 28 Adjusting time settings 29 Setting the clock 29 Setting the sleep timer 29 Adjusting menu settings 30 Selecting the menu language 30 Changing the menu transparency 30 Labeling an input source 31 Adjusting the INSIGNIA logo brightness 31 Turning Auto Input Sensing on or off 32 Resetting settings to the defaults 33 Programming your remote control 33 Troubleshooting remote control...
... Downloading rating information 26 Locking control buttons 27 Using closed captioning 27 Viewing closed captioning 27 Selecting the closed captioning mode 27 Customizing DTV closed captioning styles 28 Adjusting time settings 29 Setting the clock 29 Setting the sleep timer 29 Adjusting menu settings 30 Selecting the menu language 30 Changing the menu transparency 30 Labeling an input source 31 Adjusting the INSIGNIA logo brightness 31 Turning Auto Input Sensing on or off 32 Resetting settings to the defaults 33 Programming your remote control 33 Troubleshooting remote control...
User Manual (English)
Page 5
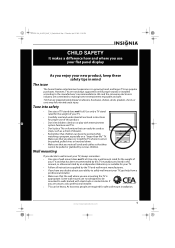
... sure that you enjoy your flat panel display As you place or install the TV where it cannot be heavy. Use only a wall mount rated for the weight of drawers. • Remember that the wall where you route all enclosed instructions for safe wall mount installation. At least two people are not always supported on dressers, bookcases, shelves, desks, speakers, chests, or carts may fall...
... sure that you enjoy your flat panel display As you place or install the TV where it cannot be heavy. Use only a wall mount rated for the weight of drawers. • Remember that the wall where you route all enclosed instructions for safe wall mount installation. At least two people are not always supported on dressers, bookcases, shelves, desks, speakers, chests, or carts may fall...
User Manual (English)
Page 8
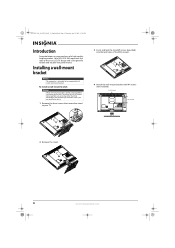
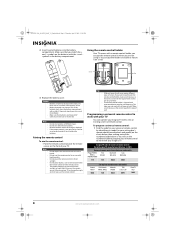
... TV. 3 Insert and lock the standoff screws (provided) into the lock holes of the VESA mount. 4 Attach the wall-mount bracket with M4 screws (not included). 3.94" (100 mm) 3.94" (100 mm) 2 Remove the stand. 4 www.insigniaproducts.com Your NS-L22X-10A represents the state of the art in the operating instructions unless you are for reliable and trouble-free performance. To install a wall-mount bracket: Warning These servicing instructions are qualified to do...
... TV. 3 Insert and lock the standoff screws (provided) into the lock holes of the VESA mount. 4 Attach the wall-mount bracket with M4 screws (not included). 3.94" (100 mm) 3.94" (100 mm) 2 Remove the stand. 4 www.insigniaproducts.com Your NS-L22X-10A represents the state of the art in the operating instructions unless you are for reliable and trouble-free performance. To install a wall-mount bracket: Warning These servicing instructions are qualified to do...

User Manual (English)
Page 9
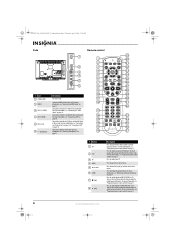
...; Remote control holder • AC power cord • VGA Cable • Component cable • Cleaning cloth • Stand-off screws (4) for wall mounting • User Guide • Quick Setup Guide Cleaning cloth The cleaning cloth is off (standby mode). Press the bottom of the button functions as the OK/ENTER button. In Menu mode, functions as the down arrow. When your TV is for a component video device to turn Game mode On or Off. Press to these jacks...
...; Remote control holder • AC power cord • VGA Cable • Component cable • Cleaning cloth • Stand-off screws (4) for wall mounting • User Guide • Quick Setup Guide Cleaning cloth The cleaning cloth is off (standby mode). Press the bottom of the button functions as the OK/ENTER button. In Menu mode, functions as the down arrow. When your TV is for a component video device to turn Game mode On or Off. Press to these jacks...
User Manual (English)
Page 10
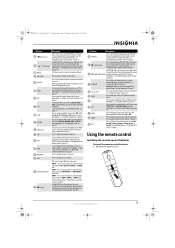
... stop ) 8 (play) Description Press to program the remote control to these jacks. For more information, see "Connecting a VCR" on page 10. Connect the video for an S-Video or standard AV device to control connected devices. For more information, see "Programming your TV. Press to control connected devices. You need to program the remote control to control a connected DVD player. You need to program the remote control to display the program guide. Press to control connected devices. For more information, see "Connecting headphones" on page...
... stop ) 8 (play) Description Press to program the remote control to these jacks. For more information, see "Connecting a VCR" on page 10. Connect the video for an S-Video or standard AV device to control connected devices. For more information, see "Programming your TV. Press to control connected devices. You need to program the remote control to control a connected DVD player. You need to program the remote control to display the program guide. Press to control connected devices. For more information, see "Connecting headphones" on page...
User Manual (English)
Page 11
...-channel number. You need to program the remote 29 / (skip forward) control to control connected devices. In digital TV mode, press to confirm selections or changes. To disconnect power, unplug the power cord. You can select Heavy, Medium, Light, or Off. NS-L22X-10A_09-0222_MAN_V1_English.book Page 7 Thursday, April 2, 2009 12:14 PM # Button 9 (fast reverse) 10 / (skip back) 11 RECALL 12 VOL+/VOL- 13 Numbers 14 INPUT 15 FAV 16 SAP 17 SLEEP...
...-channel number. You need to program the remote 29 / (skip forward) control to control connected devices. In digital TV mode, press to confirm selections or changes. To disconnect power, unplug the power cord. You can select Heavy, Medium, Light, or Off. NS-L22X-10A_09-0222_MAN_V1_English.book Page 7 Thursday, April 2, 2009 12:14 PM # Button 9 (fast reverse) 10 / (skip back) 11 RECALL 12 VOL+/VOL- 13 Numbers 14 INPUT 15 FAV 16 SAP 17 SLEEP...
User Manual (English)
Page 12
... mix batteries of walls. Do not use the correct tape for the type of wall. (Screws are disposed of the numbered code below it . Insignia TV codes for universal remote controls (for all types of different types. Notes Do not expose the remote control to work if direct sunlight or bright light shines on the front of time, remove the batteries. Using the remote control holder Your TV comes with separate adhesive tape for wall mounting.
... mix batteries of walls. Do not use the correct tape for the type of wall. (Screws are disposed of the numbered code below it . Insignia TV codes for universal remote controls (for all types of different types. Notes Do not expose the remote control to work if direct sunlight or bright light shines on the front of time, remove the batteries. Using the remote control holder Your TV comes with separate adhesive tape for wall mounting.
User Manual (English)
Page 13
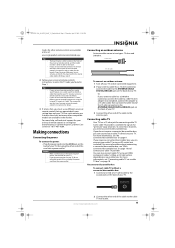
... the power cord from the power outlet. Some cable TV providers scramble the signals for connecting cable TV. For more information, see "Connecting cable TV via a cable TV box" on your cable box. See the label on the chart, but many other compatible models are available in Step 1. If you do not intend to your universal remote control's instructions and try several codes before finding a match. 2 Follow your cable TV using an HDMI, component video, S-Video...
... the power cord from the power outlet. Some cable TV providers scramble the signals for connecting cable TV. For more information, see "Connecting cable TV via a cable TV box" on your cable box. See the label on the chart, but many other compatible models are available in Step 1. If you do not intend to your universal remote control's instructions and try several codes before finding a match. 2 Follow your cable TV using an HDMI, component video, S-Video...

User Manual (English)
Page 15
... 2 VIDEO and AV IN 2 L and R audio jacks on the side of your TV: 1 Connect an HDMI cable to the HDMI OUT jack on the HDMI device. If the picture mode is connected to Game or Custom Game, pressing INPUT opens the Game Inputs list. NS-L22X-10A_09-0222_MAN_V1_English.book Page 11 Thursday, April 2, 2009 12:14 PM 3 Turn on your TV. Connecting a camcorder or game console To connect a camcorder or game console: 1 Connect an AV cable to select...
... 2 VIDEO and AV IN 2 L and R audio jacks on the side of your TV: 1 Connect an HDMI cable to the HDMI OUT jack on the HDMI device. If the picture mode is connected to Game or Custom Game, pressing INPUT opens the Game Inputs list. NS-L22X-10A_09-0222_MAN_V1_English.book Page 11 Thursday, April 2, 2009 12:14 PM 3 Turn on your TV. Connecting a camcorder or game console To connect a camcorder or game console: 1 Connect an AV cable to select...
User Manual (English)
Page 20
... to select menu items. Audio menu Audio Audyssey Dynamic Volume SRS TruSurround HD Treble Bass Balance Digital Audio/SPDIF PICTURE AUDIO CHANNELS SETTINGS Medium Off 32 32 0 RAW MOVE OK ENTER SELECT Adjust settings to affect sound quality MENU PREVIOUS EXIT EXIT Channels menu Channels Auto Channel Search Add/Skip Channels Favorites Channel Labels Channel Strength Audio Only PICTURE AUDIO CHANNELS SETTINGS Off MOVE OK ENTER SELECT Adjust channel options MENU PREVIOUS EXIT EXIT Settings menu Settings Parental Controls Closed Caption Time Menu Settings LOGO Brightness Auto Input...
... to select menu items. Audio menu Audio Audyssey Dynamic Volume SRS TruSurround HD Treble Bass Balance Digital Audio/SPDIF PICTURE AUDIO CHANNELS SETTINGS Medium Off 32 32 0 RAW MOVE OK ENTER SELECT Adjust settings to affect sound quality MENU PREVIOUS EXIT EXIT Channels menu Channels Auto Channel Search Add/Skip Channels Favorites Channel Labels Channel Strength Audio Only PICTURE AUDIO CHANNELS SETTINGS Off MOVE OK ENTER SELECT Adjust channel options MENU PREVIOUS EXIT EXIT Settings menu Settings Parental Controls Closed Caption Time Menu Settings LOGO Brightness Auto Input...

User Manual (English)
Page 21
... and Game mode is on using the remote control. Displaying additional information To display additional information: • Press INFO. Adjusting the picture Note Unless otherwise noted, all tasks in a submenu. 4 Press MENU to go to the previous menu or EXIT to the factory defaults. Adjusting the TV picture To adjust the picture: 1 Press MENU. You can select: • Mode-Selects the picture mode. For more information, see all picture settings to close the menu. Picture Advanced Video Aspert Ratio Overscan Color...
... and Game mode is on using the remote control. Displaying additional information To display additional information: • Press INFO. Adjusting the picture Note Unless otherwise noted, all tasks in a submenu. 4 Press MENU to go to the previous menu or EXIT to the factory defaults. Adjusting the TV picture To adjust the picture: 1 Press MENU. You can select: • Mode-Selects the picture mode. For more information, see all picture settings to close the menu. Picture Advanced Video Aspert Ratio Overscan Color...
User Manual (English)
Page 23
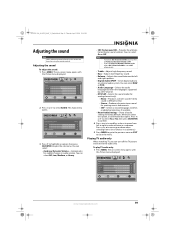
...; Reset Audio Settings- The on the languages supported by a DTV channel. • MTS/SAP-Selects the sound mode (for analog channel only). • Mono-Produces a clearer sound if stereo sound is set Audyssey Dynamic Volume to an external audio system. You can select RAW or PCM. • Audio Language-Selects the audio language based on -screen menu opens with the Picture menu displayed. Press or to open the sub-menu. Audio Audyssey Dynamic Volume SRS TruSurround HD Treble Bass Balance Digital Audio...
...; Reset Audio Settings- The on the languages supported by a DTV channel. • MTS/SAP-Selects the sound mode (for analog channel only). • Mono-Produces a clearer sound if stereo sound is set Audyssey Dynamic Volume to an external audio system. You can select RAW or PCM. • Audio Language-Selects the audio language based on -screen menu opens with the Picture menu displayed. Press or to open the sub-menu. Audio Audyssey Dynamic Volume SRS TruSurround HD Treble Bass Balance Digital Audio...

User Manual (English)
Page 24
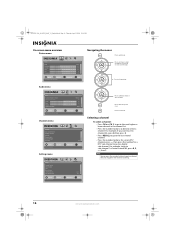
... the channel information in the on -screen menu closes. If the TV signal source changes, for example you change from an outdoor antenna to cable TV (no box), you select Cable/Satellite Box, your TV source Antenna Cable Cable/Satellite Box 0 Analog Channels 0 Digital Channels Scan for channels MOVE OK ENTER SELECT MENU PREVIOUS Select Antenna if using the remote control. Channels Auto Channel Search Add/Skip Channels Favorites Channel Labels Channel Strength Audio Only PICTURE AUDIO CHANNELS SETTINGS Off MOVE OK ENTER SELECT Adjust channel options MENU PREVIOUS...
... the channel information in the on -screen menu closes. If the TV signal source changes, for example you change from an outdoor antenna to cable TV (no box), you select Cable/Satellite Box, your TV source Antenna Cable Cable/Satellite Box 0 Analog Channels 0 Digital Channels Scan for channels MOVE OK ENTER SELECT MENU PREVIOUS Select Antenna if using the remote control. Channels Auto Channel Search Add/Skip Channels Favorites Channel Labels Channel Strength Audio Only PICTURE AUDIO CHANNELS SETTINGS Off MOVE OK ENTER SELECT Adjust channel options MENU PREVIOUS...

User Manual (English)
Page 25
... SELECT MENU PREVIOUS Manually add and skip channels in your TV will skip the hidden channels. Setting up a favorite channel list To set up a favorite channel list: 1 Press MENU. www.insigniaproducts.com 21 Picture Mode Brightness Contrast Color Tint Sharpness PICTURE AUDIO CHANNELS SETTINGS Vivid 42 45 54 0 +5 MOVE OK ENTER SELECT Adjust settings to affect picture quality MENU PREVIOUS EXIT EXIT 2 Press or to open the Channel Lists screen. Channels Auto Channel Search Add/Skip Channels Favorites Channel Labels Channel Strength Audio Only PICTURE AUDIO CHANNELS SETTINGS...
... SELECT MENU PREVIOUS Manually add and skip channels in your TV will skip the hidden channels. Setting up a favorite channel list To set up a favorite channel list: 1 Press MENU. www.insigniaproducts.com 21 Picture Mode Brightness Contrast Color Tint Sharpness PICTURE AUDIO CHANNELS SETTINGS Vivid 42 45 54 0 +5 MOVE OK ENTER SELECT Adjust settings to affect picture quality MENU PREVIOUS EXIT EXIT 2 Press or to open the Channel Lists screen. Channels Auto Channel Search Add/Skip Channels Favorites Channel Labels Channel Strength Audio Only PICTURE AUDIO CHANNELS SETTINGS...
User Manual (English)
Page 27
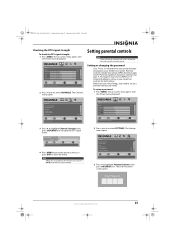
... Note When you are based on content and age). Settings Parental Controls Closed Caption Time Menu Settings LOGO Brightness Auto Input Sensing PICTURE AUDIO CHANNELS SETTINGS Low On MOVE OK ENTER SELECT Set various TV options MENU PREVIOUS EXIT EXIT 3 Press to select CHANNELS. NS-L22X-10A_09-0222_MAN_V1_English.book Page 23 Thursday, April 2, 2009 12:14 PM Checking the DTV signal strength To check the DTV signal strength: 1 Press MENU. Setting or changing the password Your TV has...
... Note When you are based on content and age). Settings Parental Controls Closed Caption Time Menu Settings LOGO Brightness Auto Input Sensing PICTURE AUDIO CHANNELS SETTINGS Low On MOVE OK ENTER SELECT Set various TV options MENU PREVIOUS EXIT EXIT 3 Press to select CHANNELS. NS-L22X-10A_09-0222_MAN_V1_English.book Page 23 Thursday, April 2, 2009 12:14 PM Checking the DTV signal strength To check the DTV signal strength: 1 Press MENU. Setting or changing the password Your TV has...
User Manual (English)
Page 37
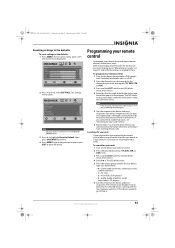
... close the menu. Settings Parental Controls Closed Caption Time Menu Settings LOGO Brightness Auto Input Sensing PICTURE AUDIO CHANNELS SETTINGS Low On MOVE OK ENTER SELECT Set various TV options MENU PREVIOUS EXIT EXIT Note You may need to scroll down each code for your device type (see "Searching for your code" below ). • 0-Cable (cable converters, video accessories, satellite receivers) • 1-TV (TVs) • 2-VCR (VCRs, DVD players) • 3-Audio (audio amplifiers, audio amps/tuners, CD players) 6 Aim the remote at the device and press (power...
... close the menu. Settings Parental Controls Closed Caption Time Menu Settings LOGO Brightness Auto Input Sensing PICTURE AUDIO CHANNELS SETTINGS Low On MOVE OK ENTER SELECT Set various TV options MENU PREVIOUS EXIT EXIT Note You may need to scroll down each code for your device type (see "Searching for your code" below ). • 0-Cable (cable converters, video accessories, satellite receivers) • 1-TV (TVs) • 2-VCR (VCRs, DVD players) • 3-Audio (audio amplifiers, audio amps/tuners, CD players) 6 Aim the remote at the device and press (power...
User Manual (English)
Page 53
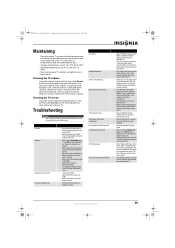
... sound but poor color Solution • Make sure that the power cord is not stable or synchronized No output from the cloth, then wipe the screen or cabinet with the + and - Problem Poor picture Horizontal dotted line "Ghost" or double image Remote control does not work After images appear Picture has a few bright or dark dots on your computer. • Adjust the balance in the Audio menu...
... sound but poor color Solution • Make sure that the power cord is not stable or synchronized No output from the cloth, then wipe the screen or cabinet with the + and - Problem Poor picture Horizontal dotted line "Ghost" or double image Remote control does not work After images appear Picture has a few bright or dark dots on your computer. • Adjust the balance in the Audio menu...
Firmware Installation Guide (English)
Page 1
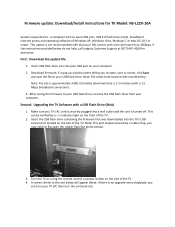
... instructions provided below do not help, call Insignia Customer Support at (877) 467‐4289 for TV Model: NS‐L22X‐10A System requirements: a computer with a 1.5 Mbps broadband connection). 3. Download firmware; Note: File size is turned off , then turn your TV off . After saving the firmware to your USB flash drive. Note: This port maybe covered by a red indicator light on your computer. A screen similar to flip open USB port, USB 2.0 flash drive (stick), broadband internet access...
... instructions provided below do not help, call Insignia Customer Support at (877) 467‐4289 for TV Model: NS‐L22X‐10A System requirements: a computer with a 1.5 Mbps broadband connection). 3. Download firmware; Note: File size is turned off , then turn your TV off . After saving the firmware to your USB flash drive. Note: This port maybe covered by a red indicator light on your computer. A screen similar to flip open USB port, USB 2.0 flash drive (stick), broadband internet access...
What is Firmware? (English)
Page 1
... software that can solve the problem quickly. Sometimes you . On a GPS, upgrading the firmware keeps you on the flash, displays the menus, and many other type of photos. Firmware is loaded at the factory and controls how an electronic device works. But, you only deleted photos, not the firmware, so the next time you press the power button, the firmware opens the lens, turns on track (literally) by helping...
... software that can solve the problem quickly. Sometimes you . On a GPS, upgrading the firmware keeps you on the flash, displays the menus, and many other type of photos. Firmware is loaded at the factory and controls how an electronic device works. But, you only deleted photos, not the firmware, so the next time you press the power button, the firmware opens the lens, turns on track (literally) by helping...


