User Manual (English)
Page 1
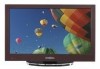
NS-L19X-10A_09-0241_MAN_V2_English.book Page 0 Tuesday, April 7, 2009 9:29 AM User Guide 19" LCD TV with Decorative Faceplates NS-L19X-10A
NS-L19X-10A_09-0241_MAN_V2_English.book Page 0 Tuesday, April 7, 2009 9:29 AM User Guide 19" LCD TV with Decorative Faceplates NS-L19X-10A
User Manual (English)
Page 2
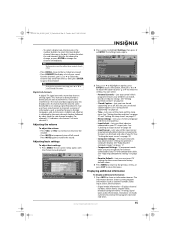
NS-L19X-10A_09-0241_MAN_V2_English.book Page i Tuesday, April 7, 2009 9:29 AM Contents CHILD SAFETY 1 Important safety instructions 2 Warnings 2 Cautions 3 Introduction 4 Installing the stand or wall-mount bracket 4 Installing the stand 4 Installing a wall-mount bracket 4 Adjusting the viewing angle 4 Replacing the decorative faceplate 4 Replacing the decorative faceplate 4 TV...Programming a universal remote control to work with your TV . . . . 8 Making connections 9 Connecting the power 9 Connecting an antenna, cable TV, or satellite TV box 9 Connecting a VCR 9 Connecting a ...
NS-L19X-10A_09-0241_MAN_V2_English.book Page i Tuesday, April 7, 2009 9:29 AM Contents CHILD SAFETY 1 Important safety instructions 2 Warnings 2 Cautions 3 Introduction 4 Installing the stand or wall-mount bracket 4 Installing the stand 4 Installing a wall-mount bracket 4 Adjusting the viewing angle 4 Replacing the decorative faceplate 4 Replacing the decorative faceplate 4 TV...Programming a universal remote control to work with your TV . . . . 8 Making connections 9 Connecting the power 9 Connecting an antenna, cable TV, or satellite TV box 9 Connecting a VCR 9 Connecting a ...
User Manual (English)
Page 3
NS-L19X-10A_09-0241_MAN_V2_English.book Page ii Tuesday, April 7, 2009 9:29 AM Contents Adjusting the picture 16 Adjusting the TV picture 16 Adjusting Advanced Video settings 16 Adjusting the computer image 17 Adjusting component settings 17 Adjusting the sound 18 Adjusting the sound 18 Selecting the audio mode 18 Playing TV audio only 19... Changing channel settings 19 Automatically scanning for channels 19 Adding or skipping channels 20 Setting up a favorite channel list 20 Adding ...
NS-L19X-10A_09-0241_MAN_V2_English.book Page ii Tuesday, April 7, 2009 9:29 AM Contents Adjusting the picture 16 Adjusting the TV picture 16 Adjusting Advanced Video settings 16 Adjusting the computer image 17 Adjusting component settings 17 Adjusting the sound 18 Adjusting the sound 18 Selecting the audio mode 18 Playing TV audio only 19... Changing channel settings 19 Automatically scanning for channels 19 Adding or skipping channels 20 Setting up a favorite channel list 20 Adding ...

User Manual (English)
Page 5
...to be used as steps, such as suitable for proper use your flat panel display As you enjoy your TV. • Follow all cords and cables so that they cannot be heavy. NS-L19X-10A_09-0241_MAN_V2_English.book Page 1 Tuesday, April 7, 2009 9:29 AM f CHILD SAFETY It makes a difference ...how and where you use of this product. • Don't let children climb on or play with entertainment system furniture and TVs. • Don't place TVs on furniture that can...
...to be used as steps, such as suitable for proper use your flat panel display As you enjoy your TV. • Follow all cords and cables so that they cannot be heavy. NS-L19X-10A_09-0241_MAN_V2_English.book Page 1 Tuesday, April 7, 2009 9:29 AM f CHILD SAFETY It makes a difference ...how and where you use of this product. • Don't let children climb on or play with entertainment system furniture and TVs. • Don't place TVs on furniture that can...
User Manual (English)
Page 6
... provided for your TV or hit, jolt, or press hard against the LCD panel. If the provided plug does not fit into such power lines or circuits. This label is a class I apparatus. Do not drop your safety. No user-serviceable parts are inside. Refer servicing to rain or moisture. NS-L19X-10A_09-0241_MAN_V2_English.book...
... provided for your TV or hit, jolt, or press hard against the LCD panel. If the provided plug does not fit into such power lines or circuits. This label is a class I apparatus. Do not drop your safety. No user-serviceable parts are inside. Refer servicing to rain or moisture. NS-L19X-10A_09-0241_MAN_V2_English.book...
User Manual (English)
Page 7
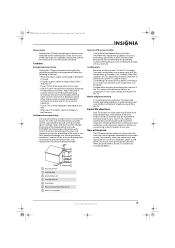
... correct grounding. Non-active pixels The LCD panel contains almost 3 million thin film transistors, which provide exceptionally sharp video quality. Article 810 of the National Electrical Code, ANSI/NFPA No. 70, provides information with your TV picture and sound, operating problems, or... sure that the room temperature rises gradually. Specifically, it on the screen as practical. In such cases, change in your TV only from the TV. NS-L19X-10A_09-0241_MAN_V2_English.book Page 3 Tuesday, April 7, 2009 9:29 AM Power source Operate your area. Cautions Damage requiring service Unplug...
... correct grounding. Non-active pixels The LCD panel contains almost 3 million thin film transistors, which provide exceptionally sharp video quality. Article 810 of the National Electrical Code, ANSI/NFPA No. 70, provides information with your TV picture and sound, operating problems, or... sure that the room temperature rises gradually. Specifically, it on the screen as practical. In such cases, change in your TV only from the TV. NS-L19X-10A_09-0241_MAN_V2_English.book Page 3 Tuesday, April 7, 2009 9:29 AM Power source Operate your area. Cautions Damage requiring service Unplug...
User Manual (English)
Page 8
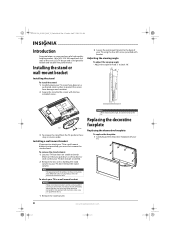
... faceplate To replace the faceplate: 1 Carefully pull the decorative faceplate off your purchase of a high-quality Insignia product. To reduce the risk of the product in these steps in LCD TV design and is for comparative purposes only. Adjusting the viewing angle To adjust the viewing angle: •...remove the stand column. Your NS-L19X-10A represents the state of your TV face down a soft cushion or cloth so that contained in the operating instructions unless you want to attach your TV to your TV to tip the TV. To remove the stand column: 1 Lay your TV using the four M4 screws...
... faceplate To replace the faceplate: 1 Carefully pull the decorative faceplate off your purchase of a high-quality Insignia product. To reduce the risk of the product in these steps in LCD TV design and is for comparative purposes only. Adjusting the viewing angle To adjust the viewing angle: •...remove the stand column. Your NS-L19X-10A represents the state of your TV face down a soft cushion or cloth so that contained in the operating instructions unless you want to attach your TV to your TV to tip the TV. To remove the stand column: 1 Lay your TV using the four M4 screws...

User Manual (English)
Page 9
...Press to open the on-screen menu. When your TV is off (standby mode). When your TV is turned off (standby mode). To disconnect all power, unplug the power cord. www.insigniaproducts.com 5 Press to decrease or increase the volume. NS-L19X-10A_09-0241_MAN_V2_English.book Page 5 Tuesday, April 7, 2009... 9:29 AM 2 Align the plastic studs on the new faceplate with the holes on the front of your TV, then press firmly to the next or previous channel in...
...Press to open the on-screen menu. When your TV is off (standby mode). When your TV is turned off (standby mode). To disconnect all power, unplug the power cord. www.insigniaproducts.com 5 Press to decrease or increase the volume. NS-L19X-10A_09-0241_MAN_V2_English.book Page 5 Tuesday, April 7, 2009... 9:29 AM 2 Align the plastic studs on the new faceplate with the holes on the front of your TV, then press firmly to the next or previous channel in...

User Manual (English)
Page 10
NS-L19X-10A_09-0241_MAN_V2_English.book Page 6 Tuesday, April 7, 2009 9:29 AM Back # Jack... information, see "Connecting a component video device" on page 9. For more information, see "Connecting an antenna, cable TV, or satellite TV box" on page 10. Press twice for upgrading firmware. Press twice for HDMI 3. Do not use . For more...device, such as a cable box or DVD player, to this jack. Remote control 1 12 2 13 3 14 4 15 5 16 17 18 6 19 20 7 8 21 9 22 10 23 24 11 25 # Button 1 (power) 2 ZOOM 3 COMP 4 HDMI 5 Numbers 6 VOL +/VOL ...
NS-L19X-10A_09-0241_MAN_V2_English.book Page 6 Tuesday, April 7, 2009 9:29 AM Back # Jack... information, see "Connecting a component video device" on page 9. For more information, see "Connecting an antenna, cable TV, or satellite TV box" on page 10. Press twice for upgrading firmware. Press twice for HDMI 3. Do not use . For more...device, such as a cable box or DVD player, to this jack. Remote control 1 12 2 13 3 14 4 15 5 16 17 18 6 19 20 7 8 21 9 22 10 23 24 11 25 # Button 1 (power) 2 ZOOM 3 COMP 4 HDMI 5 Numbers 6 VOL +/VOL ...

User Manual (English)
Page 11
... digital sub-channel. If chemicals touch your favorite channel list. Do not burn or incinerate. NS-L19X-10A_09-0241_MAN_V2_English.book Page 7 Tuesday, April 7, 2009 9:29 AM # Button 7 ENTER 8 9 MENU 10 SLEEP ...11 MTS/SAP 12 FM 13 INFO 14 TV 15 VIDEO 16 MUTE 17 GUIDE 18 (dot) 19 RECALL 20 FAVORITE 21 INPUT 22 CCD 23 EXIT 24 PICTURE 25 AUDIO Description ... display the input source menu. Press to select the audio mode. For more information, see "Adjusting the TV picture" on page 18. Press to select the picture mode. For more information, see "Selecting the audio...
... digital sub-channel. If chemicals touch your favorite channel list. Do not burn or incinerate. NS-L19X-10A_09-0241_MAN_V2_English.book Page 7 Tuesday, April 7, 2009 9:29 AM # Button 7 ENTER 8 9 MENU 10 SLEEP ...11 MTS/SAP 12 FM 13 INFO 14 TV 15 VIDEO 16 MUTE 17 GUIDE 18 (dot) 19 RECALL 20 FAVORITE 21 INPUT 22 CCD 23 EXIT 24 PICTURE 25 AUDIO Description ... display the input source menu. Press to select the audio mode. For more information, see "Adjusting the TV picture" on page 18. Press to select the picture mode. For more information, see "Selecting the audio...
User Manual (English)
Page 12
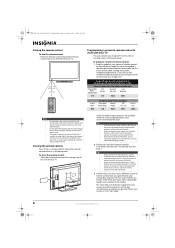
NS-L19X-10A_09-0241_MAN_V2_English.book Page 8 Tuesday, April 7, 2009 9:29 AM Aiming the remote control To aim the remote control: • Point the remote control toward the remote control sensor on the front of the numbered code below , then making note of your TV. 16.4 ft (5 m) Programming... remote control that matches your universal remote control or set -top box and your TV. Insignia TV codes for universal remote controls (for other compatible models are available in an area with your TV You can operate your universal remote control has a "Learn" feature, you can operate...
NS-L19X-10A_09-0241_MAN_V2_English.book Page 8 Tuesday, April 7, 2009 9:29 AM Aiming the remote control To aim the remote control: • Point the remote control toward the remote control sensor on the front of the numbered code below , then making note of your TV. 16.4 ft (5 m) Programming... remote control that matches your universal remote control or set -top box and your TV. Insignia TV codes for universal remote controls (for other compatible models are available in an area with your TV You can operate your universal remote control has a "Learn" feature, you can operate...
User Manual (English)
Page 13
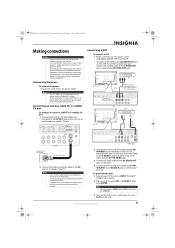
NS-L19X-10A_09-0241_MAN_V2_English.book Page 9 Tuesday, April 7, 2009 9:29 AM Making connections Cautions • Check the terminals for position and type before making any connections. • Loose connections can also press VIDEO once for AV1 or three times for an extended period of your TV. Connecting a VCR ...you can connect an S-Video cable to correct the problem. Connecting an antenna, cable TV, or satellite TV box To connect an antenna, cable TV, or satellite TV box: 1 Connect one end of TV VCR AV cable Note: Cables are tight and secure. • The external audio/video...
NS-L19X-10A_09-0241_MAN_V2_English.book Page 9 Tuesday, April 7, 2009 9:29 AM Making connections Cautions • Check the terminals for position and type before making any connections. • Loose connections can also press VIDEO once for AV1 or three times for an extended period of your TV. Connecting a VCR ...you can connect an S-Video cable to correct the problem. Connecting an antenna, cable TV, or satellite TV box To connect an antenna, cable TV, or satellite TV box: 1 Connect one end of TV VCR AV cable Note: Cables are tight and secure. • The external audio/video...

User Manual (English)
Page 14
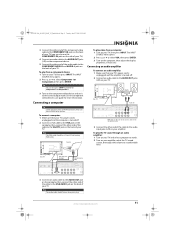
...more information. See the HDMI device's user guide for more information. To connect a camcorder or game: 1 Make sure that your TV. Back of TV Device with HDMI output HDMI cable Camcorder or game Note: Cables are often color-coded to the AV2 IN VIDEO, AUDIO-L, and AUDIO... audio cable to connectors. Component video device Back of your TV's power cord is unplugged and the component video device is turned off . 2 Connect a component video cable to white. Tip You can be used for a better picture. NS-L19X-10A_09-0241_MAN_V2_English.book Page 10 Tuesday, April 7, 2009 9:29...
...more information. See the HDMI device's user guide for more information. To connect a camcorder or game: 1 Make sure that your TV. Back of TV Device with HDMI output HDMI cable Camcorder or game Note: Cables are often color-coded to the AV2 IN VIDEO, AUDIO-L, and AUDIO... audio cable to connectors. Component video device Back of your TV's power cord is unplugged and the component video device is turned off . 2 Connect a component video cable to white. Tip You can be used for a better picture. NS-L19X-10A_09-0241_MAN_V2_English.book Page 10 Tuesday, April 7, 2009 9:29...
User Manual (English)
Page 15
... to the COMPONENT AUDIO-R and AUDIO-L jacks on the back of your TV. www.insigniaproducts.com 11 Note The audio cable should be used for more information. Connecting a computer Tip Some computers have a stereo mini plug. NS-L19X-10A_09-0241_MAN_V2_English.book Page 11 Tuesday, April 7, 2009 9:29 AM 3 ...Connect the other end of the component video cable to the COMPONENT1 IN jacks on the back of your TV (you can also use the COMPONENT2 IN jacks on...
... to the COMPONENT AUDIO-R and AUDIO-L jacks on the back of your TV. www.insigniaproducts.com 11 Note The audio cable should be used for more information. Connecting a computer Tip Some computers have a stereo mini plug. NS-L19X-10A_09-0241_MAN_V2_English.book Page 11 Tuesday, April 7, 2009 9:29 AM 3 ...Connect the other end of the component video cable to the COMPONENT1 IN jacks on the back of your TV (you can also use the COMPONENT2 IN jacks on...
User Manual (English)
Page 16
... and other end of the cable to the FM antenna jack on the back of your TV, then press INPUT. To listen to FM radio: 1 Turn on your TV: 1 Make sure that you hear the sound. NS-L19X-10A_09-0241_MAN_V2_English.book Page 12 Tuesday, April 7, 2009 9:29 AM Connecting a digital sound ...system To connect a digital sound system: 1 Make sure that your TV's power cord is unplugged and the digital sound system ...
... and other end of the cable to the FM antenna jack on the back of your TV, then press INPUT. To listen to FM radio: 1 Turn on your TV: 1 Make sure that you hear the sound. NS-L19X-10A_09-0241_MAN_V2_English.book Page 12 Tuesday, April 7, 2009 9:29 AM Connecting a digital sound ...system To connect a digital sound system: 1 Make sure that your TV's power cord is unplugged and the digital sound system ...

User Manual (English)
Page 17
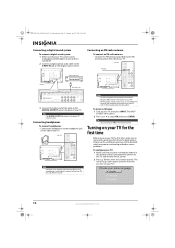
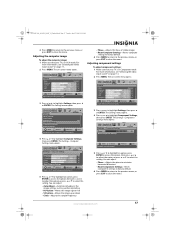
NS-L19X-10A_09-0241_MAN_V2_English.book Page 13 Tuesday, April 7, 2009 9:29 AM 3 Press or to create a channel list. 6 Select the corresponding video input source through a tuner box, select Cable/Satellite Box. 5 Press ENTER when you have : • If you are using an antenna for a standard or HD TV signal, ...SETTINGS RADIO Standard 70 40 60 0 -16 MOVE OK SELECT ENTER MENU PREVIOUS Adjust settings to select FM radio. Note If your TV does not receive an input signal for available channels in the channel list. Selecting the video input source To select the video input ...
NS-L19X-10A_09-0241_MAN_V2_English.book Page 13 Tuesday, April 7, 2009 9:29 AM 3 Press or to create a channel list. 6 Select the corresponding video input source through a tuner box, select Cable/Satellite Box. 5 Press ENTER when you have : • If you are using an antenna for a standard or HD TV signal, ...SETTINGS RADIO Standard 70 40 60 0 -16 MOVE OK SELECT ENTER MENU PREVIOUS Adjust settings to select FM radio. Note If your TV does not receive an input signal for available channels in the channel list. Selecting the video input source To select the video input ...
User Manual (English)
Page 18
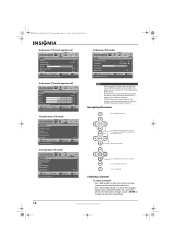
... to change the channel immediately. 14 www.insigniaproducts.com Selecting a channel To select a channel: • Press CH+ or CH- NS-L19X-10A_09-0241_MAN_V2_English.book Page 14 Tuesday, April 7, 2009 9:29 AM Audio menu (TV mode, equalizer on) Audio Equalizer Equalizer Mode Equalizer Setting Balance Digital Audio/SPDIF MTS/SAP PICTURE AUDIO CHANNELS SETTINGS...
... to change the channel immediately. 14 www.insigniaproducts.com Selecting a channel To select a channel: • Press CH+ or CH- NS-L19X-10A_09-0241_MAN_V2_English.book Page 14 Tuesday, April 7, 2009 9:29 AM Audio menu (TV mode, equalizer on) Audio Equalizer Equalizer Mode Equalizer Setting Balance Digital Audio/SPDIF MTS/SAP PICTURE AUDIO CHANNELS SETTINGS...
User Manual (English)
Page 19
NS-L19X-10A_09-0241_MAN_V2_English.book Page 15 Tuesday, April 7, 2009 9:29 AM • To select a digital sub-channel, press the number buttons to select the main digital channel, then press the dot (.) button to restore the sound. Broadcasters may use these sub-channels to transmit a variety of your TV...video input source, and resolution. • Digital mode information-Displays channel number, station name, channel label, broadcast program name, TV rating, signal type, audio information, resolution, CC mode, current time, and current program start and end times. Picture Mode Brightness...
NS-L19X-10A_09-0241_MAN_V2_English.book Page 15 Tuesday, April 7, 2009 9:29 AM • To select a digital sub-channel, press the number buttons to select the main digital channel, then press the dot (.) button to restore the sound. Broadcasters may use these sub-channels to transmit a variety of your TV...video input source, and resolution. • Digital mode information-Displays channel number, station name, channel label, broadcast program name, TV rating, signal type, audio information, resolution, CC mode, current time, and current program start and end times. Picture Mode Brightness...
User Manual (English)
Page 20
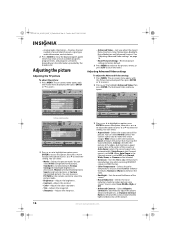
.../DVI signals in the Channels menu is decreased), Theater (a finely detailed picture), Sports (a dynamic picture), or Custom (customized picture). You can select: • Aspect Ratio - NS-L19X-10A_09-0241_MAN_V2_English.book Page 16 Tuesday, April 7, 2009 9:29 AM • Analog mode information-Displays channel number, channel label (if preset), signal type, audio information... also press PICTURE on -screen menu opens with the Picture menu displayed, then press ENTER or to select the setting. Adjusting the picture Adjusting the TV picture To adjust the picture: 1 Press MENU.
.../DVI signals in the Channels menu is decreased), Theater (a finely detailed picture), Sports (a dynamic picture), or Custom (customized picture). You can select: • Aspect Ratio - NS-L19X-10A_09-0241_MAN_V2_English.book Page 16 Tuesday, April 7, 2009 9:29 AM • Analog mode information-Displays channel number, channel label (if preset), signal type, audio information... also press PICTURE on -screen menu opens with the Picture menu displayed, then press ENTER or to select the setting. Adjusting the picture Adjusting the TV picture To adjust the picture: 1 Press MENU.
User Manual (English)
Page 21
NS-L19X-10A_09-0241_MAN_V2_English.book Page 17 Tuesday, April 7, 2009 9:29 AM 4 Press MENU to return to the previous menu, or press EXIT to highlight Settings, then press or ENTER. Adjusting component settings To adjust component settings: 1 Make sure that your TV is connected to the TV EXIT EXIT...or press EXIT to highlight Computer Settings, then press ENTER. Adjusting the computer image To adjust the computer image: 1 Make sure that your TV is in Component mode. For more information, see "Selecting the video input source" on page 13. 2 Press MENU. Component Settings menu ...
NS-L19X-10A_09-0241_MAN_V2_English.book Page 17 Tuesday, April 7, 2009 9:29 AM 4 Press MENU to return to the previous menu, or press EXIT to highlight Settings, then press or ENTER. Adjusting component settings To adjust component settings: 1 Make sure that your TV is connected to the TV EXIT EXIT...or press EXIT to highlight Computer Settings, then press ENTER. Adjusting the computer image To adjust the computer image: 1 Make sure that your TV is in Component mode. For more information, see "Selecting the video input source" on page 13. 2 Press MENU. Component Settings menu ...


