

Warranty (English)
Page 1
... call 1-866-BESTBUY for 1 year (365 days) from a Best Buy or Future Shop online web site (www.bestbuy.com, www.bestbuy.ca, or www.futureshop.ca), mail your original receipt and the Product to you . This warranty does not cover: • Customer instruction/education • Installation • Set up adjustments • Cosmetic damage • Damage due to obtain warranty service?
... call 1-866-BESTBUY for 1 year (365 days) from a Best Buy or Future Shop online web site (www.bestbuy.com, www.bestbuy.ca, or www.futureshop.ca), mail your original receipt and the Product to you . This warranty does not cover: • Customer instruction/education • Installation • Set up adjustments • Cosmetic damage • Damage due to obtain warranty service?

Warranty (English)
Page 2
... or power supply • Attempted repair by any person not authorized by Best Buy Purchasing LLC 7601 Penn Avenue South, Richfield, Minnesota, U.S.A. 55423-3645 © 2014 BBY Solutions, Inc. AA, AAA, C etc.) • Products where the factory applied serial number has been altered or removed • Loss or Theft of this product or any part of the product • Display panels containing...
... or power supply • Attempted repair by any person not authorized by Best Buy Purchasing LLC 7601 Penn Avenue South, Richfield, Minnesota, U.S.A. 55423-3645 © 2014 BBY Solutions, Inc. AA, AAA, C etc.) • Products where the factory applied serial number has been altered or removed • Loss or Theft of this product or any part of the product • Display panels containing...
User Manual English
Page 3
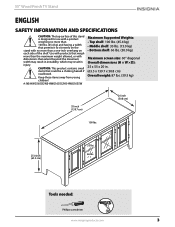
... lbs. (39.5 kg) 55 inch (139.7 cm) 20 inch (50.8 cm) 100 lbs. 25.0 inch (63.5 cm) 33 lbs. 66 lbs. Keep these items away from young children! #: NS-HWG1655E/NS-HWG1655C/NS-HWG1655W Maximum Supported Weights: - 55" Wood Finish TV Stand ENGLISH SAFETY INFORMATION AND SPECIFICATIONS CAUTION: The top surface of this stand is designed for use with a product weighing no more than...
... lbs. (39.5 kg) 55 inch (139.7 cm) 20 inch (50.8 cm) 100 lbs. 25.0 inch (63.5 cm) 33 lbs. 66 lbs. Keep these items away from young children! #: NS-HWG1655E/NS-HWG1655C/NS-HWG1655W Maximum Supported Weights: - 55" Wood Finish TV Stand ENGLISH SAFETY INFORMATION AND SPECIFICATIONS CAUTION: The top surface of this stand is designed for use with a product weighing no more than...

User Manual English
Page 4
Use this part identification to help distinguish similar parts from each other. Left middle panel E - Top B - Middle back panel 4 www.insigniaproducts.com 55" Wood Finish TV Stand PACKAGE CONTENTS: PARTS Make sure that you have a label or an inked letter on the edge to help identify similar parts. A - Right middle panel F - Adjustable shelf G - Bottom panel H - While not all parts are labeled, some of the parts will...
Use this part identification to help distinguish similar parts from each other. Left middle panel E - Top B - Middle back panel 4 www.insigniaproducts.com 55" Wood Finish TV Stand PACKAGE CONTENTS: PARTS Make sure that you have a label or an inked letter on the edge to help identify similar parts. A - Right middle panel F - Adjustable shelf G - Bottom panel H - While not all parts are labeled, some of the parts will...
User Manual English
Page 5
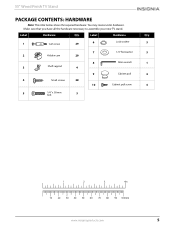
You may receive extra hardware. 55" Wood Finish TV Stand PACKAGE CONTENTS: HARDWARE Note: The table below shows the required hardware. Label Hardware Qty. 1 Cam screw 29 6 Lock washer 3 7 1/4" flat washer 3 2 Hidden cam 29 8 Allen wrench 1 3 Shelf support 4 9 Cabinet pull 4 4 Small screws 28 10 Cabinet pull screw 4 5 1/4" x 38 mm bolt 3 1 2 3 4in 10 20 30 40 50 60 70 80 90 100mm www.insigniaproducts.com 5 Make sure that you have all the hardware necessary to assemble your new TV stand. Label Hardware Qty.
You may receive extra hardware. 55" Wood Finish TV Stand PACKAGE CONTENTS: HARDWARE Note: The table below shows the required hardware. Label Hardware Qty. 1 Cam screw 29 6 Lock washer 3 7 1/4" flat washer 3 2 Hidden cam 29 8 Allen wrench 1 3 Shelf support 4 9 Cabinet pull 4 4 Small screws 28 10 Cabinet pull screw 4 5 1/4" x 38 mm bolt 3 1 2 3 4in 10 20 30 40 50 60 70 80 90 100mm www.insigniaproducts.com 5 Make sure that you have all the hardware necessary to assemble your new TV stand. Label Hardware Qty.

User Manual English
Page 6
You'll need: Phillips screwdriver 1 Cam screw (29) 6 www.insigniaproducts.com Use the holes indicated. 55" Wood Finish TV Stand ASSEMBLY INSTRUCTIONS Step 1: Preparing the top, bottom, side panels, and front Caution: Assemble your stand on a carpeted floor or on the empty box to avoid scratching your stand. • Screw 29 cam screws (1) into the holes in the top (A), bottom (G), sides panels (B and C), and front (H), then tighten with a phillips screw driver until the smooth portion of the cam screw is flush with the surface of the part.
You'll need: Phillips screwdriver 1 Cam screw (29) 6 www.insigniaproducts.com Use the holes indicated. 55" Wood Finish TV Stand ASSEMBLY INSTRUCTIONS Step 1: Preparing the top, bottom, side panels, and front Caution: Assemble your stand on a carpeted floor or on the empty box to avoid scratching your stand. • Screw 29 cam screws (1) into the holes in the top (A), bottom (G), sides panels (B and C), and front (H), then tighten with a phillips screw driver until the smooth portion of the cam screw is flush with the surface of the part.
User Manual English
Page 7
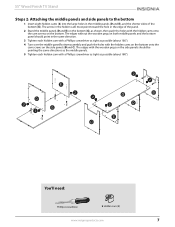
... panel. 2 Stand the middle panels (D and E) on the bottom (G), as shown, then push the holes with a Phillips screwdriver as tight as possible (about 180°). 4 Turn over the middle panel/bottom assembly and push the holes with the hidden cams on the bottom onto the cam screws on the side panels ...each hidden cam with a Phillips screwdriver as tight as the middle panels. 5 Tighten each hidden cam with the hidden cams onto the cam screws on the side panels should point in the edge of the bottom (G). You'll need: Phillips screwdriver 2 Hidden cam (8) www.insigniaproducts.com 7 The...
... panel. 2 Stand the middle panels (D and E) on the bottom (G), as shown, then push the holes with a Phillips screwdriver as tight as possible (about 180°). 4 Turn over the middle panel/bottom assembly and push the holes with the hidden cams on the bottom onto the cam screws on the side panels ...each hidden cam with a Phillips screwdriver as tight as the middle panels. 5 Tighten each hidden cam with the hidden cams onto the cam screws on the side panels should point in the edge of the bottom (G). You'll need: Phillips screwdriver 2 Hidden cam (8) www.insigniaproducts.com 7 The...
User Manual English
Page 8
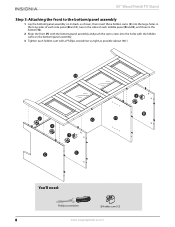
... Wood Finish TV Stand Step 3: Attaching the front to the bottom/panel assembly 1 Lay the bottom/panel assembly on its back, as shown, then insert three hidden cams (2) into the large holes in the long sides of each side panel (B and C), two in the sides of each middle panel (D and E), ...bottom (G). 2 Align the front (H) with the bottom/panel assembly and push the cam screws into the holes with the hidden cams on the bottom/panel assembly. 3 Tighten each hidden cam with a Phillips screwdriver as tight as possible (about 180°). You'll need: Phillips screwdriver 2 Hidden cam (13) 8 www....
... Wood Finish TV Stand Step 3: Attaching the front to the bottom/panel assembly 1 Lay the bottom/panel assembly on its back, as shown, then insert three hidden cams (2) into the large holes in the long sides of each side panel (B and C), two in the sides of each middle panel (D and E), ...bottom (G). 2 Align the front (H) with the bottom/panel assembly and push the cam screws into the holes with the hidden cams on the bottom/panel assembly. 3 Tighten each hidden cam with a Phillips screwdriver as tight as possible (about 180°). You'll need: Phillips screwdriver 2 Hidden cam (13) 8 www....

User Manual English
Page 9
... the cam screws into the holes with the hidden cams in the side and middle panels. 3 Tighten each hidden cam with three 1/4" bolts (5), 1/4" flat washers (7), and lock washers (6). 55" Wood Finish TV Stand Step 4: Attaching the top 1 Carefully stand the unit on its legs, then insert eight hidden cams (2), as possible (about 180°). 4 Using the Allen...
... the cam screws into the holes with the hidden cams in the side and middle panels. 3 Tighten each hidden cam with three 1/4" bolts (5), 1/4" flat washers (7), and lock washers (6). 55" Wood Finish TV Stand Step 4: Attaching the top 1 Carefully stand the unit on its legs, then insert eight hidden cams (2), as possible (about 180°). 4 Using the Allen...

User Manual English
Page 10
You'll need: Phillips screwdriver 4 Small screws (28) 10 www.insigniaproducts.com Push on opposite corners to "square" the unit, if required. 2 Using a Phillips screwdriver, fasten the back to the main body of the TV stand with the small screws (4). 3 Align the center back panel (J) with the back of the unit. 55" Wood Finish TV Stand Step 5: Attaching...
You'll need: Phillips screwdriver 4 Small screws (28) 10 www.insigniaproducts.com Push on opposite corners to "square" the unit, if required. 2 Using a Phillips screwdriver, fasten the back to the main body of the TV stand with the small screws (4). 3 Align the center back panel (J) with the back of the unit. 55" Wood Finish TV Stand Step 5: Attaching...
User Manual English
Page 11
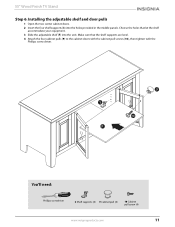
... cabinet pull screws (10), then tighten with the Phillips screw driver. 55" Wood Finish TV Stand Step 6: Installing the adjustable shelf and door pulls 1 Open the two center cabinet doors. 2 Insert the four shelf supports (3) into the unit. Make sure that let the shelf accommodate your equipment. 3 Slide the adjustable shelf (F) into the holes provided in the middle panels.
... cabinet pull screws (10), then tighten with the Phillips screw driver. 55" Wood Finish TV Stand Step 6: Installing the adjustable shelf and door pulls 1 Open the two center cabinet doors. 2 Insert the four shelf supports (3) into the unit. Make sure that let the shelf accommodate your equipment. 3 Slide the adjustable shelf (F) into the holes provided in the middle panels.
User Manual English
Page 12
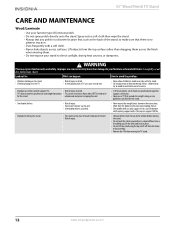
... playing with a TV can cause it in the instructions. • Work from the frame or leg assembly. • Remove the TV before moving the TV stand. 12 www.insigniaproducts.com Improper use your stand correctly and safely. and the bottom shelf can only support 33 lbs. 55" Wood Finish TV Stand CARE AND MAINTENANCE Wood/Laminate • Use your favorite type...
... playing with a TV can cause it in the instructions. • Work from the frame or leg assembly. • Remove the TV before moving the TV stand. 12 www.insigniaproducts.com Improper use your stand correctly and safely. and the bottom shelf can only support 33 lbs. 55" Wood Finish TV Stand CARE AND MAINTENANCE Wood/Laminate • Use your favorite type...
User Manual English
Page 13
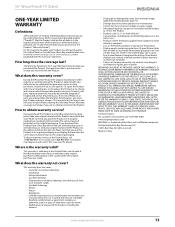
..." or "with this warranty to obtain warranty service? Products and parts replaced under this warranty become the property of Insignia and are dark or incorrectly illuminated) grouped in ). • Damage due to incorrect operation or maintenance • Connection to an incorrect voltage or power supply • Attempted repair by any Best Buy store. Warranty coverage terminates if you . THIS WARRANTY GIVES YOU SPECIFIC LEGAL RIGHTS, AND YOU...
..." or "with this warranty to obtain warranty service? Products and parts replaced under this warranty become the property of Insignia and are dark or incorrectly illuminated) grouped in ). • Damage due to incorrect operation or maintenance • Connection to an incorrect voltage or power supply • Attempted repair by any Best Buy store. Warranty coverage terminates if you . THIS WARRANTY GIVES YOU SPECIFIC LEGAL RIGHTS, AND YOU...

User Manual English
Page 14
55" Wood Finish TV Stand 14 www.insigniaproducts.com
55" Wood Finish TV Stand 14 www.insigniaproducts.com


