User Manual (English)
Page 3
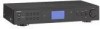
www.insignia-products.com 1 NS-HDTUNE Insignia NS-HDTUNE HD Radio Tuner Contents Introduction 1 Safety information 2 Features 4 Setting up your radio 13 Using your radio 19 Troubleshooting 21 Specifications 22 Legal notices 23 Introduction Congratulations on your purchase of the art in HD radio tuner design and is designed for reliable and trouble-free performance. Your NS-HDTUNE represents the state of a high-quality Insignia product.
www.insignia-products.com 1 NS-HDTUNE Insignia NS-HDTUNE HD Radio Tuner Contents Introduction 1 Safety information 2 Features 4 Setting up your radio 13 Using your radio 19 Troubleshooting 21 Specifications 22 Legal notices 23 Introduction Congratulations on your purchase of the art in HD radio tuner design and is designed for reliable and trouble-free performance. Your NS-HDTUNE represents the state of a high-quality Insignia product.
User Manual (English)
Page 5
... radio for ventilation. • Do not place your radio in any heat sources such as the power-supply cord or plug is damaged, liquid has been spilled or objects have fallen into your outlet, consult an electrician for replacement of the obsolete outlet. 10 Protect the power ...13 Unplug your radio during lightning storms or when unused for your safety. Servicing is required when your radio has been damaged in a closed bookcase or rack without proper ventilation. When a cart is used, use attachments or accessories specified by the manufacturer. NS-HDTUNE 8 Do not install near any way...
... radio for ventilation. • Do not place your radio in any heat sources such as the power-supply cord or plug is damaged, liquid has been spilled or objects have fallen into your outlet, consult an electrician for replacement of the obsolete outlet. 10 Protect the power ...13 Unplug your radio during lightning storms or when unused for your safety. Servicing is required when your radio has been damaged in a closed bookcase or rack without proper ventilation. When a cart is used, use attachments or accessories specified by the manufacturer. NS-HDTUNE 8 Do not install near any way...

User Manual (English)
Page 6
...HD radio tuner • FM antenna • AM antenna • Remote control with extremely high or low temperature. • Do not expose your radio. NS-HDTUNE • Do not cover the ventilation openings with any items, such as newspapers, tablecloths, or curtains. • Do not place objects on the battery faces out. • When you replace...; When you use your radio in an area with battery • Right and left audio ouput cables • User Guide 4 www.insignia-products.com Make sure that the replacement battery is the main disconnect device for your radio to dripping or...
...HD radio tuner • FM antenna • AM antenna • Remote control with extremely high or low temperature. • Do not expose your radio. NS-HDTUNE • Do not cover the ventilation openings with any items, such as newspapers, tablecloths, or curtains. • Do not place objects on the battery faces out. • When you replace...; When you use your radio in an area with battery • Right and left audio ouput cables • User Guide 4 www.insignia-products.com Make sure that the replacement battery is the main disconnect device for your radio to dripping or...

User Manual (English)
Page 7
....insignia-products.com 5 The button will not tune to an HD radio multicast station. 7 HD SEEK button Press to go to the next FM, AM, or HD radio station. NS-HDTUNE Front 1 2 3 4 5 67 8 9 10 # Component Description 1 Power button Press to turn on your radio is tuning to an HD broadcast. 4 LCD Shows status information. 5 Remote control sensor Receives signals from the remote control. Press to go to a stored (preset) station. 3 HD logo Lights when your radio or put it into standby mode. 2 Number buttons...
....insignia-products.com 5 The button will not tune to an HD radio multicast station. 7 HD SEEK button Press to go to the next FM, AM, or HD radio station. NS-HDTUNE Front 1 2 3 4 5 67 8 9 10 # Component Description 1 Power button Press to turn on your radio is tuning to an HD broadcast. 4 LCD Shows status information. 5 Remote control sensor Receives signals from the remote control. Press to go to a stored (preset) station. 3 HD logo Lights when your radio or put it into standby mode. 2 Number buttons...

User Manual (English)
Page 8
... the COAXIAL IN jack on a sound system to listen to your radio through the sound system. 6 www.insignia-products.com Press to the next or previous preset station. amd FM2 tuning bands. 5 6 # Component 1 COAXIAL jack 2 OPTICAL jack 7 Description Connect a coaxial audio cable to this jack and to the OPTICAL IN jack on a sound system to listen to a lower frequency. NS-HDTUNE # Component 8 PRESET / buttons 9 TUNING knob 10 AM/FM button Back 12 3 4 Description Press to go to switch between AM, FM1. Turn...
... the COAXIAL IN jack on a sound system to listen to your radio through the sound system. 6 www.insignia-products.com Press to the next or previous preset station. amd FM2 tuning bands. 5 6 # Component 1 COAXIAL jack 2 OPTICAL jack 7 Description Connect a coaxial audio cable to this jack and to the OPTICAL IN jack on a sound system to listen to a lower frequency. NS-HDTUNE # Component 8 PRESET / buttons 9 TUNING knob 10 AM/FM button Back 12 3 4 Description Press to go to switch between AM, FM1. Turn...
User Manual (English)
Page 9
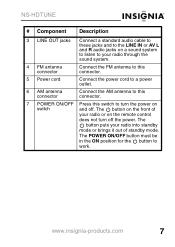
NS-HDTUNE # Component Description 3 LINE OUT jacks Connect a standard audio cable to these jacks and to the LINE IN or AV L and R audio jacks on a sound system to listen to your radio or on the remote control does not turn the power on the front of standby mode. The POWER ON/OFF button must be in the ON position for the button to turn off . www.insignia-products.com 7 The button on switch and off the power. The...
NS-HDTUNE # Component Description 3 LINE OUT jacks Connect a standard audio cable to these jacks and to the LINE IN or AV L and R audio jacks on a sound system to listen to your radio or on the remote control does not turn the power on the front of standby mode. The POWER ON/OFF button must be in the ON position for the button to turn off . www.insignia-products.com 7 The button on switch and off the power. The...
User Manual (English)
Page 10
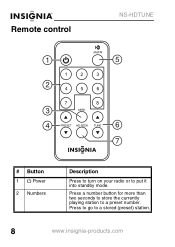
Press to go to a preset number. Press a number button for more than two seconds to store the currently playing station to a stored (preset) station. 8 www.insignia-products.com Remote control 1 2 3 4 NS-HDTUNE 5 6 7 # Button 1 Power 2 Numbers Description Press to turn on your radio or to put it into standby mode.
Press to go to a preset number. Press a number button for more than two seconds to store the currently playing station to a stored (preset) station. 8 www.insignia-products.com Remote control 1 2 3 4 NS-HDTUNE 5 6 7 # Button 1 Power 2 Numbers Description Press to turn on your radio or to put it into standby mode.

User Manual (English)
Page 12
NS-HDTUNE LCD display HD radio broadcast display When receiving an HD radio broadcast, the following information appears on the LCD. 1 6 7 23 4 5 # Description 1 Shows the frequency band, AM, FM1, or FM2. 2 Station call letters 3 HD radio broadcast indicator 4 Signal strength 5 Broadcast frequency 6 Artist 7 Song title or radio show title 10 www.insignia-products.com
NS-HDTUNE LCD display HD radio broadcast display When receiving an HD radio broadcast, the following information appears on the LCD. 1 6 7 23 4 5 # Description 1 Shows the frequency band, AM, FM1, or FM2. 2 Station call letters 3 HD radio broadcast indicator 4 Signal strength 5 Broadcast frequency 6 Artist 7 Song title or radio show title 10 www.insignia-products.com
User Manual (English)
Page 15
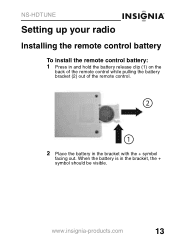
NS-HDTUNE Setting up your radio Installing the remote control battery To install the remote control battery: 1 Press in and hold the battery release clip (1) on the back of the remote control while pulling the battery bracket (2) out of the remote control. 2 1 2 Place the battery in the bracket, the + symbol should be visible. When the battery is in the bracket with the + symbol facing out. www.insignia-products.com 13
NS-HDTUNE Setting up your radio Installing the remote control battery To install the remote control battery: 1 Press in and hold the battery release clip (1) on the back of the remote control while pulling the battery bracket (2) out of the remote control. 2 1 2 Place the battery in the bracket, the + symbol should be visible. When the battery is in the bracket with the + symbol facing out. www.insignia-products.com 13

User Manual (English)
Page 16
... power cord To connect the power cord: • Plug the power cord into place. NS-HDTUNE 3 Push the battery bracket into the battery compartment until it clicks into a power outlet. Power cord 14 www.insignia-products.com The battery is a CR2025 3 V battery. • Dispose of the same type and voltage. Notes • If the remote control only works within a short distance from your radio, replace...
... power cord To connect the power cord: • Plug the power cord into place. NS-HDTUNE 3 Push the battery bracket into the battery compartment until it clicks into a power outlet. Power cord 14 www.insignia-products.com The battery is a CR2025 3 V battery. • Dispose of the same type and voltage. Notes • If the remote control only works within a short distance from your radio, replace...

User Manual (English)
Page 17
... adjust the antennas to get the best reception. Turning on power Your radio has a POWER ON/OFF switch on power: • After you connect the power cord, slide the POWER ON/OFF switch to the ON position. The Power button on the front of your radio in standby mode, but they do not turn on the back. FM antenna AM antenna 2 Fully extend the antenna wires. To turn off power. NS-HDTUNE Connecting the antennas To connect the antennas: 1 Connect the FM antenna...
... adjust the antennas to get the best reception. Turning on power Your radio has a POWER ON/OFF switch on power: • After you connect the power cord, slide the POWER ON/OFF switch to the ON position. The Power button on the front of your radio in standby mode, but they do not turn on the back. FM antenna AM antenna 2 Fully extend the antenna wires. To turn off power. NS-HDTUNE Connecting the antennas To connect the antennas: 1 Connect the FM antenna...

User Manual (English)
Page 18
... connect to a sound system using a coaxial audio cable: 1 Make sure that matches the audio output jack you connected your radio to. 16 www.insignia-products.com NS-HDTUNE Connecting to a sound system You can connect your radio. Coaxial audio cable 3 Connect the other end of the cable to the COAXIAL IN jack on a sound system. 4 Reconnect the power cables, then turn on your radio and the sound system. 5 Select the audio input on your sound system that your radio and the sound system are turned off and the power...
... connect to a sound system using a coaxial audio cable: 1 Make sure that matches the audio output jack you connected your radio to. 16 www.insignia-products.com NS-HDTUNE Connecting to a sound system You can connect your radio. Coaxial audio cable 3 Connect the other end of the cable to the COAXIAL IN jack on a sound system. 4 Reconnect the power cables, then turn on your radio and the sound system. 5 Select the audio input on your sound system that your radio and the sound system are turned off and the power...

User Manual (English)
Page 19
Optical audio cable 3 Connect the other end of the cable to the OPTICAL IN jack on a sound system. 4 Reconnect the power cables, then turn on your radio and the sound system. 5 Select the audio input on your sound system that your radio and the sound system are turned off and the power cords are unplugged. 2 Connect one end of a coaxial audio cable to the OPTICAL jack on the back of your radio to a sound system using an optical audio cable: 1 Make sure that matches the audio output jack you connected your radio. www.insignia-products.com 17 NS-HDTUNE To connect to .
Optical audio cable 3 Connect the other end of the cable to the OPTICAL IN jack on a sound system. 4 Reconnect the power cables, then turn on your radio and the sound system. 5 Select the audio input on your sound system that your radio and the sound system are turned off and the power cords are unplugged. 2 Connect one end of a coaxial audio cable to the OPTICAL jack on the back of your radio to a sound system using an optical audio cable: 1 Make sure that matches the audio output jack you connected your radio. www.insignia-products.com 17 NS-HDTUNE To connect to .

User Manual (English)
Page 20
NS-HDTUNE To connect to . 18 www.insignia-products.com Standard AV audio cable 3 Connect the other end of the cable to the LINE IN or AV AUDIO IN jacks on a sound system. 4 Reconnect the power cables, then turn on your radio and the sound system. 5 Select the audio input on your sound system that your radio and the sound system are turned off and the power cords are unplugged. 2 Connect one end of a standard AV...
NS-HDTUNE To connect to . 18 www.insignia-products.com Standard AV audio cable 3 Connect the other end of the cable to the LINE IN or AV AUDIO IN jacks on a sound system. 4 Reconnect the power cables, then turn on your radio and the sound system. 5 Select the audio input on your sound system that your radio and the sound system are turned off and the power cords are unplugged. 2 Connect one end of a standard AV...
User Manual (English)
Page 21
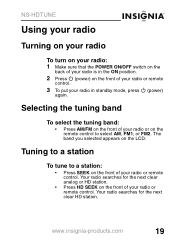
... remote control. 3 To put your radio or remote control. Your radio searches for the next clear HD station. www.insignia-products.com 19 Tuning to a station To tune to select AM, FM1, or FM2. The band you selected appears on the LCD. NS-HDTUNE Using your radio Turning on your radio To turn on your radio: 1 Make sure that the POWER ON/OFF switch on the back of your radio is in standby mode, press (power...
... remote control. 3 To put your radio or remote control. Your radio searches for the next clear HD station. www.insignia-products.com 19 Tuning to a station To tune to select AM, FM1, or FM2. The band you selected appears on the LCD. NS-HDTUNE Using your radio Turning on your radio To turn on your radio: 1 Make sure that the POWER ON/OFF switch on the back of your radio is in standby mode, press (power...
User Manual (English)
Page 22
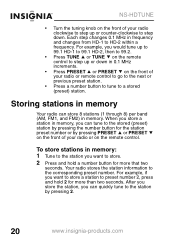
... frequency and changes from HD-1 to the corresponding preset number. NS-HDTUNE • Turn the tuning knob on the front of your radio clockwise to step up or down . Each step changes 0.1 MHz in 0.1 MHz increments. • Press PRESET or PRESET on the front of your radio or remote control to go to the next or previous preset station. • Press a number button to tune to a stored (preset) station. To store stations...
... frequency and changes from HD-1 to the corresponding preset number. NS-HDTUNE • Turn the tuning knob on the front of your radio clockwise to step up or down . Each step changes 0.1 MHz in 0.1 MHz increments. • Press PRESET or PRESET on the front of your radio or remote control to go to the next or previous preset station. • Press a number button to tune to a stored (preset) station. To store stations...
User Manual (English)
Page 23
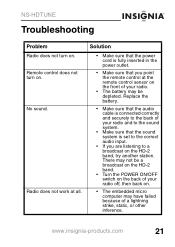
....insignia-products.com 21 Solution • Make sure that the power cord is set to the correct audio input. • If you point the remote control at all. There may not be depleted. NS-HDTUNE Troubleshooting Problem Radio does not turn on. Radio does not work at the remote control sensor on . • The embedded micro computer may be a broadcast on the HD-2 band. • Turn the POWER ON/OFF switch on...
....insignia-products.com 21 Solution • Make sure that the power cord is set to the correct audio input. • If you point the remote control at all. There may not be depleted. NS-HDTUNE Troubleshooting Problem Radio does not turn on. Radio does not work at the remote control sensor on . • The embedded micro computer may be a broadcast on the HD-2 band. • Turn the POWER ON/OFF switch on...

User Manual (English)
Page 25
... that may cause harmful interference to provide reasonable protection against harmful interference in accordance with the instructions, may cause undesired operation. This equipment has been tested and found to which can radiate radio frequency energy and, if not installed and used in a residential installation. If this device must accept any interference received, including interference that to comply within the...
... that may cause harmful interference to provide reasonable protection against harmful interference in accordance with the instructions, may cause undesired operation. This equipment has been tested and found to which can radiate radio frequency energy and, if not installed and used in a residential installation. If this device must accept any interference received, including interference that to comply within the...

User Manual (English)
Page 28
... • Commercial use • Modification of any part of protection as is or with a screen 25 inches or larger, call 1-888-BESTBUY. If you place the Product in ). This warranty is the warranty valid? This warranty does not cover: • Customer instruction • Installation • Set up adjustments • Cosmetic damage • Damage due to service the Product •...
... • Commercial use • Modification of any part of protection as is or with a screen 25 inches or larger, call 1-888-BESTBUY. If you place the Product in ). This warranty is the warranty valid? This warranty does not cover: • Customer instruction • Installation • Set up adjustments • Cosmetic damage • Damage due to service the Product •...

Warranty (English)
Page 1
...the same amount of protection as you received with new or rebuilt comparable products or parts. This warranty is determined to be defective by an authorized Insignia repair center or store personnel, Insignia will have an Insignia-approved repair person dispatched to your home. HOW LONG DOES ...store location, take your original receipt and the product to the address listed on the receipt you own your purchase of the product ("Warranty Period"). WHERE IS THE WARRANTY VALID? This warranty does not cover: • Customer instruction • Installation • Set up adjustments ...
...the same amount of protection as you received with new or rebuilt comparable products or parts. This warranty is determined to be defective by an authorized Insignia repair center or store personnel, Insignia will have an Insignia-approved repair person dispatched to your home. HOW LONG DOES ...store location, take your original receipt and the product to the address listed on the receipt you own your purchase of the product ("Warranty Period"). WHERE IS THE WARRANTY VALID? This warranty does not cover: • Customer instruction • Installation • Set up adjustments ...


