Quick Setup Guide (English)
Page 4
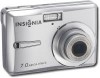
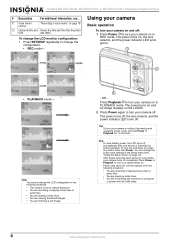
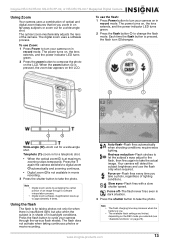
... mode. 4 Press any button except POWER to turn on the LCD display. Use PLAYBACK mode to a computer or printer with the USB cable Changing the mode You can change the power save setting in REC mode. Power-saving function To save battery power, the LCD monitor automatically turns off one minute, power turns off completely. The power save feature will not activate while you are: • Recording or playing movie clips or audio files • Playing a slideshow • Connecting the camera to replay, delete, or edit images on the display. to switch...
... mode. 4 Press any button except POWER to turn on the LCD display. Use PLAYBACK mode to a computer or printer with the USB cable Changing the mode You can change the power save setting in REC mode. Power-saving function To save battery power, the LCD monitor automatically turns off one minute, power turns off completely. The power save feature will not activate while you are: • Recording or playing movie clips or audio files • Playing a slideshow • Connecting the camera to replay, delete, or edit images on the display. to switch...
Quick Setup Guide (English)
Page 7
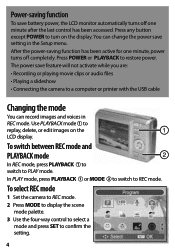
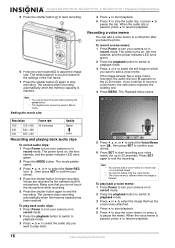
... through images quickly. Digital zoom cannot be used in the focus area . Connecting the camera to a computer There are stored, [No image] appears on the display. 2 Press to see the previous image or to see the next image. Use the zoom button to PLAYBACK mode. Note: The camera will automatically stop recording. Recording video clips 1 Turn the power on. 2 Press the SCN button to display the mode screen, then select the MOVIE mode. 3 Center your subject in Movie mode. 5 Press the shutter button...
... through images quickly. Digital zoom cannot be used in the focus area . Connecting the camera to a computer There are stored, [No image] appears on the display. 2 Press to see the previous image or to see the next image. Use the zoom button to PLAYBACK mode. Note: The camera will automatically stop recording. Recording video clips 1 Turn the power on. 2 Press the SCN button to display the mode screen, then select the MOVIE mode. 3 Center your subject in Movie mode. 5 Press the shutter button...
User Manual (English)
Page 3
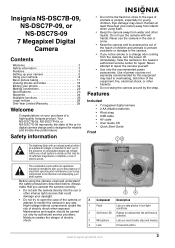
... children. Before using flash. • Keep the camera away from the camera, turn the power off immediately. Take the camera to constitute a risk of important operating and maintenance (servicing) instructions in low-light conditions. Insignia NS-DSC7B-09, NS-DSC7P-09, or NS-DSC7S-09 7 Megapixel Digital Camera Contents Welcome 3 Safety information 3 Features 3 Setting up your camera 5 Using your camera 8 Basic picture taking 11 Viewing photos and video 18 Editing your photos 19 Making connections 22 Specifications 23 Appendix 24 Available functions 25 Legal...
... children. Before using flash. • Keep the camera away from the camera, turn the power off immediately. Take the camera to constitute a risk of important operating and maintenance (servicing) instructions in low-light conditions. Insignia NS-DSC7B-09, NS-DSC7P-09, or NS-DSC7S-09 7 Megapixel Digital Camera Contents Welcome 3 Safety information 3 Features 3 Setting up your camera 5 Using your camera 8 Basic picture taking 11 Viewing photos and video 18 Editing your photos 19 Making connections 22 Specifications 23 Appendix 24 Available functions 25 Legal...

User Manual (English)
Page 4
... to open the camera menu system to let you change camera settings. 4 Power indicator LED Lights green when the camera is on. 5 Flash button Press to cycle through the available flash options. 6 SET/DISP button In REC or PLAYBACK mode, press to install batteries and an optional memory card. Attach the carrying strap (included) to a TV or computer. Use to mount the camera to take a photo. Press to a tripod. 4 www.insignia-products.com Open to change the LCD monitor view. Back Insignia NS...
... to open the camera menu system to let you change camera settings. 4 Power indicator LED Lights green when the camera is on. 5 Flash button Press to cycle through the available flash options. 6 SET/DISP button In REC or PLAYBACK mode, press to install batteries and an optional memory card. Attach the carrying strap (included) to a TV or computer. Use to mount the camera to take a photo. Press to a tripod. 4 www.insignia-products.com Open to change the LCD monitor view. Back Insignia NS...

User Manual (English)
Page 6
... power on page 18 to add a date stamp to change the settings continuously. See "Setting the date stamp" on . 2 Press PLAY, then press MENU. Note If the batteries are removed for all settings, then press SET or MENU to select SETUP, then press SET. Insignia NS-DSC7B-09, NS-DSC7P-09, or NS-DSC7S-09 7 Megapixel Digital Camera Making initial settings When using the camera. The Date & Time menu opens with the year highlighted. 4 Press or to select Date & Time, then press SET. The initial menu is displayed...
... power on page 18 to add a date stamp to change the settings continuously. See "Setting the date stamp" on . 2 Press PLAY, then press MENU. Note If the batteries are removed for all settings, then press SET or MENU to select SETUP, then press SET. Insignia NS-DSC7B-09, NS-DSC7P-09, or NS-DSC7S-09 7 Megapixel Digital Camera Making initial settings When using the camera. The Date & Time menu opens with the year highlighted. 4 Press or to select Date & Time, then press SET. The initial menu is displayed...
User Manual (English)
Page 7
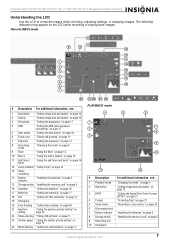
... 17 5 Date stamp "Setting the date stamp" on page 18 6 Focus area "Taking still pictures" on page 11 7 Exposure "Setting the exposure" on page 17 8 Recording mode "Changing the mode" on page 9 9 Flash "Using the flash" on page 13 10 Macro "Using the macro feature" on page 14 11 Self-timer/ Burst "Using the self-timer and burst" on page 14 12 Zoom indicator "Using Zoom" on page 13 13 Shots remaining 14 Battery indicator "Installing the batteries" on page 5 15 Storage media "Installing the memory card" on...
... 17 5 Date stamp "Setting the date stamp" on page 18 6 Focus area "Taking still pictures" on page 11 7 Exposure "Setting the exposure" on page 17 8 Recording mode "Changing the mode" on page 9 9 Flash "Using the flash" on page 13 10 Macro "Using the macro feature" on page 14 11 Self-timer/ Burst "Using the self-timer and burst" on page 14 12 Zoom indicator "Using Zoom" on page 13 13 Shots remaining 14 Battery indicator "Installing the batteries" on page 5 15 Storage media "Installing the memory card" on...
User Manual (English)
Page 8
... . Power save battery power, the LCD turns off . The power turns on page 16 12 Captured date and Shows the date and time that the photo time was taken. Tips To turn your camera on the LCD . 2 Press Power again to change the configuration. • REC mode- OR - Insignia NS-DSC7B-09, NS-DSC7P-09, or NS-DSC7S-09 7 Megapixel Digital Camera # Description For additional information, see "Using the Setup menu" on in PLAYBACK mode. The power turns off, the lens retracts, and the power indicator...
... . Power save battery power, the LCD turns off . The power turns on page 16 12 Captured date and Shows the date and time that the photo time was taken. Tips To turn your camera on the LCD . 2 Press Power again to change the configuration. • REC mode- OR - Insignia NS-DSC7B-09, NS-DSC7P-09, or NS-DSC7S-09 7 Megapixel Digital Camera # Description For additional information, see "Using the Setup menu" on in PLAYBACK mode. The power turns off, the lens retracts, and the power indicator...

User Manual (English)
Page 9
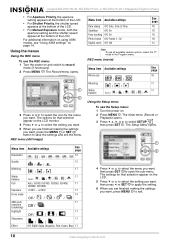
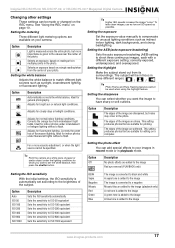
... setting. www.insignia-products.com 9 Landscape For wide, scenic photos. Increases black and white contrast. 3 Press , , , or to display the scene mode palette. For recording movie clips. The scene mode palette opens. Sharpens the image to help capture the subject's smile. Voice REC For recording audio clips. Lets you take a still image of food. Icon Scene mode Description Program Movie The camera automatically makes settings suitable for recording sunset images. Sunset Backlight Enhances the red...
... setting. www.insignia-products.com 9 Landscape For wide, scenic photos. Increases black and white contrast. 3 Press , , , or to display the scene mode palette. For recording movie clips. The scene mode palette opens. Sharpens the image to help capture the subject's smile. Voice REC For recording audio clips. Lets you take a still image of food. Icon Scene mode Description Program Movie The camera automatically makes settings suitable for recording sunset images. Sunset Backlight Enhances the red...
User Manual (English)
Page 10
..., Negative, Red, Green, Blue 17 10 www.insignia-products.com REC menu (still image) Using the Setup menu To use the REC menu: 1 Turn the power on the LCD monitor. 4 Press or to select the setting you want. 5 When you are finished making the settings you want . The initial menu (Record or Playback) opens. 3 Press , , , or to record mode (if necessary). 2 Press MENU . REC menu (movie) Menu item Available settings Movie size See page 16 Metering 17 White 17 balance 3 Press...
..., Negative, Red, Green, Blue 17 10 www.insignia-products.com REC menu (still image) Using the Setup menu To use the REC menu: 1 Turn the power on the LCD monitor. 4 Press or to select the setting you want. 5 When you are finished making the settings you want . The initial menu (Record or Playback) opens. 3 Press , , , or to record mode (if necessary). 2 Press MENU . REC menu (movie) Menu item Available settings Movie size See page 16 Metering 17 White 17 balance 3 Press...

User Manual (English)
Page 11
...created" error. • Series-Stores the latest used file number whether deleting files or inserting a new memory card. • Reset-Resets file numbering each time the memory card is too slow, the image may be blurred. www.insignia-products.com 11 Insignia NS-DSC7B-09, NS-DSC7P-09, or NS-DSC7S-09 7 Megapixel Digital Camera Setup menu Menu item Sounds Auto Review Power Save Date & Time Language File No. Lets you set the battery type to turn off . • Volume-Adjusts the volume of the shutter sound, startup sound, beep, and playback sound. See "Setting the date stamp" on the LCD...
...created" error. • Series-Stores the latest used file number whether deleting files or inserting a new memory card. • Reset-Resets file numbering each time the memory card is too slow, the image may be blurred. www.insignia-products.com 11 Insignia NS-DSC7B-09, NS-DSC7P-09, or NS-DSC7S-09 7 Megapixel Digital Camera Setup menu Menu item Sounds Auto Review Power Save Date & Time Language File No. Lets you set the battery type to turn off . • Volume-Adjusts the volume of the shutter sound, startup sound, beep, and playback sound. See "Setting the date stamp" on the LCD...
User Manual (English)
Page 12
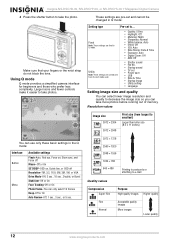
... values Image size 3072 × 2304 3072 × 2048 Print size (from the last mode used. • Quality: S.Fine • Highlight: Off • Metering: Multi • Sharpness: Normal • White balance: Auto • Effect: Off • ISO: Auto • Date Stamp: Date & Time • Exposure: Auto • Digital Zoom: Off • AEB: Off • Shutter sound • File No. • Startup sound • TV out • Power save • USB • Date & Time • Startup image • Utility setting • Language Setting image size...
... values Image size 3072 × 2304 3072 × 2048 Print size (from the last mode used. • Quality: S.Fine • Highlight: Off • Metering: Multi • Sharpness: Normal • White balance: Auto • Effect: Off • ISO: Auto • Date Stamp: Date & Time • Exposure: Auto • Digital Zoom: Off • AEB: Off • Shutter sound • File No. • Startup sound • TV out • Power save • USB • Date & Time • Startup image • Utility setting • Language Setting image size...
User Manual (English)
Page 13
...-angle shot. Red-eye reduction-Flash strobes to let the subject's eyes adjust to the flash, then fires again to compose the photo on the LCD. The power turns on, the lens extends, and the power indicator LED turns green. 2 Press the zoom button to take a photo, regardless of the camera. Digital zoom achieves magnification levels up to take the photo. Slow sync-Flash fires with a slow shutter speed. When the zoom button is not available in record mode. To use the flash only...
...-angle shot. Red-eye reduction-Flash strobes to let the subject's eyes adjust to the flash, then fires again to compose the photo on the LCD. The power turns on, the lens extends, and the power indicator LED turns green. 2 Press the zoom button to take a photo, regardless of the camera. Digital zoom achieves magnification levels up to take the photo. Slow sync-Flash fires with a slow shutter speed. When the zoom button is not available in record mode. To use the flash only...

User Manual (English)
Page 14
... power indicator LED turns green. 14 www.insignia-products.com The power turns on a level, stable surface. Double-Press the shutter button for 10 seconds. Note When using the self-timer, make sure that lets you focus on the LCD monitor. 2 Open the Record menu by pressing MENU . Selecting a lower aperture value (a larger lens opening ) brings the background into focus. Use burst to record a series of photos. To use the aperture priority setting: 1 Press Power to turn your camera on in record mode. Using ASM settings Using...
... power indicator LED turns green. 14 www.insignia-products.com The power turns on a level, stable surface. Double-Press the shutter button for 10 seconds. Note When using the self-timer, make sure that lets you focus on the LCD monitor. 2 Open the Record menu by pressing MENU . Selecting a lower aperture value (a larger lens opening ) brings the background into focus. Use burst to record a series of photos. To use the aperture priority setting: 1 Press Power to turn your camera on in record mode. Using ASM settings Using...

User Manual (English)
Page 15
... shutter button to take the photo. The power turns on in record mode. Using the manual exposure setting In this mode you can set the aperture and shutter speed for the best photo. 4 Press the shutter button to take the photo. The mode palette opens. 3 Press , , , or to select the Movie icon , then press SET to enter the camera. Note The larger the aperture value, the smaller the lens opening, allowing less light to confirm your camera on , the lens extends, and the power indicator LED turns green...
... shutter button to take the photo. The power turns on in record mode. Using the manual exposure setting In this mode you can set the aperture and shutter speed for the best photo. 4 Press the shutter button to take the photo. The mode palette opens. 3 Press , , , or to select the Movie icon , then press SET to enter the camera. Note The larger the aperture value, the smaller the lens opening, allowing less light to confirm your camera on , the lens extends, and the power indicator LED turns green...
User Manual (English)
Page 16
... MENU. Setting the movie size 4 Press to start recording. 6 Press the zoom button to adjust the image size. The power turns on in Movie mode. Resolution Frame rate Quality 16:9 720 × 400 30 frames/sec. 640 640 × 480 320 320 × 240 Higher Lower Recording and playing back audio clips To record audio clips: 1 Press Power to turn your camera on , the lens extends, and the power indicator LED turns green. 2 Press the playback button to switch...
... MENU. Setting the movie size 4 Press to start recording. 6 Press the zoom button to adjust the image size. The power turns on in Movie mode. Resolution Frame rate Quality 16:9 720 × 400 30 frames/sec. 640 640 × 480 320 320 × 240 Higher Lower Recording and playing back audio clips To record audio clips: 1 Press Power to turn your camera on , the lens extends, and the power indicator LED turns green. 2 Press the playback button to switch...
User Manual (English)
Page 17
.... Corrects the green hue of the photo. Setting the exposure Set the exposure value manually to shoot three continuous images, each with a different exposure setting: correctly exposed, underexposed, and overexposed. Adjusts for cloudy days or twilight conditions. Insignia NS-DSC7B-09, NS-DSC7P-09, or NS-DSC7S-09 7 Megapixel Digital Camera Changing other settings These settings can be made or changed on page 10. See "Using the REC menu" on the REC menu. Selects an exposure, based on...
.... Corrects the green hue of the photo. Setting the exposure Set the exposure value manually to shoot three continuous images, each with a different exposure setting: correctly exposed, underexposed, and overexposed. Adjusts for cloudy days or twilight conditions. Insignia NS-DSC7B-09, NS-DSC7P-09, or NS-DSC7S-09 7 Megapixel Digital Camera Changing other settings These settings can be made or changed on page 10. See "Using the REC menu" on the REC menu. Selects an exposure, based on...
User Manual (English)
Page 18
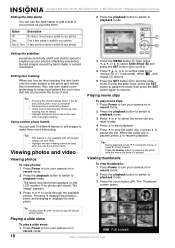
... AF area shows green, focus is powered by hand shake or subject movement. Viewing photos and video Viewing photos To view photos: 1 Press Power to turn on in record mode. 2 Press the playback button to switch to playback mode. Playing a slide show : 1 Press Power to playback mode. Option Description Off Date Date & Time No date or time stamp is added to your photos Only a date stamp is added to your camera on the LCD monitor. Tips • • • • Pressing the shutter halfway down...
... AF area shows green, focus is powered by hand shake or subject movement. Viewing photos and video Viewing photos To view photos: 1 Press Power to turn on in record mode. 2 Press the playback button to switch to playback mode. Playing a slide show : 1 Press Power to playback mode. Option Description Off Date Date & Time No date or time stamp is added to your photos Only a date stamp is added to your camera on the LCD monitor. Tips • • • • Pressing the shutter halfway down...

User Manual (English)
Page 19
... view the photo in record mode. 2 Press the playback button to switch to playback mode. 3 Press or to select the photo to which you want to add the special effects. 4 Press the MENU button, then press , , , or to select Photo Edit and press SET to confirm. 5 Press or to select an effects option, then press SET again to a memory card. Insignia NS-DSC7B-09, NS-DSC7P-09, or NS-DSC7S-09 7 Megapixel Digital Camera...
... view the photo in record mode. 2 Press the playback button to switch to playback mode. 3 Press or to select the photo to which you want to add the special effects. 4 Press the MENU button, then press , , , or to select Photo Edit and press SET to confirm. 5 Press or to select an effects option, then press SET again to a memory card. Insignia NS-DSC7B-09, NS-DSC7P-09, or NS-DSC7S-09 7 Megapixel Digital Camera...
User Manual (English)
Page 21
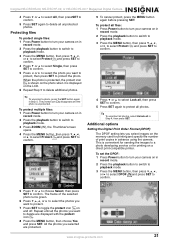
... SET to confirm. When the photo is protected, the protect icon is shown on and off. To protect multiple files: 1 Press Power button to turn your camera on in Step 5. To protect all files: 1 Press Power button to turn your camera on in record mode. 2 Press the playback button to switch to playback mode. 3 Press ZOOM (W), the Thumbnail screen opens. 4 Press the MENU button, then press , , , or to select Protect and press SET to protect all in record mode. 2 Press the playback button to switch to playback mode. 3 Press the MENU button...
... SET to confirm. When the photo is protected, the protect icon is shown on and off. To protect multiple files: 1 Press Power button to turn your camera on in Step 5. To protect all files: 1 Press Power button to turn your camera on in record mode. 2 Press the playback button to switch to playback mode. 3 Press ZOOM (W), the Thumbnail screen opens. 4 Press the MENU button, then press , , , or to select Protect and press SET to protect all in record mode. 2 Press the playback button to switch to playback mode. 3 Press the MENU button...
User Manual (English)
Page 23
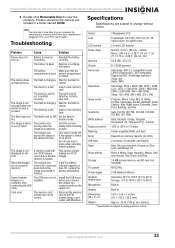
.... This camera cannot display non-DCIF images. new card. The memory is charging. Do not use macro mode when shooting distant subjects. Cannot transfer images to change without notice. www.insignia-products.com 23 The memory is inserted incorrectly. Specifications Specifications are subject to not take pictures. Battery is full. Wait for the flash to 40 cm. A memory card with Windows. Recorded images are located in .~3.28 ft. (40 cm~1m) Aperture f/2.8 (W) / f/5.2 (T) Shutter 8~1/2000 seconds File format Still Image: EXIF 2.2-compatible format (JPEG...
.... This camera cannot display non-DCIF images. new card. The memory is charging. Do not use macro mode when shooting distant subjects. Cannot transfer images to change without notice. www.insignia-products.com 23 The memory is inserted incorrectly. Specifications Specifications are subject to not take pictures. Battery is full. Wait for the flash to 40 cm. A memory card with Windows. Recorded images are located in .~3.28 ft. (40 cm~1m) Aperture f/2.8 (W) / f/5.2 (T) Shutter 8~1/2000 seconds File format Still Image: EXIF 2.2-compatible format (JPEG...


