User Manual (English)
Page 2
...the first time 8 Changing camera modes 8 Turning Simple mode on or off 8 Taking photos 9 Using the zoom 9 Using the flash 9 Using the self-timer 10 Using the macro feature 10 Using face tracking 10 Recording video 11 Viewing photos and videos 11 Viewing photos 11 Viewing videos 11 Zooming photos in Playback mode 12 Using the thumbnail view 12 Erasing photos and videos 12 Erasing photos or videos using the delete button 12 Using the Record menu 12 Setting the quality 12 Setting the resolution 13 Setting ISO 14 Setting the color balance 14 Turning the stabilizer function on...
...the first time 8 Changing camera modes 8 Turning Simple mode on or off 8 Taking photos 9 Using the zoom 9 Using the flash 9 Using the self-timer 10 Using the macro feature 10 Using face tracking 10 Recording video 11 Viewing photos and videos 11 Viewing photos 11 Viewing videos 11 Zooming photos in Playback mode 12 Using the thumbnail view 12 Erasing photos and videos 12 Erasing photos or videos using the delete button 12 Using the Record menu 12 Setting the quality 12 Setting the resolution 13 Setting ISO 14 Setting the color balance 14 Turning the stabilizer function on...

User Manual (English)
Page 3
... videos 17 Copying photos and videos to a memory card 17 Viewing a slideshow of photos 18 Using the Setup menu 19 Turning alert sounds on or off 19 Turning Quick View on or off 19 Imprinting the date and time on photos 19 Setting the date and time 20 Turning Power Save on or off 20 Using the Tools menu 21 Setting the menu language 21 Setting the battery type 21 Turning help text on or off 22 Resetting settings to the factory defaults 22 Transferring files to a computer 23 Troubleshooting 23 Specifications...
... videos 17 Copying photos and videos to a memory card 17 Viewing a slideshow of photos 18 Using the Setup menu 19 Turning alert sounds on or off 19 Turning Quick View on or off 19 Imprinting the date and time on photos 19 Setting the date and time 20 Turning Power Save on or off 20 Using the Tools menu 21 Setting the menu language 21 Setting the battery type 21 Turning help text on or off 22 Resetting settings to the factory defaults 22 Transferring files to a computer 23 Troubleshooting 23 Specifications...
User Manual (English)
Page 6
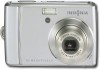
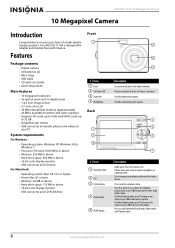
...; Digital camera • AA batteries (2) • Wrist strap • USB cable • CD with User Guide • Quick Setup Guide Main features • 10 megapixel resolution • 3x optical zoom and 5x digital zoom • 1/2.3 inch image sensor • 2.7-inch color LCD • 32 MB internal flash memory (approximately 20 MB is activated. Press to your camera is designed for photo/video capture. Used for reliable and trouble-free performance. Records audio during video capture. Your NS-DSC1110A is processing photos...
...; Digital camera • AA batteries (2) • Wrist strap • USB cable • CD with User Guide • Quick Setup Guide Main features • 10 megapixel resolution • 3x optical zoom and 5x digital zoom • 1/2.3 inch image sensor • 2.7-inch color LCD • 32 MB internal flash memory (approximately 20 MB is activated. Press to your camera is designed for photo/video capture. Used for reliable and trouble-free performance. Records audio during video capture. Your NS-DSC1110A is processing photos...

User Manual (English)
Page 7
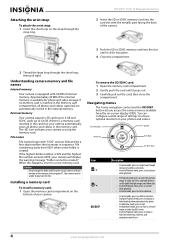
... away from the battery compartment. # Item 1 USB connector 2 Strap ring Description Lets you hear audio recorded during video capture. Press to start or stop a video recording. See "Navigating menus" on page 4. For more information, see "Installing a memory card" on page 4. For more information, see "Installing the batteries" on -screen menus. 10 Megapixel Camera # Item 6 4-way navigation button 7 MENU button Description The Macro, Face Tracking, Self-Timer, and Flash buttons are also used to navigate...
... away from the battery compartment. # Item 1 USB connector 2 Strap ring Description Lets you hear audio recorded during video capture. Press to start or stop a video recording. See "Navigating menus" on page 4. For more information, see "Installing a memory card" on page 4. For more information, see "Installing the batteries" on -screen menus. 10 Megapixel Camera # Item 6 4-way navigation button 7 MENU button Description The Macro, Face Tracking, Self-Timer, and Flash buttons are also used to navigate...
User Manual (English)
Page 8
... a wide range of internal memory. If no memory card is using your camera is inserted in the memory card compartment, all photos and videos in the internal memory. The icon indicates your PC. Installing a memory card To install a memory card: 1 Open the memory card compartment on -screen display (OSD). Caution Do not change the folder and file names in sequence. Face tracking/Up OK/DISP Macro/Left Flash/Right Self-Timer/Down Item / / OK/DISP Description • In menu mode, press to navigate up...
... a wide range of internal memory. If no memory card is using your camera is inserted in the memory card compartment, all photos and videos in the internal memory. The icon indicates your PC. Installing a memory card To install a memory card: 1 Open the memory card compartment on -screen display (OSD). Caution Do not change the folder and file names in sequence. Face tracking/Up OK/DISP Macro/Left Flash/Right Self-Timer/Down Item / / OK/DISP Description • In menu mode, press to navigate up...
User Manual (English)
Page 9
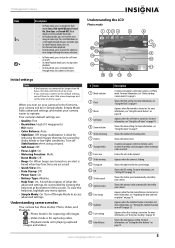
... images and videos. # Item 1 Mode indicator 2 Flash 3 Macro 4 Self-timer 5 Zoom indicator 6 Shots remaining 7 Battery 8 Storage media 9 Focus area 10 Shake warning 11 Histogram 12 ISO 13 Shutter speed 14 Aperture value 15 Date stamp 16 Stabilizer 17 Face tracking 18 Color Balance Description A camera icon appears when your camera is for longer than 48 hours, the date and time must be in Photo mode. Simple Mode hides advanced settings and makes your camera easier to access advanced settings. Understanding camera modes Your camera has three modes: Photo, Video...
... images and videos. # Item 1 Mode indicator 2 Flash 3 Macro 4 Self-timer 5 Zoom indicator 6 Shots remaining 7 Battery 8 Storage media 9 Focus area 10 Shake warning 11 Histogram 12 ISO 13 Shutter speed 14 Aperture value 15 Date stamp 16 Stabilizer 17 Face tracking 18 Color Balance Description A camera icon appears when your camera is for longer than 48 hours, the date and time must be in Photo mode. Simple Mode hides advanced settings and makes your camera easier to access advanced settings. Understanding camera modes Your camera has three modes: Photo, Video...
User Manual (English)
Page 10
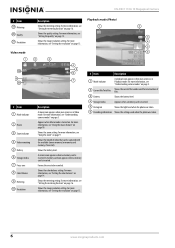
... a memory card is inserted. Shows the quality setting. Playback mode (Photo) # Item 1 Mode indicator 2 Macro 3 Zoom indicator 4 Video remaining 5 Battery 6 Storage media 7 Focus area 8 Color Balance 9 Metering 10 Resolution Description A movie icon appears when your camera is in Playback mode. Shows the battery level. Shows the length of files. # Item 19 Metering 20 Quality 21 Resolution Video mode NS-DSC1110A 10 Megapixel Camera Description Shows the metering setting. For more information, see "Using the macro feature" on page 9. Shows the color balance setting. For...
... a memory card is inserted. Shows the quality setting. Playback mode (Photo) # Item 1 Mode indicator 2 Macro 3 Zoom indicator 4 Video remaining 5 Battery 6 Storage media 7 Focus area 8 Color Balance 9 Metering 10 Resolution Description A movie icon appears when your camera is in Playback mode. Shows the battery level. Shows the length of files. # Item 19 Metering 20 Quality 21 Resolution Video mode NS-DSC1110A 10 Megapixel Camera Description Shows the metering setting. For more information, see "Using the macro feature" on page 9. Shows the color balance setting. For...
User Manual (English)
Page 11
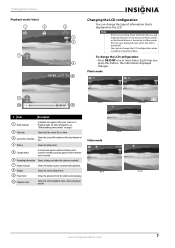
... control video playback. 8 Volume Shows the current volume level. To change the LCD configuration when recording or playing videos. OSD off www.insigniaproducts.com 7 A memory card icon appears when a memory card is turned off. You cannot change the LCD configuration: • Press OK/DISP one or more information, see "Understanding camera modes" on 9 Played time Shows the amount of information that the current file is inserted. Notes • • If the Face tracking, Flash, Self-timer, Macro...
... control video playback. 8 Volume Shows the current volume level. To change the LCD configuration when recording or playing videos. OSD off www.insigniaproducts.com 7 A memory card icon appears when a memory card is turned off. You cannot change the LCD configuration: • Press OK/DISP one or more information, see "Understanding camera modes" on 9 Played time Shows the amount of information that the current file is inserted. Notes • • If the Face tracking, Flash, Self-timer, Macro...

User Manual (English)
Page 12
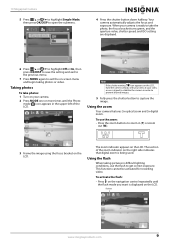
... the LCD. -Photo mode icon. -Video mode icon. -Playback mode icon. Playback mode NS-DSC1110A 10 Megapixel Camera 2 Press / or / to highlight . The Select Time and Date screen opens. The Setup menu opens. 8 www.insigniaproducts.com Tip You can press and hold POWER until the Insignia startup image appears. Simple mode hides advanced user settings and less frequently used menu options, while still letting you need to choose a menu language and set the hour, then press / to move to select a mode. To choose a menu language and set the date and time: 1 Turn...
... the LCD. -Photo mode icon. -Video mode icon. -Playback mode icon. Playback mode NS-DSC1110A 10 Megapixel Camera 2 Press / or / to highlight . The Select Time and Date screen opens. The Setup menu opens. 8 www.insigniaproducts.com Tip You can press and hold POWER until the Insignia startup image appears. Simple mode hides advanced user settings and less frequently used menu options, while still letting you need to choose a menu language and set the hour, then press / to move to select a mode. To choose a menu language and set the date and time: 1 Turn...
User Manual (English)
Page 13
... focus bracket turns green, and the aperture value, shutter speed, and ISO setting are displayed. 6 Press / or / to highlight Off or On, then press OK/DISP to save the setting and exit to the previous menu. 7 Press MENU again to open the submenu. 4 Press the shutter button down halfway. To use the flash to zoom in the upper-left of the zoom indicator on the LCD. This function cannot be activated for recording video. Taking photos To take photos: 1 Turn...
... focus bracket turns green, and the aperture value, shutter speed, and ISO setting are displayed. 6 Press / or / to highlight Off or On, then press OK/DISP to save the setting and exit to the previous menu. 7 Press MENU again to open the submenu. 4 Press the shutter button down halfway. To use the flash to zoom in the upper-left of the zoom indicator on the LCD. This function cannot be activated for recording video. Taking photos To take photos: 1 Turn...
User Manual (English)
Page 14
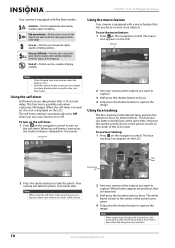
... lighting conditions. Flash off . Macro icon Notes • • Flash charging time may take a photo, regardless of the screen turns green. 4 Fully press the shutter button to capture the image. This function is equipped with five flash modes: Auto flash-Flash fires automatically when shooting conditions require extra lighting. Self-timer icon 2 Aim your camera at the subject you want to focus. Using face tracking The face tracking mode detects faces and sets the camera to turn on the self-timer: 1 Press on the navigation control...
... lighting conditions. Flash off . Macro icon Notes • • Flash charging time may take a photo, regardless of the screen turns green. 4 Fully press the shutter button to capture the image. This function is equipped with five flash modes: Auto flash-Flash fires automatically when shooting conditions require extra lighting. Self-timer icon 2 Aim your camera at the subject you want to focus. Using face tracking The face tracking mode detects faces and sets the camera to turn on the self-timer: 1 Press on the navigation control...
User Manual (English)
Page 16
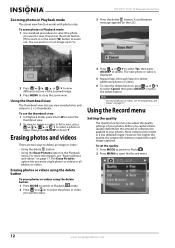
... press the delete button. NS-DSC1110A 10 Megapixel Camera 3 Press the delete button. Note To erase all photos or videos. Using the Record menu Setting the quality The Quality function lets you adjust the quality settings of the zoomed image. 3 Press MENU to close the delete function, press / or / to open the Record menu. 12 www.insigniaproducts.com Erasing photos or videos using the delete button To erase photos or videos using the delete button: 1 Press MODE to switch to Playback mode. 2 Press / or / to delete additional photos or videos. 6 To close the zoom view. For more...
... press the delete button. NS-DSC1110A 10 Megapixel Camera 3 Press the delete button. Note To erase all photos or videos. Using the Record menu Setting the quality The Quality function lets you adjust the quality settings of the zoomed image. 3 Press MENU to close the delete function, press / or / to open the Record menu. 12 www.insigniaproducts.com Erasing photos or videos using the delete button To erase photos or videos using the delete button: 1 Press MODE to switch to Playback mode. 2 Press / or / to delete additional photos or videos. 6 To close the zoom view. For more...
User Manual (English)
Page 18
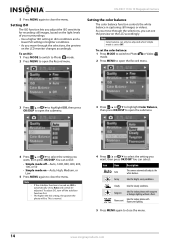
... a lower ISO setting in capturing still images or videos. You can see the preview on the LCD monitor changes accordingly. Note Color balance can select: Icon Item Auto Auto Description The camera automatically adjusts the white balance. To adjust ISO, turn off -Auto, 1600, 800, 400, 200, 100, or 50 • Simple mode on , ISO is turned on -Auto, High, Medium, or Low 5 Press MENU again to Auto and cannot be . NS-DSC1110A 10 Megapixel Camera 5 Press MENU again to...
... a lower ISO setting in capturing still images or videos. You can see the preview on the LCD monitor changes accordingly. Note Color balance can select: Icon Item Auto Auto Description The camera automatically adjusts the white balance. To adjust ISO, turn off -Auto, 1600, 800, 400, 200, 100, or 50 • Simple mode on , ISO is turned on -Auto, High, Medium, or Low 5 Press MENU again to Auto and cannot be . NS-DSC1110A 10 Megapixel Camera 5 Press MENU again to...
User Manual (English)
Page 20
... a balanced exposure reading. NS-DSC1110A 10 Megapixel Camera An icon that corresponds to select the setting you want, then press OK/DISP. To turn burst mode on the left side of photos. To set to the subject matter at the center. • Multi-Divides the image into several zones and measures the light in each zone for continuous shooting of the LCD. Setting the metering function This feature controls exposure metering...
... a balanced exposure reading. NS-DSC1110A 10 Megapixel Camera An icon that corresponds to select the setting you want, then press OK/DISP. To turn burst mode on the left side of photos. To set to the subject matter at the center. • Multi-Divides the image into several zones and measures the light in each zone for continuous shooting of the LCD. Setting the metering function This feature controls exposure metering...
User Manual (English)
Page 21
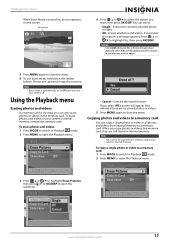
... screen. Photos are captured in your camera off. To erase photos and videos: 1 Press MODE to switch to Playback mode. 2 Press MENU to open the Playback menu. • Cancel-Cancels the erase function If you want to save before you turn your camera's internal memory, remove the memory card. Note Burst mode is automatically set to close the menu. 6 To use burst mode, hold down the shutter button. Using the Playback menu Erasing photos and videos If a memory card is inserted, you copy photos or videos to open the Playback menu. 3 Press / or / to highlight Erase Pictures...
... screen. Photos are captured in your camera off. To erase photos and videos: 1 Press MODE to switch to Playback mode. 2 Press MENU to open the Playback menu. • Cancel-Cancels the erase function If you want to save before you turn your camera's internal memory, remove the memory card. Note Burst mode is automatically set to close the menu. 6 To use burst mode, hold down the shutter button. Using the Playback menu Erasing photos and videos If a memory card is inserted, you copy photos or videos to open the Playback menu. 3 Press / or / to highlight Erase Pictures...
User Manual (English)
Page 23
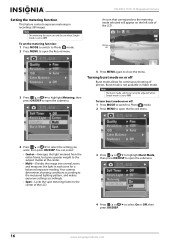
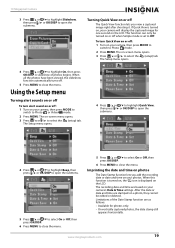
... function automatically turns off : 1 Turn on or off . 5 Press MENU to Photo mode. 2 Press MENU. The recording date and time are based on photos The Date Stamp function lets you view a captured image right after shooting it. This function can only be edited or deleted. Imprinting the date and time on your camera will display the captured image for photos only. • On vertically captured photos, the date stamp still appears horizontally. Using the Setup menu Turning alert sounds on or off To turn Quick View...
... function automatically turns off : 1 Turn on or off . 5 Press MENU to Photo mode. 2 Press MENU. The recording date and time are based on photos The Date Stamp function lets you view a captured image right after shooting it. This function can only be edited or deleted. Imprinting the date and time on your camera will display the captured image for photos only. • On vertically captured photos, the date stamp still appears horizontally. Using the Setup menu Turning alert sounds on or off To turn Quick View...
User Manual (English)
Page 24
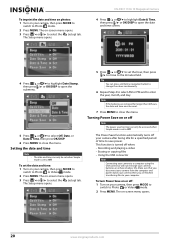
... a computer using the USB connector will not recharge your camera's batteries or enhance battery life. Setting the date and time Note • The date and time can only be accessed when Simple mode is turned off Note The power save power. Note If the batteries are finished transferring files to Photo or Video mode. 2 Press MENU. The Power Save function automatically turns off : 1 Turn on your camera, then press MODE to switch to enter the year, month, and day. NS-DSC1110A 10 Megapixel Camera...
... a computer using the USB connector will not recharge your camera's batteries or enhance battery life. Setting the date and time Note • The date and time can only be accessed when Simple mode is turned off Note The power save power. Note If the batteries are finished transferring files to Photo or Video mode. 2 Press MENU. The Power Save function automatically turns off : 1 Turn on your camera, then press MODE to switch to enter the year, month, and day. NS-DSC1110A 10 Megapixel Camera...
User Manual (English)
Page 27
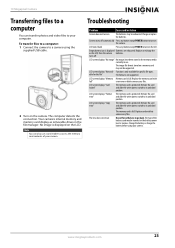
... of your camera. Change the battery or charge the battery before using the supplied USB cable. 2 Turn on the LCD. Your camera's internal memory and memory card display as removable drives in use a card reader to a camera using your camera. The image file format stored on the camera. Function is not supported. able for this file" File format is only available for specific file types. Replace card or delete unnecessary files. 10 Megapixel Camera Transferring files to a computer You can also use . Remove the card error" and slide the write-protect switch to your...
... of your camera. Change the battery or charge the battery before using the supplied USB cable. 2 Turn on the LCD. Your camera's internal memory and memory card display as removable drives in use a card reader to a camera using your camera. The image file format stored on the camera. Function is not supported. able for this file" File format is only available for specific file types. Replace card or delete unnecessary files. 10 Megapixel Camera Transferring files to a computer You can also use . Remove the card error" and slide the write-protect switch to your...
User Manual (English)
Page 28
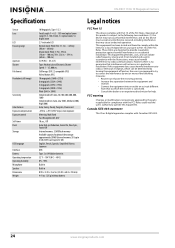
...98 × 2.38 × 3.62 in a particular installation. NS-DSC1110A 10 Megapixel Camera Specifications Sensor Lens LCD Focusing range Aperture Shutter File format Resolution (still image) Sensitivity Color balance Exposure compensation Exposure control Self-timer Flash Storage OSD language Interface Battery Operating temperature Operating humidity Microphone Speaker Dimensions Weight 10 Megapixels, Type: 1/2.3 Focal Length: F = 6.3 - 18.9 mm (optical zoom range 35.5 - 106.5 mm), 3× optical zoom, 5× digital zoom 2.7-inch color LCD Normal mode: Wide/Tele: 31.5 in. ~ infinity (80...
...98 × 2.38 × 3.62 in a particular installation. NS-DSC1110A 10 Megapixel Camera Specifications Sensor Lens LCD Focusing range Aperture Shutter File format Resolution (still image) Sensitivity Color balance Exposure compensation Exposure control Self-timer Flash Storage OSD language Interface Battery Operating temperature Operating humidity Microphone Speaker Dimensions Weight 10 Megapixels, Type: 1/2.3 Focal Length: F = 6.3 - 18.9 mm (optical zoom range 35.5 - 106.5 mm), 3× optical zoom, 5× digital zoom 2.7-inch color LCD Normal mode: Wide/Tele: 31.5 in. ~ infinity (80...
User Manual (English)
Page 29
... and parts charges. This feature is a trademark of their respective owners. INSIGNIA is only available to Insignia television consumers residing in its original packaging or packaging that provides the same amount of protection as the original packaging. This warranty lasts as long as fuses or batteries • Products where the factory applied serial number has been altered or removed REPAIR REPLACEMENT AS...
... and parts charges. This feature is a trademark of their respective owners. INSIGNIA is only available to Insignia television consumers residing in its original packaging or packaging that provides the same amount of protection as the original packaging. This warranty lasts as long as fuses or batteries • Products where the factory applied serial number has been altered or removed REPAIR REPLACEMENT AS...


