

User Manual (English)
Page 2
Contents CHILD SAFETY 1 Important Safety Instructions 2 WARNING 2 CAUTION 3 Introduction 4 Installing the stand or wall-mount bracket 5 Installing the stand 5 Installing a wall-mount bracket 5 TV components 6 Package contents 6 Front 6 Side 7 Back 7 Remote control 8 Making connections 9 What connection should I use 9 Connecting power 10 Connecting a cable or satellite box 10 ...
Contents CHILD SAFETY 1 Important Safety Instructions 2 WARNING 2 CAUTION 3 Introduction 4 Installing the stand or wall-mount bracket 5 Installing the stand 5 Installing a wall-mount bracket 5 TV components 6 Package contents 6 Front 6 Side 7 Back 7 Remote control 8 Making connections 9 What connection should I use 9 Connecting power 10 Connecting a cable or satellite box 10 ...
User Manual (English)
Page 5
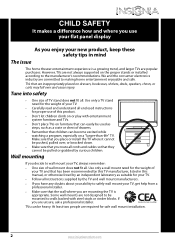
... your TV, always remember: • One size of wall mount does not fit all. Wall mounting If you route all . TVs that they cannot be heavy. Some wall mounts are not designed to be mounted to safely wall mount your TV and that has been recommended by an independent ...for your TV. • Follow all instructions supplied by the TV and wall mount manufacturers. • If you are committed to the manufacturer's recommendations. Use only a wall mount rated for safe wall mount installation. However, TVs are inappropriately placed on the proper stands or installed ...
... your TV, always remember: • One size of wall mount does not fit all. Wall mounting If you route all . TVs that they cannot be heavy. Some wall mounts are not designed to be mounted to safely wall mount your TV and that has been recommended by an independent ...for your TV. • Follow all instructions supplied by the TV and wall mount manufacturers. • If you are committed to the manufacturer's recommendations. Use only a wall mount rated for safe wall mount installation. However, TVs are inappropriately placed on the proper stands or installed ...
User Manual (English)
Page 9
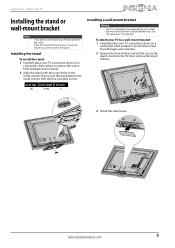
...type Screw length # of screws M5 16 mm 4 Installing a wall-mount bracket Warning This TV is intended to be supported by a UL Listed wall mount bracket with suitable weight/load. (See "Miscellaneous" on page 48.) To attach your TV to a wall-mount bracket: 1 Carefully place your TV screen face-down on a cushioned... the stand column, then secure the stand plate to the TV, then remove the stand column. 3 Install the stand cover. Insignia 55" 1080p LCD TV Installing the stand or wall-mount bracket Notes • • If you decide to wall-mount your TV, do not install the stand.
...type Screw length # of screws M5 16 mm 4 Installing a wall-mount bracket Warning This TV is intended to be supported by a UL Listed wall mount bracket with suitable weight/load. (See "Miscellaneous" on page 48.) To attach your TV to a wall-mount bracket: 1 Carefully place your TV screen face-down on a cushioned... the stand column, then secure the stand plate to the TV, then remove the stand column. 3 Install the stand cover. Insignia 55" 1080p LCD TV Installing the stand or wall-mount bracket Notes • • If you decide to wall-mount your TV, do not install the stand.

User Manual (English)
Page 10
... mode). 7 Remote control sensor Receives signals from the remote control. NS-55L260A13 Insignia 55" 1080p LCD TV 4 Attach the wall-mount bracket to your TV using the mounting holes on the back of the wall-mount screws vary depending on the wall-mount bracket you purchased. In menu mode, press to increase or decrease... to select a video input source. Do not block. 6 www.insigniaproducts.com See the instructions that came with the wall-mount bracket for screw lengths. • The mounting holes on the back of your TV take type M6 screws. 15.75 in. (400 mm) TV components Package ...
... mode). 7 Remote control sensor Receives signals from the remote control. NS-55L260A13 Insignia 55" 1080p LCD TV 4 Attach the wall-mount bracket to your TV using the mounting holes on the back of the wall-mount screws vary depending on the wall-mount bracket you purchased. In menu mode, press to increase or decrease... to select a video input source. Do not block. 6 www.insigniaproducts.com See the instructions that came with the wall-mount bracket for screw lengths. • The mounting holes on the back of your TV take type M6 screws. 15.75 in. (400 mm) TV components Package ...
User Manual (English)
Page 52
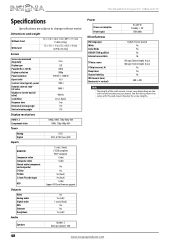
NS-55L260A13 Insignia 55" 1080p LCD TV Specifications Specifications are subject to change without notice. Dimensions and weight Without stand With stand 52 × 31.8 × 4.6 in. (132 &#... Power consumption Power input Miscellaneous OSD languages INlink Game Mode ENERGY STAR qualified Internet connectable TV base screws V-Chip (version 2.0) Sleep timer Channel labeling VESA mount (mm) (horizontal × vertical) On: 285 W Standby: list value Brightness (center typical) cd/m2 Comb filter Response time Horizontal viewing angle Vertical viewing angle 55...
NS-55L260A13 Insignia 55" 1080p LCD TV Specifications Specifications are subject to change without notice. Dimensions and weight Without stand With stand 52 × 31.8 × 4.6 in. (132 &#... Power consumption Power input Miscellaneous OSD languages INlink Game Mode ENERGY STAR qualified Internet connectable TV base screws V-Chip (version 2.0) Sleep timer Channel labeling VESA mount (mm) (horizontal × vertical) On: 285 W Standby: list value Brightness (center typical) cd/m2 Comb filter Response time Horizontal viewing angle Vertical viewing angle 55...

Quick Setup Guide (English)
Page 1
...provided in the Product Search eld, then click Search. Front features 55" 1080p LCD TV QUICK SETUP GUIDE NS-55L260A13 Thank You for connecting devices. Connecting an antenna/cable wall jack Connect a coaxial cable to come Power Remote indicator control sensor Installing the stand 1 Carefully place your ...in the stand column, then secure the stand plate to the stand column with the wall-mount bracket for years to the ANT/CABLE jack on the back of this ne Insignia television. Identifying cables Your TV has several connection types for purchasing this product for information...
...provided in the Product Search eld, then click Search. Front features 55" 1080p LCD TV QUICK SETUP GUIDE NS-55L260A13 Thank You for connecting devices. Connecting an antenna/cable wall jack Connect a coaxial cable to come Power Remote indicator control sensor Installing the stand 1 Carefully place your ...in the stand column, then secure the stand plate to the stand column with the wall-mount bracket for years to the ANT/CABLE jack on the back of this ne Insignia television. Identifying cables Your TV has several connection types for purchasing this product for information...
Important Information (English)
Page 2
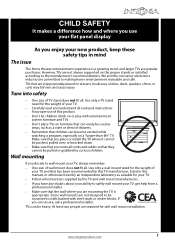
...TV stand rated for the weight of your TV. • Carefully read and understand all enclosed instructions for safe wall mount installation. 2 www.insigniaproducts.com Use only a wall mount rated for your TV. • Follow all instructions supplied by an independent laboratory as a crate or chest of...8226; Don't let children climb on or play with steel studs or cinder blocks. Make sure that has been recommended by curious children. Wall mounting If you are inappropriately placed on a "larger-than-life" TV. TVs can become excited while watching a program, especially on dressers, ...
...TV stand rated for the weight of your TV. • Carefully read and understand all enclosed instructions for safe wall mount installation. 2 www.insigniaproducts.com Use only a wall mount rated for your TV. • Follow all instructions supplied by an independent laboratory as a crate or chest of...8226; Don't let children climb on or play with steel studs or cinder blocks. Make sure that has been recommended by curious children. Wall mounting If you are inappropriately placed on a "larger-than-life" TV. TVs can become excited while watching a program, especially on dressers, ...

Important Information (English)
Page 6
Digital audio WiFi Ethernet Headphone 1 coaxial (back) No No Yes (side) Audio Speakers Number: 2 Watts per channel: 10W Power Power consumption Power input On: 285 W Standby:
Digital audio WiFi Ethernet Headphone 1 coaxial (back) No No Yes (side) Audio Speakers Number: 2 Watts per channel: 10W Power Power consumption Power input On: 285 W Standby:


