
User Manual (English)
Page 2
...INlink 4 Installing the stand or wall-mount bracket 4 Installing the stand 4 Installing a wall-mount bracket 4 TV components 5 Package contents 5 Front 5 Side 6 Remote control 7 Making connections 8 What connection should I use 8 Connecting power 9 Connecting a cable or satellite box 9 Connecting an antenna or cable TV (no box...basic home theater system 17 Connecting a home theater system with multiple devices 18 Using the remote control 19 Installing remote control batteries 19 Aiming the remote control 19 Turning on your TV for the first time 19 Understanding the basics 21 ...
...INlink 4 Installing the stand or wall-mount bracket 4 Installing the stand 4 Installing a wall-mount bracket 4 TV components 5 Package contents 5 Front 5 Side 6 Remote control 7 Making connections 8 What connection should I use 8 Connecting power 9 Connecting a cable or satellite box 9 Connecting an antenna or cable TV (no box...basic home theater system 17 Connecting a home theater system with multiple devices 18 Using the remote control 19 Installing remote control batteries 19 Aiming the remote control 19 Turning on your TV for the first time 19 Understanding the basics 21 ...
User Manual (English)
Page 4
... to obtain warranty service 50 Where is the warranty valid 50 What does the warranty not cover 50 iv www.insigniaproducts.com Insignia Televisions 50 Definitions 50 How long does the coverage last 50 What does this warranty cover 50 How to USB mode 42 ... 44 Cleaning the TV cabinet 44 Cleaning the TV screen 44 Troubleshooting 44 Video and audio 44 Remote control 46 General 46 Specifications 47 Programming universal remote controls 48 Programming a different universal remote control 48 Common universal remote control codes 48 Legal notices 49 One-year limited warranty -
... to obtain warranty service 50 Where is the warranty valid 50 What does the warranty not cover 50 iv www.insigniaproducts.com Insignia Televisions 50 Definitions 50 How long does the coverage last 50 What does this warranty cover 50 How to USB mode 42 ... 44 Cleaning the TV cabinet 44 Cleaning the TV screen 44 Troubleshooting 44 Video and audio 44 Remote control 46 General 46 Specifications 47 Programming universal remote controls 48 Programming a different universal remote control 48 Common universal remote control codes 48 Legal notices 49 One-year limited warranty -
User Manual (English)
Page 6
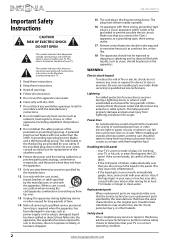
NS-40L240A13 Important Safety Instructions CAUTION RISK OF ELECTRIC SHOCK DO NOT OPEN This symbol indicates that dangerous voltage constituting a risk of the obsolete outlet. 10 Protect ... when it can fall into your outlet, consult an electrician for replacement of electric shock is a Class I apparatus to a grounding-type, three-prong outlet. 17 Remote control batteries should not be exposed to excessive heat such as sunshine, fire, or the like. 18 The apparatus should not be grounded to be...
NS-40L240A13 Important Safety Instructions CAUTION RISK OF ELECTRIC SHOCK DO NOT OPEN This symbol indicates that dangerous voltage constituting a risk of the obsolete outlet. 10 Protect ... when it can fall into your outlet, consult an electrician for replacement of electric shock is a Class I apparatus to a grounding-type, three-prong outlet. 17 Remote control batteries should not be exposed to excessive heat such as sunshine, fire, or the like. 18 The apparatus should not be grounded to be...
User Manual (English)
Page 9
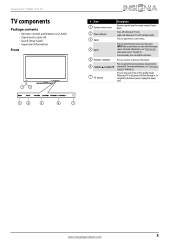
... next or previous channel in the 6 CHANNELS/CHANNELT channel list. To completely disconnect power, unplug the power cord. Insignia 40" 1080p LCD TV TV components Package contents • Remote control and batteries (2 AAA) • Stand and screws (4) • Quick Setup Guide • Important Information ...Front 12 3 4 5 6 7 # Item Description 1 Remote control sensor 2 Power indicator 3 MENU Receives signals from the remote control. Turns off (standby mode). When your TV on or off when your TV is on page 21. For...
... next or previous channel in the 6 CHANNELS/CHANNELT channel list. To completely disconnect power, unplug the power cord. Insignia 40" 1080p LCD TV TV components Package contents • Remote control and batteries (2 AAA) • Stand and screws (4) • Quick Setup Guide • Important Information ...Front 12 3 4 5 6 7 # Item Description 1 Remote control sensor 2 Power indicator 3 MENU Receives signals from the remote control. Turns off (standby mode). When your TV on or off when your TV is on page 21. For...
User Manual (English)
Page 11
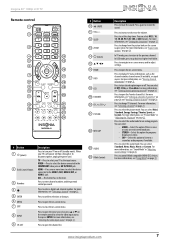
... 7 For more information, see "Selecting the video input source" on page 21. Press to open the Input source list, press S or T on the remote control to select the video input source, then press ENTER. To disconnect power, unplug the power cord. Press to a higher level folder. For more information..., see "Aspect ratio options" on page 24. Press to turn your TV as the channel number, channel name (if available), or signal source. Insignia 40" 1080p LCD TV Remote control * # Button 10 /MUTE 11 VOL+/- 12 SLEEP 13 ZOOM 14 (return) 15 S T W X 16 HOME 17 INFO 18 CCD 19 FAVORITE...
... 7 For more information, see "Selecting the video input source" on page 21. Press to open the Input source list, press S or T on the remote control to select the video input source, then press ENTER. To disconnect power, unplug the power cord. Press to a higher level folder. For more information..., see "Aspect ratio options" on page 24. Press to turn your TV as the channel number, channel name (if available), or signal source. Insignia 40" 1080p LCD TV Remote control * # Button 10 /MUTE 11 VOL+/- 12 SLEEP 13 ZOOM 14 (return) 15 S T W X 16 HOME 17 INFO 18 CCD 19 FAVORITE...
User Manual (English)
Page 23
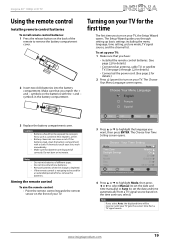
... batteries into the battery compartment. The Setup Wizard guides you through setting up your TV: 1 Make sure that you have: • Installed the remote control batteries. (See page 19 for details.) • Connected an antenna, cable TV, or satellite TV. (See page 9 through 12 for details...Setup Wizard opens. Make sure that you match the + and - Insignia 40" 1080p LCD TV Using the remote control Installing remote control batteries To install remote control batteries: 1 Press the release button on the back of the remote to turn on your TV. To set up basic settings including the...
... batteries into the battery compartment. The Setup Wizard guides you through setting up your TV: 1 Make sure that you have: • Installed the remote control batteries. (See page 19 for details.) • Connected an antenna, cable TV, or satellite TV. (See page 9 through 12 for details...Setup Wizard opens. Make sure that you match the + and - Insignia 40" 1080p LCD TV Using the remote control Installing remote control batteries To install remote control batteries: 1 Press the release button on the back of the remote to turn on your TV. To set up basic settings including the...

User Manual (English)
Page 35
...-digit password. Blocking unrated TV To block unrated TV: 1 Press MENU. The Settings menu opens with Parental Controls highlighted. To lock control buttons: 1 Press MENU. Insignia 40" 1080p LCD TV Locking control buttons When the button lock is 0000, Please change your password. 2 Press W or X to highlight SETTINGS, then press T or... OK ENTER Select Set TV parental controls. The on the side of your TV are locked, and you can only operate your TV using the remote control.
...-digit password. Blocking unrated TV To block unrated TV: 1 Press MENU. The Settings menu opens with Parental Controls highlighted. To lock control buttons: 1 Press MENU. Insignia 40" 1080p LCD TV Locking control buttons When the button lock is 0000, Please change your password. 2 Press W or X to highlight SETTINGS, then press T or... OK ENTER Select Set TV parental controls. The on the side of your TV are locked, and you can only operate your TV using the remote control.
User Manual (English)
Page 43
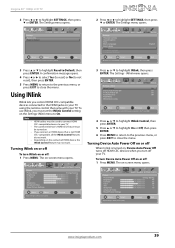
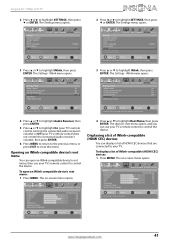
... not HDMI CEC-compatible, all the INlink Control features do not work . The on -screen menu opens. MENU Previous EXIT Exit www.insigniaproducts.com 39 Insignia 40" 1080p LCD TV 2 Press W or X to affect picture quality. EXIT Exit Settings Parental Controls Closed Caption Time Menu Language Input Labels INlink Computer ...MENU. Note • HDMI cables must set the INlink Control setting on options or reset TV to the HDMI jacks on your TV using the remote control that is turned on or off HDMI CEC devices when you connect an HDMI device that came with your TV. The on -screen menu...
... not HDMI CEC-compatible, all the INlink Control features do not work . The on -screen menu opens. MENU Previous EXIT Exit www.insigniaproducts.com 39 Insignia 40" 1080p LCD TV 2 Press W or X to affect picture quality. EXIT Exit Settings Parental Controls Closed Caption Time Menu Language Input Labels INlink Computer ...MENU. Note • HDMI cables must set the INlink Control setting on options or reset TV to the HDMI jacks on your TV using the remote control that is turned on or off HDMI CEC devices when you connect an HDMI device that came with your TV. The on -screen menu...
User Manual (English)
Page 44
... Move OK ENTER Select MENU Previous EXIT Exit Automatically turn on the TV when an HDMI CEC device is set to the TV via HDMI. NS-40L240A13 Insignia 40" 1080p LCD TV 2 Press W or X to control the volume on the audio receiver. The on -screen menu opens. PICTURE AUDIO CHANNELS SETTINGS PHOTOS Settings... and you turn on the connected device) or Off (does not turn on an HDMI CEC device, TV Auto Power On turns on your TV's remote control to highlight SETTINGS, then press T or ENTER. The on -screen menu opens.
... Move OK ENTER Select MENU Previous EXIT Exit Automatically turn on the TV when an HDMI CEC device is set to the TV via HDMI. NS-40L240A13 Insignia 40" 1080p LCD TV 2 Press W or X to control the volume on the audio receiver. The on -screen menu opens. PICTURE AUDIO CHANNELS SETTINGS PHOTOS Settings... and you turn on the connected device) or Off (does not turn on an HDMI CEC device, TV Auto Power On turns on your TV's remote control to highlight SETTINGS, then press T or ENTER. The on -screen menu opens.
User Manual (English)
Page 45
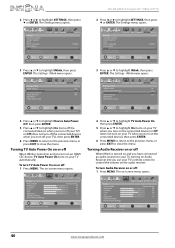
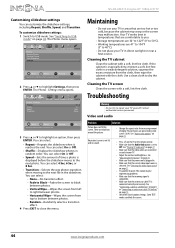
...Tint Sharpness Advanced Video Reset Picture Settings Energy Saving 48 52 68 0 10 Move OK ENTER Select Adjust settings to your TV's remote control to control the device. MENU Previous EXIT Exit www.insigniaproducts.com 41 The Settings menu opens. PICTURE AUDIO CHANNELS SETTINGS PHOTOS...Press MENU to return to the previous menu, or press EXIT to highlight SETTINGS, then press T or ENTER. The on -screen menu opens. Insignia 40" 1080p LCD TV 2 Press W or X to close the menu. EXIT Exit PICTURE AUDIO CHANNELS SETTINGS PHOTOS Settings INlink INlink Control On Device...
...Tint Sharpness Advanced Video Reset Picture Settings Energy Saving 48 52 68 0 10 Move OK ENTER Select Adjust settings to your TV's remote control to control the device. MENU Previous EXIT Exit www.insigniaproducts.com 41 The Settings menu opens. PICTURE AUDIO CHANNELS SETTINGS PHOTOS...Press MENU to return to the previous menu, or press EXIT to highlight SETTINGS, then press T or ENTER. The on -screen menu opens. Insignia 40" 1080p LCD TV 2 Press W or X to close the menu. EXIT Exit PICTURE AUDIO CHANNELS SETTINGS PHOTOS Settings INlink INlink Control On Device...
User Manual (English)
Page 48
...areas that is connected correctly and securely. The Photos · Settings menu opens. See "Playing TV audio only" on the TV or the remote control. • Make sure that the video cables are black bars around the picture. • Change the aspect ratio. The station may ... and audio Problem Solution Picture does not fill the screen. See "Aspect ratio options" on page 21. • Try another channel. NS-40L240A13 Insignia 40" 1080p LCD TV Customizing slideshow settings You can block the screen. 44 www.insigniaproducts.com Troubleshooting Warning Do not try to repair your...
...areas that is connected correctly and securely. The Photos · Settings menu opens. See "Playing TV audio only" on the TV or the remote control. • Make sure that the video cables are black bars around the picture. • Change the aspect ratio. The station may ... and audio Problem Solution Picture does not fill the screen. See "Aspect ratio options" on page 21. • Try another channel. NS-40L240A13 Insignia 40" 1080p LCD TV Customizing slideshow settings You can block the screen. 44 www.insigniaproducts.com Troubleshooting Warning Do not try to repair your...
User Manual (English)
Page 50
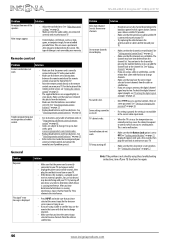
NS-40L240A13 Insignia 40" 1080p LCD TV Problem No output from one device at the remote control sensor on your TV, then turn it further from the TV to eliminate the interference. • Press INPUT and make sure that there are no channels. Remote control Problem Solution Remote control does not work . See "Installing remote... that accompanied your warranty. Solution • Adjust the audio balance. This type of a given station. See "Installing remote control batteries" on page 37. General Problem No power. "No signal" error message is in the current video input...
NS-40L240A13 Insignia 40" 1080p LCD TV Problem No output from one device at the remote control sensor on your TV, then turn it further from the TV to eliminate the interference. • Press INPUT and make sure that there are no channels. Remote control Problem Solution Remote control does not work . See "Installing remote... that accompanied your warranty. Solution • Adjust the audio balance. This type of a given station. See "Installing remote control batteries" on page 37. General Problem No power. "No signal" error message is in the current video input...
User Manual (English)
Page 52
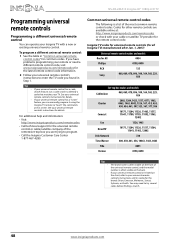
..., and the model number is a list of the remote/set-top box you found in "Common universal remote control codes" for common codes. NS-40L240A13 Insignia 40" 1080p LCD TV Programming universal remote controls Programming a different universal remote control You can manually program it using the Insignia TV remote to "teach" the commands one at : http://www.insigniaproducts.com...
..., and the model number is a list of the remote/set-top box you found in "Common universal remote control codes" for common codes. NS-40L240A13 Insignia 40" 1080p LCD TV Programming universal remote controls Programming a different universal remote control You can manually program it using the Insignia TV remote to "teach" the commands one at : http://www.insigniaproducts.com...
Quick Setup Guide (English)
Page 1
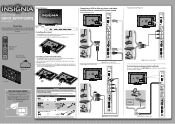
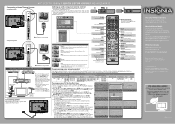
Front features 40" LCD TV 1080p QUICK SETUP GUIDE NS-40L240A13 Thank You for connecting devices. We hope you enjoy the ... the DVI device's jack. You need to attach an HDMI-to-DVI adapter to the end of this ne Insignia television. See the instructions that came with the four provided screws. Using composite cable (good) AUDIO/VIDEO OUT ...Home INFO* ENTER EXI T INPUT CCD CH-LIST FAVORITE + MUTE VOL CH SLEEP ZOOM MTS/SAP PICTURE AUDIO Remote control and 2 AAA batteries NS-RC03A-13 ST5 (14mm) screws (4) Stand cover OR Installing a wall-mount bracket 1 Carefully place your TV...
Front features 40" LCD TV 1080p QUICK SETUP GUIDE NS-40L240A13 Thank You for connecting devices. We hope you enjoy the ... the DVI device's jack. You need to attach an HDMI-to-DVI adapter to the end of this ne Insignia television. See the instructions that came with the four provided screws. Using composite cable (good) AUDIO/VIDEO OUT ...Home INFO* ENTER EXI T INPUT CCD CH-LIST FAVORITE + MUTE VOL CH SLEEP ZOOM MTS/SAP PICTURE AUDIO Remote control and 2 AAA batteries NS-RC03A-13 ST5 (14mm) screws (4) Stand cover OR Installing a wall-mount bracket 1 Carefully place your TV...
Quick Setup Guide (English)
Page 2
... Input source TV AV Component VGA HDMI 1 HDMI 2 HDMI 3 USB Aspect ratio options Normal: Displays the original 4:3 aspect ratio with your new Insignia TV, see the table for analog programs. AUDIO Selects the audio mode. ENTER Con rms selections or changes. A message asks how you connected the...the TV? Need additional help? Connecting a Home Theater System Using digital audio 40" LCD TV 1080p I QUICK SETUP GUIDE I NS-40L240A13 Setting up and using your remote control 1 Press the release button on the back of their respective owners. Using analog audio OPTICAL AUDIO IN Note: Cable is not...
... Input source TV AV Component VGA HDMI 1 HDMI 2 HDMI 3 USB Aspect ratio options Normal: Displays the original 4:3 aspect ratio with your new Insignia TV, see the table for analog programs. AUDIO Selects the audio mode. ENTER Con rms selections or changes. A message asks how you connected the...the TV? Need additional help? Connecting a Home Theater System Using digital audio 40" LCD TV 1080p I QUICK SETUP GUIDE I NS-40L240A13 Setting up and using your remote control 1 Press the release button on the back of their respective owners. Using analog audio OPTICAL AUDIO IN Note: Cable is not...
Important Information (English)
Page 3
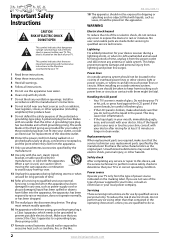
... a Class I apparatus to a grounding-type, three-prong outlet. 17 Remote control batteries should be exposed to excessive heat such as sunshine, fire, or the like. A polarized plug has two blades with three-prong, grounding-type plug is located on the marking label. NS-40L240A13 18 The apparatus should not be grounded to prevent...
... a Class I apparatus to a grounding-type, three-prong outlet. 17 Remote control batteries should be exposed to excessive heat such as sunshine, fire, or the like. A polarized plug has two blades with three-prong, grounding-type plug is located on the marking label. NS-40L240A13 18 The apparatus should not be grounded to prevent...
Important Information (English)
Page 4
...Your TV also contains material that can be regulated for about an hour before switching it states that accompanied your existing universal remote control • See instructions and a table of the antenna-discharge unit, connection to grounding electrodes, and requirements for ...guidance for the grounding electrode. 1 2 3 4 5 7 6 1 Antenna lead-in your TV yourself. Contact authorized service personnel. See "Installing remote control batteries" in damage and will form on , or make sure that the power cord is damaged or frayed. • If liquid has ...
...Your TV also contains material that can be regulated for about an hour before switching it states that accompanied your existing universal remote control • See instructions and a table of the antenna-discharge unit, connection to grounding electrodes, and requirements for ...guidance for the grounding electrode. 1 2 3 4 5 7 6 1 Antenna lead-in your TV yourself. Contact authorized service personnel. See "Installing remote control batteries" in damage and will form on , or make sure that the power cord is damaged or frayed. • If liquid has ...
Important Information (English)
Page 5
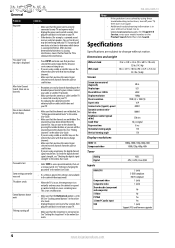
... the online User Guide. See "Setting the sleep timer" in . Specifications Specifications are subject to the channel by using a cable or satellite box, use the remote that came with your TV. LCD 60Hz 1080p 1920 (H) × 1080 (V) 16:9 4000:1 8000:1 350 nits 3d y/c digital 8 ms 178 178 Display ...cabinet creaks Control buttons do not work TV keeps turning off • Make sure that the power cord is in your online User Guide. NS-40L240A13 Notes • • If the problem is not solved by pressing the number buttons or you have determined which device is not turned ...
... the online User Guide. See "Setting the sleep timer" in . Specifications Specifications are subject to the channel by using a cable or satellite box, use the remote that came with your TV. LCD 60Hz 1080p 1920 (H) × 1080 (V) 16:9 4000:1 8000:1 350 nits 3d y/c digital 8 ms 178 178 Display ...cabinet creaks Control buttons do not work TV keeps turning off • Make sure that the power cord is in your online User Guide. NS-40L240A13 Notes • • If the problem is not solved by pressing the number buttons or you have determined which device is not turned ...
Information Brochure (English)
Page 2
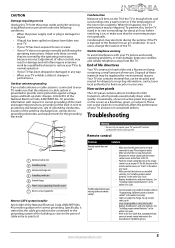
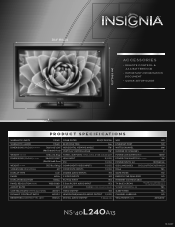
38.6" (98 cm) 40" (101.6 cm) 25.9" (65.9 cm) AC C E S S O R I E S • REMOTE CONTROL & AAA BATTERIES (2) • IMPORTANT INFORMATION DOCUMENT • QUICK SETUP GUIDE P R O D U C T S P E C I F I CAT I O N S WARRANTY-PARTS 1 YEAR COMB FILTER 3D Y/C DIGITAL WARRANTY-LABOR 1 YEAR RESPONSE TIME 8ms ... SCREWS M6 TYPE (12mm LENGTH) (4 pcs) ST5 type (14 mm length) (4 pcs) V-CHIP (VERSION 2.0) YES SLEEP TIMER YES CHANNEL LABELING NO VESA MOUNT (mm) 400x200 NS-40L240A13 12-0407
38.6" (98 cm) 40" (101.6 cm) 25.9" (65.9 cm) AC C E S S O R I E S • REMOTE CONTROL & AAA BATTERIES (2) • IMPORTANT INFORMATION DOCUMENT • QUICK SETUP GUIDE P R O D U C T S P E C I F I CAT I O N S WARRANTY-PARTS 1 YEAR COMB FILTER 3D Y/C DIGITAL WARRANTY-LABOR 1 YEAR RESPONSE TIME 8ms ... SCREWS M6 TYPE (12mm LENGTH) (4 pcs) ST5 type (14 mm length) (4 pcs) V-CHIP (VERSION 2.0) YES SLEEP TIMER YES CHANNEL LABELING NO VESA MOUNT (mm) 400x200 NS-40L240A13 12-0407


