

User Manual (English)
Page 5
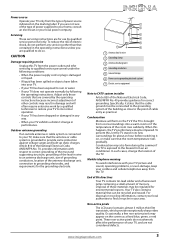
.... If you route all . Use only a wall mount rated for the weight of wall mount does not fit all instructions supplied by this TV manufacturer, listed in mind The issue The home theater entertainment experience is appropriate. TVs can become excited while watching a program, especially on the proper stands or installed according to safely wall mount your TV, get help from a professional installer. • Make sure that...
.... If you route all . Use only a wall mount rated for the weight of wall mount does not fit all instructions supplied by this TV manufacturer, listed in mind The issue The home theater entertainment experience is appropriate. TVs can become excited while watching a program, especially on the proper stands or installed according to safely wall mount your TV, get help from a professional installer. • Make sure that...
User Manual (English)
Page 7
... surroundings for correct grounding. Servicing These servicing instructions are not sure of the type of power supplied to the point of cable entry as a fixed blue, green, or red point. To prevent this, let the TV stand in its normal operation. • If your TV has been dropped or damaged in any servicing other controls may result in the operating instructions unless you are for...
... surroundings for correct grounding. Servicing These servicing instructions are not sure of the type of power supplied to the point of cable entry as a fixed blue, green, or red point. To prevent this, let the TV stand in its normal operation. • If your TV has been dropped or damaged in any servicing other controls may result in the operating instructions unless you are for...
User Manual (English)
Page 8
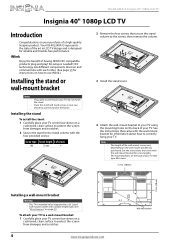
... a wall-mount bracket: 1 Carefully place your purchase of having HDMI CEC compatible products plug and play! See the instructions that came with the wall-mount bracket for reliable and trouble-free performance. See the instructions that came with the wall-mount bracket for instructions on how to use the stand in LCD TV design and is designed for screw lengths. NS-40L240A13 Insignia 40" 1080p LCD TV Insignia 40" 1080p LCD TV Introduction Congratulations on your TV screen face...
... a wall-mount bracket: 1 Carefully place your purchase of having HDMI CEC compatible products plug and play! See the instructions that came with the wall-mount bracket for reliable and trouble-free performance. See the instructions that came with the wall-mount bracket for instructions on how to use the stand in LCD TV design and is designed for screw lengths. NS-40L240A13 Insignia 40" 1080p LCD TV Insignia 40" 1080p LCD TV Introduction Congratulations on your TV screen face...
User Manual (English)
Page 11
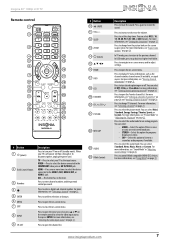
.../SAP # Button 1 (power) 2 Quick Launch Inputs 3 Numbers 4 5 ENTER 6 MENU 7 EXIT 8 INPUT 9 CH-LIST Description Press to confirm selections or changes. Press to turn closed captioning on -screen menu. Press to navigate in "Adjusting sound settings" on -screen menus and to turn your TV is noise or static on page 29. Press to adjust settings. For more information, see "Setting the sleep timer" on or off , power still flows through it. Press to select the picture mode. Press to enter a digital sub-channel number...
.../SAP # Button 1 (power) 2 Quick Launch Inputs 3 Numbers 4 5 ENTER 6 MENU 7 EXIT 8 INPUT 9 CH-LIST Description Press to confirm selections or changes. Press to turn closed captioning on -screen menu. Press to navigate in "Adjusting sound settings" on -screen menus and to turn your TV is noise or static on page 29. Press to adjust settings. For more information, see "Setting the sleep timer" on or off , power still flows through it. Press to select the picture mode. Press to enter a digital sub-channel number...
User Manual (English)
Page 16
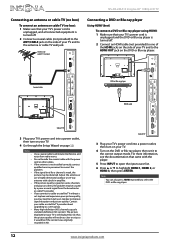
... 3 Plug your TV's power cord into a power outlet, then turn on your TV is still displayed as SD, thus the picture quality will not be as clear or crisp as it to the correct output mode. Contact your TV and to the antenna or cable TV wall jack. Adjust the antenna or use a highly directional outdoor or set-top antenna with a built-in HD. NS-40L240A13 Insignia 40" 1080p LCD TV Connecting an antenna or cable...
... 3 Plug your TV's power cord into a power outlet, then turn on your TV is still displayed as SD, thus the picture quality will not be as clear or crisp as it to the correct output mode. Contact your TV and to the antenna or cable TV wall jack. Adjust the antenna or use a highly directional outdoor or set-top antenna with a built-in HD. NS-40L240A13 Insignia 40" 1080p LCD TV Connecting an antenna or cable...
User Manual (English)
Page 26
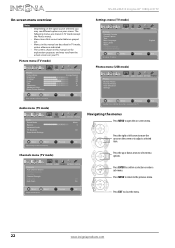
... Channels menu (TV mode) Settings menu (TV mode) Settings Parental Controls Closed Caption Time Menu Language Input Labels INLink Computer Settings Component Settings PICTURE AUDIO CHANNELS SETTINGS PHOTOS English Move OK ENTER Select Set various TV options. Channels Auto Channel Search Add/Skip Channels Favorites Channel Strength Audio only Auto Zoom PICTURE AUDIO CHANNELS SETTINGS PHOTOS Off On Press ENTER to close the menu. 22 www.insigniaproducts.com NS-40L240A13 Insignia 40" 1080p LCD TV On-screen menu overview Notes • • • • Depending on the signal...
... Channels menu (TV mode) Settings menu (TV mode) Settings Parental Controls Closed Caption Time Menu Language Input Labels INLink Computer Settings Component Settings PICTURE AUDIO CHANNELS SETTINGS PHOTOS English Move OK ENTER Select Set various TV options. Channels Auto Channel Search Add/Skip Channels Favorites Channel Strength Audio only Auto Zoom PICTURE AUDIO CHANNELS SETTINGS PHOTOS Off On Press ENTER to close the menu. 22 www.insigniaproducts.com NS-40L240A13 Insignia 40" 1080p LCD TV On-screen menu overview Notes • • • • Depending on the signal...

User Manual (English)
Page 27
... the volume. • Press MUTE to turn the sound back on -screen menu opens. The information banner shows the current program information such as channel number, video input source, and resolution. • Digital channel information-Displays the channel number, station name, channel label, broadcast program name, TV rating, signal type, audio information, resolution, CC mode, current time, and current program start and end times. • Analog channel information-Displays channel number, channel label (if present), signal type, audio information, and resolution. PICTURE AUDIO...
... the volume. • Press MUTE to turn the sound back on -screen menu opens. The information banner shows the current program information such as channel number, video input source, and resolution. • Digital channel information-Displays the channel number, station name, channel label, broadcast program name, TV rating, signal type, audio information, resolution, CC mode, current time, and current program start and end times. • Analog channel information-Displays channel number, channel label (if present), signal type, audio information, and resolution. PICTURE AUDIO...
User Manual (English)
Page 30
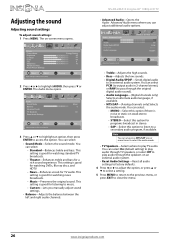
...-Balances treble and bass. This setting is noise or static on -screen menu opens. PICTURE AUDIO CHANNELS SETTINGS PHOTOS Picture Picture Mode Brightness Contrast Color Tint Sharpness Advanced Video Reset Picture Settings Energy Saving 48 52 68 0 10 Move OK ENTER Select Adjust settings to close the menu. 26 www.insigniaproducts.com PICTURE AUDIO CHANNELS SETTINGS PHOTOS Audio • Advanced Audio Bass 50 Treble 50 Digital Audio/SPDIF MTS/SAP Audio Language PCM Stereo English Move OK ENTER Select Adjust low frequency sound. The Audio menu opens.
...-Balances treble and bass. This setting is noise or static on -screen menu opens. PICTURE AUDIO CHANNELS SETTINGS PHOTOS Picture Picture Mode Brightness Contrast Color Tint Sharpness Advanced Video Reset Picture Settings Energy Saving 48 52 68 0 10 Move OK ENTER Select Adjust settings to close the menu. 26 www.insigniaproducts.com PICTURE AUDIO CHANNELS SETTINGS PHOTOS Audio • Advanced Audio Bass 50 Treble 50 Digital Audio/SPDIF MTS/SAP Audio Language PCM Stereo English Move OK ENTER Select Adjust low frequency sound. The Audio menu opens.
User Manual (English)
Page 34
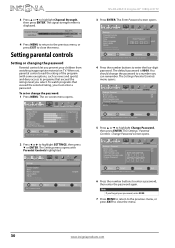
... of the program (with Parental Controls highlighted. PICTURE AUDIO CHANNELS SETTINGS PHOTOS Picture Picture Mode Brightness Contrast Color Tint Sharpness Advanced Video Reset Picture Settings Energy Saving 48 52 68 0 10 Move OK ENTER Select Adjust settings to highlight SETTINGS, then press T or ENTER. The Settings menu opens with some exceptions, such as news and sports) and deny access to enter the four-digit password. Settings Parental Controls Closed Caption Time Menu Language Input Labels INLink Computer Settings Component Settings PICTURE AUDIO CHANNELS SETTINGS PHOTOS Enter...
... of the program (with Parental Controls highlighted. PICTURE AUDIO CHANNELS SETTINGS PHOTOS Picture Picture Mode Brightness Contrast Color Tint Sharpness Advanced Video Reset Picture Settings Energy Saving 48 52 68 0 10 Move OK ENTER Select Adjust settings to highlight SETTINGS, then press T or ENTER. The Settings menu opens with some exceptions, such as news and sports) and deny access to enter the four-digit password. Settings Parental Controls Closed Caption Time Menu Language Input Labels INLink Computer Settings Component Settings PICTURE AUDIO CHANNELS SETTINGS PHOTOS Enter...
User Manual (English)
Page 40
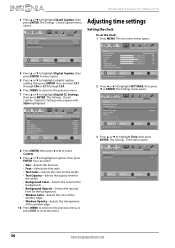
... (digital) programs. EXIT Exit 4 Press S or T to affect picture quality. PICTURE AUDIO CHANNELS SETTINGS PHOTOS Picture Picture Mode Brightness Contrast Color Tint Sharpness Advanced Video Reset Picture Settings Energy Saving 48 52 68 0 10 Move OK ENTER Select Adjust settings to highlight Digital Caption, then press ENTER. The Settings menu opens. You can select CS1 through CS6 or CC1 through CC4. 6 Press MENU to return to the previous menu. 7 Press S or T to close the menu. PICTURE AUDIO CHANNELS SETTINGS PHOTOS Settings Closed Caption Caption Control Analog Caption Digital...
... (digital) programs. EXIT Exit 4 Press S or T to affect picture quality. PICTURE AUDIO CHANNELS SETTINGS PHOTOS Picture Picture Mode Brightness Contrast Color Tint Sharpness Advanced Video Reset Picture Settings Energy Saving 48 52 68 0 10 Move OK ENTER Select Adjust settings to highlight Digital Caption, then press ENTER. The Settings menu opens. You can select CS1 through CS6 or CC1 through CC4. 6 Press MENU to return to the previous menu. 7 Press S or T to close the menu. PICTURE AUDIO CHANNELS SETTINGS PHOTOS Settings Closed Caption Caption Control Analog Caption Digital...
User Manual (English)
Page 48
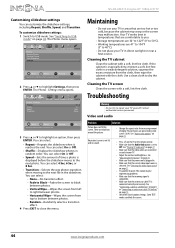
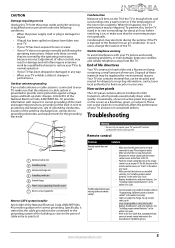
.... Your TV works best in temperatures that is connected to Off. Cleaning the TV screen Clean the screen with a soft, lint-free cloth. Troubleshooting Warning Do not try to USB mode. No picture (screen is not lit) and no box)" on page 12. • Check the closed caption settings. See "Selecting the video input source" on page 24. You can select On or Off. • Shuffle-Displays the slideshow photos...
.... Your TV works best in temperatures that is connected to Off. Cleaning the TV screen Clean the screen with a soft, lint-free cloth. Troubleshooting Warning Do not try to USB mode. No picture (screen is not lit) and no box)" on page 12. • Check the closed caption settings. See "Selecting the video input source" on page 24. You can select On or Off. • Shuffle-Displays the slideshow photos...
User Manual (English)
Page 49
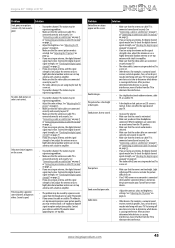
... sound receiver, external speakers, fans, or hair dryers) may be interfering with your TV. Insignia 40" 1080p LCD TV Problem Solution Dark, poor, or no picture (screen is lit), but sound is not too bright. See "Connecting a cable or satellite box" on page 9 or "Connecting an antenna or cable TV (no box)" on page 29. • If you are using an antenna, the digital channel signal may be experiencing problems. No color, dark picture...
... sound receiver, external speakers, fans, or hair dryers) may be interfering with your TV. Insignia 40" 1080p LCD TV Problem Solution Dark, poor, or no picture (screen is lit), but sound is not too bright. See "Connecting a cable or satellite box" on page 9 or "Connecting an antenna or cable TV (no box)" on page 29. • If you are using an antenna, the digital channel signal may be experiencing problems. No color, dark picture...
User Manual (English)
Page 50
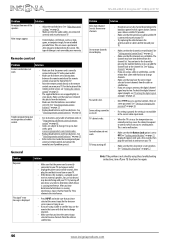
... Button Lock option is set a new password. After you have determined which device is causing interference, move it on again. 46 www.insigniaproducts.com NS-40L240A13 Insignia 40" 1080p LCD TV Problem No output from one device at the remote control sensor on your TV and a power outlet. • Unplug the power cord, wait 60 seconds, then plug the cord back in "Programming a different universal remote control" on page 48. • Codes...
... Button Lock option is set a new password. After you have determined which device is causing interference, move it on again. 46 www.insigniaproducts.com NS-40L240A13 Insignia 40" 1080p LCD TV Problem No output from one device at the remote control sensor on your TV and a power outlet. • Unplug the power cord, wait 60 seconds, then plug the cord back in "Programming a different universal remote control" on page 48. • Codes...

User Manual (English)
Page 51
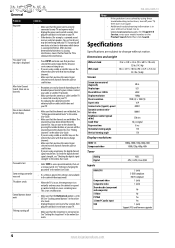
...firmware upgrade Outputs Video Analog audio Digital audio WiFi Ethernet Headphone No Yes 1 coaxial (side) No No Yes Audio Simulated Surround Sound Audyssey Dynamic Volume Sound Leveler Speakers Power Power consumption Power input Miscellaneous OSD languages INlink Game Mode ENERGY STAR qualified Internet connectable TV base screws V-Chip (version 2.0) Sleep timer Channel labeling VESA mount (mm) (horizontal × vertical) Yes No Yes Number: 2 Watts per channel: 8W On: 165 W Standby: Insignia 40" 1080p LCD TV Specifications Specifications are subject to change without notice. list...
...firmware upgrade Outputs Video Analog audio Digital audio WiFi Ethernet Headphone No Yes 1 coaxial (side) No No Yes Audio Simulated Surround Sound Audyssey Dynamic Volume Sound Leveler Speakers Power Power consumption Power input Miscellaneous OSD languages INlink Game Mode ENERGY STAR qualified Internet connectable TV base screws V-Chip (version 2.0) Sleep timer Channel labeling VESA mount (mm) (horizontal × vertical) Yes No Yes Number: 2 Watts per channel: 8W On: 165 W Standby: Insignia 40" 1080p LCD TV Specifications Specifications are subject to change without notice. list...
Quick Setup Guide (English)
Page 1
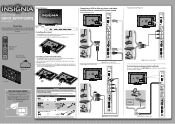
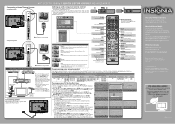
... scratches. 2 Remove the four screws that connects to the best available connection. Using composite cable (good) AUDIO/VIDEO OUT Note: Cable is intended to the ANT/CABLE jack on the back of your model number in the box but is not provided. Connecting an antenna/cable wall jack Connect a coaxial cable to be supported by a UL Listed wall mount bracket. Go to the screen with the wall-mount bracket for years to come TV VIDE HDMI ACC Remote control sensor Power Indicator Installing the stand 1 Carefully place...
... scratches. 2 Remove the four screws that connects to the best available connection. Using composite cable (good) AUDIO/VIDEO OUT Note: Cable is intended to the ANT/CABLE jack on the back of your model number in the box but is not provided. Connecting an antenna/cable wall jack Connect a coaxial cable to be supported by a UL Listed wall mount bracket. Go to the screen with the wall-mount bracket for years to come TV VIDE HDMI ACC Remote control sensor Power Indicator Installing the stand 1 Carefully place...
Quick Setup Guide (English)
Page 2
... owners. Connecting a Home Theater System Using digital audio 40" LCD TV 1080p I QUICK SETUP GUIDE I NS-40L240A13 Setting up and using your remote control 1 Press the release button on the back of the remote to remove the battery compartment cover. 2 Insert two AAA batteries into a power outlet and press the Power button. INSIGNIA is not provided. EXIT Exit Input source TV AV Component VGA HDMI 1 HDMI 2 HDMI 3 USB Aspect ratio options Normal: Displays the original 4:3 aspect ratio with multiple devices Blu-ray player/DVD player/VCR Cable or satellite TV box...
... owners. Connecting a Home Theater System Using digital audio 40" LCD TV 1080p I QUICK SETUP GUIDE I NS-40L240A13 Setting up and using your remote control 1 Press the release button on the back of the remote to remove the battery compartment cover. 2 Insert two AAA batteries into a power outlet and press the Power button. INSIGNIA is not provided. EXIT Exit Input source TV AV Component VGA HDMI 1 HDMI 2 HDMI 3 USB Aspect ratio options Normal: Displays the original 4:3 aspect ratio with multiple devices Blu-ray player/DVD player/VCR Cable or satellite TV box...
Important Information (English)
Page 3
...the cart, stand, tripod, bracket, or table specified by qualified service personnel only. If the screen breaks, be grounded to be careful of broken glass. • If the LCD panel is broken, make sure that the service technician uses replacement parts specified by ...wall plug is left unattended and unused for use attachments/accessories specified by the manufacturer. 12 Use only with them might be exposed to a grounding-type, three-prong outlet. 17 Remote control batteries should be exposed to qualified service technicians. When a cart is located on the apparatus. NS-40L240A13...
...the cart, stand, tripod, bracket, or table specified by qualified service personnel only. If the screen breaks, be grounded to be careful of broken glass. • If the LCD panel is broken, make sure that the service technician uses replacement parts specified by ...wall plug is left unattended and unused for use attachments/accessories specified by the manufacturer. 12 Use only with them might be exposed to a grounding-type, three-prong outlet. 17 Remote control batteries should be exposed to qualified service technicians. When a cart is located on the apparatus. NS-40L240A13...
Important Information (English)
Page 4
...; When the power supply cord or plug is exposed to the breeze from cool surroundings into your TV. • If your TV has been exposed to repair your existing universal remote control • See instructions and a table of common codes in "Programming a different universal remote control" in the online User Guide. • Make sure that the antenna or cable system is connected to change the location of mercury. Troubleshooting Warning Do not...
...; When the power supply cord or plug is exposed to the breeze from cool surroundings into your TV. • If your TV has been exposed to repair your existing universal remote control • See instructions and a table of common codes in "Programming a different universal remote control" in the online User Guide. • Make sure that the antenna or cable system is connected to change the location of mercury. Troubleshooting Warning Do not...
Important Information (English)
Page 5
... Button Lock option is set a new password. See "Setting the sleep timer" in . (98 × 65.9 × 25.5 cm) 35.3 lbs.(16 kg) Screen Screen size measured diagonally Display type Panel 60 Hz vs.120 Hz Display resolution Panel resolution Aspect ratio Contrast ratio (typical)-panel Dynamic contrast ratio- Additional troubleshooting information is in your TV. NS-40L240A13 Notes • • If the problem is not solved by pressing the number buttons or you have the correct input selected to view channels...
... Button Lock option is set a new password. See "Setting the sleep timer" in . (98 × 65.9 × 25.5 cm) 35.3 lbs.(16 kg) Screen Screen size measured diagonally Display type Panel 60 Hz vs.120 Hz Display resolution Panel resolution Aspect ratio Contrast ratio (typical)-panel Dynamic contrast ratio- Additional troubleshooting information is in your TV. NS-40L240A13 Notes • • If the problem is not solved by pressing the number buttons or you have the correct input selected to view channels...

Important Information (English)
Page 6
Outputs Video Analog audio Digital audio WiFi Ethernet Headphone No Yes 1 coaxial (side) No No Yes Audio Speakers Number: 2 Watts per channel: 8W Power Power consumption Power input On: 165 W Standby:
Outputs Video Analog audio Digital audio WiFi Ethernet Headphone No Yes 1 coaxial (side) No No Yes Audio Speakers Number: 2 Watts per channel: 8W Power Power consumption Power input On: 165 W Standby:


