

User Manual (English)
Page 2
... 4 Installing the stand 4 Attaching a wall-mount bracket 5 Connecting the power cord 5 TV components 6 Package contents 6 Cleaning cloth 6 Front 6 Back 7 Remote Control 7 Using the remote control 8 Installing remote control batteries 8 Aiming the remote control 9 Programming a universal remote control to work with your TV . . . . 9 Making connections 10 Connecting the power cord 10 Connecting an antenna, cable TV...
... 4 Installing the stand 4 Attaching a wall-mount bracket 5 Connecting the power cord 5 TV components 6 Package contents 6 Cleaning cloth 6 Front 6 Back 7 Remote Control 7 Using the remote control 8 Installing remote control batteries 8 Aiming the remote control 9 Programming a universal remote control to work with your TV . . . . 9 Making connections 10 Connecting the power cord 10 Connecting an antenna, cable TV...
User Manual (English)
Page 6
..., such as contact with a protective earthing connection. 17 Remote control batteries should not be fatal. This symbol indicates that there are required, make absolutely sure that you connect the class I apparatus. If the screen breaks, be exposed to qualified service personnel. NS-19E430A10/NS-22E430A10 Important safety instructions CAUTION RISK OF ELECTRIC SHOCK DO...
..., such as contact with a protective earthing connection. 17 Remote control batteries should not be fatal. This symbol indicates that there are required, make absolutely sure that you connect the class I apparatus. If the screen breaks, be exposed to qualified service personnel. NS-19E430A10/NS-22E430A10 Important safety instructions CAUTION RISK OF ELECTRIC SHOCK DO...
User Manual (English)
Page 10
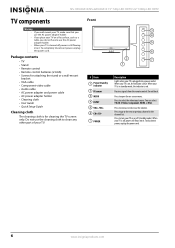
... S-Video, Component, HDMI, or VGA. Press to open the on-screen menu. Receives signals from the remote control. Press to go to clean any other part of your TV. NS-19E430A10/NS-22E430A10 19" 720p LED HDTV/ 22" 1080p LED HDTV TV components Warning • If you wall mount your...User Guide • Quick Setup Guide Cleaning cloth The cleaning cloth is off (standby mode). Package contents • TV • Stand • Remote control • Remote control batteries (2 AAA) • Screws for cleaning the TV screen only. When your TV is on or off , power still flows into it...
... S-Video, Component, HDMI, or VGA. Press to open the on-screen menu. Receives signals from the remote control. Press to go to clean any other part of your TV. NS-19E430A10/NS-22E430A10 19" 720p LED HDTV/ 22" 1080p LED HDTV TV components Warning • If you wall mount your...User Guide • Quick Setup Guide Cleaning cloth The cleaning cloth is off (standby mode). Package contents • TV • Stand • Remote control • Remote control batteries (2 AAA) • Screws for cleaning the TV screen only. When your TV is on or off , power still flows into it...
User Manual (English)
Page 11
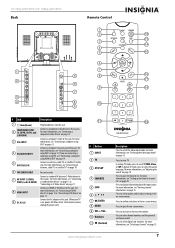
..., see "Viewing channel information" on -screen menus. Press to select digital sub-channels. www.insigniaproducts.com 7 19" 720p LED HDTV/ 22" 1080p LED HDTV Back Remote Control 1 2 12 13 3 14 4 5 15 6 1 7 5 8 16 2 17 6 9 18 7 3 4 8 10 9 # Jack 1 (headphone) COMPONENT INPUT 2 (Y, CB/PB, CR/PR, and L/R AUDIO) 3 VGA INPUT 4 VGA AUDIO INPUT 5 ANT...
..., see "Viewing channel information" on -screen menus. Press to select digital sub-channels. www.insigniaproducts.com 7 19" 720p LED HDTV/ 22" 1080p LED HDTV Back Remote Control 1 2 12 13 3 14 4 5 15 6 1 7 5 8 16 2 17 6 9 18 7 3 4 8 10 9 # Jack 1 (headphone) COMPONENT INPUT 2 (Y, CB/PB, CR/PR, and L/R AUDIO) 3 VGA INPUT 4 VGA AUDIO INPUT 5 ANT...
User Manual (English)
Page 12
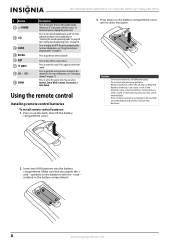
...information, see "Selecting the closed captioning mode" on page 28 and "Setting closed captioning styles" on page 28. Using the remote control Installing remote control batteries To install remote control batteries: 1 Press in the channel list. If the batteries leak, clean the battery compartment with the + and - ...ratio. For more information about closed captioning, see "Selecting a channel" on page 15. Press to display the DTV electronic program guide. NS-19E430A10/NS-22E430A10 19" 720p LED HDTV/ 22" 1080p LED HDTV # Button 12 POWER 13 CCD 14 GUIDE 15 RECALL 16 EXIT 17 MUTE 18 CH...
...information, see "Selecting the closed captioning mode" on page 28 and "Setting closed captioning styles" on page 28. Using the remote control Installing remote control batteries To install remote control batteries: 1 Press in the channel list. If the batteries leak, clean the battery compartment with the + and - ...ratio. For more information about closed captioning, see "Selecting a channel" on page 15. Press to display the DTV electronic program guide. NS-19E430A10/NS-22E430A10 19" 720p LED HDTV/ 22" 1080p LED HDTV # Button 12 POWER 13 CCD 14 GUIDE 15 RECALL 16 EXIT 17 MUTE 18 CH...

User Manual (English)
Page 13
...on the charts below, then make note of the numbered code below it using the Insignia TV remote to "teach" the commands one at 1-877-467-4289. Four such remotes are listed on the chart, but many other remote controls are available in the market. 19" 720p LED HDTV/ 22" 1080p LED HDTV... PHDVD5, PH5DSS, PMDVR8, PDVR8 RCA RCU807 One for your TV. You may not work if direct sunlight or bright light shines on the remote sensor. Insignia TV codes for universal remote controls (for all else fails, you found in direct sunlight. • Do not place objects, such as furniture, between the...
...on the charts below, then make note of the numbered code below it using the Insignia TV remote to "teach" the commands one at 1-877-467-4289. Four such remotes are listed on the chart, but many other remote controls are available in the market. 19" 720p LED HDTV/ 22" 1080p LED HDTV... PHDVD5, PH5DSS, PMDVR8, PDVR8 RCA RCU807 One for your TV. You may not work if direct sunlight or bright light shines on the remote sensor. Insignia TV codes for universal remote controls (for all else fails, you found in direct sunlight. • Do not place objects, such as furniture, between the...
User Manual (English)
Page 14
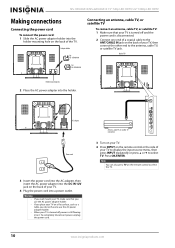
.... Press OK/ENTER. Note You can also press TV on the back of your TV is turned off, power is still flowing into it. NS-19E430A10/NS-22E430A10 19" 720p LED HDTV/ 22" 1080p LED HDTV Making connections Connecting the power cord To connect the power cord: 1 Slide the AC power ...adapter holder into the holder mounting hole on the remote control to select the TV. 10 www.insigniaproducts.com Antenna, cable TV, or satellite TV connection 3 ...
.... Press OK/ENTER. Note You can also press TV on the back of your TV is turned off, power is still flowing into it. NS-19E430A10/NS-22E430A10 19" 720p LED HDTV/ 22" 1080p LED HDTV Making connections Connecting the power cord To connect the power cord: 1 Slide the AC power ...adapter holder into the holder mounting hole on the remote control to select the TV. 10 www.insigniaproducts.com Antenna, cable TV, or satellite TV connection 3 ...

User Manual (English)
Page 15
..., then connect the other end of the cable to the corresponding audio jacks on the external device. 4 Turn on your TV. 5 Press INPUT on the remote control or the side of your TV to display the input source menu, then press INPUT repeatedly or press or to select S-Video. Press OK.../ENTER. Back of TV Standard video device S-Video device A A White=Left audio Red=Right audio Yellow=Video 3 Turn on your TV. 4 Press INPUT on the remote control or the side of your TV to display the input source menu, then press INPUT repeatedly or press or to select AV.
..., then connect the other end of the cable to the corresponding audio jacks on the external device. 4 Turn on your TV. 5 Press INPUT on the remote control or the side of your TV to display the input source menu, then press INPUT repeatedly or press or to select S-Video. Press OK.../ENTER. Back of TV Standard video device S-Video device A A White=Left audio Red=Right audio Yellow=Video 3 Turn on your TV. 4 Press INPUT on the remote control or the side of your TV to display the input source menu, then press INPUT repeatedly or press or to select AV.
User Manual (English)
Page 16
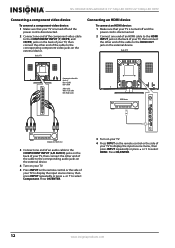
NS-19E430A10/NS-22E430A10 19" 720p LED HDTV/ 22" 1080p LED HDTV Connecting a component video device To connect a component video device:.../PR) jacks on the back of your TV, then connect the other end of your TV. 5 Press INPUT on the remote control or the side of the cable to the corresponding component video jacks on the external device. Press OK/ENTER. 12 www....insigniaproducts.com Press OK/ENTER. 3 Turn on your TV. 4 Press INPUT on the remote control or the side of the cable to the HDMI OUT jack on the back of your TV, then connect the other...
NS-19E430A10/NS-22E430A10 19" 720p LED HDTV/ 22" 1080p LED HDTV Connecting a component video device To connect a component video device:.../PR) jacks on the back of your TV, then connect the other end of your TV. 5 Press INPUT on the remote control or the side of the cable to the corresponding component video jacks on the external device. Press OK/ENTER. 12 www....insigniaproducts.com Press OK/ENTER. 3 Turn on your TV. 4 Press INPUT on the remote control or the side of the cable to the HDMI OUT jack on the back of your TV, then connect the other...

User Manual (English)
Page 17
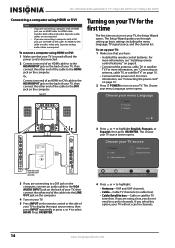
... press or to the DVI OUT jack on the external device. Separate analog audio cables are required. 4 Turn on your TV. 5 Press INPUT on the remote control or the side of your TV to display the input source menu, then press INPUT repeatedly or press or to the VGA AUDIO INPUT... cable into the VGA jack on page 14. To connect a computer using an HDMI connection. Note An HDMI-to the VGA INPUT jack on the remote control or the side of TV DVI device O O Audio cable HDMI-to-DVI cable 3 Connect an audio cable to select HDMI. Back of the cable...
... press or to the DVI OUT jack on the external device. Separate analog audio cables are required. 4 Turn on your TV. 5 Press INPUT on the remote control or the side of your TV to display the input source menu, then press INPUT repeatedly or press or to the VGA AUDIO INPUT... cable into the VGA jack on page 14. To connect a computer using an HDMI connection. Note An HDMI-to the VGA INPUT jack on the remote control or the side of TV DVI device O O Audio cable HDMI-to-DVI cable 3 Connect an audio cable to select HDMI. Back of the cable...
User Manual (English)
Page 18
... your TV. 5 Press INPUT on the remote control or the side of your TV, then connect the other end of TV Turning on your TV for the first time The first time you select this option, your TV, the Setup Wizard opens. NS-19E430A10/NS-22E430A10 19" 720p LED HDTV/ 22" 1080p ... audio cables are connecting a computer with an HDMI jack, use an HDMI-to select HDMI. The Setup Wizard guides you have: • Installed the remote control batteries. Press OK/ENTER. An HDMI cable transfers both video and audio. Choose your TV source Antenna Cable Cable/Satellite box 0 Digital Channels 0 ...
... your TV. 5 Press INPUT on the remote control or the side of your TV, then connect the other end of TV Turning on your TV for the first time The first time you select this option, your TV, the Setup Wizard opens. NS-19E430A10/NS-22E430A10 19" 720p LED HDTV/ 22" 1080p ... audio cables are connecting a computer with an HDMI jack, use an HDMI-to select HDMI. The Setup Wizard guides you have: • Installed the remote control batteries. Press OK/ENTER. An HDMI cable transfers both video and audio. Choose your TV source Antenna Cable Cable/Satellite box 0 Digital Channels 0 ...
User Manual (English)
Page 19
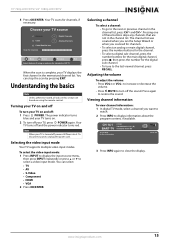
... Antenna 0 Cable 0 Cable/Satellite box Scan for channels Digital Channels Analog Channels Move OK Select ENTER MENU Previous EXIT Exit Select Antenna if using the remote control. Press again to the next or previous channel in the channel list, press CH and CH . Understanding the basics Note Unless otherwise noted, all...
... Antenna 0 Cable 0 Cable/Satellite box Scan for channels Digital Channels Analog Channels Move OK Select ENTER MENU Previous EXIT Exit Select Antenna if using the remote control. Press again to the next or previous channel in the channel list, press CH and CH . Understanding the basics Note Unless otherwise noted, all...
User Manual (English)
Page 22
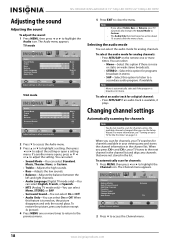
... select On or Off. To select an audio track for channels: 1 Press MENU, then press or to a secondary audio program, if available. NS-19E430A10/NS-22E430A10 19" 720p LED HDTV/ 22" 1080p LED HDTV Adjusting the sound Adjusting the sound To adjust the sound: 1 Press MENU, then press or ...com If an audio track is noise or static on weak stereo broadcasts. • STEREO-Select this option for the first time" on the remote one or more information, see "Turning on , the picture disappears and only the sound plays. MENU Previous EXIT Exit 2 Press to highlight the...
... select On or Off. To select an audio track for channels: 1 Press MENU, then press or to a secondary audio program, if available. NS-19E430A10/NS-22E430A10 19" 720p LED HDTV/ 22" 1080p LED HDTV Adjusting the sound Adjusting the sound To adjust the sound: 1 Press MENU, then press or ...com If an audio track is noise or static on weak stereo broadcasts. • STEREO-Select this option for the first time" on the remote one or more information, see "Turning on , the picture disappears and only the sound plays. MENU Previous EXIT Exit 2 Press to highlight the...
User Manual (English)
Page 36
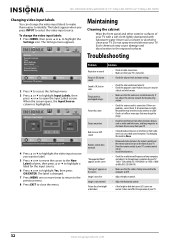
...TV. To change the video input labels to make them . Never use a solvent or alcohol to your TV. • Point the remote control at 60Hz (NS-22E430A10 ). Troubleshooting Problem Solution No picture or sound • Check all connections are tight, the problem may be a black and white movie.... the antenna and its connection. "No Signal" appears on the front of your TV's remote control sensor. • Install fresh batteries. It does not affect the operation of your TV. NS-19E430A10/NS-22E430A10 19" 720p LED HDTV/ 22" 1080p LED HDTV Changing video input labels You can cause...
...TV. To change the video input labels to make them . Never use a solvent or alcohol to your TV. • Point the remote control at 60Hz (NS-22E430A10 ). Troubleshooting Problem Solution No picture or sound • Check all connections are tight, the problem may be a black and white movie.... the antenna and its connection. "No Signal" appears on the front of your TV's remote control sensor. • Install fresh batteries. It does not affect the operation of your TV. NS-19E430A10/NS-22E430A10 19" 720p LED HDTV/ 22" 1080p LED HDTV Changing video input labels You can cause...


