

User Manual (English)
Page 2
... remote control 9 Programming a universal remote control to work with your TV . . . . 9 Making connections 10 Connecting the power cord 10 Connecting an antenna, cable TV, or satellite TV 10 Connecting a standard video device 11 Connecting an S-Video device 11 Connecting a component video device 12 Connecting an HDMI device 12 Connecting a DVI device 13 Connecting a computer using VGA 13 Connecting a computer using HDMI or DVI 14 Turning on your TV for the first time 14 Understanding the basics 15 Turning your TV on and off 15 Selecting the video input mode...
... remote control 9 Programming a universal remote control to work with your TV . . . . 9 Making connections 10 Connecting the power cord 10 Connecting an antenna, cable TV, or satellite TV 10 Connecting a standard video device 11 Connecting an S-Video device 11 Connecting a component video device 12 Connecting an HDMI device 12 Connecting a DVI device 13 Connecting a computer using VGA 13 Connecting a computer using HDMI or DVI 14 Turning on your TV for the first time 14 Understanding the basics 15 Turning your TV on and off 15 Selecting the video input mode...
User Manual (English)
Page 3
... closed captioning mode 28 Setting closed captioning styles 28 Adjusting time settings 29 Manually setting the current date and time 30 Setting the sleep timer 30 Setting the wake timer 31 Adjusting menu settings 31 Selecting the menu language and transparency 31 Changing video input labels 32 Maintaining 32 Cleaning the cabinet 32 Troubleshooting 32 Specifications 33 NS-19E430A10 33 NS-22E430A10 33 Legal notices 34 Two-year limited warranty 35 www.insigniaproducts.com iii Contents Changing channel settings 18 Automatically scanning for channels 18 Selecting the signal...
... closed captioning mode 28 Setting closed captioning styles 28 Adjusting time settings 29 Manually setting the current date and time 30 Setting the sleep timer 30 Setting the wake timer 31 Adjusting menu settings 31 Selecting the menu language and transparency 31 Changing video input labels 32 Maintaining 32 Cleaning the cabinet 32 Troubleshooting 32 Specifications 33 NS-19E430A10 33 NS-22E430A10 33 Legal notices 34 Two-year limited warranty 35 www.insigniaproducts.com iii Contents Changing channel settings 18 Automatically scanning for channels 18 Selecting the signal...
User Manual (English)
Page 5
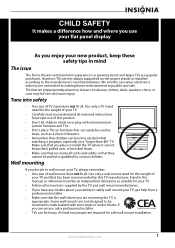
... to be mounted to walls backed with entertainment system furniture and TVs. • Don't place TVs on the proper stands or installed according to making home entertainment enjoyable and safe. We and the consumer electronics industry are not always supported on furniture that can easily be used as steps, such as suitable for proper use your flat panel display As you...
... to be mounted to walls backed with entertainment system furniture and TVs. • Don't place TVs on the proper stands or installed according to making home entertainment enjoyable and safe. We and the consumer electronics industry are not always supported on furniture that can easily be used as steps, such as suitable for proper use your flat panel display As you...
User Manual (English)
Page 6
... or hit, jolt, or press hard against the LCD panel. Refer servicing to prevent possible electric shock. This may result in any antenna or cable system. If the screen breaks, be fatal. The plug must remain readily operable. 16 The apparatus with grounding-type plug is broken, make sure that the service technician uses replacement parts specified by the manufacturer, or sold with one...
... or hit, jolt, or press hard against the LCD panel. Refer servicing to prevent possible electric shock. This may result in any antenna or cable system. If the screen breaks, be fatal. The plug must remain readily operable. 16 The apparatus with grounding-type plug is broken, make sure that the service technician uses replacement parts specified by the manufacturer, or sold with one...
User Manual (English)
Page 7
... the type of power supplied to your home, consult an electrician or your TV, and are covered by following conditions: • When the power supply cord or plug is exposed to its new surroundings for the grounding electrode. 1 2 3 4 5 7 6 1 Antenna lead-in performance. To prevent this, let the TV stand in your area. In such cases, change in wire 2 Grounding clamp 3 Antenna discharge...
... the type of power supplied to your home, consult an electrician or your TV, and are covered by following conditions: • When the power supply cord or plug is exposed to its new surroundings for the grounding electrode. 1 2 3 4 5 7 6 1 Antenna lead-in performance. To prevent this, let the TV stand in your area. In such cases, change in wire 2 Grounding clamp 3 Antenna discharge...
User Manual (English)
Page 11
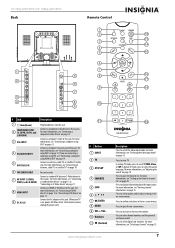
... antenna, cable TV, or satellite TV to these jacks. For more information, see "Connecting a standard video device" on page 11 or "Connecting an S-Video device" on page 18. Connect an HDMI or DVI device to this jack Connect a component video device to this jack. Press to select the video input mode. In analog TV mode, press to select the audio language. In digital TV mode, press to select STEREO, Mono, or SAP. Press to enter channel numbers and the parental control password...
... antenna, cable TV, or satellite TV to these jacks. For more information, see "Connecting a standard video device" on page 11 or "Connecting an S-Video device" on page 18. Connect an HDMI or DVI device to this jack Connect a component video device to this jack. Press to select the video input mode. In analog TV mode, press to select the audio language. In digital TV mode, press to select STEREO, Mono, or SAP. Press to enter channel numbers and the parental control password...
User Manual (English)
Page 12
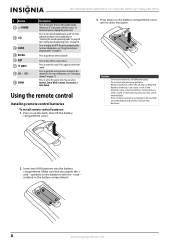
... turn your TV on or off , power still flows into it clicks into the battery compartment. For more information about closed captioning, see "Selecting the closed captioning mode" on page 28 and "Setting closed captioning on or off. You can cause a rash. For more information, see "Using the electronic program guide" on page 22. Press to select the aspect ratio. Press to mute the sound. Using the remote control Installing remote control batteries To install remote control...
... turn your TV on or off , power still flows into it clicks into the battery compartment. For more information about closed captioning, see "Selecting the closed captioning mode" on page 28 and "Setting closed captioning on or off. You can cause a rash. For more information, see "Using the electronic program guide" on page 22. Press to select the aspect ratio. Press to mute the sound. Using the remote control Installing remote control batteries To install remote control...
User Manual (English)
Page 14
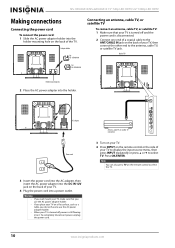
.../CABLE IN jack on the back of your TV to display the input source menu, then press INPUT repeatedly or press or to use the AC power adapter holder. • If you place your TV on a flat surface, such as a table, you wall mount your TV, make sure that your TV. 4 Plug the power cord into a power outlet. NS-19E430A10/NS-22E430A10 19" 720p LED HDTV/ 22" 1080p LED HDTV Making connections Connecting the power cord...
.../CABLE IN jack on the back of your TV to display the input source menu, then press INPUT repeatedly or press or to use the AC power adapter holder. • If you place your TV on a flat surface, such as a table, you wall mount your TV, make sure that your TV. 4 Plug the power cord into a power outlet. NS-19E430A10/NS-22E430A10 19" 720p LED HDTV/ 22" 1080p LED HDTV Making connections Connecting the power cord...
User Manual (English)
Page 18
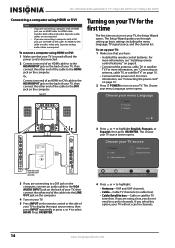
... setting up your TV, then connect the other end of the cable to the DVI jack on the remote control or the side of the cable to turn on your TV. 5 Press INPUT on the computer. For more information, see "Installing remote control batteries" on page 10. • Connected the power cord. Choose your TV source Antenna Cable Cable/Satellite box 0 Digital Channels 0 Analog Channels O Audio cable is disconnected. 2 Connect one end of an HDMI-to-DVI cable to the HDMI INPUT jack...
... setting up your TV, then connect the other end of the cable to the DVI jack on the remote control or the side of the cable to turn on your TV. 5 Press INPUT on the computer. For more information, see "Installing remote control batteries" on page 10. • Connected the power cord. Choose your TV source Antenna Cable Cable/Satellite box 0 Digital Channels 0 Analog Channels O Audio cable is disconnected. 2 Connect one end of an HDMI-to-DVI cable to the HDMI INPUT jack...
User Manual (English)
Page 19
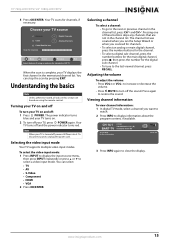
... input mode Your TV supports multiple video input modes. Adjusting the volume To adjust the volume: • Press VOL+ or VOL- Choose your TV on using an antenna for channels Digital Channels Analog Channels Move OK Select ENTER MENU Previous EXIT Exit Select Antenna if using the remote control. Turning your TV source Antenna 0 Cable 0 Cable/Satellite box Scan for standard or HD TV. To disconnect power, unplug the power cord. You can stop the scan by pressing EXIT. Viewing channel information To view channel information: 1 In digital TV mode, select a channel...
... input mode Your TV supports multiple video input modes. Adjusting the volume To adjust the volume: • Press VOL+ or VOL- Choose your TV on using an antenna for channels Digital Channels Analog Channels Move OK Select ENTER MENU Previous EXIT Exit Select Antenna if using the remote control. Turning your TV source Antenna 0 Cable 0 Cable/Satellite box Scan for standard or HD TV. To disconnect power, unplug the power cord. You can stop the scan by pressing EXIT. Viewing channel information To view channel information: 1 In digital TV mode, select a channel...
User Manual (English)
Page 20
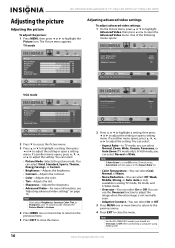
... picture: 1 Press MENU, then press or to adjust the setting or open a setting menu. You can select: • Aspect Ratio-In TV mode, you can select: • Picture Mode-Selects the picture mode. EXIT Exit VGA mode Picture Picture Mode Brightness Contrast Color Tint Sharpness Advanced Video Picture Audio Channel Settings Standard 50 50 50 50 50 Move OK Select ENTER MENU Previous Adjust settings to affect picture quality. Note For the NS-22E430A10 model, you adjust Brightness, Contrast, Color, Tint, or Sharpness, your TV automatically changes the Picture Mode...
... picture: 1 Press MENU, then press or to adjust the setting or open a setting menu. You can select: • Aspect Ratio-In TV mode, you can select: • Picture Mode-Selects the picture mode. EXIT Exit VGA mode Picture Picture Mode Brightness Contrast Color Tint Sharpness Advanced Video Picture Audio Channel Settings Standard 50 50 50 50 50 Move OK Select ENTER MENU Previous Adjust settings to affect picture quality. Note For the NS-22E430A10 model, you adjust Brightness, Contrast, Color, Tint, or Sharpness, your TV automatically changes the Picture Mode...

User Manual (English)
Page 21
Settings Parental Controls Time Menu Settings Input Labels Computer Settings Closed Caption Reset to the PC signal timing automatically when ON. Move OK Select ENTER Set various TV options. Picture Settings • Computer Settings Auto Adjust H.Position V.Position Clock Phase Audio Channel Settings 50 27 50 75 Move OK Select ENTER MENU Previous Adjust to Factory Picture Audio Channel Settings Changing the PC's video resolution To change the PC's video resolution: 1 Click Start, Control Panel, then double-click Display. EXIT Exit 4 Press or to highlight a setting, then ...
Settings Parental Controls Time Menu Settings Input Labels Computer Settings Closed Caption Reset to the PC signal timing automatically when ON. Move OK Select ENTER Set various TV options. Picture Settings • Computer Settings Auto Adjust H.Position V.Position Clock Phase Audio Channel Settings 50 27 50 75 Move OK Select ENTER MENU Previous Adjust to Factory Picture Audio Channel Settings Changing the PC's video resolution To change the PC's video resolution: 1 Click Start, Control Panel, then double-click Display. EXIT Exit 4 Press or to highlight a setting, then ...
User Manual (English)
Page 22
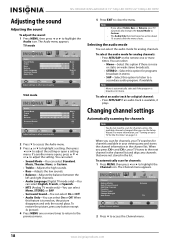
... channels changed after the menu closes. To automatically scan for a digital channel: • Press MTS/SAP. NS-19E430A10/NS-22E430A10 19" 720p LED HDTV/ 22" 1080p LED HDTV Adjusting the sound Adjusting the sound To adjust the sound: 1 Press MENU, then press or to affect sound quality. TV mode Audio Sound Mode Treble Bass Balance Audio Language Surround Sound Audio Only Picture Audio Channel Settings Music 70 75 50 English Off Off Move OK Select ENTER MENU Previous Adjust settings to highlight the Audio icon. You can select: • Sound Mode-You can select...
... channels changed after the menu closes. To automatically scan for a digital channel: • Press MTS/SAP. NS-19E430A10/NS-22E430A10 19" 720p LED HDTV/ 22" 1080p LED HDTV Adjusting the sound Adjusting the sound To adjust the sound: 1 Press MENU, then press or to affect sound quality. TV mode Audio Sound Mode Treble Bass Balance Audio Language Surround Sound Audio Only Picture Audio Channel Settings Music 70 75 50 English Off Off Move OK Select ENTER MENU Previous Adjust settings to highlight the Audio icon. You can select: • Sound Mode-You can select...
User Manual (English)
Page 26
... 4-digit password. EXIT Exit 4 Press the number buttons to Factory Picture Audio Channel Settings Move OK Select ENTER Set various TV options. The Settings menu appears. The Enter Password screen opens. Default is 0000. The default password is 0000. Settings Parental Controls Time Menu Settings Input Labels Computer Settings Closed Caption Reset to enter the password. Channel Antenna/Cable Auto Channel Search Add/Skip Channels Favorites Channel Label Channel Strength Auto Zoom Picture Audio Channel Settings Antenna On Move OK Select ENTER Adjust channel options...
... 4-digit password. EXIT Exit 4 Press the number buttons to Factory Picture Audio Channel Settings Move OK Select ENTER Set various TV options. The Settings menu appears. The Enter Password screen opens. Default is 0000. The default password is 0000. Settings Parental Controls Time Menu Settings Input Labels Computer Settings Closed Caption Reset to enter the password. Channel Antenna/Cable Auto Channel Search Add/Skip Channels Favorites Channel Label Channel Strength Auto Zoom Picture Audio Channel Settings Antenna On Move OK Select ENTER Adjust channel options...

User Manual (English)
Page 27
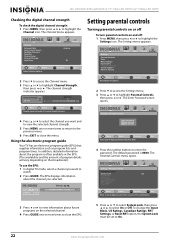
... Parental Controls Time Menu Settings Input Labels Computer Settings Closed Caption Reset to select On. The Enter Password screen opens. Picture Audio Settings • Parental Controls • Input Block Change Password System Lock Input Block US Ratings Canadian Ratings RRT Settings Reset RRT TV AV S-Video Component HDMI VGA Channel Settings On Move OK Select ENTER Block TV input source. Rating FV L S V D Description Fantasy violence Adult language Sexual situations Violence Sexually suggestive dialog 5 Press or to select System Lock, then press or to Factory Picture Audio...
... Parental Controls Time Menu Settings Input Labels Computer Settings Closed Caption Reset to select On. The Enter Password screen opens. Picture Audio Settings • Parental Controls • Input Block Change Password System Lock Input Block US Ratings Canadian Ratings RRT Settings Reset RRT TV AV S-Video Component HDMI VGA Channel Settings On Move OK Select ENTER Block TV input source. Rating FV L S V D Description Fantasy violence Adult language Sexual situations Violence Sexually suggestive dialog 5 Press or to select System Lock, then press or to Factory Picture Audio...
User Manual (English)
Page 28
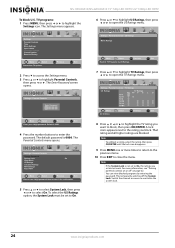
... to access the Settings menu. 3 Press or to Factory Picture Audio Channel Settings Move OK Select ENTER Set various TV options. Settings Parental Controls Time Menu Settings Input Labels Computer Settings Closed Caption Reset to highlight Parental Controls, then press or . Default is 0000. NS-19E430A10/NS-22E430A10 19" 720p LED HDTV/ 22" 1080p LED HDTV To block U.S. TV programs: 1 Press MENU, then press or to enter the password. The Settings menu appears. EXIT Exit 4 Press the number buttons to highlight the Settings icon. The Parental Controls menu opens...
... to access the Settings menu. 3 Press or to Factory Picture Audio Channel Settings Move OK Select ENTER Set various TV options. Settings Parental Controls Time Menu Settings Input Labels Computer Settings Closed Caption Reset to highlight Parental Controls, then press or . Default is 0000. NS-19E430A10/NS-22E430A10 19" 720p LED HDTV/ 22" 1080p LED HDTV To block U.S. TV programs: 1 Press MENU, then press or to enter the password. The Settings menu appears. EXIT Exit 4 Press the number buttons to highlight the Settings icon. The Parental Controls menu opens...
User Manual (English)
Page 30
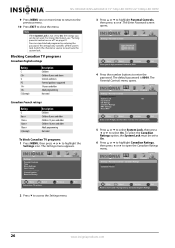
... be set do not work. Settings Parental Controls Time Menu Settings Input Labels Computer Settings Closed Caption Reset to reactivate the system lock. Default is 0000. The default password is 0000. Picture Audio Channel Settings Settings • Parental Controls • Canadian Ratings Canadian English Canadian French Move OK Select ENTER MENU Previous EXIT Exit Restrict movie and TV programs by entering the password. The Parental Controls menu opens. You can view blocked programs by Canadian English Ratings. 26 www.insigniaproducts.com The Settings menu appears. Picture...
... be set do not work. Settings Parental Controls Time Menu Settings Input Labels Computer Settings Closed Caption Reset to reactivate the system lock. Default is 0000. The default password is 0000. Picture Audio Channel Settings Settings • Parental Controls • Canadian Ratings Canadian English Canadian French Move OK Select ENTER MENU Previous EXIT Exit Restrict movie and TV programs by entering the password. The Parental Controls menu opens. You can view blocked programs by Canadian English Ratings. 26 www.insigniaproducts.com The Settings menu appears. Picture...
User Manual (English)
Page 31
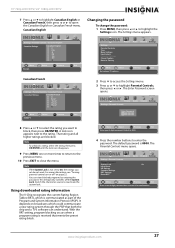
... password To change the password: 1 Press MENU, then press or to enter the password. Settings Parental Controls Time Menu Settings Input Labels Computer Settings Closed Caption Reset to reactivate the system lock. Note If the System Lock is communicated as part of the Program and System Information Protocol (PSIP). Switch the channel or source to Factory Picture Audio Channel Settings Move OK Select ENTER Set various TV options. The default password is received that both the chip and a TV's software can view blocked programs...
... password To change the password: 1 Press MENU, then press or to enter the password. Settings Parental Controls Time Menu Settings Input Labels Computer Settings Closed Caption Reset to reactivate the system lock. Note If the System Lock is communicated as part of the Program and System Information Protocol (PSIP). Switch the channel or source to Factory Picture Audio Channel Settings Move OK Select ENTER Set various TV options. The default password is received that both the chip and a TV's software can view blocked programs...
User Manual (English)
Page 34
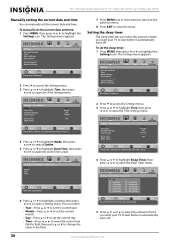
... set by TV source. Picture Audio Settings • Time Settings • Date / Time Year Month Day Time Channel Settings Move OK Select ENTER Select the current year. You can manually set the current date and time. To manually set the current date and time: 1 Press MENU, then press or to change the value in the field. Settings Parental Controls Time Menu Settings Input Labels Computer Settings Closed Caption Reset to Factory Picture Audio Channel Settings Move OK Select ENTER Set various TV options. Picture Settings • Time Settings • Sleep Timer Audio Channel...
... set by TV source. Picture Audio Settings • Time Settings • Date / Time Year Month Day Time Channel Settings Move OK Select ENTER Select the current year. You can manually set the current date and time. To manually set the current date and time: 1 Press MENU, then press or to change the value in the field. Settings Parental Controls Time Menu Settings Input Labels Computer Settings Closed Caption Reset to Factory Picture Audio Channel Settings Move OK Select ENTER Set various TV options. Picture Settings • Time Settings • Sleep Timer Audio Channel...
User Manual (English)
Page 36
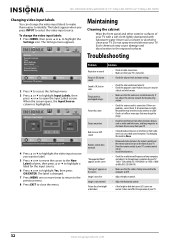
... Settings Parental Controls Time Menu Settings Input Labels Computer Settings Closed Caption Reset to clean your TV. The label is installed correctly. Try changing the mode to close the menu. The Settings menu appears. Stripes on . NS-19E430A10/NS-22E430A10 19" 720p LED HDTV/ 22" 1080p LED HDTV Changing video input labels You can cause bad sound reception. Troubleshooting Problem Solution No picture or sound • Check all connections are tight, the problem may be a black and white movie. Remote control does not work • Remove obstacles between the remote control...
... Settings Parental Controls Time Menu Settings Input Labels Computer Settings Closed Caption Reset to clean your TV. The label is installed correctly. Try changing the mode to close the menu. The Settings menu appears. Stripes on . NS-19E430A10/NS-22E430A10 19" 720p LED HDTV/ 22" 1080p LED HDTV Changing video input labels You can cause bad sound reception. Troubleshooting Problem Solution No picture or sound • Check all connections are tight, the problem may be a black and white movie. Remote control does not work • Remove obstacles between the remote control...


