User Manual (English)
Page 2
... 4 Installing the stand 4 Attaching a wall-mount bracket 5 Connecting the power cord 5 TV components 6 Package contents 6 Cleaning cloth 6 Front 6 Back 7 Remote Control 7 Using the remote control 8 Installing remote control batteries 8 Aiming the remote control 9 Programming a universal remote control to work with your TV . . . . 9 Making connections 10 Connecting the power cord 10 Connecting an antenna, cable TV...
... 4 Installing the stand 4 Attaching a wall-mount bracket 5 Connecting the power cord 5 TV components 6 Package contents 6 Cleaning cloth 6 Front 6 Back 7 Remote Control 7 Using the remote control 8 Installing remote control batteries 8 Aiming the remote control 9 Programming a universal remote control to work with your TV . . . . 9 Making connections 10 Connecting the power cord 10 Connecting an antenna, cable TV...
User Manual (English)
Page 6
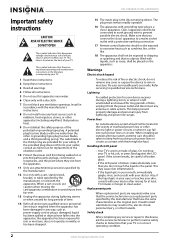
...TV. Handling the LCD panel • Your TV's screen is a class I apparatus to a mains socket outlet with a protective earthing connection. 17 Remote control batteries should not be exposed to excessive heat such as sunshine, fire, or the like. 18 The apparatus shall not be exposed to dripping...or touches your skin, consult with liquids, such as vases, shall be connected to earth ground wire to prevent possible electric shock. NS-19E430A10/NS-22E430A10 Important safety instructions CAUTION RISK OF ELECTRIC SHOCK DO NOT OPEN This symbol indicates that your TV is in the panel. The plug...
...TV. Handling the LCD panel • Your TV's screen is a class I apparatus to a mains socket outlet with a protective earthing connection. 17 Remote control batteries should not be exposed to excessive heat such as sunshine, fire, or the like. 18 The apparatus shall not be exposed to dripping...or touches your skin, consult with liquids, such as vases, shall be connected to earth ground wire to prevent possible electric shock. NS-19E430A10/NS-22E430A10 Important safety instructions CAUTION RISK OF ELECTRIC SHOCK DO NOT OPEN This symbol indicates that your TV is in the panel. The plug...
User Manual (English)
Page 10
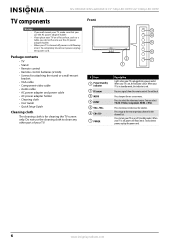
... to increase or decrease the volume. When your TV is in the channel list. Package contents • TV • Stand • Remote control • Remote control batteries (2 AAA) • Screws for cleaning the TV screen only. To disconnect power, unplug the power cord. 6 www.insigniaproducts.com...holder • Cleaning cloth • User Guide • Quick Setup Guide Cleaning cloth The cleaning cloth is still flowing into a power outlet. NS-19E430A10/NS-22E430A10 19" 720p LED HDTV/ 22" 1080p LED HDTV TV components Warning • If you wall mount your TV, make sure that you...
... to increase or decrease the volume. When your TV is in the channel list. Package contents • TV • Stand • Remote control • Remote control batteries (2 AAA) • Screws for cleaning the TV screen only. To disconnect power, unplug the power cord. 6 www.insigniaproducts.com...holder • Cleaning cloth • User Guide • Quick Setup Guide Cleaning cloth The cleaning cloth is still flowing into a power outlet. NS-19E430A10/NS-22E430A10 19" 720p LED HDTV/ 22" 1080p LED HDTV TV components Warning • If you wall mount your TV, make sure that you...

User Manual (English)
Page 11
...) 19 Description Press to select STEREO, Mono, or SAP. Press to increase or decrease the volume. 19" 720p LED HDTV/ 22" 1080p LED HDTV Back Remote Control 1 2 12 13 3 14 4 5 15 6 1 7 5 8 16 2 17 6 9 18 7 3 4 8 10 9 # Jack 1 (headphone) COMPONENT INPUT 2 (Y, CB/PB, CR/PR, and L/R AUDIO) 3 VGA INPUT 4 VGA AUDIO INPUT 5 ANT...
...) 19 Description Press to select STEREO, Mono, or SAP. Press to increase or decrease the volume. 19" 720p LED HDTV/ 22" 1080p LED HDTV Back Remote Control 1 2 12 13 3 14 4 5 15 6 1 7 5 8 16 2 17 6 9 18 7 3 4 8 10 9 # Jack 1 (headphone) COMPONENT INPUT 2 (Y, CB/PB, CR/PR, and L/R AUDIO) 3 VGA INPUT 4 VGA AUDIO INPUT 5 ANT...
User Manual (English)
Page 12
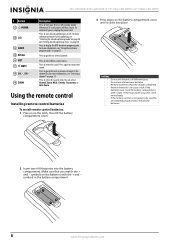
... the channel list. Press to display the DTV electronic program guide. If the batteries leak, clean the battery compartment with the + and - NS-19E430A10/NS-22E430A10 19" 720p LED HDTV/ 22" 1080p LED HDTV # Button 12 POWER 13 CCD 14 GUIDE 15 RECALL 16 EXIT 17 MUTE 18 CH... /CH 19 ZOOM Description Press to turn closed captioning on or off (standby mode). Using the remote control Installing remote control batteries To install remote control batteries: 1 Press in the battery compartment. 8 www.insigniaproducts.com When your skin, wash immediately. • If the...
... the channel list. Press to display the DTV electronic program guide. If the batteries leak, clean the battery compartment with the + and - NS-19E430A10/NS-22E430A10 19" 720p LED HDTV/ 22" 1080p LED HDTV # Button 12 POWER 13 CCD 14 GUIDE 15 RECALL 16 EXIT 17 MUTE 18 CH... /CH 19 ZOOM Description Press to turn closed captioning on or off (standby mode). Using the remote control Installing remote control batteries To install remote control batteries: 1 Press in the battery compartment. 8 www.insigniaproducts.com When your skin, wash immediately. • If the...
User Manual (English)
Page 13
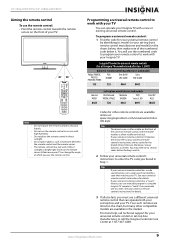
...code that can operate both your set -top box manufacturer, or call technical support for details. 3 If all Insignia TVs manufactured after Jan. 1, 2007) Universal remote control manufacturers and models Philips PHDVD5, PH5DSS, PMDVR8, PDVR8 RCA RCU807 One for All URC-6690 Sony RM-...the market. For more help, call the Insignia Customer Care Center at which you use the remote control. See your universal remote control's instructions for your universal remote control or set -top box and your TV. Insignia TV codes for universal remote controls (for all else fails, you ...
...code that can operate both your set -top box manufacturer, or call technical support for details. 3 If all Insignia TVs manufactured after Jan. 1, 2007) Universal remote control manufacturers and models Philips PHDVD5, PH5DSS, PMDVR8, PDVR8 RCA RCU807 One for All URC-6690 Sony RM-...the market. For more help, call the Insignia Customer Care Center at which you use the remote control. See your universal remote control's instructions for your universal remote control or set -top box and your TV. Insignia TV codes for universal remote controls (for all else fails, you ...
User Manual (English)
Page 14
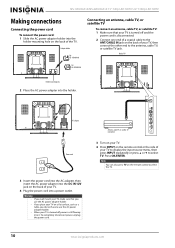
...on the back of a coaxial cable to the ANT/CABLE IN jack on the remote control to the antenna, cable TV, or satellite TV jack. Press OK/ENTER. To completely disconnect power, unplug the power cord. NS-19E430A10/NS-22E430A10 19" 720p LED HDTV/ 22" 1080p LED HDTV Making connections Connecting the ...power cord To connect the power cord: 1 Slide the AC power adapter holder into the holder. Adapter holder For NS-19E430A10 Connecting an antenna, cable TV, or satellite TV To connect an antenna, cable TV, or satellite TV: 1 Make sure that you use the ...
...on the back of a coaxial cable to the ANT/CABLE IN jack on the remote control to the antenna, cable TV, or satellite TV jack. Press OK/ENTER. To completely disconnect power, unplug the power cord. NS-19E430A10/NS-22E430A10 19" 720p LED HDTV/ 22" 1080p LED HDTV Making connections Connecting the ...power cord To connect the power cord: 1 Slide the AC power adapter holder into the holder. Adapter holder For NS-19E430A10 Connecting an antenna, cable TV, or satellite TV To connect an antenna, cable TV, or satellite TV: 1 Make sure that you use the ...
User Manual (English)
Page 15
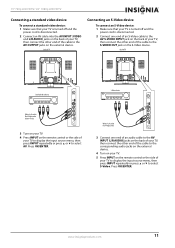
... device. Back of TV Standard video device S-Video device A A White=Left audio Red=Right audio Yellow=Video 3 Turn on your TV. 4 Press INPUT on the remote control or the side of your TV to display the input source menu, then press INPUT repeatedly or press or to select S-Video. Back of... cable to the AV S-VIDEO INPUT jack on the back of your TV, then connect the other end of your TV. 5 Press INPUT on the remote control or the side of the cable to select AV. www.insigniaproducts.com 11 Press OK/ENTER.
... device. Back of TV Standard video device S-Video device A A White=Left audio Red=Right audio Yellow=Video 3 Turn on your TV. 4 Press INPUT on the remote control or the side of your TV to display the input source menu, then press INPUT repeatedly or press or to select S-Video. Back of... cable to the AV S-VIDEO INPUT jack on the back of your TV, then connect the other end of your TV. 5 Press INPUT on the remote control or the side of the cable to select AV. www.insigniaproducts.com 11 Press OK/ENTER.

User Manual (English)
Page 16
...TV, then connect the other end of the cable to the corresponding component video jacks on the external device. NS-19E430A10/NS-22E430A10 19" 720p LED HDTV/ 22" 1080p LED HDTV Connecting a component video device To connect a component ...your TV, then connect the other end of the cable to the HDMI OUT jack on the remote control or the side of your TV to display the input source menu, then press INPUT repeatedly...audio jacks on the external device. 4 Turn on your TV. 5 Press INPUT on the remote control or the side of your TV to display the input source menu, then press INPUT repeatedly or ...
...TV, then connect the other end of the cable to the corresponding component video jacks on the external device. NS-19E430A10/NS-22E430A10 19" 720p LED HDTV/ 22" 1080p LED HDTV Connecting a component video device To connect a component ...your TV, then connect the other end of the cable to the HDMI OUT jack on the remote control or the side of your TV to display the input source menu, then press INPUT repeatedly...audio jacks on the external device. 4 Turn on your TV. 5 Press INPUT on the remote control or the side of your TV to display the input source menu, then press INPUT repeatedly or ...

User Manual (English)
Page 17
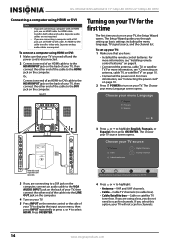
... information, see "Connecting a computer using HDMI or DVI" on the computer. Separate analog audio cables are required. 4 Turn on your TV. 5 Press INPUT on the remote control or the side of your TV, then connect the other end of the cable to the DVI OUT jack on the DVI device. Press... TV, then connect the other end of the cable into the LINE OUT jack on the computer. 4 Turn on your TV. 5 Press INPUT on the remote control or the side of your TV, then connect the other end of TV Connecting a computer using VGA Note You can also connect a computer using...
... information, see "Connecting a computer using HDMI or DVI" on the computer. Separate analog audio cables are required. 4 Turn on your TV. 5 Press INPUT on the remote control or the side of your TV, then connect the other end of the cable to the DVI OUT jack on the DVI device. Press... TV, then connect the other end of the cable into the LINE OUT jack on the computer. 4 Turn on your TV. 5 Press INPUT on the remote control or the side of your TV, then connect the other end of TV Connecting a computer using VGA Note You can also connect a computer using...
User Manual (English)
Page 18
... HDMI-to the HDMI jack on the computer. To connect a computer using HDMI or DVI: 1 Make sure that you have: • Installed the remote control batteries. For more information, see "Connecting the power cord" on page 10. 2 Press POWER to turn on your TV to display the input .... For more information, see "Connecting an antenna, cable TV, or satellite TV" on page 8. • Connected the antenna, cable TV, or satellite TV. NS-19E430A10/NS-22E430A10 19" 720p LED HDTV/ 22" 1080p LED HDTV Connecting a computer using HDMI or DVI Note • If you are conncting a computer with a DVI ...
... HDMI-to the HDMI jack on the computer. To connect a computer using HDMI or DVI: 1 Make sure that you have: • Installed the remote control batteries. For more information, see "Connecting the power cord" on page 10. 2 Press POWER to turn on your TV to display the input .... For more information, see "Connecting an antenna, cable TV, or satellite TV" on page 8. • Connected the antenna, cable TV, or satellite TV. NS-19E430A10/NS-22E430A10 19" 720p LED HDTV/ 22" 1080p LED HDTV Connecting a computer using HDMI or DVI Note • If you are conncting a computer with a DVI ...

User Manual (English)
Page 19
... a video input mode. Your TV scans for channels Digital Channels Analog Channels Move OK Select ENTER MENU Previous EXIT Exit Select Antenna if using the remote control. Understanding the basics Note Unless otherwise noted, all tasks in the channel list, press CH and CH . To select the video input mode: 1 Press...
... a video input mode. Your TV scans for channels Digital Channels Analog Channels Move OK Select ENTER MENU Previous EXIT Exit Select Antenna if using the remote control. Understanding the basics Note Unless otherwise noted, all tasks in the channel list, press CH and CH . To select the video input mode: 1 Press...
User Manual (English)
Page 22
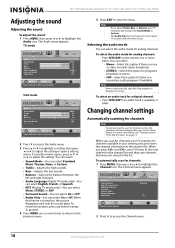
... for a digital channel: • Press MTS/SAP. To select an audio track for analog channels. To automatically scan for the first time" on the remote one or more times to return to the previous menu. 5 Press EXIT to close the menu. EXIT Exit 2 Press to access the Audio menu. 3... you scan for channels, your TV searches for channels unless the available channels changed after the menu closes. When this option to listen to Custom. NS-19E430A10/NS-22E430A10 19" 720p LED HDTV/ 22" 1080p LED HDTV Adjusting the sound Adjusting the sound To adjust the sound: 1 Press MENU, then press ...
... for a digital channel: • Press MTS/SAP. To select an audio track for analog channels. To automatically scan for the first time" on the remote one or more times to return to the previous menu. 5 Press EXIT to close the menu. EXIT Exit 2 Press to access the Audio menu. 3... you scan for channels, your TV searches for channels unless the available channels changed after the menu closes. When this option to listen to Custom. NS-19E430A10/NS-22E430A10 19" 720p LED HDTV/ 22" 1080p LED HDTV Adjusting the sound Adjusting the sound To adjust the sound: 1 Press MENU, then press ...
User Manual (English)
Page 36
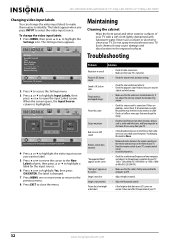
...TV: 1360 × 768 at 60Hz (NS-19E430A10 ) or 1920 × 1080 at your TV. 32 www.insigniaproducts.com Try changing the mode to the computer and TV. Remote control does not work • Remove obstacles between the remote control and the remote control sensor on the screen • ...is firmly connected to Mono. Stripes on . "Unsupported Mode" appears on an LCD screen are or dark dots normal. Image is highlighted. NS-19E430A10/NS-22E430A10 19" 720p LED HDTV/ 22" 1080p LED HDTV Changing video input labels You can cause bad sound reception. The picture has overlapped...
...TV: 1360 × 768 at 60Hz (NS-19E430A10 ) or 1920 × 1080 at your TV. 32 www.insigniaproducts.com Try changing the mode to the computer and TV. Remote control does not work • Remove obstacles between the remote control and the remote control sensor on the screen • ...is firmly connected to Mono. Stripes on . "Unsupported Mode" appears on an LCD screen are or dark dots normal. Image is highlighted. NS-19E430A10/NS-22E430A10 19" 720p LED HDTV/ 22" 1080p LED HDTV Changing video input labels You can cause bad sound reception. The picture has overlapped...


