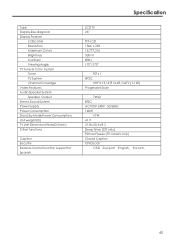
User Manual (English)
Page 4
... to take adequate 1 For disposal or recycling information, please contact your local authorities or the Electronic Industries Alliance: www.eia.org FCC STATEMENT FCC Notice LCD TV: A CLASS B digital device This equipment has been tested and found to comply with the limits for proper grounding and, in particular, specifies that provides guidelines...
User Manual (English)
Page 5
... basement, or near any ventilation openings. The vents and other similar surface, since insufficient ventilation can cause overheating and/or shorten the life of your LCD TV product, 5. Do not place the product on a bed, sofa, rug or other openings in the cabinet are provided for built-in accordance with dry cloth...
User Manual (English)
Page 14
... sure that all connectors are securely inserted into their terminals. Refer to connect: Connect the Audio/Video cables between the Audio (L/R)/Video jacks on your LCD TV , press Source control. When connecting an external device, turn the power off on the remote Source Select VGA DVI RF Video1 Video2 SVideo YPbPr1 YPbPr2...
User Manual (English)
Page 15
... is Source Select VGA DVI RF Video1 Video2 SVideo YPbPr1 YPbPr2 12 Press CH+/- To playback Camcorder 1. to select Video2 and press Enter to your LCD TV , press Source button on the unit and camcorder. Connect a Camcorder ANTENNA INPUT HEADPHONE S-VIDEO AVI INPUT R AUDIO L/MONO VIDEO AV2 INPUT AV OUT AV1 IN...
User Manual (English)
Page 16
... cable between the Y, Pb, Pr input jacks on the unit and Y, Pb, Pr ( or Y, Cb, Cr) output jacks on the remote control. 2. Turn on your LCD TV , press Source button on the DVD player. Connections (continued) Connect a DVD player Video cable G BR DVI-D IN D-Sub IN D-Sub D-Sub IN AU DI O DVI...
User Manual (English)
Page 17
... DVI RF Video1 Video2 SVideo YPbPr1 YPbPr2 14 Press CH+/- button on the DTV receiver . To Watch DTV 1. to the antenna input jack on your LCD TV , press Source control. 2. Turn on the DTV receiver. Connect a DTV receiver Connections (continued) DVI cable DVI COMPONENT Pr Pb Y W R AUDIO L AUDIO R AUDIO L AUDIO R ANT Rear...
User Manual (English)
Page 18
To Watch the PC screen 1. Press Enter to select VGA. 3. Source Select VGA DVI RF Video1 Video2 SVideo YPbPr1 YPbPr2 15 Turn on your PC and check for PC system requirements. to confirm. 4. Turn on your LCD TV , press Source button on the unit. Press CH+/- Connections (continued) Connect a PC Audio cable D-Sub cable DVI-D IN D-Sub IN D-Sub D-Sub IN AU DI O DVI-D DVI-D IN AU DI O COMPONENT IN COMPONENT IN How to connect: Connect a D-Sub (VGA) cable between the D-Sub (VGA) jack on the PC and the D-Sub input jack on the remote control. 2.
User Manual (English)
Page 19
Turn on your VCR, insert a videotape for recording Connect the Audio/Video cables between the Audio (L/R)/Video jacks on your LCD TV, select a program you wish to record. 2. Press the Record button to begin recording. Note: 16 Turn on the unit and VCR. Connect a VCR for Recording ...
User Manual (English)
Page 20
... DSP button on the screen. Turning Off With the power on, press the Power button on the remote Note: Viewing the Menus and Displays Your LCD TV has a simple, easy-to select menu item.
User Manual (English)
Page 21
... Memory Automatically 1 2 3 4 5 The unit will begin memorizing all the available channels for both antenna and cable channels. Memorizing the Channels Your LCD TV can memorize the available channels, you must specify the type of signal source that is connected to the unit. (i.e., an antenna or cable system)... 1 2 3 4 If you connect cable, please select cable. During the MAIN MENU Picture Sound CH System TV/Cable Channel No Add/Erase Auto Search OSD TVPC Setup Auto Searching Ch. Selecting the Signal Source Before your LCD TV can memorize and store all the available channels.
User Manual (English)
Page 43
... Speaker Output Stereo Sound System Power Supply Power Consumption Stand by Mode Power Consumption Unit weight (lb) TV Unit Dimension (WxHxD) (inch) Other functions Caption Security Remote Control function support for Spanish Specification LCD TV 26" TFT-LCD 1366 x 768 16,777,216 500 nit 800:1 170O/170O FST x 1 NTSC VHF 2-13, UHF 14...