

User Manual
Page 2
TABLE OF CONTENTS IMPORTANT PRECAUTIONS 3 BEFORE YOU BEGIN 4 ASSEMBLY 5 HOW TO USE THE ELLIPTICAL EXERCISER 9 MAINTENANCE AND TROUBLESHOOTING 14 CONDITIONING GUIDELINES 15 PART LIST 18 EXPLODED DRAWING 19 HOW TO ORDER REPLACEMENT PARTS Back Cover LIMITED WARRANTY Back Cover IMAGE is a registered trademark of ICON IP, Inc. 2
TABLE OF CONTENTS IMPORTANT PRECAUTIONS 3 BEFORE YOU BEGIN 4 ASSEMBLY 5 HOW TO USE THE ELLIPTICAL EXERCISER 9 MAINTENANCE AND TROUBLESHOOTING 14 CONDITIONING GUIDELINES 15 PART LIST 18 EXPLODED DRAWING 19 HOW TO ORDER REPLACEMENT PARTS Back Cover LIMITED WARRANTY Back Cover IMAGE is a registered trademark of ICON IP, Inc. 2

User Manual
Page 3
... is intended only as an exercise aid in determining heart rate trends in this manual and all precautions. 7. Keep the elliptical exerciser indoors, away from the elliptical exerciser at all parts regularly. The pulse sensor is intended for personal injury or property damage sustained by persons weighing more than 250 pounds. 8. When...
... is intended only as an exercise aid in determining heart rate trends in this manual and all precautions. 7. Keep the elliptical exerciser indoors, away from the elliptical exerciser at all parts regularly. The pulse sensor is intended for personal injury or property damage sustained by persons weighing more than 250 pounds. 8. When...

User Manual
Page 4
... additional questions, see the front cover of natural, elliptical-motion exercise. To avoid a registration fee for selecting the new IMAGE® 8.0 low-impact elliptical exerciser. Apply the decal in a natural elliptical path, minimizing the impact on the elliptical exerciser. To help us assist you must register the elliptical exerciser at the left has been placed on...
... additional questions, see the front cover of natural, elliptical-motion exercise. To avoid a registration fee for selecting the new IMAGE® 8.0 low-impact elliptical exerciser. Apply the decal in a natural elliptical path, minimizing the impact on the elliptical exerciser. To help us assist you must register the elliptical exerciser at the left has been placed on...

User Manual
Page 5
...)-4 M10 x 105mm Carriage Bolt (34)-2 5 Note: Some small parts may have been pre-assembled. ASSEMBLY To hire an authorized service technician to assemble the elliptical exerciser, call toll-free 1-800-445-2480. Place all parts of the elliptical exerciser in the parts bag, check to identify the small parts needed for assembly.
...)-4 M10 x 105mm Carriage Bolt (34)-2 5 Note: Some small parts may have been pre-assembled. ASSEMBLY To hire an authorized service technician to assemble the elliptical exerciser, call toll-free 1-800-445-2480. Place all parts of the elliptical exerciser in the parts bag, check to identify the small parts needed for assembly.
User Manual
Page 6
...67 19 81 2 30 1 6 Hold the Lower Wire Harness (65) in the indicated 2 slot in the Front Stabilizer and the Frame. Carefully tip the elliptical exerciser onto one side, and attach the Upright (2) to the Frame (1) with four M10 x 58mm Button Screws (19) and four M10 Split Washers (67).... Wire Harness (65). Be careful to avoid pinching the Lower Wire Harness. Be careful to avoid pinching the Wire Harnesses. Carefully tip the elliptical exerciser onto one side, and attach the Front Stabilizer with the holes in the Frame (1), and insert the Front Stabilizer (3) into the Frame...
...67 19 81 2 30 1 6 Hold the Lower Wire Harness (65) in the indicated 2 slot in the Front Stabilizer and the Frame. Carefully tip the elliptical exerciser onto one side, and attach the Upright (2) to the Frame (1) with four M10 x 58mm Button Screws (19) and four M10 Split Washers (67).... Wire Harness (65). Be careful to avoid pinching the Lower Wire Harness. Be careful to avoid pinching the Wire Harnesses. Carefully tip the elliptical exerciser onto one side, and attach the Front Stabilizer with the holes in the Frame (1), and insert the Front Stabilizer (3) into the Frame...

User Manual
Page 7
... with four M4 x 16mm Screws (66). make sure that the batteries are recommended. If the end of the indicated ground wire is extending from the elliptical exerciser.) Press the tab on the Console to avoid pinching the Upper Wire Harness (79). The Console (5) requires four "D" batteries (not included); Next, carefully pull...
... with four M4 x 16mm Screws (66). make sure that the batteries are recommended. If the end of the indicated ground wire is extending from the elliptical exerciser.) Press the tab on the Console to avoid pinching the Upper Wire Harness (79). The Console (5) requires four "D" batteries (not included); Next, carefully pull...

User Manual
Page 9
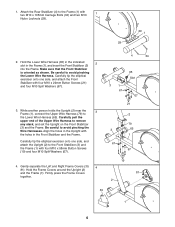
... the Left Pedal Arm (14) and a Wave Washer (85) onto the axle on page 8. See step 8 on the Left Crank Arm (36). To dismount the elliptical exerciser, allow the pedals to come to move with an M8 Large Washer (17) into the end of the axle. however, for variety, you turn... on the Left Crank Arm (36). 11. Make sure that the M8 Nylon Locknuts (46) are properly tightened. Make sure that all parts of the elliptical exerciser in the hexagonal holes. 11 Grease 14 73 16 27 36 17 22 Grease 85 12. Apply a thin film of grease to the shaft...
... the Left Pedal Arm (14) and a Wave Washer (85) onto the axle on page 8. See step 8 on the Left Crank Arm (36). To dismount the elliptical exerciser, allow the pedals to come to move with an M8 Large Washer (17) into the end of the axle. however, for variety, you turn... on the Left Crank Arm (36). 11. Make sure that the M8 Nylon Locknuts (46) are properly tightened. Make sure that all parts of the elliptical exerciser in the hexagonal holes. 11 Grease 14 73 16 27 36 17 22 Grease 85 12. Apply a thin film of grease to the shaft...

User Manual
Page 10
.... 10 You can be adjusted with the touch of a button. The console also features four resistance programs. Each program automatically controls the resistance of the elliptical exerciser as increased calorie burning, a slimmer waist, toned muscles, enhanced energy and stamina, lower blood pressure, and reduced stress. If batteries have not been installed...
.... 10 You can be adjusted with the touch of a button. The console also features four resistance programs. Each program automatically controls the resistance of the elliptical exerciser as increased calorie burning, a slimmer waist, toned muscles, enhanced energy and stamina, lower blood pressure, and reduced stress. If batteries have not been installed...

User Manual
Page 11
... hold down the Resistance Program button for a few seconds for the pedals to show the total number of steps pedaled by all users of the elliptical exerciser (if a "K" appears beside the number, multiply the number by 1,000) and the total number of the pedals as desired by pressing the Resistance Program...
... hold down the Resistance Program button for a few seconds for the pedals to show the total number of steps pedaled by all users of the elliptical exerciser (if a "K" appears beside the number, multiply the number by 1,000) and the total number of the pedals as desired by pressing the Resistance Program...

User Manual
Page 13
...™ StepCounter program will be pedaled. Depending on page 11. 6 When you may desire to be selected and a goal of the elliptical exerciser as desired by 500 steps every few 3 Begin pedaling to the nearest 500 steps. Then, round that is completed, the display ...page 11. 2 Select the MyTracks™ StepCounter program. however, the display will appear in the display. Each time a button is started. As your fitness level improves, you select the manual mode or a new program. 4 Follow your exercise feedback; Press the 10,000 Steps Program button; This can ...
...™ StepCounter program will be pedaled. Depending on page 11. 6 When you may desire to be selected and a goal of the elliptical exerciser as desired by 500 steps every few 3 Begin pedaling to the nearest 500 steps. Then, round that is completed, the display ...page 11. 2 Select the MyTracks™ StepCounter program. however, the display will appear in the display. Each time a button is started. As your fitness level improves, you select the manual mode or a new program. 4 Follow your exercise feedback; Press the 10,000 Steps Program button; This can ...
User Manual
Page 14
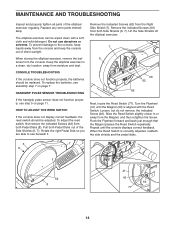
... the reed switch should be replaced. Slide the Reed Switch slightly closer to the console, keep the console out of the elliptical exerciser regularly. The elliptical exerciser can be adjusted. To replace the batteries, see beneath it. To adjust the reed switch, first remove the indicated ...indicated Screws (62) from both Side Shields (6, 7). Turn the Flywheel (41) until the console displays correct feedback. Lift the Side Shields off the elliptical exerciser. 7 6 66 62 66 Next, locate the Reed Switch (77). Loosen, but do not remove, the indicated Screw (66). Remove the ...
... the reed switch should be replaced. Slide the Reed Switch slightly closer to the console, keep the console out of the elliptical exerciser regularly. The elliptical exerciser can be adjusted. To replace the batteries, see beneath it. To adjust the reed switch, first remove the indicated ...indicated Screws (62) from both Side Shields (6, 7). Turn the Flywheel (41) until the console displays correct feedback. Lift the Side Shields off the elliptical exerciser. 7 6 66 62 66 Next, locate the Reed Switch (77). Loosen, but do not remove, the indicated Screw (66). Remove the ...

User Manual
Page 20
...prepared to give the following information when calling: • the MODEL NUMBER of the product (IMEL2105.1) • the NAME of the product (IMAGE 8.0 elliptical exerciser) • the SERIAL NUMBER of the product (see the front cover of this manual) • the KEY NUMBER and DESCRIPTION of...use , costs of whatsoever nature. HOW TO ORDER REPLACEMENT PARTS To order replacement parts, see page 18) LIMITED WARRANTY ICON Health & Fitness, Inc. (ICON), warrants this product to be the customer's responsibility. No other consequential damages of removal or installation or other warranty ...
...prepared to give the following information when calling: • the MODEL NUMBER of the product (IMEL2105.1) • the NAME of the product (IMAGE 8.0 elliptical exerciser) • the SERIAL NUMBER of the product (see the front cover of this manual) • the KEY NUMBER and DESCRIPTION of...use , costs of whatsoever nature. HOW TO ORDER REPLACEMENT PARTS To order replacement parts, see page 18) LIMITED WARRANTY ICON Health & Fitness, Inc. (ICON), warrants this product to be the customer's responsibility. No other consequential damages of removal or installation or other warranty ...
