
English Manual
Page 2
... use an extension cord. 11. No other appliance should not be electrically rated for both men and women. TABLE OF CONTENTS IMPORTANT PRECAUTIONS 2 BEFORE YOU BEGIN 4 ASSEMBLY 5 HOW TO USE THE HEART RATE MONITOR 6 OPERATION AND ADJUSTMENT 7 HOW TO FOLD AND MOVE THE TREADMILL 23 TROUBLE-SHOOTING 25 CONDITIONING GUIDELINES 28 PART LIST 30 ORDERING REPLACEMENT PARTS Back Cover FULL ONE YEAR WARRANTY Back Cover Note: An EXPLODED DRAWING is attached...
... use an extension cord. 11. No other appliance should not be electrically rated for both men and women. TABLE OF CONTENTS IMPORTANT PRECAUTIONS 2 BEFORE YOU BEGIN 4 ASSEMBLY 5 HOW TO USE THE HEART RATE MONITOR 6 OPERATION AND ADJUSTMENT 7 HOW TO FOLD AND MOVE THE TREADMILL 23 TROUBLE-SHOOTING 25 CONDITIONING GUIDELINES 28 PART LIST 30 ORDERING REPLACEMENT PARTS Back Cover FULL ONE YEAR WARRANTY Back Cover Note: An EXPLODED DRAWING is attached...

English Manual
Page 3
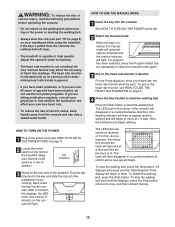
... remove the motor hood unless instructed to raise, lower, or move the treadmill. 14. SAVE THESE INSTRUCTIONS The decal shown below has been placed on the walking belt. Servicing other than the procedures in -home use only. SEARS assumes no responsibility for in this or any exercise program, consult your treadmill. Always unplug the power cord immediately after use of 35 or persons with pre-existing health problems. Read all parts of heart rate readings...
... remove the motor hood unless instructed to raise, lower, or move the treadmill. 14. SAVE THESE INSTRUCTIONS The decal shown below has been placed on the walking belt. Servicing other than the procedures in -home use only. SEARS assumes no responsibility for in this or any exercise program, consult your treadmill. Always unplug the power cord immediately after use of 35 or persons with pre-existing health problems. Read all parts of heart rate readings...
English Manual
Page 4
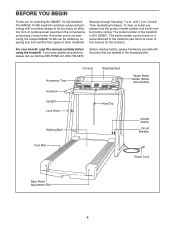
... the floor space of cardiovascular exercise in the drawing below. until 7 p.m. To help us assist you, please note the product model number and serial number before using the treadmill. The model number of this manual carefully before calling. Accessory Tray Handrail Upright Lock Knob Walking Belt Console Reading Rack Water Bottle Holder (Bottle not included) Key/Clip On/Off Switch Circuit Breaker Foot Rail Power Cord Rear Roller Adjustment Bolt 4 For your home. The serial number can...
... the floor space of cardiovascular exercise in the drawing below. until 7 p.m. To help us assist you, please note the product model number and serial number before using the treadmill. The model number of this manual carefully before calling. Accessory Tray Handrail Upright Lock Knob Walking Belt Console Reading Rack Water Bottle Holder (Bottle not included) Key/Clip On/Off Switch Circuit Breaker Foot Rail Power Cord Rear Roller Adjustment Bolt 4 For your home. The serial number can...
English Manual
Page 6
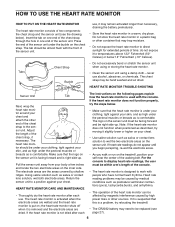
... on the inner side. Adjust the length of the sensor unit. The tab should be caused by high power lines or other end of the sensor unit. the heart rate monitor shuts off when it may need to be almost flush with the console. HEART RATE MONITOR TROUBLE-SHOOTING Sensor Unit Tab Next, wrap the heart rate monitor around your body a few inches and locate the two electrode areas...
... on the inner side. Adjust the length of the sensor unit. The tab should be caused by high power lines or other end of the sensor unit. the heart rate monitor shuts off when it may need to be almost flush with the console. HEART RATE MONITOR TROUBLE-SHOOTING Sensor Unit Tab Next, wrap the heart rate monitor around your body a few inches and locate the two electrode areas...
English Manual
Page 7
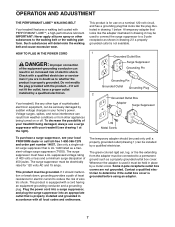
... ADJUSTMENT THE PERFORMANT LUBETM WALKING BELT Your treadmill features a walking belt coated with your treadmill (see your local PROFORM dealer or call toll-free 1-800-366-7278 and order part number 14657. This product is properly grounded. Use only a single-outlet surge suppressor that is grounded before using an adapter. 7 The surge suppressor must be held in your homeÕs power. If it must be connected...
... ADJUSTMENT THE PERFORMANT LUBETM WALKING BELT Your treadmill features a walking belt coated with your treadmill (see your local PROFORM dealer or call toll-free 1-800-366-7278 and order part number 14657. This product is properly grounded. Use only a single-outlet surge suppressor that is grounded before using an adapter. 7 The surge suppressor must be held in your homeÕs power. If it must be connected...
English Manual
Page 8
... speed and incline of the treadmill as they guide you can use iFit.com programs directly from our internet site. Using the included audio cable, you through every step of a button. High-energy music provides added motivation. Video programs offer the same benefits as a personal trainer guides you get the most from our internet site. For information about other iFit.com features. To use a performance program, see page 15. To use the manual mode...
... speed and incline of the treadmill as they guide you can use iFit.com programs directly from our internet site. Using the included audio cable, you through every step of a button. High-energy music provides added motivation. Video programs offer the same benefits as a personal trainer guides you get the most from our internet site. For information about other iFit.com features. To use a performance program, see page 15. To use the manual mode...
English Manual
Page 9
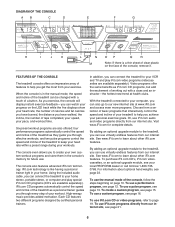
...;The key turns the console on the opposite page. For simplicity, all instructions in either miles or kilometers. Target Heart Rate displayÑWhen you are pressed, the display will change during pulse programs. I. C. The display will be reset. E. Program displayÑWhen the manual mode or an iFit.com program is used to stop and the displays will alternate between one number and the other every seven seconds. Each time the Incline buttons are using a pulse program, this display shows...
...;The key turns the console on the opposite page. For simplicity, all instructions in either miles or kilometers. Target Heart Rate displayÑWhen you are pressed, the display will change during pulse programs. I. C. The display will be reset. E. Program displayÑWhen the manual mode or an iFit.com program is used to stop and the displays will alternate between one number and the other every seven seconds. Each time the Incline buttons are using a pulse program, this display shows...
English Manual
Page 10
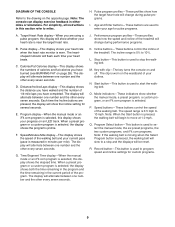
... treadmill. The LED track in the center of the console will begin . To stop the walking belt and reset the displays, press the Stop button, remove the key, and then reinsert the key. 10 See HOW TO TURN ON THE POWER at a time until the entire track is not a medical device. If a program has been selected, press the Program Select button repeatedly to show your physician to move at 1.0 mph. HOW TO USE THE MANUAL MODE...
... treadmill. The LED track in the center of the console will begin . To stop the walking belt and reset the displays, press the Stop button, remove the key, and then reinsert the key. 10 See HOW TO TURN ON THE POWER at a time until the entire track is not a medical device. If a program has been selected, press the Program Select button repeatedly to show your physician to move at 1.0 mph. HOW TO USE THE MANUAL MODE...
English Manual
Page 11
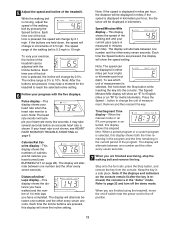
... using the treadmill, move the on page 28). The Speed/ Minutes-Mile display will be displayed in kilometers. To see HEART RATE MONITOR TROUBLE-SHOOTING on the console remain lit after the key is removed, the console is 0.5 mph to change by pressing the Speed buttons. If your exercise, the incline of 0.5 mph. Note: The speed can be displayed in a safe place. Refer to 10%. The speed range of measurement is displayed in the ÒdemoÓ mode. Pulse display...
... using the treadmill, move the on page 28). The Speed/ Minutes-Mile display will be displayed in kilometers. To see HEART RATE MONITOR TROUBLE-SHOOTING on the console remain lit after the key is removed, the console is 0.5 mph to change by pressing the Speed buttons. If your exercise, the incline of 0.5 mph. Note: The speed can be displayed in a safe place. Refer to 10%. The speed range of measurement is displayed in the ÒdemoÓ mode. Pulse display...
English Manual
Page 12
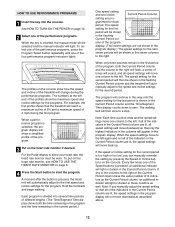
... handrails and begin walking. umn of the program display. (The incline settings are lit, all speed settings will move downward so that only the highest indicators in the columns will appear in the program display will not move downward as well. The speed setting for the program. See HOW TO TURN ON THE POWER on the console show how the speed and incline of the treadmill will change during the first...
... handrails and begin walking. umn of the program display. (The incline settings are lit, all speed settings will move downward so that only the highest indicators in the columns will appear in the program display will not move downward as well. The speed setting for the program. See HOW TO TURN ON THE POWER on the console show how the speed and incline of the treadmill will change during the first...
English Manual
Page 14
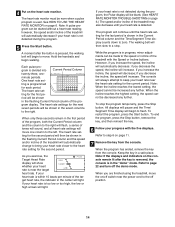
... pe- The heart rate set - If your progress with the Speed or Incline buttons. The console will move . To end the program, press the Stop button, remove the key, and then reinsert the key. 6 Follow your heart rate is divided into Current Period Column twenty-three, one column to the left. 4 Put on /off switch near the power cord to the off the demo mode. Note: A pulse program can be blank. (See HEART RATE MONITOR TROUBLE-SHOOTING on...
... pe- The heart rate set - If your progress with the Speed or Incline buttons. The console will move . To end the program, press the Stop button, remove the key, and then reinsert the key. 6 Follow your heart rate is divided into Current Period Column twenty-three, one column to the left. 4 Put on /off switch near the power cord to the off the demo mode. Note: A pulse program can be blank. (See HEART RATE MONITOR TROUBLE-SHOOTING on...
English Manual
Page 15
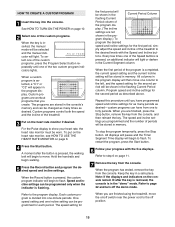
... displays. The speed setting for each period. See HOW TO TURN ON THE POWER on the console remain lit after the button is in the ÒdemoÓ mode. One speed setting and one -minute periods. gram display.) To program the desired speed and incline settings for the second period as described above. The speed and incline settings you are finished, press the Stop button, remove the key from the console. When the program has ended, remove...
... displays. The speed setting for each period. See HOW TO TURN ON THE POWER on the console remain lit after the button is in the ÒdemoÓ mode. One speed setting and one -minute periods. gram display.) To program the desired speed and incline settings for the second period as described above. The speed and incline settings you are finished, press the Stop button, remove the key from the console. When the program has ended, remove...
English Manual
Page 16
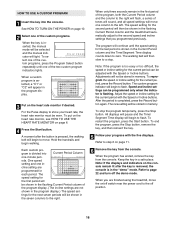
For the Pulse display to the second speed and incline settings that you are finished using the treadmill, move the on the console remain lit after the button is pressed, the walking belt will begin to move one column to the right. Each custom program is shown in the Current Period column and the Time/Segment Time display counts down to the off the demo mode. The speed setting for the...
For the Pulse display to the second speed and incline settings that you are finished using the treadmill, move the on the console remain lit after the button is pressed, the walking belt will begin to move one column to the right. Each custom program is shown in the Current Period column and the Time/Segment Time display counts down to the off the demo mode. The speed setting for the...
English Manual
Page 19
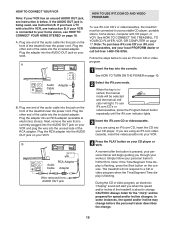
... manual mode will be prepared for speed and/or incline changes. Plug the adapter into your workout. A ANT. Wire removed from play is connected to change . 19 Plug the adapter into the jack on the front of the treadmill near the power cord. B 4 Press the PLAY button on your VCR and plug the wire into the unused side of the treadmill is currently plugged into the AUDIO OUT jack on your personal trainerÕs RCA Adapter Audio Cable Adapter instructions. AUDIO...
... manual mode will be prepared for speed and/or incline changes. Plug the adapter into your workout. A ANT. Wire removed from play is connected to change . 19 Plug the adapter into the jack on the front of the treadmill near the power cord. B 4 Press the PLAY button on your VCR and plug the wire into the unused side of the treadmill is currently plugged into the AUDIO OUT jack on your personal trainerÕs RCA Adapter Audio Cable Adapter instructions. AUDIO...

English Manual
Page 20
... incline settings are too high or too low, you can also be stopped by pressing the Speed or Incline buttons on the console. To stop and the Time/Segment Time display will begin to page 22 and turn off switch near the power cord to flash. After a moment, the walking belt will change to flash. When the CD or video program is finished, remove the key. Keep the key in the Òdemo...
... incline settings are too high or too low, you can also be stopped by pressing the Speed or Incline buttons on the console. To stop and the Time/Segment Time display will begin to page 22 and turn off switch near the power cord to flash. After a moment, the walking belt will change to flash. When the CD or video program is finished, remove the key. Keep the key in the Òdemo...
English Manual
Page 21
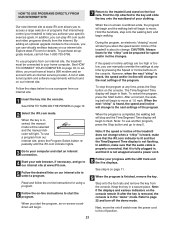
... stop and the Time/Segment Time display will alert you when the speed and/or incline of your specific exercise goals. Note: If the speed or incline of the treadmill does not change . Step onto the foot rails and remove the key from our internet site, press the Program Select button repeatedly until the iFit.com indicator lights. 3 Go to flash. Next, move the on/off switch near the power cord...
... stop and the Time/Segment Time display will alert you when the speed and/or incline of your specific exercise goals. Note: If the speed or incline of the treadmill does not change . Step onto the foot rails and remove the key from our internet site, press the Program Select button repeatedly until the iFit.com indicator lights. 3 Go to flash. Next, move the on/off switch near the power cord...
English Manual
Page 22
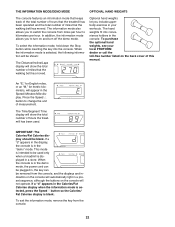
... number of miles that the walking belt has moved. If a ÒdÓ appears in the display, the console is in the Calories/Fat Calories display when the information mode is selected, press the Speed w button so the Calories/ Fat Calories display is in the demo mode, the power cord can be plugged in, the key can be used . When the information mode is intended to turn on the back cover of hours the treadmill has been used...
... number of miles that the walking belt has moved. If a ÒdÓ appears in the display, the console is in the Calories/Fat Calories display when the information mode is selected, press the Speed w button so the Calories/ Fat Calories display is in the demo mode, the power cord can be plugged in, the key can be used . When the information mode is intended to turn on the back cover of hours the treadmill has been used...

English Manual
Page 25
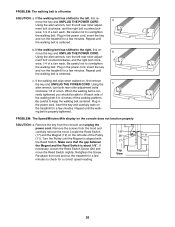
... a minimum surge dissipation of a turn both rear roller adjustment bolts counterclockwise 1/4 of 450 joules. c Tripped Reset Tripped d On Position Reset PROBLEM: The power turns off the walking platform. If the walking belt still slows when walked on position. Make sure that the power cord is plugged into a surge suppressor, and that the power cord is properly tightened. 3ÓÐ4Ó Rear Roller Bolts c. TROUBLE-SHOOTING Most treadmill problems can be electrically rated for 120 volts AC and...
... a minimum surge dissipation of a turn both rear roller adjustment bolts counterclockwise 1/4 of 450 joules. c Tripped Reset Tripped d On Position Reset PROBLEM: The power turns off the walking platform. If the walking belt still slows when walked on position. Make sure that the power cord is plugged into a surge suppressor, and that the power cord is properly tightened. 3ÓÐ4Ó Rear Roller Bolts c. TROUBLE-SHOOTING Most treadmill problems can be electrically rated for 120 volts AC and...
English Manual
Page 26
... the power cord. If necessary, loosen the Reed Switch Screw (26) and move the key and UNPLUG THE POWER CORD. b Using the allen wrench, turn the left , first re- ment bolt counterclockwise, and the right bolt clock- Repeat until the Magnet is centered. Turn the Pulley until the walking belt is aligned with the Reed Switch. PROBLEM: The Speed/Minutes-Mile display on , first remove the key and UNPLUG THE POWER CORD. Re-attach the hood and run the treadmill...
... the power cord. If necessary, loosen the Reed Switch Screw (26) and move the key and UNPLUG THE POWER CORD. b Using the allen wrench, turn the left , first re- ment bolt counterclockwise, and the right bolt clock- Repeat until the Magnet is centered. Turn the Pulley until the walking belt is aligned with the Reed Switch. PROBLEM: The Speed/Minutes-Mile display on , first remove the key and UNPLUG THE POWER CORD. Re-attach the hood and run the treadmill...

English Manual
Page 34
... THE PRODUCT (IMAGE¨ 10.4Qi treadmill) ¥ The MODEL NUMBER OF THE PRODUCT (831.299351) ¥ The KEY NUMBER AND DESCRIPTION OF THE PART (see the EXPLODED DRAWING and PART LIST included in this SEARS TREADMILL EXERCISER, contact the nearest SEARS Service Center throughout the United States and SEARS will repair or replace the TREADMILL EXERCISER, free of purchase, if failure occurs due to state. This warranty gives you specific legal rights, and...
... THE PRODUCT (IMAGE¨ 10.4Qi treadmill) ¥ The MODEL NUMBER OF THE PRODUCT (831.299351) ¥ The KEY NUMBER AND DESCRIPTION OF THE PART (see the EXPLODED DRAWING and PART LIST included in this SEARS TREADMILL EXERCISER, contact the nearest SEARS Service Center throughout the United States and SEARS will repair or replace the TREADMILL EXERCISER, free of purchase, if failure occurs due to state. This warranty gives you specific legal rights, and...


