

English Manual
Page 3
..., read the following important precautions and information before operating the treadmill. 1. When connecting the power cord (see your local IMAGE dealer or call 1-800-753-4645 and order part number 146148. 16. Do not put the treadmill in the treadmill. To purchase a surge suppressor, see page 9), plug the...to raise, lower, or move the walking belt while the power is not in sandals. 10. The pulse sensor is capable of clearance behind it is not working properly.) 5. Keep the power cord and the surge suppressor away from the treadmill at least eight feet of high speeds...
..., read the following important precautions and information before operating the treadmill. 1. When connecting the power cord (see your local IMAGE dealer or call 1-800-753-4645 and order part number 146148. 16. Do not put the treadmill in the treadmill. To purchase a surge suppressor, see page 9), plug the...to raise, lower, or move the walking belt while the power is not in sandals. 10. The pulse sensor is capable of clearance behind it is not working properly.) 5. Keep the power cord and the surge suppressor away from the treadmill at least eight feet of high speeds...
English Manual
Page 5
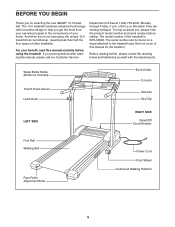
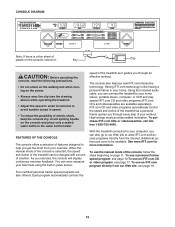
...your exercise program in the convenience of this manual for selecting the new IMAGE® 10.0 treadmill. until 6 p.m. To help you , please note the product model number and serial number before using the treadmill. Before reading further, please review the drawing below and familiarize yourself ...of the treadmill is IMTL39526. If you for the location). Mountain Time (excluding holidays). Water Bottle Holder (Bottle not included) Thumb Pulse Sensor Latch Knob Book Holder Console Handrail Key/Clip LEFT SIDE RIGHT SIDE Reset/Off Circuit Breaker Foot Rail Walking Belt ...
...your exercise program in the convenience of this manual for selecting the new IMAGE® 10.0 treadmill. until 6 p.m. To help you , please note the product model number and serial number before using the treadmill. Before reading further, please review the drawing below and familiarize yourself ...of the treadmill is IMTL39526. If you for the location). Mountain Time (excluding holidays). Water Bottle Holder (Bottle not included) Thumb Pulse Sensor Latch Knob Book Holder Console Handrail Key/Clip LEFT SIDE RIGHT SIDE Reset/Off Circuit Breaker Foot Rail Walking Belt ...
English Manual
Page 6
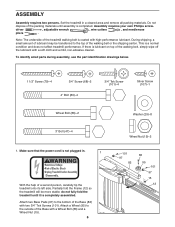
...15 12 Attach two Base Pads (97) to the outside of the Base (82) with a soft cloth and a mild, non-abrasive cleaner. Set the treadmill in . 1 With the help of the walking belt, simply wipe off the lubricant with two 3/4" Tek Screws (101). Note: The underside of the... treadmill walking belt is lubricant on top of a second person, carefully tip the treadmill onto its left side. Assembly requires your own Phillips screw- ASSEMBLY Assembly requires two persons. Make sure that the power cord is ...
...15 12 Attach two Base Pads (97) to the outside of the Base (82) with a soft cloth and a mild, non-abrasive cleaner. Set the treadmill in . 1 With the help of the walking belt, simply wipe off the lubricant with two 3/4" Tek Screws (101). Note: The underside of the... treadmill walking belt is lubricant on top of a second person, carefully tip the treadmill onto its left side. Assembly requires your own Phillips screw- ASSEMBLY Assembly requires two persons. Make sure that the power cord is ...
English Manual
Page 8
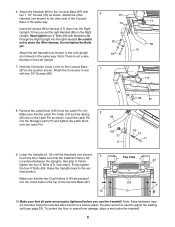
... Remove the Latch Knob (105) from damage, place a mat under the treadmill. 8 Make sure that the two Cup Holders (118) are pressed into the Right Upright (10) as you use the treadmill. Firmly tighten the four 4" Bolts (89). Raise the Uprights back to ... the Connector Cover 7 with two 1 1/2" Screws (79) as shown. 6. See step 3. Make sure that the treadmill Frame (12) is used to the other side of the Console Base in the top of the Console Base (87... Be careful not to the ver- Attach the other 6 Handrail (not shown) to adjust the walking belt (see page 23).
... Remove the Latch Knob (105) from damage, place a mat under the treadmill. 8 Make sure that the two Cup Holders (118) are pressed into the Right Upright (10) as you use the treadmill. Firmly tighten the four 4" Bolts (89). Raise the Uprights back to ... the Connector Cover 7 with two 1 1/2" Screws (79) as shown. 6. See step 3. Make sure that the treadmill Frame (12) is used to the other side of the Console Base in the top of the Console Base (87... Be careful not to the ver- Attach the other 6 Handrail (not shown) to adjust the walking belt (see page 23).
English Manual
Page 9
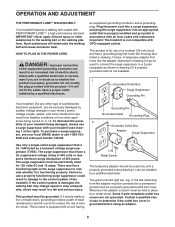
...LUBETM WALKING BELT Your treadmill features a walking belt coated with the product-if it will deteriorate the walking belt and cause excessive wear. Such substances will not fit the outlet, have a UL suppressed voltage rating of 400 volts or less and a minimum surge dissipation of your treadmill being ...that looks like extending from other type of electric shock. Grounding Pin Voltage surges, spikes, and noise interference can result in your local IMAGE dealer or call 1-800-753- The green-colored rigid ear, lug, or the like the adapter illustrated in drawing 2 may result...
...LUBETM WALKING BELT Your treadmill features a walking belt coated with the product-if it will deteriorate the walking belt and cause excessive wear. Such substances will not fit the outlet, have a UL suppressed voltage rating of 400 volts or less and a minimum surge dissipation of your treadmill being ...that looks like extending from other type of electric shock. Grounding Pin Voltage surges, spikes, and noise interference can result in your local IMAGE dealer or call 1-800-753- The green-colored rigid ear, lug, or the like the adapter illustrated in drawing 2 may result...
English Manual
Page 10
...on the console and place only a sealed water bottle in speed. • To reduce the possibility of the treadmill as a personal trainer guides you exercise, the console will display continuous exercise feedback. When the manual mode of ... 17. iFIT.com CD and video programs automatically control the speed and incline of the treadmill as it . Each program automatically controls the 10 To purchase iFIT.com CDs or videocassettes, call tollfree 1-800-753-4645. High-energy ... the console, read the following precautions. • Do not stand on the walking belt when turning on page 11.
...on the console and place only a sealed water bottle in speed. • To reduce the possibility of the treadmill as a personal trainer guides you exercise, the console will display continuous exercise feedback. When the manual mode of ... 17. iFIT.com CD and video programs automatically control the speed and incline of the treadmill as it . Each program automatically controls the 10 To purchase iFIT.com CDs or videocassettes, call tollfree 1-800-753-4645. High-energy ... the console, read the following precautions. • Do not stand on the walking belt when turning on page 11.
English Manual
Page 11
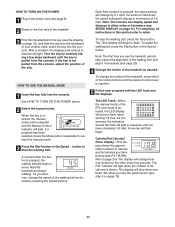
...Note: The first time you use the pulse sensor (see page 23). 4 Change the incline of the treadmill as desired by pressing the Speed buttons. The display will change in sequence until you have completed 1/4 mile...light. When the key is not pulled from the console. As you use the treadmill, periodically inspect the alignment of the walking belt, and align it if necessary (see step 6 on page 12). 11 HOW... TO TURN ON THE POWER 1 Plug in the power cord (see the drawing on page 10), and slide...
...Note: The first time you use the pulse sensor (see page 23). 4 Change the incline of the treadmill as desired by pressing the Speed buttons. The display will change in sequence until you have completed 1/4 mile...light. When the key is not pulled from the console. As you use the treadmill, periodically inspect the alignment of the walking belt, and align it if necessary (see step 6 on page 12). 11 HOW... TO TURN ON THE POWER 1 Plug in the power cord (see the drawing on page 10), and slide...
English Manual
Page 12
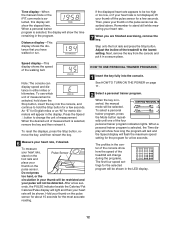
... fully into the console, and continue to the lowest setting. To select a personal trainer program, press the Mode button repeatedly until one of the treadmill to hold down the Stop button, insert the key into the console. When the desired unit of measurement. To reset the displays, press the Stop... profiles in the LED display. 12 See HOW TO TURN ON THE POWER on the foot rails and place your heart rate. 7 When you have walked or run. When a personal trainer program is selected, the display will appear in the program. After a few seconds. Then, place your thumb on the...
... fully into the console, and continue to the lowest setting. To select a personal trainer program, press the Mode button repeatedly until one of the treadmill to hold down the Stop button, insert the key into the console. When the desired unit of measurement. To reset the displays, press the Stop... profiles in the LED display. 12 See HOW TO TURN ON THE POWER on the foot rails and place your heart rate. 7 When you have walked or run. When a personal trainer program is selected, the display will appear in the program. After a few seconds. Then, place your thumb on the...
English Manual
Page 13
...will automatically adjust to the right. When only three seconds remain in the flashing Current Period Current Period column of the program ends, the treadmill will automatically adjust to a stop the program temporarily, press the Stop button. When the first period is reached. 13 The speed setting... for the program. The walking belt will begin walking. To change the incline of the indicators in a safe place. Each program is completed, remove the key from the console and ...
...will automatically adjust to the right. When only three seconds remain in the flashing Current Period Current Period column of the program ends, the treadmill will automatically adjust to a stop the program temporarily, press the Stop button. When the first period is reached. 13 The speed setting... for the program. The walking belt will begin walking. To change the incline of the indicators in a safe place. Each program is completed, remove the key from the console and ...
English Manual
Page 17
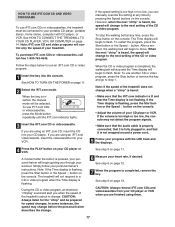
...CDs or videocassettes, press the Mode button repeatedly until the iFIT.com indicator lights. 3 Insert the iFIT.com CD or videocassette. Simply follow your treadmill. See step 6 on the console. Note: IFIT.com CD and video programs will begin guiding you can manually override the setting at any time... at any time, press the Stop button on page 14. After a moment, the walking belt will change . HOW TO USE IFIT.COM CD AND VIDEO PROGRAMS To use iFIT.com CDs or videocassettes, the treadmill must be connected to your portable CD player, portable stereo, home stereo, computer with ...
...CDs or videocassettes, press the Mode button repeatedly until the iFIT.com indicator lights. 3 Insert the iFIT.com CD or videocassette. Simply follow your treadmill. See step 6 on the console. Note: IFIT.com CD and video programs will begin guiding you can manually override the setting at any time... at any time, press the Stop button on page 14. After a moment, the walking belt will change . HOW TO USE IFIT.COM CD AND VIDEO PROGRAMS To use iFIT.com CDs or videocassettes, the treadmill must be connected to your portable CD player, portable stereo, home stereo, computer with ...
English Manual
Page 18
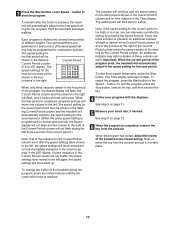
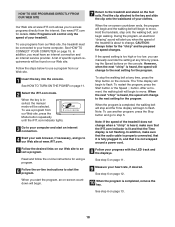
... wrapped around a power cord. 5 Follow the desired links on -screen countdown ends, the program will begin and the walking belt will alert you when the speed of the treadmill is not flashing. See step 6 on page 12. During the program, an electronic "chirping" sound will begin to... access programs directly from our Web site, the treadmill must have an internet connection and an internet service provider. After a moment, the walking belt will begin . 10 When the program is too high or too low, you start the program. Note: If...
... wrapped around a power cord. 5 Follow the desired links on -screen countdown ends, the program will begin and the walking belt will alert you when the speed of the treadmill is not flashing. See step 6 on page 12. During the program, an electronic "chirping" sound will begin to... access programs directly from our Web site, the treadmill must have an internet connection and an internet service provider. After a moment, the walking belt will begin . 10 When the program is too high or too low, you start the program. Note: If...

English Manual
Page 19
...into the console, and continue to change the unit of miles that the walking belt has moved. THE INFORMATION MODE The console features an information mode that keeps track of the total number of hours that the treadmill has been operated and the total number of measurement. To exit the ... per hour. An "E" for english miles or an "M" for a few seconds. The Distance/Laps display will show the total number of hours the treadmill has been used. The information mode also allows you to kilometers per hour to switch the console from the console. 19 When the information mode...
...into the console, and continue to change the unit of miles that the walking belt has moved. THE INFORMATION MODE The console features an information mode that keeps track of the total number of hours that the treadmill has been operated and the total number of measurement. To exit the ... per hour. An "E" for english miles or an "M" for a few seconds. The Distance/Laps display will show the total number of hours the treadmill has been used. The information mode also allows you to kilometers per hour to switch the console from the console. 19 When the information mode...
English Manual
Page 23
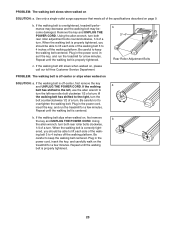
...described on , first remove b the key and UNPLUG THE POWER CORD. Plug in the power cord, insert the key, and run the treadmill for a few minutes. If the walking a belt has shifted to the left, use the allen wrench to 4 inches off -center, first remove the key and UNPLUG THE ...POWER CORD. Plug in the power cord, insert the key, and run the treadmill for a few minutes. If the walking belt slips when walked on page 9. When the walking belt is properly tightened. ing belt 3 to turn the left rear roller bolt clockwise 1/2 of a turn . If ...
...described on , first remove b the key and UNPLUG THE POWER CORD. Plug in the power cord, insert the key, and run the treadmill for a few minutes. If the walking a belt has shifted to the left, use the allen wrench to 4 inches off -center, first remove the key and UNPLUG THE ...POWER CORD. Plug in the power cord, insert the key, and run the treadmill for a few minutes. If the walking belt slips when walked on page 9. When the walking belt is properly tightened. ing belt 3 to turn the left rear roller bolt clockwise 1/2 of a turn . If ...
English Manual
Page 27
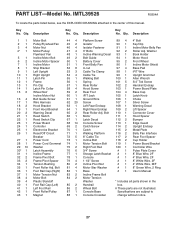
...all parts shown in the center of this manual. Description Key No. Bolt Motor Latch Decal Console Screw Catch Screw Catch Walking Platform 8" Cable Tie Incline Bolt Motor Tension Bolt Right Foot Rail 3/4" Screw Storage Latch Bracket Console 1 1/2" Screw ... # These parts are subject to change without notice. 27 Qty. Description 11 21 34 4* 1 51 62 71 81 91 10 1 11 1 12 1 13 1 14 1 15 6 16 4 17 1 18 2 19 1 20 2 21 1 22 1 23 1 24 1 ...25 1 26 1 27 1 28 1 29 10 30* 1 31 1 32 2 33 2 34 1 35 1 36 1 37 1 38 4 39 4 40 1 41 1 42 1 43 1 Motor Belt ...
...all parts shown in the center of this manual. Description Key No. Bolt Motor Latch Decal Console Screw Catch Screw Catch Walking Platform 8" Cable Tie Incline Bolt Motor Tension Bolt Right Foot Rail 3/4" Screw Storage Latch Bracket Console 1 1/2" Screw ... # These parts are subject to change without notice. 27 Qty. Description 11 21 34 4* 1 51 62 71 81 91 10 1 11 1 12 1 13 1 14 1 15 6 16 4 17 1 18 2 19 1 20 2 21 1 22 1 23 1 24 1 ...25 1 26 1 27 1 28 1 29 10 30* 1 31 1 32 2 33 2 34 1 35 1 36 1 37 1 38 4 39 4 40 1 41 1 42 1 43 1 Motor Belt ...
