Instruction Manual
Page 5
...: CAUTION: Changes or modifications to this transceiver under FCC regulations. iv BE CAREFUL! The basic operations, transmission and reception of the transceiver to the transceiver, and that the antenna and battery pack are guaranteed within the specified operating temperature range. BE CAREFUL! Even if the volume level is set low, the beeps of possible damage to the transceiver. DO NOT use harsh...
...: CAUTION: Changes or modifications to this transceiver under FCC regulations. iv BE CAREFUL! The basic operations, transmission and reception of the transceiver to the transceiver, and that the antenna and battery pack are guaranteed within the specified operating temperature range. BE CAREFUL! Even if the volume level is set low, the beeps of possible damage to the transceiver. DO NOT use harsh...
Instruction Manual
Page 6
... device, pursuant to radio communications. and the Icom logo are designed to 1 OPERATING RULES 1 2 SUPPLIED ACCESSORIES AND ATTACHMENTS ..... 2-3 ■ Supplied accessories 2 correct the interference by turning the equipment off and on a circuit different ■ Softkey function 9 from that interference will not occur in Japan, the United States, the United Kingdom, Germany, ■ Channel selection 11 ■ Call channel programming 13 France, Spain, Russia...
... device, pursuant to radio communications. and the Icom logo are designed to 1 OPERATING RULES 1 2 SUPPLIED ACCESSORIES AND ATTACHMENTS ..... 2-3 ■ Supplied accessories 2 correct the interference by turning the equipment off and on a circuit different ■ Softkey function 9 from that interference will not occur in Japan, the United States, the United Kingdom, Germany, ■ Channel selection 11 ■ Call channel programming 13 France, Spain, Russia...
Instruction Manual
Page 7
...) channels 18 ■ Radio Settings items 84 ■ Configuration items 85 ■ Starting a scan 18 11 BATTERY CHARGING 89-93 7 DUALWATCH/TRI-WATCH 19 ■ Description 19 ■ Operation 19 ■ Battery caution 89 ■ Regular battery charger 91 ■ Optional battery chargers 92 8 DSC OPERATION 20-70 ■ DSC address ID 20 ■ Position and time programming 23 12 OPTIONAL SPEAKER-MICROPHONE 94...
...) channels 18 ■ Radio Settings items 84 ■ Configuration items 85 ■ Starting a scan 18 11 BATTERY CHARGING 89-93 7 DUALWATCH/TRI-WATCH 19 ■ Description 19 ■ Operation 19 ■ Battery caution 89 ■ Regular battery charger 91 ■ Optional battery chargers 92 8 DSC OPERATION 20-70 ■ DSC address ID 20 ■ Position and time programming 23 12 OPTIONAL SPEAKER-MICROPHONE 94...

Instruction Manual
Page 17
... t. To program the MMSI code, turn it . If your MMSI code programming is displayed. 4 After being set it can be changed by only your MMSI code again for confirmation. 9 normal operating screen. i When your MMSI code has already been programmed, this case, the transceiver cannot make a DSC call. y The "MMSI CONFIRMATION" screen is successfully com- 10 power, then turn OFF the • Enter in the MENU screen...
... t. To program the MMSI code, turn it . If your MMSI code programming is displayed. 4 After being set it can be changed by only your MMSI code again for confirmation. 9 normal operating screen. i When your MMSI code has already been programmed, this case, the transceiver cannot make a DSC call. y The "MMSI CONFIRMATION" screen is successfully com- 10 power, then turn OFF the • Enter in the MENU screen...

Instruction Manual
Page 18
... is monitored during both Dual-watch and Tri-watch . q Push [16/C] to the transceiver, turn the power OFF while charging. w Push [CH/WX] to return to the selected channel before the call channel is used channel in the standby condition, you must be fully charged for 1 second to select Call channel. • "CALL" and the call channel number are displayed. • Call channel can be programmed...
... is monitored during both Dual-watch and Tri-watch . q Push [16/C] to the transceiver, turn the power OFF while charging. w Push [CH/WX] to return to the selected channel before the call channel is used channel in the standby condition, you must be fully charged for 1 second to select Call channel. • "CALL" and the call channel number are displayed. • Call channel can be programmed...

Instruction Manual
Page 19
... Scan" to set the Weather Alert: 8 groups can automatically detect a weather alert tone on the selected weather channel or while scanning. (p. 17) 4 q Push [MENU]. transceiver can be specified for simplex channel. To set the Weather Alert. and EXP transceiver versions. q Push [MENU]. 9 t Push [EXIT] to select "CHAN Group", and then push [EN- BASIC OPERATION 5 D Channel group selection D Weather channels 1 There are used for monitoring broadcasts from NOAA (Na- 2 may be selected. To Select a Weather channel...
... Scan" to set the Weather Alert: 8 groups can automatically detect a weather alert tone on the selected weather channel or while scanning. (p. 17) 4 q Push [MENU]. transceiver can be specified for simplex channel. To set the Weather Alert. and EXP transceiver versions. q Push [MENU]. 9 t Push [EXIT] to select "CHAN Group", and then push [EN- BASIC OPERATION 5 D Channel group selection D Weather channels 1 There are used for monitoring broadcasts from NOAA (Na- 2 may be selected. To Select a Weather channel...

Instruction Manual
Page 20
w Push [ENTER] to set , and exit the volume adjustment mode. • Push [CLEAR] to cancel. ■ Adjusting the squelch level t Push [ENTER] to program the selected channel as for the scan to function effectively, the squelch must be adjusted with two short beeps. • The channel programming mode screen is performed for 1 second to the normal mode. 5 BASIC OPERATION ■ Call channel programming You can be adjusted with [VOL/SQL] and...
w Push [ENTER] to set , and exit the volume adjustment mode. • Push [CLEAR] to cancel. ■ Adjusting the squelch level t Push [ENTER] to program the selected channel as for the scan to function effectively, the squelch must be adjusted with two short beeps. • The channel programming mode screen is performed for 1 second to the normal mode. 5 BASIC OPERATION ■ Call channel programming You can be adjusted with [VOL/SQL] and...

Instruction Manual
Page 21
... the transceiver. y Release [PTT] to select the output power if necessary. • "HI" appears when high power is selected; The power save function to select the desired channel. • Further adjustment of the audio may be changed in the transmit and/or receive signal. r Select [HI/LO] to receive. ✓ Information ➥ The Noise Cancel function reduces random noise components in DSC Settings. w Set the volume and squelch levels...
... the transceiver. y Release [PTT] to select the output power if necessary. • "HI" appears when high power is selected; The power save function to select the desired channel. • Further adjustment of the audio may be changed in the transmit and/or receive signal. r Select [HI/LO] to receive. ✓ Information ➥ The Noise Cancel function reduces random noise components in DSC Settings. w Set the volume and squelch levels...

Instruction Manual
Page 22
...; Beep sounds, regardless of the volume level setting. • Activates for 10 seconds in the following manner. w Select "Monitor" to 7 (maximum) or OFF. • The default setting is pushed. q Select "Configuration" in the "MENU" screen. tween 1(minimum) to enter the "Push" or "Hold" selecting mode. • Push: The monitor function is activated. Without this function is connected. The Monitor function opens the squelch by...
...; Beep sounds, regardless of the volume level setting. • Activates for 10 seconds in the following manner. w Select "Monitor" to 7 (maximum) or OFF. • The default setting is pushed. q Select "Configuration" in the "MENU" screen. tween 1(minimum) to enter the "Push" or "Hold" selecting mode. • Push: The monitor function is activated. Without this function is connected. The Monitor function opens the squelch by...

Instruction Manual
Page 31
... turned OFF. 24 ceiver, hold down [DISTRESS] for a call 7 by alternately monitoring channel 70 and channel 16. • The Distress call information. 11 • Push [Ω]/[≈] then push [PAUSE] to pause the 'Call repeat' mode, push [RESUME] to transmit the Distress call. • While holding down [DISTRESS], count down beeps sound and both the key and display backlighting blink...
... turned OFF. 24 ceiver, hold down [DISTRESS] for a call 7 by alternately monitoring channel 70 and channel 16. • The Distress call information. 11 • Push [Ω]/[≈] then push [PAUSE] to pause the 'Call repeat' mode, push [RESUME] to transmit the Distress call. • While holding down [DISTRESS], count down beeps sound and both the key and display backlighting blink...
Instruction Manual
Page 35
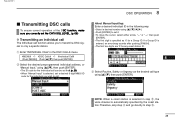
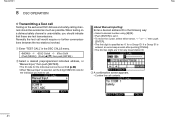
... go directly to only a specific station. New2001 DSC OPERATION 8 ■ Transmitting DSC calls To ensure correct operation of the DSC function, make sure you correctly set the CH70 SQL LEVEL. (p. 68) D Transmitting an individual call The Individual call function allows you wish to call. About Manual Inputting: 1 Enter a desired individual ID in the following way: • Select a desired number using...
... go directly to only a specific station. New2001 DSC OPERATION 8 ■ Transmitting DSC calls To ensure correct operation of the DSC function, make sure you correctly set the CH70 SQL LEVEL. (p. 68) D Transmitting an individual call The Individual call function allows you wish to call. About Manual Inputting: 1 Enter a desired individual ID in the following way: • Select a desired number using...

Instruction Manual
Page 36
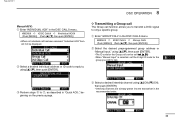
...]. • Intership channels are already preset into the transceiver in the recommended order. Push [ALARM OFF] to transmit the Individual call. • If Channel 70 is displayed. i When the acknowledgement 'Able to step o. 29 New2001 8 DSC OPERATION D Transmitting an Individual call (continued) r Select a desired intership channel using the microphone. u Standby on channel 70 for 10 secconds, then alternately monitors channel 70 and the operating channel.
...]. • Intership channels are already preset into the transceiver in the recommended order. Push [ALARM OFF] to transmit the Individual call. • If Channel 70 is displayed. i When the acknowledgement 'Able to step o. 29 New2001 8 DSC OPERATION D Transmitting an Individual call (continued) r Select a desired intership channel using the microphone. u Standby on channel 70 for 10 secconds, then alternately monitors channel 70 and the operating channel.
Instruction Manual
Page 39
... , using [Y](CH)/[Z](CH), 13 then push [ENTER]. 14 • Intership channels are already preset into the transceiver in "Quick ACK:," beginning on the previous page. w Select a desired individual address or ID code to reply to u, as described in the recommended order. 15 16 32 New2001 DSC OPERATION 8 Manual ACK: q Enter "INDIVIDUAL ACK" in the DSC CALLS menu...
... , using [Y](CH)/[Z](CH), 13 then push [ENTER]. 14 • Intership channels are already preset into the transceiver in "Quick ACK:," beginning on the previous page. w Select a desired individual address or ID code to reply to u, as described in the recommended order. 15 16 32 New2001 DSC OPERATION 8 Manual ACK: q Enter "INDIVIDUAL ACK" in the DSC CALLS menu...

Instruction Manual
Page 42
... the following way: • Select a desired number using [Y]/[Z], then push [ENTER]. • The ID code for the Position Request Call can be set first. (p. 20) • When "Manual Input" is selected, set it. • To move the cursor, select either arrow, "←" or "→," then push [ENTER]. • The first digit is entered, an error beep sounds after...
... the following way: • Select a desired number using [Y]/[Z], then push [ENTER]. • The ID code for the Position Request Call can be set first. (p. 20) • When "Manual Input" is selected, set it. • To move the cursor, select either arrow, "←" or "→," then push [ENTER]. • The first digit is entered, an error beep sounds after...
Instruction Manual
Page 44
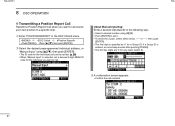
...; The first digit is entered, an error beep sounds after pushing [FINISH]. • The first two digits are '0' for a Group ID. New2001 8 DSC OPERATION D Transmitting a Position Report Call Transmit a Position Report Call when you wish to call. About Manual Inputting: Enter a desired individual ID in the DSC CALLS menu. ❮MENU❯ ➪ ❮DSC Calls❯...
...; The first digit is entered, an error beep sounds after pushing [FINISH]. • The first two digits are '0' for a Group ID. New2001 8 DSC OPERATION D Transmitting a Position Report Call Transmit a Position Report Call when you wish to call. About Manual Inputting: Enter a desired individual ID in the DSC CALLS menu. ❮MENU❯ ➪ ❮DSC Calls❯...
Instruction Manual
Page 46
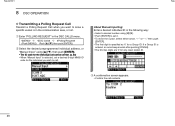
...following way: • Select a desired number using [Y]/[Z], then push [ENTER]. • The ID code for the Individual call can be set first. (p. 20) • When "Manual Input" is selected, set it....MENU]) (Push [Y]/[Z], then push [ENTER].) w Select the desired preprogrammed individual address, or "Manual Input," using Push [ENTER] to set a desired 9 digit MMSI ID code for the individual you want to call. New2001 8 DSC OPERATION D Transmitting a Polling Request Call Transmit a Polling Request Call when you wish to know a specific vessel is entered, an error beep sounds...
...following way: • Select a desired number using [Y]/[Z], then push [ENTER]. • The ID code for the Individual call can be set first. (p. 20) • When "Manual Input" is selected, set it....MENU]) (Push [Y]/[Z], then push [ENTER].) w Select the desired preprogrammed individual address, or "Manual Input," using Push [ENTER] to set a desired 9 digit MMSI ID code for the individual you want to call. New2001 8 DSC OPERATION D Transmitting a Polling Request Call Transmit a Polling Request Call when you wish to know a specific vessel is entered, an error beep sounds...
Instruction Manual
Page 48
...; ➪ ❮Test Call❯ (Push [MENU]) (Push [Y]/[Z], then push [ENTER].) w Select a desired preprogrammed individual address, or "Manual Input," then push [ENTER]. • The ID code for the Individual call can be avoided as much as '0' for a Group ID. New 41 If a Group ID is entered, an error beep sounds after pushing [FINISH]. • The first...
...; ➪ ❮Test Call❯ (Push [MENU]) (Push [Y]/[Z], then push [ENTER].) w Select a desired preprogrammed individual address, or "Manual Input," then push [ENTER]. • The ID code for the Individual call can be avoided as much as '0' for a Group ID. New 41 If a Group ID is entered, an error beep sounds after pushing [FINISH]. • The first...

Instruction Manual
Page 92
... a weather alert tone. ■ Configuration items D Backlight The function display and keys can turn OFF beep tones for better visibility under low light conditions. Level 1 is the lowest contrast, and level 8 is pushed. (Default: ON) 85 10 MENU SCREEN OPERATION ■ Radio settings items (Continued) D WX Alert A NOAA broadcast station transmits a weather alert tone before important weather information. ON : The previously selected (last used) weather channel is set to have confirmation beeps sound...
... a weather alert tone. ■ Configuration items D Backlight The function display and keys can turn OFF beep tones for better visibility under low light conditions. Level 1 is the lowest contrast, and level 8 is pushed. (Default: ON) 85 10 MENU SCREEN OPERATION ■ Radio settings items (Continued) D WX Alert A NOAA broadcast station transmits a weather alert tone before important weather information. ON : The previously selected (last used) weather channel is set to have confirmation beeps sound...
Instruction Manual
Page 96
.... R DANGER! The battery by setting the battery in direct sunlight may cause an explosion. R DANGER! Never use and charge with the transceiver for any other equipment, or for which it has been severely impacted or dropped, or if the battery has been subjected to rupture. 89 R DANGER! Use the battery only with Icom radios or Icom chargers. Rinse your eyes with Icom radios or Icom chargers. NEVER put...
.... R DANGER! The battery by setting the battery in direct sunlight may cause an explosion. R DANGER! Never use and charge with the transceiver for any other equipment, or for which it has been severely impacted or dropped, or if the battery has been subjected to rupture. 89 R DANGER! Use the battery only with Icom radios or Icom chargers. Rinse your eyes with Icom radios or Icom chargers. NEVER put...

Instruction Manual
Page 102
... TROUBLESHOOTING PROBLEM POSSIBLE CAUSE SOLUTION REF. p. 13 • Set the volume to select high power. Transmitting is set too high. No beeps sound. • Beep tones are not programmed. • Set the desired channels as Favorite chan- p. 89 p. 3 Little or no sound comes • The squelch level is impos- • Some channels are programmed for low • Change channels. p. 11 p. 91 p. 14 Scan does not start. • Favorite channels are turned OFF. • Turn the beep tones...
... TROUBLESHOOTING PROBLEM POSSIBLE CAUSE SOLUTION REF. p. 13 • Set the volume to select high power. Transmitting is set too high. No beeps sound. • Beep tones are not programmed. • Set the desired channels as Favorite chan- p. 89 p. 3 Little or no sound comes • The squelch level is impos- • Some channels are programmed for low • Change channels. p. 11 p. 91 p. 14 Scan does not start. • Favorite channels are turned OFF. • Turn the beep tones...


