
User Guide
Page 1
IBM ThinkVision™ L170 Monitor User's Guide L170 English
IBM ThinkVision™ L170 Monitor User's Guide L170 English

User Guide
Page 2
First Edition (April/2003) Note: For important information, refer to the Monitor Safety and Warranty manual that comes with this monitor.
First Edition (April/2003) Note: For important information, refer to the Monitor Safety and Warranty manual that comes with this monitor.
User Guide
Page 3
...ESPAÑOL Contents Safety (Read first 2 Setting up the monitor 3 Product Description 3 Handling Instructions 3 Workplace Preparation 4 Adjusting the Monitor Position 4 Working Practices 4 Caring for your Monitor 5 Connecting your Monitor 6 Switching on your Monitor 7 Device Driver Installation 8 Windows 95/98 8 Windows 2000/Me...2000, Windows NT, Windows Me or Windows XP 13 Manual Setup 14 Adjusting Your LCD Monitor 15 User controls 15 On-screen display (OSD) controls 17 Further Information 20 Display modes 21 Power Management 22 Product Disposal 22 Troubleshooting 23 ...
...ESPAÑOL Contents Safety (Read first 2 Setting up the monitor 3 Product Description 3 Handling Instructions 3 Workplace Preparation 4 Adjusting the Monitor Position 4 Working Practices 4 Caring for your Monitor 5 Connecting your Monitor 6 Switching on your Monitor 7 Device Driver Installation 8 Windows 95/98 8 Windows 2000/Me...2000, Windows NT, Windows Me or Windows XP 13 Manual Setup 14 Adjusting Your LCD Monitor 15 User controls 15 On-screen display (OSD) controls 17 Further Information 20 Display modes 21 Power Management 22 Product Disposal 22 Troubleshooting 23 ...
User Guide
Page 5
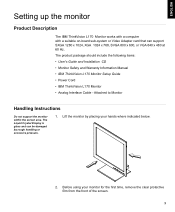
... package should include the following items: • User's Guide and Installation CD • Monitor Safety and Warranty Information Manual • IBM ThinkVision L170 Monitor Setup Guide • Power Cord • IBM ThinkVision L170 Monitor • Analog Interface Cable - The Liquid Crystal Display is glass and can support SXGA 1280...ÇAIS DEUTSCH Setting up the monitor Product Description The IBM ThinkVision L170 Monitor works with a computer with a suitable on-board sub-system or Video Adapter card that can be damaged by placing your monitor for the first time, remove the...
... package should include the following items: • User's Guide and Installation CD • Monitor Safety and Warranty Information Manual • IBM ThinkVision L170 Monitor Setup Guide • Power Cord • IBM ThinkVision L170 Monitor • Analog Interface Cable - The Liquid Crystal Display is glass and can support SXGA 1280...ÇAIS DEUTSCH Setting up the monitor Product Description The IBM ThinkVision L170 Monitor works with a computer with a suitable on-board sub-system or Video Adapter card that can be damaged by placing your monitor for the first time, remove the...
User Guide
Page 6
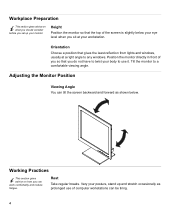
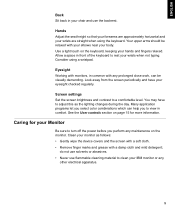
...that gives the least reflection from lights and windows, usually at your body to twist your workstation. Rest Take regular breaks. Tilt the monitor to any windows. Orientation Choose a position that you do not have to use of the screen is slightly below . Working Practices ...This section gives advice on what you should consider before you set up and stretch occasionally as shown below your monitor. Vary your posture, stand up your eye level when you sit at a right angle to a comfortable viewing angle. Workplace Preparation This...
...that gives the least reflection from lights and windows, usually at your body to twist your workstation. Rest Take regular breaks. Tilt the monitor to any windows. Orientation Choose a position that you do not have to use of the screen is slightly below . Working Practices ...This section gives advice on what you should consider before you set up and stretch occasionally as shown below your monitor. Vary your posture, stand up your eye level when you sit at a right angle to a comfortable viewing angle. Workplace Preparation This...
User Guide
Page 7
...page 15 for your chair and use flammable cleaning material to clean your monitor as the lighting changes during the day. do not use solvents or abrasives. • Never use the backrest. Clean your IBM monitor or any other electrical apparatus. 5 ITALIANO JAPANESE COMPL & WARR ENGLISH ...FRANÇAIS DEUTSCH ESPAÑOL Back Sit back in your Monitor Be sure to turn off the power before you to view in...
...page 15 for your chair and use flammable cleaning material to clean your monitor as the lighting changes during the day. do not use solvents or abrasives. • Never use the backrest. Clean your IBM monitor or any other electrical apparatus. 5 ITALIANO JAPANESE COMPL & WARR ENGLISH ...FRANÇAIS DEUTSCH ESPAÑOL Back Sit back in your Monitor Be sure to turn off the power before you to view in...
User Guide
Page 8
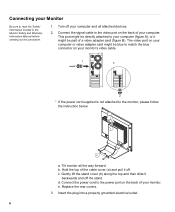
...covers. 3. Hold the top of your computer and all the way forward. Connect the power cord to read the 'Safety' Information located in the Monitor Safety and Warranty Information Manual before carrying out this procedure. 1. e. Connecting your computer. The video port on your computer or video adapter card ...figure B). Gently lift the stand cover (b) along the top and then slide it off the stand. This port might be directly attached to your monitor's video cable. * If the power cord supplied is not attached to the video port on the back of the cable cover (a) and pull ...
...covers. 3. Hold the top of your computer and all the way forward. Connect the power cord to read the 'Safety' Information located in the Monitor Safety and Warranty Information Manual before carrying out this procedure. 1. e. Connecting your computer. The video port on your computer or video adapter card ...figure B). Gently lift the stand cover (b) along the top and then slide it off the stand. This port might be directly attached to your monitor's video cable. * If the power cord supplied is not attached to the video port on the back of the cable cover (a) and pull ...
User Guide
Page 9
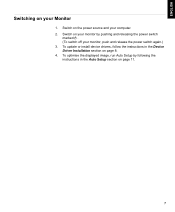
ENGLISH FRANÇAIS DEUTSCH ESPAÑOL ITALIANO Switching on your computer. 2. Switch on page 11. 7 JAPANESE COMPL & WARR Switch on page 8. 4. To update or install device drivers, follow the instructions in the Auto Setup section on the power source and your Monitor 1. To optimise the displayed image, run Auto Setup by following the instructions in the Device Driver Installation section on your monitor by pushing and releasing the power switch marked . (To switch off your monitor, push and release the power switch again.) 3.
ENGLISH FRANÇAIS DEUTSCH ESPAÑOL ITALIANO Switching on your computer. 2. Switch on page 11. 7 JAPANESE COMPL & WARR Switch on page 8. 4. To update or install device drivers, follow the instructions in the Auto Setup section on the power source and your Monitor 1. To optimise the displayed image, run Auto Setup by following the instructions in the Device Driver Installation section on your monitor by pushing and releasing the power switch marked . (To switch off your monitor, push and release the power switch again.) 3.

User Guide
Page 10
...on CHANGE button and then select the NEXT button. 4. Open the DISPLAY PROPERTIES window by clicking on page 13 On LCD monitors, unlike CRTs, a faster refresh rate does not improve display quality. Click the CHANGE MONITOR TYPE button. • In case of the known drivers for this device so that the..., CONTROL PANEL and then double - Insert the Setup CD into Windows 95 or Windows 98. Ensure that your hard disk drive. 11. Choose IBM ThinkVision L170 monitor and Click OK. The system will be loaded from the CD to boot into the CD driver: and click the HAVE DISK button. 8.
...on CHANGE button and then select the NEXT button. 4. Open the DISPLAY PROPERTIES window by clicking on page 13 On LCD monitors, unlike CRTs, a faster refresh rate does not improve display quality. Click the CHANGE MONITOR TYPE button. • In case of the known drivers for this device so that the..., CONTROL PANEL and then double - Insert the Setup CD into Windows 95 or Windows 98. Ensure that your hard disk drive. 11. Choose IBM ThinkVision L170 monitor and Click OK. The system will be loaded from the CD to boot into the CD driver: and click the HAVE DISK button. 8.
User Guide
Page 11
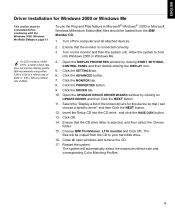
... NEXT button. 12. Turn off the computer and all open windows and remove the CD. 17. Ensure that the CD drive letter is connected correctly. 3. Open the DISPLAY PROPERTIES window by...into Windows 2000 or Windows Me. 4. Ensure that the monitor is selected, and then select the 'Drivers' folder. 15. Turn on page 13 On LCD monitors, unlike CRTs, a faster refresh rate does not improve ...system. Click the SETTINGS tab. 6. Click OK. 14. Choose IBM ThinkVision L170 monitor and Click OK. The system will be completed before continuing with the Windows 2000, Windows Me Auto Setup on ...
... NEXT button. 12. Turn off the computer and all open windows and remove the CD. 17. Ensure that the CD drive letter is connected correctly. 3. Open the DISPLAY PROPERTIES window by...into Windows 2000 or Windows Me. 4. Ensure that the monitor is selected, and then select the 'Drivers' folder. 15. Turn on page 13 On LCD monitors, unlike CRTs, a faster refresh rate does not improve ...system. Click the SETTINGS tab. 6. Click OK. 14. Choose IBM ThinkVision L170 monitor and Click OK. The system will be completed before continuing with the Windows 2000, Windows Me Auto Setup on ...
User Guide
Page 12
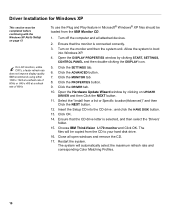
... the MONITOR tab. 8. Choose IBM ThinkVision L170 monitor and Click OK. Open the DISPLAY PROPERTIES window by clicking on the monitor and then the system unit. Insert the Setup CD into Windows XP. 4. Restart the system. Click OK. 14. Turn off the computer and all open windows and remove the CD. 17. The... 13. Ensure that the monitor is selected, and then select the 'Drivers' folder. 15. To use the Plug and Play feature in Microsoft® Windows® XP files should be completed before continuing with the Windows XP Auto Setup on page 13 On LCD monitors, unlike CRTs, a faster...
... the MONITOR tab. 8. Choose IBM ThinkVision L170 monitor and Click OK. Open the DISPLAY PROPERTIES window by clicking on the monitor and then the system unit. Insert the Setup CD into Windows XP. 4. Restart the system. Click OK. 14. Turn off the computer and all open windows and remove the CD. 17. The... 13. Ensure that the monitor is selected, and then select the 'Drivers' folder. 15. To use the Plug and Play feature in Microsoft® Windows® XP files should be completed before continuing with the Windows XP Auto Setup on page 13 On LCD monitors, unlike CRTs, a faster...

User Guide
Page 13
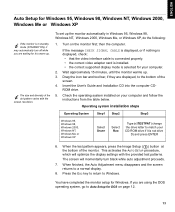
... resolution shown in the range of the utility is set -up for each operating system that if you will have direct access to reset the monitor. When a new mode is for normal operation. When you must perform Auto Setup. Operating System Corresponding Auto Setup procedure DOS Auto Setup for...can choose to run AUTO SETUP for 15 minutes. They do not replace or modify the display driver. The Auto Setup instructions require the monitor to be warmed up utility is provided on the installation CD is selected, repeat this section to Auto Adjustment. This procedure sets up your...
... resolution shown in the range of the utility is set -up for each operating system that if you will have direct access to reset the monitor. When a new mode is for normal operation. When you must perform Auto Setup. Operating System Corresponding Auto Setup procedure DOS Auto Setup for...can choose to run AUTO SETUP for 15 minutes. They do not replace or modify the display driver. The Auto Setup instructions require the monitor to be warmed up utility is provided on the installation CD is selected, repeat this section to Auto Adjustment. This procedure sets up your...
User Guide
Page 14
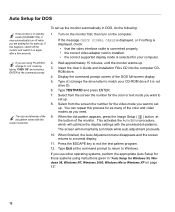
...match your computer. 2. If you are waiting for it may automatically turn black while auto adjustment proceeds. 10. The size and diversity of the monitor. Insert the User's Guide and Installation Files CD into the computer CD- Select from the screen the number for the color or text mode ...-ROM drive if it is in DOS, do the following: 1. This activates the AUTO SETUP procedure, which will momentarily turn off the monitor and switch it on the monitor first; Press the ESCAPE key to exit the test pattern program. 12. When the dot pattern appears, press the Image Setup ( )...
...match your computer. 2. If you are waiting for it may automatically turn black while auto adjustment proceeds. 10. The size and diversity of the monitor. Insert the User's Guide and Installation Files CD into the computer CD- Select from the screen the number for the color or text mode ...-ROM drive if it is in DOS, do the following: 1. This activates the AUTO SETUP procedure, which will momentarily turn off the monitor and switch it on the monitor first; Press the ESCAPE key to exit the test pattern program. 12. When the dot pattern appears, press the Image Setup ( )...
User Guide
Page 15
... 2000, Windows NT, Windows Me or Windows XP Select START Select RUN Type D:\TESTPAT (change the drive letter to Auto Setup for DOS on the monitor first; The screen will optimize the display settings with the screen resolution. Insert the User's Guide and Installation CD into the computer CDROM drive. 5....FRANÇAIS DEUTSCH ESPAÑOL Auto Setup for Windows 95, Windows 98, Windows NT, Windows 2000, Windows Me or Windows XP If the monitor is in Windows 95, Windows 98, Windows NT, Windows 2000, Windows Me, or Windows XP, do the following: 1. Wait approximately 15 minutes, until...
... 2000, Windows NT, Windows Me or Windows XP Select START Select RUN Type D:\TESTPAT (change the drive letter to Auto Setup for DOS on the monitor first; The screen will optimize the display settings with the screen resolution. Insert the User's Guide and Installation CD into the computer CDROM drive. 5....FRANÇAIS DEUTSCH ESPAÑOL Auto Setup for Windows 95, Windows 98, Windows NT, Windows 2000, Windows Me or Windows XP If the monitor is in Windows 95, Windows 98, Windows NT, Windows 2000, Windows Me, or Windows XP, do the following: 1. Wait approximately 15 minutes, until...
User Guide
Page 16
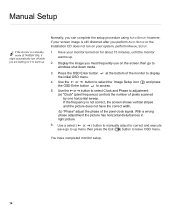
...pixel frequency) controls the number of pixels scanned by one horizontal sweep. You have the correct width. (b) "Phase" adjust the phase of the monitor to leave OSD menu. Display the image you can complete the setup procedure using AUTO SETUP; With a wrong phase adjustment the picture has horizontal ...run on your system, perform MANUAL SETUP. 1. Have your screen image is still distorted after you are waiting for about 15 minutes, until the monitor warms up. 2. and press 5. Use a select ( or ) button to manually adjust to correct and execute save go to warm up ...
...pixel frequency) controls the number of pixels scanned by one horizontal sweep. You have the correct width. (b) "Phase" adjust the phase of the monitor to leave OSD menu. Display the image you can complete the setup procedure using AUTO SETUP; With a wrong phase adjustment the picture has horizontal ...run on your system, perform MANUAL SETUP. 1. Have your screen image is still distorted after you are waiting for about 15 minutes, until the monitor warms up. 2. and press 5. Use a select ( or ) button to manually adjust to correct and execute save go to warm up ...
User Guide
Page 17
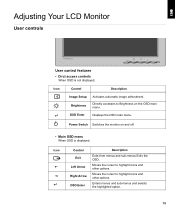
... the OSD main menu. Moves the cursor to highlight icons and other options. ELNIHGS Adjusting Your LCD Monitor User controls FRAINSÇA DUETHSC EPSAÑOL ITALIANO Thinkvision User control features • Dirct access controls When OSD is displayed, Icon Control Exit Left Arrow Right Arrow OSD Enter Description Exits from menus and...
... the OSD main menu. Moves the cursor to highlight icons and other options. ELNIHGS Adjusting Your LCD Monitor User controls FRAINSÇA DUETHSC EPSAÑOL ITALIANO Thinkvision User control features • Dirct access controls When OSD is displayed, Icon Control Exit Left Arrow Right Arrow OSD Enter Description Exits from menus and...
User Guide
Page 19
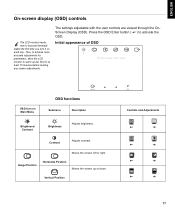
... button ( ) to warm up or down. Image Position Horizontal Position Moves the screen up (be On) for parameters, allow the LCD monitor to activate the OSD. Initial appearance of OSD Brightness/Contrast OSD Icon on each day. Vertical Position OK Controls and Adjustments ITALIANO JAPANESE ...COMPL & WARR 17 ENGLISH FRANÇAIS DEUTSCH ESPAÑOL On-screen display (OSD) controls The LCD monitor needs time to become thermally stable the first time you turn it on Main Menu...
... button ( ) to warm up or down. Image Position Horizontal Position Moves the screen up (be On) for parameters, allow the LCD monitor to activate the OSD. Initial appearance of OSD Brightness/Contrast OSD Icon on each day. Vertical Position OK Controls and Adjustments ITALIANO JAPANESE ...COMPL & WARR 17 ENGLISH FRANÇAIS DEUTSCH ESPAÑOL On-screen display (OSD) controls The LCD monitor needs time to become thermally stable the first time you turn it on Main Menu...
User Guide
Page 21
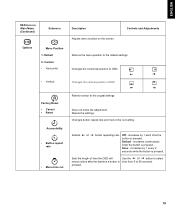
Factory Reset • Cancel • Reset Accessibility • Button repeat rate • Menu time out Resets monitor to the default settings. Resets the settings. Off - Slow - increases by 1 each time the button is pressed. pressed. Default 2. Sets the length of OSD. ENGLISH ...
Factory Reset • Cancel • Reset Accessibility • Button repeat rate • Menu time out Resets monitor to the default settings. Resets the settings. Off - Slow - increases by 1 each time the button is pressed. pressed. Default 2. Sets the length of OSD. ENGLISH ...

User Guide
Page 22
...require a high refresh rate to minimize flicker, TFT technology is normal and the image can be readjusted using AUTO SETUP and the monitor controls. For the display modes listed on how to your computer for details on the next page, the screen image has been ...optimized during manufacture. 20 Further Information Display modes The display mode the monitor uses is controlled by the computer. Therefore, refer to change when the display mode changes. If possible, configure your computer documentation for 1280 ...
...require a high refresh rate to minimize flicker, TFT technology is normal and the image can be readjusted using AUTO SETUP and the monitor controls. For the display modes listed on how to your computer for details on the next page, the screen image has been ...optimized during manufacture. 20 Further Information Display modes The display mode the monitor uses is controlled by the computer. Therefore, refer to change when the display mode changes. If possible, configure your computer documentation for 1280 ...
User Guide
Page 23
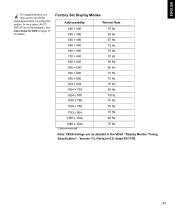
... this section. In most cases, AUTO SETUP can fix the problems. See Auto Setup for DOS on page 12 for details. Version 1.0, Revision 0.8, dated 09/17/98. Factory Set Display Modes Addressability Refresh Rate 640 × 400 640 × 480 640 × 480 640 × 480 640 × 480 720 ×... Hz 1152 x 864 1280 x 1024 75 Hz 60 Hz 1280 x 1024 † Recommended 75 Hz Note: VESA timings are as detailed in the VESA "Display Monitor Timing Specification". ESPAÑOL ITALIANO JAPANESE COMPL & WARR 21
... this section. In most cases, AUTO SETUP can fix the problems. See Auto Setup for DOS on page 12 for details. Version 1.0, Revision 0.8, dated 09/17/98. Factory Set Display Modes Addressability Refresh Rate 640 × 400 640 × 480 640 × 480 640 × 480 640 × 480 720 ×... Hz 1152 x 864 1280 x 1024 75 Hz 60 Hz 1280 x 1024 † Recommended 75 Hz Note: VESA timings are as detailed in the VESA "Display Monitor Timing Specification". ESPAÑOL ITALIANO JAPANESE COMPL & WARR 21

