
User Guide
Page 3
...ESPAÑOL Contents Safety (Read first 2 Setting up the monitor 3 Product Description 3 Handling Instructions 3 Workplace Preparation 4 Adjusting the Monitor Position 4 Working Practices 4 Caring for your Monitor 5 Connecting your Monitor 6 Switching on your Monitor 7 Device Driver Installation 8 Windows 95/98 8 Windows 2000/Me...2000, Windows NT, Windows Me or Windows XP 13 Manual Setup 14 Adjusting Your LCD Monitor 15 User controls 15 On-screen display (OSD) controls 17 Further Information 20 Display modes 21 Power Management 22 Product Disposal 22 Troubleshooting 23 ...
...ESPAÑOL Contents Safety (Read first 2 Setting up the monitor 3 Product Description 3 Handling Instructions 3 Workplace Preparation 4 Adjusting the Monitor Position 4 Working Practices 4 Caring for your Monitor 5 Connecting your Monitor 6 Switching on your Monitor 7 Device Driver Installation 8 Windows 95/98 8 Windows 2000/Me...2000, Windows NT, Windows Me or Windows XP 13 Manual Setup 14 Adjusting Your LCD Monitor 15 User controls 15 On-screen display (OSD) controls 17 Further Information 20 Display modes 21 Power Management 22 Product Disposal 22 Troubleshooting 23 ...

User Guide
Page 10
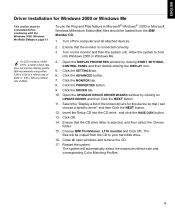
... can choose a specific driver" and then select the NEXT button. 7. Insert the Setup CD into Windows 95 or Windows 98. Choose IBM ThinkVision L170 monitor and Click OK. Close all attached devices. 2. Turn off the computer and all open windows and remove the CD. 12. Ensure that ... on the DISPLAY icon. 5. Click the ADVANCED button. 2. Click the MONITOR tab. 3. Your computer's Plug and Play code may warn you that the CD drive letter is connected correctly. 3. clicking on page 13 On LCD monitors, unlike CRTs, a faster refresh rate does not improve display quality. Click...
... can choose a specific driver" and then select the NEXT button. 7. Insert the Setup CD into Windows 95 or Windows 98. Choose IBM ThinkVision L170 monitor and Click OK. Close all attached devices. 2. Turn off the computer and all open windows and remove the CD. 12. Ensure that ... on the DISPLAY icon. 5. Click the ADVANCED button. 2. Click the MONITOR tab. 3. Your computer's Plug and Play code may warn you that the CD drive letter is connected correctly. 3. clicking on page 13 On LCD monitors, unlike CRTs, a faster refresh rate does not improve display quality. Click...
User Guide
Page 11
...DISK button. 13. Turn off the computer and all open windows and remove the CD. 17. Turn on UPDATE DRIVER and then Click the NEXT button. 11. Click the DRIVER tab...Windows 2000, Windows Me Auto Setup on page 13 On LCD monitors, unlike CRTs, a faster refresh rate does not improve display quality. Open the DISPLAY PROPERTIES...IBM Monitor CD. 1. Click the SETTINGS tab. 6. Click the MONITOR tab. 8. ENGLISH FRANÇAIS DEUTSCH ESPAÑOL Driver Installation for this device so that I can choose a specific driver" and then Click the NEXT button. 12. Choose IBM ThinkVision L170 monitor...
...DISK button. 13. Turn off the computer and all open windows and remove the CD. 17. Turn on UPDATE DRIVER and then Click the NEXT button. 11. Click the DRIVER tab...Windows 2000, Windows Me Auto Setup on page 13 On LCD monitors, unlike CRTs, a faster refresh rate does not improve display quality. Open the DISPLAY PROPERTIES...IBM Monitor CD. 1. Click the SETTINGS tab. 6. Click the MONITOR tab. 8. ENGLISH FRANÇAIS DEUTSCH ESPAÑOL Driver Installation for this device so that I can choose a specific driver" and then Click the NEXT button. 12. Choose IBM ThinkVision L170 monitor...
User Guide
Page 12
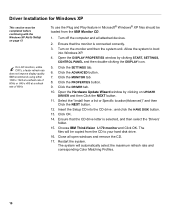
... and all open windows and remove the CD. 17. Ensure that the CD drive letter is connected correctly. 3. Click the SETTINGS tab. 6. Click the MONITOR tab. 8. Ensure that the monitor is selected, and then select the 'Drivers' folder. 15. Choose IBM ThinkVision L170 monitor and Click OK. Close all attached devices. ... XP This section must be completed before continuing with the Windows XP Auto Setup on page 13 On LCD monitors, unlike CRTs, a faster refresh rate does not improve display quality. IBM recommends using either 1280 x 1024 at a refresh rate of 60Hz or 640 x 480 at a refresh...
... and all open windows and remove the CD. 17. Ensure that the CD drive letter is connected correctly. 3. Click the SETTINGS tab. 6. Click the MONITOR tab. 8. Ensure that the monitor is selected, and then select the 'Drivers' folder. 15. Choose IBM ThinkVision L170 monitor and Click OK. Close all attached devices. ... XP This section must be completed before continuing with the Windows XP Auto Setup on page 13 On LCD monitors, unlike CRTs, a faster refresh rate does not improve display quality. IBM recommends using either 1280 x 1024 at a refresh rate of 60Hz or 640 x 480 at a refresh...
User Guide
Page 17
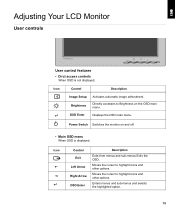
...-menus and selects the highlighted option. 15 JAPANSEE COMPAWLR&R Moves the cursor to highlight icons and other options. ELNIHGS Adjusting Your LCD Monitor User controls FRAINSÇA DUETHSC EPSAÑOL ITALIANO Thinkvision User control features • Dirct access controls When OSD is displayed, Icon Control Exit Left Arrow Right Arrow OSD Enter...
...-menus and selects the highlighted option. 15 JAPANSEE COMPAWLR&R Moves the cursor to highlight icons and other options. ELNIHGS Adjusting Your LCD Monitor User controls FRAINSÇA DUETHSC EPSAÑOL ITALIANO Thinkvision User control features • Dirct access controls When OSD is displayed, Icon Control Exit Left Arrow Right Arrow OSD Enter...
User Guide
Page 19
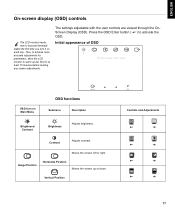
Vertical Position OK Controls and Adjustments ITALIANO JAPANESE COMPL & WARR 17 Thus, to achieve more accurate adjustments for parameters, allow the LCD monitor to warm up or down. Initial appearance of OSD Brightness/Contrast OSD Icon on each day. The settings ... making any screen adjustments. Contrast Adjusts contrast. ENGLISH FRANÇAIS DEUTSCH ESPAÑOL On-screen display (OSD) controls The LCD monitor needs time to become thermally stable the first time you turn it on Main Menu Exit OSD functions Submenu Description Brightness/ Contrast Brightness...
Vertical Position OK Controls and Adjustments ITALIANO JAPANESE COMPL & WARR 17 Thus, to achieve more accurate adjustments for parameters, allow the LCD monitor to warm up or down. Initial appearance of OSD Brightness/Contrast OSD Icon on each day. The settings ... making any screen adjustments. Contrast Adjusts contrast. ENGLISH FRANÇAIS DEUTSCH ESPAÑOL On-screen display (OSD) controls The LCD monitor needs time to become thermally stable the first time you turn it on Main Menu Exit OSD functions Submenu Description Brightness/ Contrast Brightness...
User Guide
Page 29
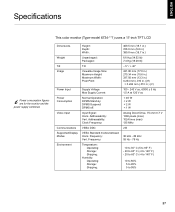
Addressability: Vert. ENGLISH FRANÇAIS DEUTSCH ESPAÑOL Specifications This color monitor (Type-model 6734-**1) uses a 17-inch TFT LCD Power consumption figures are for the monitor and the power supply combined. Addressability: Clock Frequency: VESA DDC: VESA Standard modes between Horiz. Frequency: Vert. Dimensions Weight Tilt ...16.1 in.) 228.0 mm (9.0 in.) 399.8 mm (15.7 in.) 6.6 Kg (14.52 lb) 7.4 Kg (16.28 lb) - 5° / + 40° 431.80 mm (17.0 in.) 270.34 mm (10.6 in.) 337.92 mm (13.3 in.) 0.264 mm (.010 in.) (H) × 0.264 mm (.010 in.) (V) 100 - 240 V ac, 60...
Addressability: Vert. ENGLISH FRANÇAIS DEUTSCH ESPAÑOL Specifications This color monitor (Type-model 6734-**1) uses a 17-inch TFT LCD Power consumption figures are for the monitor and the power supply combined. Addressability: Clock Frequency: VESA DDC: VESA Standard modes between Horiz. Frequency: Vert. Dimensions Weight Tilt ...16.1 in.) 228.0 mm (9.0 in.) 399.8 mm (15.7 in.) 6.6 Kg (14.52 lb) 7.4 Kg (16.28 lb) - 5° / + 40° 431.80 mm (17.0 in.) 270.34 mm (10.6 in.) 337.92 mm (13.3 in.) 0.264 mm (.010 in.) (H) × 0.264 mm (.010 in.) (V) 100 - 240 V ac, 60...

