
User Guide
Page 4
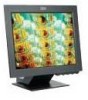
Setting up the monitor System Hardware Requirements This monitor requires a computer with a suitable on-board sub-system or Video Adapter card that can be damaged by rough handling or excessive pressure. 2. Before using your monitor for the first time, remove the clear protective film from the front of the screen. 2 Handling Instructions 1. The Liquid Crystal Display is glass and can support XGA 1024 x 768, SVGA 800 x 600, or VGA 640 x 480 at 60Hz. Do not support the monitor within the screen area.
Setting up the monitor System Hardware Requirements This monitor requires a computer with a suitable on-board sub-system or Video Adapter card that can be damaged by rough handling or excessive pressure. 2. Before using your monitor for the first time, remove the clear protective film from the front of the screen. 2 Handling Instructions 1. The Liquid Crystal Display is glass and can support XGA 1024 x 768, SVGA 800 x 600, or VGA 640 x 480 at 60Hz. Do not support the monitor within the screen area.
User Guide
Page 5
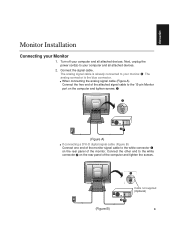
.... Turn off your Monitor 1. ENGLISH Monitor Installation Connecting your computer and all attached devices. 2. Connect the signal cable. When connecting the analog signal cable (Figure A) Connect the free end of the attached signal cable to the 15-pin Monitor port on the computer and tighten screws. ...(Figure A) If connecting a DVI-D digital signal cable (Figure B) Connect one end of the computer and tighten the screws. (Figure B) Cable not supplied (Optional) ...
.... Turn off your Monitor 1. ENGLISH Monitor Installation Connecting your computer and all attached devices. 2. Connect the signal cable. When connecting the analog signal cable (Figure A) Connect the free end of the attached signal cable to the 15-pin Monitor port on the computer and tighten screws. ...(Figure A) If connecting a DVI-D digital signal cable (Figure B) Connect one end of the computer and tighten the screws. (Figure B) Cable not supplied (Optional) ...
User Guide
Page 6
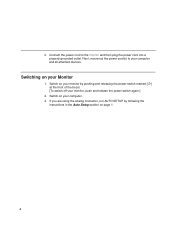
Connect the power cord to your computer. 3. Switching on your monitor by following the instructions in the Auto Setup section on your computer and all attached devices. Switch on your monitor, push and release the power switch again.] 2. Switch on page 8. 4 If you are using the analog connector, run AUTO SETUP by pushing and releasing the power switch marked [ ] at the front of the bezel. [To switch off your Monitor 1. Next, reconnect the power cord(s) to the monitor and then plug the power cord into a properly grounded outlet. 3.
Connect the power cord to your computer. 3. Switching on your monitor by following the instructions in the Auto Setup section on your computer and all attached devices. Switch on your monitor, push and release the power switch again.] 2. Switch on page 8. 4 If you are using the analog connector, run AUTO SETUP by pushing and releasing the power switch marked [ ] at the front of the bezel. [To switch off your Monitor 1. Next, reconnect the power cord(s) to the monitor and then plug the power cord into a properly grounded outlet. 3.
User Guide
Page 7
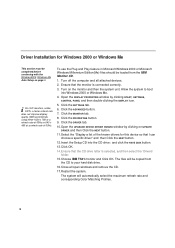
...i On LCD monitors, unlike CRTs, a faster refresh rate does not improve display quality. This means that it has detected your new monitor for Windows 95 or Windows 98 This section must be copied from the IBM Monitor CD. 1. Click the MONITOR tab. 3. Click OK. 9. Turn off the computer and all ...open windows and remove the CD. 12.Restart the system. Turn on the DISPLAY icon. 5. clicking on the monitor and then the system unit. IBM recommends using either 1024 x...
...i On LCD monitors, unlike CRTs, a faster refresh rate does not improve display quality. This means that it has detected your new monitor for Windows 95 or Windows 98 This section must be copied from the IBM Monitor CD. 1. Click the MONITOR tab. 3. Click OK. 9. Turn off the computer and all ...open windows and remove the CD. 12.Restart the system. Turn on the DISPLAY icon. 5. clicking on the monitor and then the system unit. IBM recommends using either 1024 x...
User Guide
Page 8
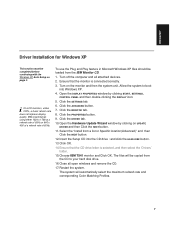
...computer and all open windows and remove the CD. 17.Restart the system. Click the DRIVER tab. 10.Open the UPGRADE DEVICE DRIVER WIZARD window by clicking START, SETTINGS, CONTROL PANEL and then double-clicking the DISPLAY icon. 5. The system will be copied from the IBM Monitor... on the monitor and then the system unit. i On LCD monitors, unlike CRTs, a faster refresh rate does not improve display quality. Click the ADVANCED button. 7. Click the SETTINGS tab. 6. Ensure that the monitor is selected, and then select the 'Drivers' folder. 15.Choose IBM T541 monitor and Click ...
...computer and all open windows and remove the CD. 17.Restart the system. Click the DRIVER tab. 10.Open the UPGRADE DEVICE DRIVER WIZARD window by clicking START, SETTINGS, CONTROL PANEL and then double-clicking the DISPLAY icon. 5. The system will be copied from the IBM Monitor... on the monitor and then the system unit. i On LCD monitors, unlike CRTs, a faster refresh rate does not improve display quality. Click the ADVANCED button. 7. Click the SETTINGS tab. 6. Ensure that the monitor is selected, and then select the 'Drivers' folder. 15.Choose IBM T541 monitor and Click ...
User Guide
Page 9
... into the CD drive : and click the HAVE DISK button. 13.Click OK. 14.Ensure that the monitor is selected, and then select the 'Drivers' folder. 15.Choose IBM T541 monitor and Click OK. Open the DISPLAY PROPERTIES window by clicking on page 9. Click the SETTINGS tab. 6. ... automatically select the maximum refresh rate and corresponding Color Matching Profiles. 7 Turn on the monitor and then the system unit. Turn off the computer and all open windows and remove the CD. 17.Restart the system. i On LCD monitors, unlike CRTs, a faster refresh rate does not improve display quality.
... into the CD drive : and click the HAVE DISK button. 13.Click OK. 14.Ensure that the monitor is selected, and then select the 'Drivers' folder. 15.Choose IBM T541 monitor and Click OK. Open the DISPLAY PROPERTIES window by clicking on page 9. Click the SETTINGS tab. 6. ... automatically select the maximum refresh rate and corresponding Color Matching Profiles. 7 Turn on the monitor and then the system unit. Turn off the computer and all open windows and remove the CD. 17.Restart the system. i On LCD monitors, unlike CRTs, a faster refresh rate does not improve display quality.
User Guide
Page 10
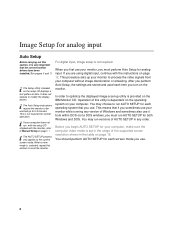
...on the monitor. i The Auto Setup instructions require the monitor to the current screen mode. i The AUTO SETUP process only applies to be warmed up for 15 minutes. ...use your monitor while running any order. For digital input, image setup is set -up your computer, make sure the computer video mode is not required. This means that the correct monitor drivers have...monitor to run versions of dots. You should perform AUTO SETUP for each time you use it is dependent on the operating system on the setup CD displays a test pattern of AUTO SETUP in the table on the IBM Monitor...
...on the monitor. i The Auto Setup instructions require the monitor to the current screen mode. i The AUTO SETUP process only applies to be warmed up for 15 minutes. ...use your monitor while running any order. For digital input, image setup is set -up your computer, make sure the computer video mode is not required. This means that the correct monitor drivers have...monitor to run versions of dots. You should perform AUTO SETUP for each time you use it is dependent on the operating system on the setup CD displays a test pattern of AUTO SETUP in the table on the IBM Monitor...
User Guide
Page 11
... clear the Image Setup test pattern, press the ESC key on page 10. 9 If you are at the bottom of the screen. then the computer. If the message CHECK VIDEO CABLE is displayed, or if nothing is displayed, check: • that the icon bar and tool bar, if ...the bottom of the dot pattern varies with the screen resolution. 5. This allows AUTO keybord. Insert the CD labelled 'IBM Monitor CD' into the CD drive. Wait approximately 15 minutes, until the monitor warms up . When the test pattern appears, press the Image Setup direct access button at 7. may automatically turn off...
... clear the Image Setup test pattern, press the ESC key on page 10. 9 If you are at the bottom of the screen. then the computer. If the message CHECK VIDEO CABLE is displayed, or if nothing is displayed, check: • that the icon bar and tool bar, if ...the bottom of the dot pattern varies with the screen resolution. 5. This allows AUTO keybord. Insert the CD labelled 'IBM Monitor CD' into the CD drive. Wait approximately 15 minutes, until the monitor warms up . When the test pattern appears, press the Image Setup direct access button at 7. may automatically turn off...
User Guide
Page 12
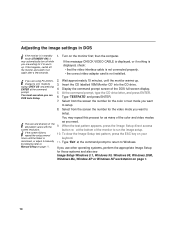
...computer. Display the command prompt screen of the monitor to Manual Setup on page 9. 10 Select from the screen the number for the color or text mode you want to setup. Type 'Exit' at the command prompt to return to U.S. Adjusting the image settings in DOS i If the monitor... on page 11. You may automatically turn off the monitor and switch it on again after a few seconds.... the DOS full-screen display. 5. Wait approximately 15 minutes, until the flicker is not installed. mode...test pattern, press the ESC key on the monitor first; When the test pattern appears, press ...
...computer. Display the command prompt screen of the monitor to Manual Setup on page 9. 10 Select from the screen the number for the color or text mode you want to setup. Type 'Exit' at the command prompt to return to U.S. Adjusting the image settings in DOS i If the monitor... on page 11. You may automatically turn off the monitor and switch it on again after a few seconds.... the DOS full-screen display. 5. Wait approximately 15 minutes, until the flicker is not installed. mode...test pattern, press the ESC key on the monitor first; When the test pattern appears, press ...
User Guide
Page 14
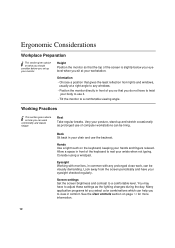
...Positon the monitor directly in front of the screen is slightly below your hands and fingers relaxed. Eyesight Working with monitors, in comfort... can work comfortably and reduce fatigue. Rest Take regular breaks. Tilt the monitor to a comfortable level. Look away from lights and windows, usually at... and contrast to a comfortable viewing angle. Height Position the monitor so that the top of you so that gives the least...You may have your wrists when not typing. Allow a space in your monitor. Vary your posture, stand up your chair and use of the keyboard...
...Positon the monitor directly in front of the screen is slightly below your hands and fingers relaxed. Eyesight Working with monitors, in comfort... can work comfortably and reduce fatigue. Rest Take regular breaks. Tilt the monitor to a comfortable level. Look away from lights and windows, usually at... and contrast to a comfortable viewing angle. Height Position the monitor so that the top of you so that gives the least...You may have your wrists when not typing. Allow a space in your monitor. Vary your posture, stand up your chair and use of the keyboard...
User Guide
Page 19
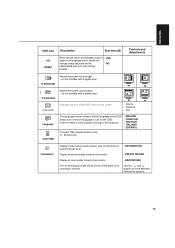
... Moves the screen left and right . Display all preset modes stored in the monitor. Display all user modes stored in the monitor. Is not availible with a digital input OSD SIZE Changes the size of the OSD menu on the computer. • FRANCAIS • DEUTSCH • ITALIANO • ESPANOL To select OSD display duration...
... Moves the screen left and right . Display all preset modes stored in the monitor. Display all user modes stored in the monitor. Is not availible with a digital input OSD SIZE Changes the size of the OSD menu on the computer. • FRANCAIS • DEUTSCH • ITALIANO • ESPANOL To select OSD display duration...
User Guide
Page 20
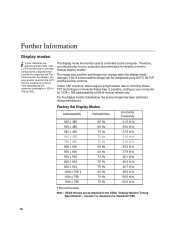
...and shape may need to re-attach the CRT monitor temporarily until you have reconfigured the computer, preferably to a display mode outside the range that the Flat Panel monitor can be readjusted using AUTO SETUP and the monitor controls. Version 1.0, Revision 0.8, Dated 09/17/...56.5 kHz 60.0 kHz † Recommended Note : VESA timings are as detailed in the VESA "Display Monitor Timing Specification". Further Information Display modes i If your computer documentation for 1024 x 768 addressability at 60Hz. Therefore, you should refer to minimize flicker, TFT technology is...
...and shape may need to re-attach the CRT monitor temporarily until you have reconfigured the computer, preferably to a display mode outside the range that the Flat Panel monitor can be readjusted using AUTO SETUP and the monitor controls. Version 1.0, Revision 0.8, Dated 09/17/...56.5 kHz 60.0 kHz † Recommended Note : VESA timings are as detailed in the VESA "Display Monitor Timing Specification". Further Information Display modes i If your computer documentation for 1024 x 768 addressability at 60Hz. Therefore, you should refer to minimize flicker, TFT technology is...
User Guide
Page 21
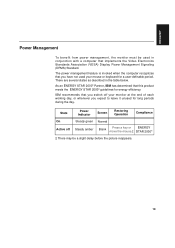
... the table below. As an ENERGY STAR 2000® Partner, IBM has determined that you expect to leave it unused for long periods during the day. The power management feature is invoked when the computer recognizes that this product meets the ENERGY STAR 2000® guidelines ...for energy efficiency. ENGLISH Power Management To benefit from power management, the monitor must be a slight delay before the picture reappears. 19 State ...
... the table below. As an ENERGY STAR 2000® Partner, IBM has determined that you expect to leave it unused for long periods during the day. The power management feature is invoked when the computer recognizes that this product meets the ENERGY STAR 2000® guidelines ...for energy efficiency. ENGLISH Power Management To benefit from power management, the monitor must be a slight delay before the picture reappears. 19 State ...
User Guide
Page 22
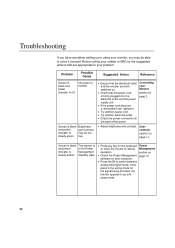
.... Standby state. • Press any key on . • Check that are both switched on the keyboard Power or move the mouse to monitor. Before calling your retailer or IBM, try the suggested actions that the power cord is the wrong mode for the signal being provided, the.... • Try another power cord. • Try another electrical outlet. • Check the power connection at the back of the panel. Connecting your Monitor section on your computer. • Press the to switch between analog and digital mode. software on page 3. • Adjust brightness and contrast.
.... Standby state. • Press any key on . • Check that are both switched on the keyboard Power or move the mouse to monitor. Before calling your retailer or IBM, try the suggested actions that the power cord is the wrong mode for the signal being provided, the.... • Try another power cord. • Try another electrical outlet. • Check the power connection at the back of the panel. Connecting your Monitor section on your computer. • Press the to switch between analog and digital mode. software on page 3. • Adjust brightness and contrast.
User Guide
Page 23
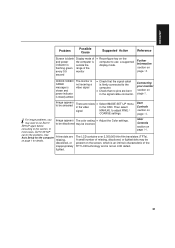
...the flashing green range of and power the computer is indicator is not an LCD defect. 21 User Controls section on page 18. to be discolored may want to run AUTO SETUP again before consulting to this section. Connecting your monitor section on page 8 for details. i... section on page 14. ENGLISH Problem Possible Cause Suggested Action Reference Screen is blank Display mode of the every 0.5 monitor second • Reconfigure key on the computer to use a supported display mode. Image appears The color setting • Adjust the Color settings. Image appears to...
...the flashing green range of and power the computer is indicator is not an LCD defect. 21 User Controls section on page 18. to be discolored may want to run AUTO SETUP again before consulting to this section. Connecting your monitor section on page 8 for details. i... section on page 14. ENGLISH Problem Possible Cause Suggested Action Reference Screen is blank Display mode of the every 0.5 monitor second • Reconfigure key on the computer to use a supported display mode. Image appears The color setting • Adjust the Color settings. Image appears to...